🐡
【Flutter】ローディングをRiverpodで共通化する
こんにちは。
以前個人開発向けに非同期処理と読み込みを一緒に行う簡素な機能を紹介しました。
実務の開発になると、コーディング規則や共通コンポーネントを作成したりと、何かと可読性などに気を遣う時が多いと思います。
今回は「読み込みダイアログの共通化」という観点から、こんなアプローチあるよ!みたいなものを紹介したいと思います。
例えばですが、読み込みの処理を共通化する際には、以下のようなパターンがあります(いろいろありますが、私が経験した部分を)。
1. 各画面のstateについて、factoryコンストラクタに.loadingや.errorなどを定義し、共通の状態ハンドリング処理でラップする
2. MaterialApp以下を読み込み表示用のWidgetでラップし、状態に応じてインディケータを表示する
今回は2の方法について、少しかいつまんで紹介しようと思います。
私が経験した実装とは少し違う部分がありますが、イメージしやすいように変えています。
今回のバージョン
flutter: ^3.10.5(asdfで管理しています)
hooks_riverpod: ^2.1.1
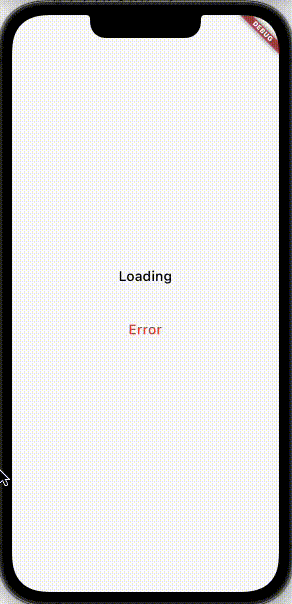
まずは出来上がりのものです。
読み込み2秒間
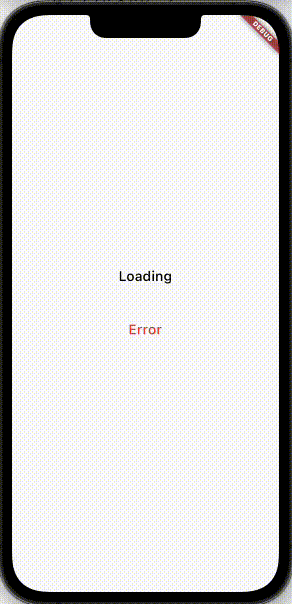
読み込み後にエラーダイアログ
実装に移ります。
①読み込み時の状態を定義します。
enum LoadingState {
  loading,
  hideLoading,
}

final loadingViewModel = StateProvider<LoadingState>((ref) => LoadingState.hideLoading);
②処理の実行結果の状態を定義します。
enum ResultState {
  success,
  failure,
  none,
}

final resultViewModel = StateProvider<ResultState>((ref) => ResultState.none);
③ラップする読み込み表示用Widgetを作成します。
class AppNotifierOverlay extends HookConsumerWidget {
const AppNotifierOverlay({
super.key,
required this.child,
});
final Widget child;
Widget build(BuildContext context, WidgetRef ref) {
final loadingState = ref.watch(loadingViewModel);
final resultState = ref.watch(resultViewModel);
return Stack(
children: [
child,
// ローディングオーバーレイ表示
if (loadingState == LoadingState.loading)
Positioned.fill(
child: Container(
color: Colors.black38, // 背景色はプロジェクトごとに合わせてください
child: const Center(
child: CupertinoActivityIndicator(radius: 10),
),
),
),
// アラートダイアログ表示
if (resultState == ResultState.failure)
Positioned.fill(
child: _AlertDialog(
onTap: () {
ref.read(resultViewModel.notifier).update((state) => ResultState.none); // 表示の有無なのでpopしないように
},
),
),
],
);
}
}
class _AlertDialog extends StatelessWidget {
const _AlertDialog({
super.key,
required this.onTap,
});
// onTapを設けることで、アラートダイアログをStatelessWidgetとして役割を明確にしています。
final VoidCallback onTap;
Widget build(BuildContext context) {
return CupertinoAlertDialog(
content: const Padding(
padding: EdgeInsets.symmetric(horizontal: 6.0),
child: Column(
crossAxisAlignment: CrossAxisAlignment.center,
children: [
Text(
'エラーが発生しました',
style: TextStyle(
fontWeight: FontWeight.w500,
fontSize: 13,
height: 1,
letterSpacing: 0.25,
),
textAlign: TextAlign.center,
),
],
),
),
actions: [
CupertinoDialogAction(
onPressed: onTap,
child: const Text(
'OK',
style: TextStyle(
fontWeight: FontWeight.w500,
fontSize: 13,
height: 1,
letterSpacing: 0.25,
),
),
),
],
);
}
}
④GIFの画面です。
class MyApp extends StatelessWidget {
const MyApp({super.key});
Widget build(BuildContext context) {
return MaterialApp(
home: const AppNotifierOverlay(child: SampleLoadView()),
);
}
}
class SampleLoadView extends HookConsumerWidget {
const SampleLoadView({super.key});
Widget build(BuildContext context, WidgetRef ref) {
return Scaffold(
body: Center(
child: Column(
mainAxisAlignment: MainAxisAlignment.center,
children: [
TextButton(
onPressed: () async {
ref.read(loadingViewModel.notifier).update((state) => LoadingState.loading);
await Future.delayed(const Duration(seconds: 2));
ref.read(loadingViewModel.notifier).update((state) => LoadingState.hideLoading);
ref.read(resultViewModel.notifier).update((state) => ResultState.success);
},
child: const Text(
'Loading',
style: TextStyle(
fontWeight: FontWeight.w500,
fontSize: 20,
height: 1,
letterSpacing: 0.25,
color: Colors.black,
),
),
),
const SizedBox(height: 30),
TextButton(
onPressed: () async {
ref.read(loadingViewModel.notifier).update((state) => LoadingState.loading);
await Future.delayed(const Duration(seconds: 2));
ref.read(loadingViewModel.notifier).update((state) => LoadingState.hideLoading);
ref.read(resultViewModel.notifier).update((state) => ResultState.failure);
},
child: const Text(
'Error',
style: TextStyle(
fontWeight: FontWeight.w500,
fontSize: 20,
height: 1,
letterSpacing: 0.25,
color: Colors.red,
),
),
),
],
),
),
);
}
}
以上でGIFの画面と処理が出来上がると思います。
細かい説明はそこまで行いませんが、対象画面の前面にStackで読み込み表示用のWidgetを配置し、各種StateProviderの状況を監視して表示の有無を変更する実装となります。
何か不明点がありましたらコメントをしてくださいね。
Riverpodの良いところは、Providerの中でRefが使用できるところですよね。
以前に書いた記事でMVVMの実装例を紹介しましたが、例えばViewModelの中で非同期処理を呼び出す際にも、同様の処理を使用することができます。
try-catchで使用する際もかなり使い勝手が良いです。
今回は極力わかりやすく実装してみましたが、実務になるとまた色が違ってくるかと思います。
あくまで非同期処理をどのように扱うかの考え方を知ってもらえますと幸いです。
それではまた!
Discussion