DMARCのレポートを可視化するdmarc-report-converterの紹介
先日、Gmail、米国Yahoo!から相次いでメール送信者ガイドライン変更のアナウンスがありました。詳しい内容についてはこちらの記事に詳細がまとまっているのでご参照ください。
DMARCのレポート
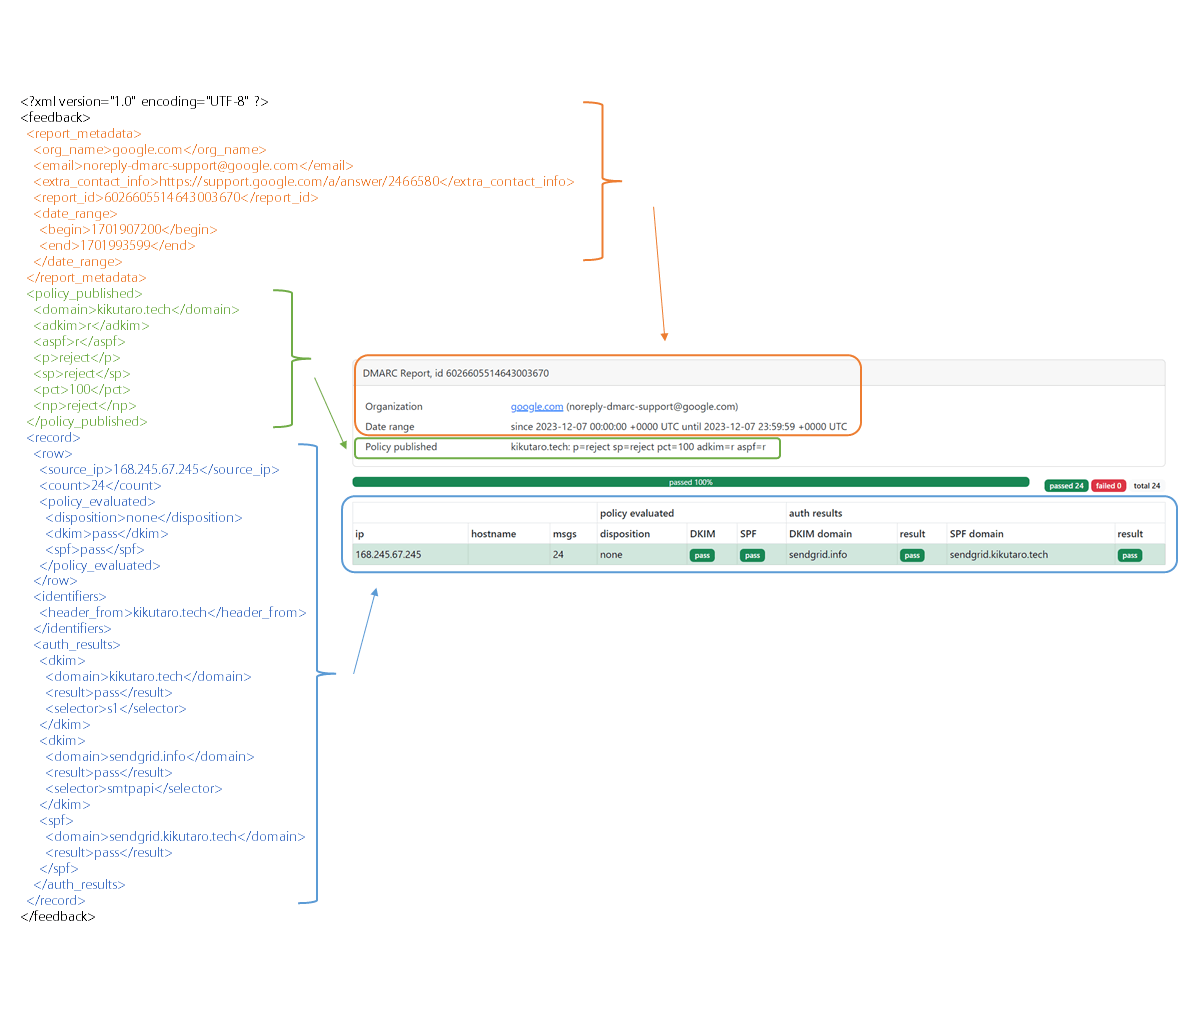
アナウンスを受けてSPF/DKIMの確認やDMARCの設定を始めた方も多いのではないでしょうか。そしてDMARCのレポートをいざ受け取ってみて、XML形式で読み取りにくいと思う方も多いのではないでしょうか。以下のXMLは実際に私のドメインで受け取ったDMARCレポートです。レコードは1つですが、これだけ長くなります。
<?xml version="1.0" encoding="UTF-8" ?>
<feedback>
  <report_metadata>
    <org_name>google.com</org_name>
    <email>noreply-dmarc-support@google.com</email>
    <extra_contact_info>https://support.google.com/a/answer/2466580</extra_contact_info>
    <report_id>6026605514643003670</report_id>
    <date_range>
      <begin>1701907200</begin>
      <end>1701993599</end>
    </date_range>
  </report_metadata>
  <policy_published>
    <domain>kikutaro.tech</domain>
    <adkim>r</adkim>
    <aspf>r</aspf>
    <p>reject</p>
    <sp>reject</sp>
    <pct>100</pct>
    <np>reject</np>
  </policy_published>
  <record>
    <row>
      <source_ip>168.245.67.245</source_ip>
      <count>24</count>
      <policy_evaluated>
        <disposition>none</disposition>
        <dkim>pass</dkim>
        <spf>pass</spf>
      </policy_evaluated>
    </row>
    <identifiers>
      <header_from>kikutaro.tech</header_from>
    </identifiers>
    <auth_results>
      <dkim>
        <domain>kikutaro.tech</domain>
        <result>pass</result>
        <selector>s1</selector>
      </dkim>
      <dkim>
        <domain>sendgrid.info</domain>
        <result>pass</result>
        <selector>smtpapi</selector>
      </dkim>
      <spf>
        <domain>sendgrid.kikutaro.tech</domain>
        <result>pass</result>
      </spf>
    </auth_results>
  </record>
</feedback>
| タグ名 | 意味 |
|---|---|
| report_metadata | レポートのメタデータ |
| policy_published | ドメインに設定しているDMARCのポリシー |
| policy_evaluated | 認証結果の概要 |
| disposition | メッセージに適用されたポリシー(none,quarantine,reject) |
| dkim | DKIM認証の結果 |
| spf | SPF認証の結果 |
| auth_results | 認証結果 |
| dkim / result | DKIMアライメントの結果 |
| spf / result | SPFアライメントの結果 |
今回紹介するdmarc-report-converterを通すとXMLは以下のHTMLに変換されます。
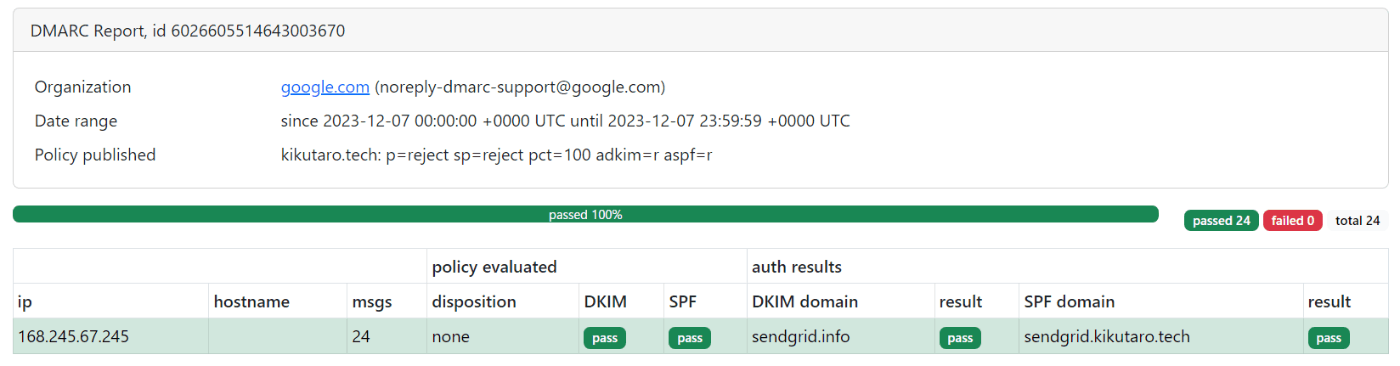
メールがDMARC認証にpassするには、SPF認証とSPFアライメント、またはDKIM認証とDKIMアライメントのいずれかにpassする必要があります。DMARCがpassしたものは行が緑色になっています。
XMLとHTML表示の対応関係はシンプルです。
dmarc-report-converter
ではdmarc-report-converterの使い方を紹介します。GitHubのリポジトリはこちらです。
私はDocker上のUbuntu Linux 24.04の環境で試しました。
まずはGitHubのReleaseからパッケージをダウンロードして解凍します。
wget https://github.com/tierpod/dmarc-report-converter/releases/download/v0.6.5/dmarc-report-converter_v0.6.5-20220905_x86-64.tar.gz
tar xvf dmarc-report-converter_v0.6.5-20220905_x86-64.tar.gz
解凍した中身はこんな感じです。
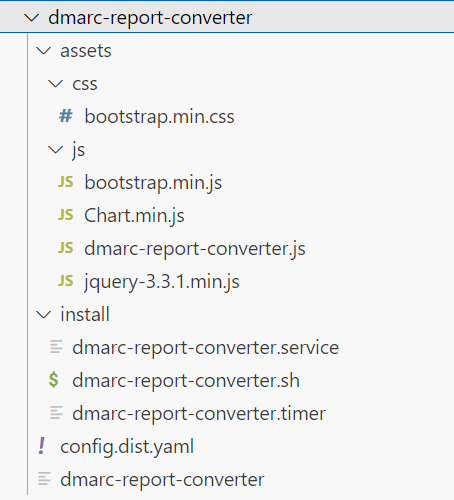
DMARCのレポートファイルを置くinputとHTMLが出力されるoutputフォルダを作ります。
cd dmarc-report-converter
mkdir dmarc_files
mkdir dmarc_files/input
mkdir dmarc_files/output
config.dist.yamlというファイルに各種設定が定義されています。
input:
  delete: no
  dir: "/tmp/dmarc_files/"
  #imap:
  #  server: ""
  #  username: ""
  #  password: ""
  #  mailbox: ""
  # enable debug messages for imap package?
  #  debug: no
  # delete emails from server after fetch?
  #  delete: no

output:
  # output file
  # should be: string, golang template string or "stdout"
  file: "/tmp/html/{{ .ID }}.html"
  # file: "/tmp/html/{{ .ReportMetadata.Email }}/{{ .PolicyPublished.Domain }}!{{.ReportMetadata.DateRange.Begin}}!{{ .ReportMetadata.ReportID }}.html"

  # output format
  # should be: txt, json, html_static, html, external_template
  format: "html_static"

  # if you configure format to "html" output, don't forget to configure assets_path and your web server
  # assets_path: "./assets"

  # if you configure format to "external_output", don't forget to configure external_template
  external_template: "/path/to/your/txt.gotmpl"

# perform reverse lookups?
lookup_addr: no

# merge multiple similar reports to one?
merge_reports: yes

log_debug: no
log_datetime: no
ファイル名はconfig.yamlに変更します。
cp config.dist.yaml config.yaml
vi config.yaml
今回は入力フォルダと出力フォルダの部分だけ変更しました。
input:
  dir: "./dmarc_files/input"

output:
  file: "./dmarc_files/output/{{ .ID }}.html"
あとは普段から受信しているDMARCのレポートをinputフォルダに格納するだけです。ファイルは圧縮された形式(zipでもgz)のままおけば、コンバーターが解凍してくれます。
./dmarc-report-converter
[INFO] files: found 6 input files in ./dmarc_files/input
[INFO] ReadParseZIP: read file google.com!kikutaro.tech!1701388800!1701475199.xml from zip
[INFO] ReadParseZIP: read file google.com!kikutaro.tech!1701475200!1701561599.xml from zip
[INFO] ReadParseZIP: read file google.com!kikutaro.tech!1701561600!1701647999.xml from zip
[INFO] ReadParseZIP: read file google.com!kikutaro.tech!1701648000!1701734399.xml from zip
[INFO] ReadParseZIP: read file google.com!kikutaro.tech!1701734400!1701820799.xml from zip
[INFO] ReadParseZIP: read file google.com!kikutaro.tech!1701820800!1701907199.xml from zip
[INFO] merge: 6 report(s), grouped by key 'google.com!noreply-dmarc-support@google.com!kikutaro.tech'
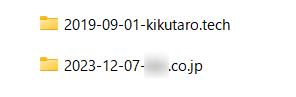
[INFO] output: write to file ./dmarc_files/output/2023-12-01-kikutaro.tech/noreply-dmarc-support@google.com-11424171723771080651.html
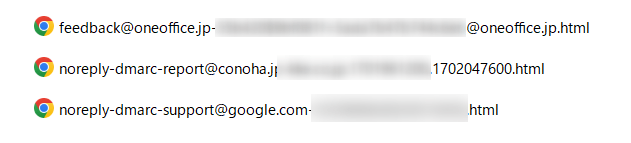
複数のレポートファイルを置いた場合は、ドメインごとにフォルダを分けてくれて、受信先ごとにファイルをまとめてくれます。
その他のDMARCレポートツール
GitHubを探すと他にもDMARCのレポートツールは存在します。 いくつか触ったのですが、インストールが手軽でシンプルな使い勝手の良さがdmarc-report-converterのいいところです。
その他、EasyDMARC、PowerDMARC、dmarcian、Valimailなどサービス型のレポートツールなども存在します。Valimailも少し触っているのですが、生のXMLファイルが参照できないのでちょっと不便だなと思う時があります。
ツール型もサービス型もどちらも一長一短なので色々試して自分に合うものを探すのがよさそうです。
Discussion