Amazon OpenSearch Serviceに入門してみた。チュートリアル編② Webアプリを作る
全3編です
概要
前回に引き続きOpenSearch Serviceのチュートリアルをやってみる。
今回は以下。
以下を参考に環境を作る。
環境構築
- localstackを起動しておく
localstack start --network ls
- OpenSearchのドメインを作成する
awslocal opensearch create-domain --cli-input-json file://./opensearch_domain.json --region us-east-1
- 以下で起動状態を確認する
しばらく時間がかかる場合もあるのでその場合は少し待つ。
curl -u 'admin:really-secure-passwordAa!1' http://secure-domain.us-east-1.opensearch.localhost.localstack.cloud:4566/_cluster/health | jq .
チュートリアル: Amazon OpenSearch Service を用いて検索アプリケーションを作成する
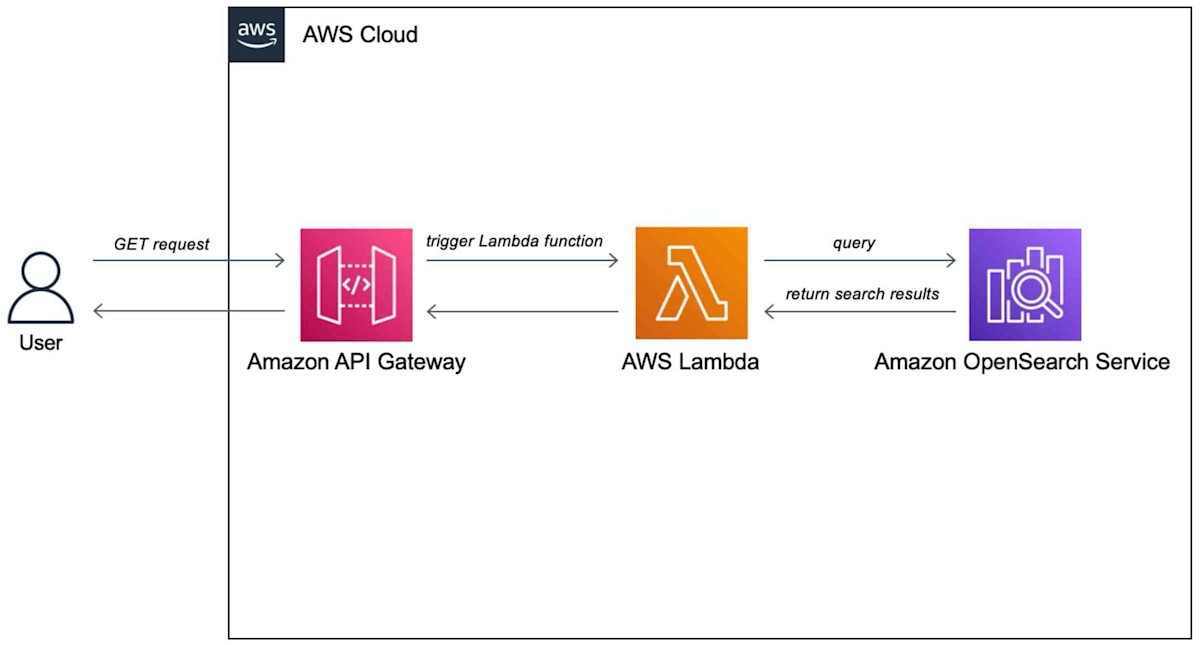
Amazon OpenSearch Serviceを用いて検索アプリケーションを作成する一般的な方法は、サーバーへのユーザクエリを送信するウェブフォームを使用することです。
次にOpenSearch APIを直接呼び出すようにサーバーを承認し、サーバーがOpeSearch Serviceにリクエスをと送信するようにします。
今回はapi-gatewayからlambdaを経由してOpenSearch Serviceを呼び出します。
これによりlambdaで署名を付与しユーザを制限します。
事前準備
OpenSearch Serviceのドメインが必要です。今回は冒頭に記載した環境構築でlocalstack環境を作成済みなので、ドメインは以下になります。
http://secure-domain.us-east-1.opensearch.localhost.localstack.cloud:4566
実際のAWSアカウントでやる場合は以下に従いドメインを作りましょう。
Step1. サンプルデータをインデックスする
sample-movies.zipをダウンロードします。
次に_bulk API で5000個のドキュメントをmoviesインデックスに追加します。
ファイルをダウンロードしたところで以下のコマンドを実行します。
curl -XPOST -u 'admin:really-secure-passwordAa!1' 'http://secure-domain.us-east-1.opensearch.localhost.localstack.cloud:4566/_bulk' --data-binary @sample-movies.bulk -H 'Content-Type: application/json'
Step2. lambda functionを作成する
API Gatewayを作る前にlambda関数を作ります。
ここではチュートリアルに記載の方法とは異なる作業となります。
localstackをベースとした作業となるためです。
- 適当な場所でディレクトを作成
mkdir opensearch-function
- 仮想環境作成
python -m venv test && source test/bin/activate
- 必要なライブラリをインストール
pip3 install --target ./opensearch-function boto3
pip3 install --target ./opensearch-function requests
pip3 install --target ./opensearch-function requests_aws4auth
- ラムダハンドラのコードを準備
vi ./opensearch-function/opensearch-lambda.py
以下コードを貼り付け
code
import boto3
import json
import requests
from requests_aws4auth import AWS4Auth

region = 'us-west-1' # For example, us-west-1
service = 'es'
credentials = boto3.Session().get_credentials()
awsauth = AWS4Auth(credentials.access_key, credentials.secret_key, region, service, session_token=credentials.token)

host = 'http://secure-domain.us-east-1.opensearch.host.docker.internal.localstack.cloud:4566' # The OpenSearch domain endpoint with https:// and without a trailing slash
index = 'movies'
url = host + '/' + index + '/_search'

# Lambda execution starts here
def lambda_handler(event, context):

    # Put the user query into the query DSL for more accurate search results.
    # Note that certain fields are boosted (^).
    query = {
        "size": 25,
        "query": {
            "multi_match": {
                "query": event['queryStringParameters']['q'],
                "fields": ["title^4", "plot^2", "actors", "directors"]
            }
        }
    }

    # Elasticsearch 6.x requires an explicit Content-Type header
    headers = { "Content-Type": "application/json" }

    # Make the signed HTTP request
    r = requests.get(url, auth=awsauth, headers=headers, data=json.dumps(query))

    # Create the response and add some extra content to support CORS
    response = {
        "statusCode": 200,
        "headers": {
            "Access-Control-Allow-Origin": '*'
        },
        "isBase64Encoded": False
    }

    # Add the search results to the response
    response['body'] = r.text
    return response
- コードをzip化
コード階層を深くしないためにopensearch-functionに入ってからzip化する。
これをしないとpythoのimportの解決が面倒になる。
(cd opensearch-function && zip -r ../func.zip ./*)
- localstackにdeploy
# venvで作成した環境のバージョンを取得
runtime_version=$(python --version 2>&1 | awk '{print $2}' | cut -d. -f1,2)
# deploy
awslocal --region us-east-1 lambda create-function \
    --function-name opensearch-function \
    --runtime "python$runtime_version" \
    --handler opensearch-lambda.lambda_handler \
    --zip-file fileb://func.zip \
    --role arn:aws:iam::000000000000:role/lambda-role \
    --architectures arm64
Step3. API Gatewayを作る
API Gatewayを使うことでOpenSearchのAPI利用を限定し利用を簡略化します。
API Gatewayで認証やスロットリングのリクエストもできます。
本家ではRole等の権限周りの設定の記載がありますが、localstackではそこら辺はあまり気にせずにやります。
lambda,apigatewayのlocalstackを使ったdeployについては以下がわかりやすいです。
- ApiGatwayを作成
awslocal --region us-east-1 apigateway create-rest-api --name 'opensearch-api' --endpoint-url=http://localhost:4566
- ルートリソースID取得
API_IDは上記コマンドで出力された値を使う。
API_ID=${API_ID}
awslocal --region us-east-1 apigateway get-resources --rest-api-id ${API_ID} --endpoint-url=http://localhost:4566
- GETメソッドを使用可能にする
RESOURCE_IDは上記コマンドで出力された値を使う
RESOURCE_ID=${RESOURCE_ID}$
awslocal --region us-east-1 apigateway put-method \
  --rest-api-id ${API_ID} \
  --resource-id ${RESOURCE_ID} \
  --http-method GET \
  --authorization-type "NONE" \
  --endpoint-url=http://localhost:4566
- lambdaと連携
 awslocal --region us-east-1 apigateway put-integration \
  --rest-api-id ${API_ID} \
  --resource-id ${RESOURCE_ID} \
  --http-method GET \
  --type AWS_PROXY \
  --integration-http-method POST \
  --uri arn:aws:apigateway:us-east-1:lambda:path/2015-03-31/functions/arn:aws:lambda:us-east-1:000000000000:function:opensearch-function/invocations \
  --passthrough-behavior WHEN_NO_MATCH \
  --endpoint-url=http://localhost:4566
- api-gatwayをdeploy
awslocal --region us-east-1 apigateway create-deployment \
  --rest-api-id ${API_ID} \
  --stage-name dev \
  --endpoint-url=http://localhost:4566
Step4 Webアプリケーションをテストする
sample-site.zipをダウンロードし、展開します。
scripts/search.jsの
var apigatewayendpoint = '';
にエンドポイントを設定します。
今回は例えば、以下のエンドポイントになります。
var apigatewayendpoint = 'http://localhost:4566/_aws/execute-api/${API_ID}/dev/'
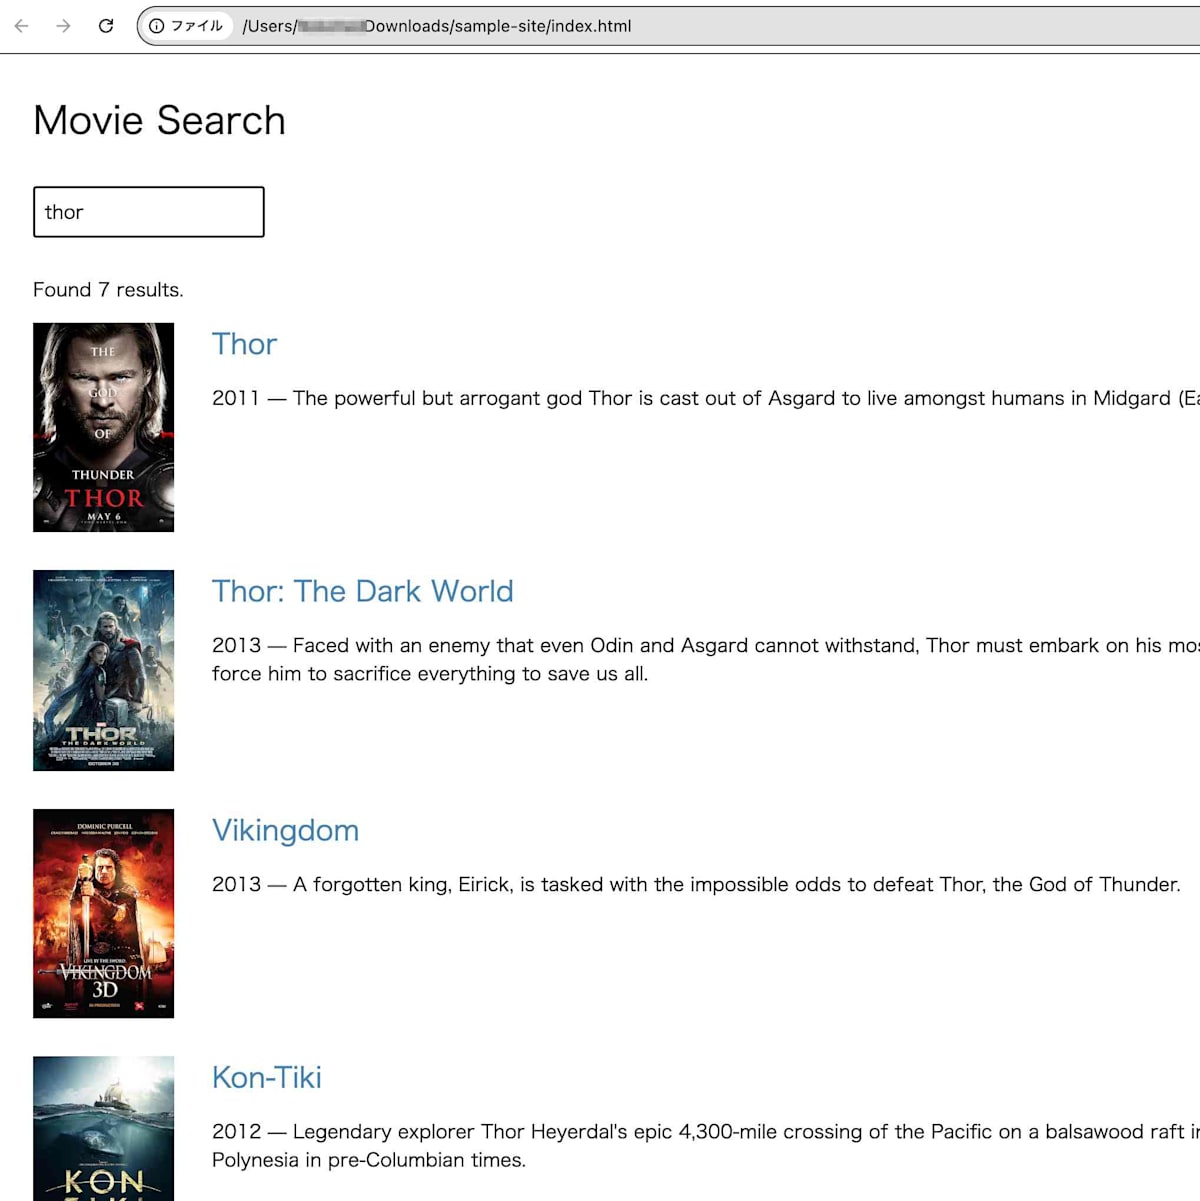
index.htmlを叩いてサイトを起動します。
検索できました!
まとめ
lambdaとapi-gatewayのdeployで一番手こずってしまいました 😅
検索はできましたが、RDBと比べてのメリットなど特にわかりませんでした。
別途調べる必要がありそうです。
Discussion