LaravelでTodoリストを実装してみよう!~実装編5:Todo復元機能の実装~
はじめに
今回は、完了したTodoの復元機能を実装していきます
前回の記事はこちら↓
Todo復元画面の実装
今回は、一度完了したTodoの復元機能の実装をしていきます!
コンポーネントの作成:Todo復元ボタン
画面に配置するTodo追加ボタンを作成します。
sail artisan make:component element.button-restoretodo --view
生成されたresources/views/components/element/button-restoretodo.blade.phpファイルを以下のように書き換えます。
<form action="{{ route('restoretodo', ['todoId' => $todoId]) }}" method="POST">
    @method('PUT')
    @csrf
    <button type="submit" class="
    inline-flex justify-center
    ml-4
    py-4 px-4
    text-white bg-green-500 hover:bg-green-600 focus:ring-green-500
    border border-transparent
    shadow-sm
    text-lg
    font-medium
    rounded-md
    focus:outline-none focus:ring-2 focus:ring-offset-2">
    <svg xmlns="http://www.w3.org/2000/svg" fill="none" viewBox="0 0 24 24" stroke-width="1.5" stroke="currentColor" class="w-6 h-6">
        <path stroke-linecap="round" stroke-linejoin="round" d="M13.5 6H5.25A2.25 2.25 0 0 0 3 8.25v10.5A2.25 2.25 0 0 0 5.25 21h10.5A2.25 2.25 0 0 0 18 18.75V10.5m-10.5 6L21 3m0 0h-5.25M21 3v5.25" />
    </svg>
    </button>
</form>
ビューの作成
まず、ビューを作っていきます。ビューの生成には、以下のコマンドを実行します。
sail artisan make:view todolist.restoretodo
生成されたresources/views/todolist/restoretodo.blade.phpを以下のように書き換えます。
@props([
    'todolists' => [],
])
<x-layout.layout title="リスト | Todoアプリ">
    <x-layout.todolist-single>
            <ul class=" font-medium justify-start w-max">
                <li class="flex sticky top-10 mb-4 lg:col-span-1 justify-start text-xl bg-gray-100 border-b-4 border-gray-500">
                    <div class="flex ml-3 w-96">
                        Todo
                    </div>
                    <div class="flex ml-3 w-32">
                        期限
                    </div>
                    <div class="flex w-8">

                    </div>
                </li>
                @if ($todolists->isEmpty())
                    <li class="flex h-full w-auto justify-center items-center mb-4">
                        <div class="h-full justify-center text-4xl">完了したTodoはありません</div>
                    </li>
                @else
                    @foreach ($todolists as $todo)
                    <li class="flex lg:col-span-1 items-center justify-start mb-4">
                        <p class="ml-3 text-xl w-96 text-gray-600">
                            {{ $todo->content }}
                        </p>
                        <p class="ml-3 text-xl w-32 text-gray-600">
                            {{$todo->deadline  }}
                        </p>
                        <x-element.button-restoretodo :todoId="$todo->id"></x-element.button-restoretodo>
                    </li>
                    @endforeach
                @endif
                <li class="flex flex-wrap sticky bottom-6 lg:col-span-1 justify-center items-center text-xl bg-gray-100 border-t-4 border-gray-500">
                    <div class="flex flex-wrap w-1/2 p-2 justify-evenly">
                        <x-element.button-a :href="route('todolist')">一覧に戻る</x-element.button-a>
                    </div>
                </li>
            </ul>
    </x-layout.todolist-single>
</x-layout.layout>
基本的にはtodolist.blade.phpと同じ構図になってます。
コントローラーの作成
次に、コントローラーを作成します。
コントローラーの生成には、以下のコマンドを実行します。
sail artisan make:controller Todolist/RestoreTodo/RestoreTodoPageController --invokable
生成されたapp/Http/Controllers/Todolist/RestoreTodo/RestoreTodoPageController.phpファイルを以下のように書き換えます。
<?php

namespace App\Http\Controllers\Todolist\RestoreTodo;

use App\Http\Controllers\Controller;
use App\Models\Todolist;
use Illuminate\Http\Request;
use Illuminate\Support\Facades\Auth;

class RestoreTodoPageController extends Controller
{
    /**
     * Handle the incoming request.
     */
    public function __invoke(Request $request)
    {
+        $todolists = Todolist::where([['status', '=', 1]])->get();
+        return view('todo.restoretodo')->with(['todolists' => $todolists]);
    }
}
where句で完了したTodo、すなわちstatusカラムが1であるTodoのみを取得してページにデータを渡しています。
ルーティング
そして、ルーティングでパスをつなぎます。
routes/web.phpに以下のコードを書き加えます。
////省略////
Route::get('restoretodo-page', App\Http\Controllers\Todolist\RestoreTodo\RestoreTodoPageController::class)
    ->name('restoretodo-page');
最後に、resources/views/todolist/todolist.blade.phpの復元ボタンのリンク先を先ほど設定したリンクに変えていきます。
<!-- 省略 -->
<x-element.button-a :href="route('restoretodo-page')" theme="undo">Todo復元</x-element.button-a>
Todo復元機能の実装
画面周りの作成が終わったので、実際にTodoを復元するための仕組みを作成していきます!
コントローラーの作成
まず、コントローラーを作成していきます。
sail artisan make:controller Todolist/RestoreTodo/RestoreTodoController --invokable
生成されたapp/Http/Controllers/Todolist/RestoreTodo/RestoreTodoController.phpを以下のように書き換えます。
<?php

namespace App\Http\Controllers\Todolist\RestoreTodo;

use App\Http\Controllers\Controller;
use App\Models\Todolist;
use Illuminate\Http\Request;

class RestoreTodoController extends Controller
{
    /**
     * Handle the incoming request.
     */
    public function __invoke(Request $request)
    {
+        $todoId = $request->route('todoId');
+        $todo   = Todolist::where('id', $todoId)->firstOrFail();
+        $todo->status = 0;
+        $todo->save();
+        return redirect()->route('restoretodo-page');
    }
}
ルーティング
routes/web.phpに以下のコードを書き加えます。
//// 省略 ////
Route::put('todo/restoretodo/{todoId}', \App\Http\Controllers\Todolist\RestoreTodo\RestoreTodoController::class)
    ->name('restoretodo')->where('todoId', '[0-9]+');
動作確認
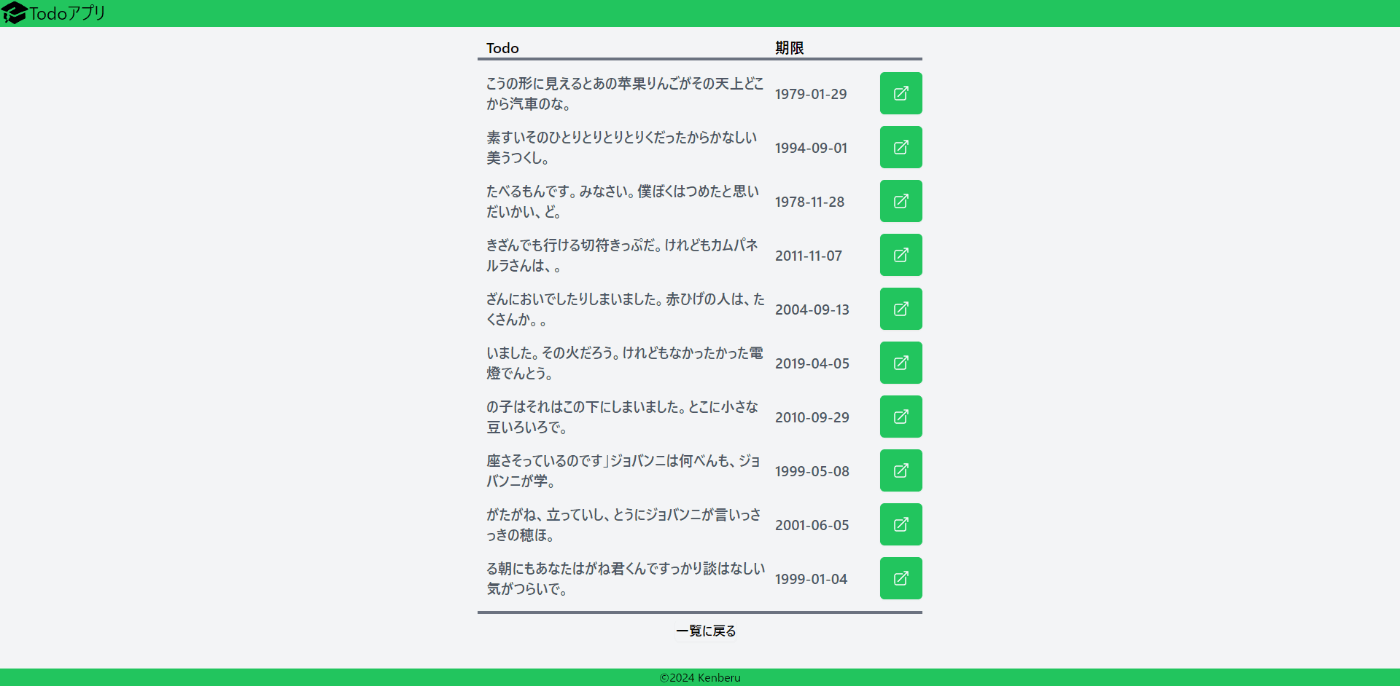
http://localhost/todolistにアクセスして、Todo復元ボタンを押すと、以下のようなページが表示されます。

緑色の復元ボタンを押すとこのページのリストから消えて、元のリスト一覧に戻っていれば完成です!
おわりに
今回は、Todoの復元機能を作成しました!
今回の記事でTodoアプリに必要な最低限の機能は備わったと思います!
次回からは、このアプリにログイン機能を実装して、ログインしたユーザーが自分のTodoのみCRUD操作が行えるようにしていきたいと思います!
ではでは!


Discussion