Firefoxを手探る


この記事は2023年度の東京大学工学部電気電子工学科・電子情報工学科 3 年後期実験「大規模ソフトウェアを手探る」のレポートとして作成されました。
題材としてFirefoxを選択し、調査といくつかの機能追加を行った結果についてここで報告します。
1. Firefoxとは
オープンソースで開発されているブラウザです。2023年10月時点で、日本ではChrome、Safari、Edgeに次いで利用者が多いようです(https://gs.statcounter.com/browser-market-share/all/japan を参照)。
ソースコードは https://hg.mozilla.org/ にあります。コードを眺めたところ、主にC++でコア部分が、JavaScriptで描画部分が実装されているようです。以下では主にJavaScriptで書かれた部分について扱いました。
2. ビルド手順
公式ドキュメントに沿って、以下のコマンドを実行しました。
初回のビルド時はおよそ1時間程度かかりますが、一度実行した後は数秒でビルドが終わるようになります。
python3 -m pip install --user mercurial
curl https://hg.mozilla.org/mozilla-central/raw-file/default/python/mozboot/bin/bootstrap.py -O
python3 bootstrap.py
cd mozilla-unified
hg up -C central
./mach build
./mach run
-
mercurial not foundというエラーが出たため、sudo snap install mercurialでインストールして解決しました。 -
./mach build時、unzip not foundというエラーが出たため、unset UNZIPというコマンドで解決しました。-
unzipコマンドが環境変数UNZIPで参照するバイナリが、ビルドで要求されるものと異なるために起こるエラーと思われます。(参考:https://bugzilla.mozilla.org/show_bug.cgi?id=1760246)
-
3. 手探り方針
デバッガーについて
デバッガーはBrowser ToolBoxにしました。Browser ToolboxはFirefoxに標準で備わっているデバッガーです。開き方は以下のようになります。
- 右上にあるapplication menu を開く
- more toolsを選択
- Browser Toolboxを選択
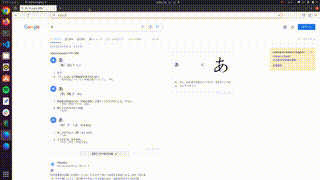
vscodeのようにファイル内、フォルダ内検索もできます。気になるワードで検索してブレークポイントを設置することでその関数が目的の動作と関係があるかどうかがわかります。下にブレークしたときの画像を貼りました。右下にcall stackがありブレークするまでにどの関数を巡ってきたかがわかるようになっていて、これを見ながら目的の動作を達成するためにどのコードを変えればよいかを考えました。

コードを書き換える
ブレークポイントを設置して動かすことでどのコードを変えればよいかわかったら、目的に合わせてコードを書き換えました。
コード書き換えの結果を見る
コードを書き換えたらターミナルで再び
./mach build
./mach run
してブラウザを開きました。この際変更箇所に関係するところだけをビルドするので、ビルド時間はかなり短かったです。うまく変更できていたら成功です。失敗したらはじめに戻ります。
4. タブ操作にサウンドをつける
ここからは、実際に実装した機能について説明していきます。
背景
実用性は無視して、第一段階として「タブを操作したときに音が鳴る」機能を実装しました。また第二段階として「鳴る音を設定画面から簡単に変更」できたら便利だと思い、実装を試みました。
手探り、実装
「タブ操作にサウンドをつける」 について、まずはタブ操作に関連する関数を見つけるためにファイル検索で’tab’のつく名前のファイルについて3.手探り方針の手法に則って手探りました。結果、タブを変更した際にタブを更新する関数がbrowser/base/content/tabbrowser.js の setupEventListeners() 内にあるthis.updateCurrentBrowser() であることがわかったので、以下のように music1 を定義して updateCurrentBrowser 関数のあとに再生するようにしたら成功しました。
music1 = new Audio("音楽ファイルのパス"); //ここを追加

this.tabpanels.addEventListener("select", event => {
        if (event.target == this.tabpanels) {
          this.updateCurrentBrowser();
          music1.play(); //ここを追加
        }
      });
またタブを消す動作は browser/base/content/tabbrowser-tab.js のon_click(event) 内にある if (event.target.classList.contains("tab-close-button")) の条件文に対応していることがわかりました。先ほどと同じように音を鳴らす関数を追加して成功しました。以下にコードを貼ります。
music2 = new Audio("音楽ファイルのパス"); //ここを追加

if (event.target.classList.contains("tab-close-button")) {
  music2.play(); //ここを追加
  if (this.multiselected) {
    gBrowser.removeMultiSelectedTabs();
  } else {
    gBrowser.removeTab(this, {
      animate: true,
      triggeringEvent: event,
    });
  }
  // This enables double-click protection for the tab container
  // (see tabbrowser-tabs 'click' handler).
  gBrowser.tabContainer._blockDblClick = true;
}
「鳴る音を設定画面から簡単に変更」について、2023-07/browser/component/preferences/main.js がfirefoxのsettings画面の機能を実装しているjsファイルだとわかりました。今回は変更を加えることがありませんでしたが、同じディレクトリにある main.inc.xhtml もsettings画面を構成するファイルであることがわかりました。今回はmain.js 内のdownloadsという機能を実装している部分を書き換えました。結果から言うと設定したい音楽ファイルのローカルのパスを取得するところまでできました。ローカルのパスから直接音楽を鳴らすことはできませんでした。設定したい音楽ファイルを指定するための関数を以下に貼ります。具体的な変更点は fp.init で(nsIFilePicker.modeGetFolder)をファイルを選択するモード(nsIFilePicker.modeOpen)にしたことと、選択できるファイルの種類をmp3かwavに絞るために appendFiter 関数を追加した点です。このとき fp.file.path にはローカルファイルのパスが格納されています。
async chooseFolderTask() {
    let [title] = await document.l10n.formatValues([
      { id: "choose-download-folder-title" },
    ]);
    let folderListPref = Preferences.get("browser.download.folderList");
    let currentDirPref = await this._indexToFolder(folderListPref.value);
    let defDownloads = await this._indexToFolder(1);
    let fp = Cc["@mozilla.org/filepicker;1"].createInstance(Ci.nsIFilePicker);

    fp.init(window, title, Ci.nsIFilePicker.modeOpen);
    fp.appendFilter("オーディオファイル", "*.wav; *.mp3");
    // First try to open what's currently configured
    if (currentDirPref && currentDirPref.exists()) {
      fp.displayDirectory = currentDirPref;
    } else if (defDownloads && defDownloads.exists()) {
      // Try the system's download dir
      fp.displayDirectory = defDownloads;
    } else {
      // Fall back to Desktop
      fp.displayDirectory = await this._indexToFolder(0);
    }

    let result = await new Promise(resolve => fp.open(resolve));
    if (result != Ci.nsIFilePicker.returnOK) {
      return;
    }


    let downloadDirPref = Preferences.get("browser.download.dir");
    downloadDirPref.value = fp.file;
    folderListPref.value = await this._folderToIndex(fp.file);
    // Note, the real prefs will not be updated yet, so dnld manager's
    // userDownloadsDirectory may not return the right folder after
    // this code executes. displayDownloadDirPref will be called on
    // the assignment above to update the UI.
  }
5. ローディング画面をつける
背景
ページを長時間読み込んでいるとき、白い画面のまま変わらないと不安になることがあると思います。そこで、読み込みの際にアニメーションを表示し、一定時間経ったらメッセージを表示するようにしました。
実装結果
手探り
“loading” でコード内検索していたところ、browser/base/content/browser.jsに以下のコメント・関数呼び出しを見つけました。
// use a pseudo-object instead of a (potentially nonexistent) channel for getting
    // a correct error message - and make sure that the UI is always either in
    // loading (STATE_START) or done (STATE_STOP) mode
    this.onStateChange(
      gBrowser.webProgress,
      { URI: gBrowser.currentURI },
      loadingDone
        ? nsIWebProgressListener.STATE_STOP
        : nsIWebProgressListener.STATE_START,
      aStatus
    );
ここから、nsIProgressListener の STATE_START がロード状態、STATE_STOP がロード完了状態に対応し、onStateChange()がロード中に呼ばれる処理だろう、と推測できます。
そこで、onStateChange() 内で nsIProgressListener を参照すれば実装可能だろう、という方針を立てました。
実装
以下のように動きます。
-
onStateChange()が初めて呼ばれた際、ロード画面用の HTML 要素を作成 - ロード開始時、10個の異なる時間のタイマー(0.4, 0.6, 0.8, …, 2.0, 7.0 秒)を設定し、それぞれタイムアウトした際に
HTML要素の透明度を変化させるようにする- ただし、最後に7.0秒でタイムアウトするタイマーではタイムアウト時にメッセージを表示させる
- ロード終了時、透明度やタイマーをリセット
具体的な実装は以下のようになりました。
- タイマーの初期化、HTML要素の宣言
let loadingTimer = Array(10);
...
onStateChange(aWebProgress, aRequest, aStateFlags, aStatus) {
const nsIWebProgressListener = Ci.nsIWebProgressListener;
for (let i = 0; i < 10; i++) {
clearTimeout(loadingTimer[i]);
}
let browser = gBrowser.selectedBrowser;
gProtectionsHandler.onStateChange(aWebProgress, aStateFlags);
// ローディングインジケーター要素を取得or作成
let loadingIndicator = document.getElementById('loadingIndicator');
let loadingIndicatorImg = document.getElementById('loadingIndicatorImg');
let loadingIndicatorTxt = document.getElementById('loadingIndicatorTxt');
const loadingMsgs = ['The Internet\'s Slow Lane - We\'re Racing a Snail 🐌!',
'Our Hamsters are Spinning the Wheels 🐹 - Page Coming Soon!',
'Loading... Our Cyber Gnomes are Navigating a Maze 🧙♂️🌌 - Cross Your Fingers!',
'Loading... Like Counting Shooting Stars 🌠 - Catch One, and You\'re In!',
'Loading... Like Waiting for Your Hogwarts Acceptance Letter 💌🪄 - Patience, Young Wizard!'
];
onStateChange() の初めの方では、ロード画面で用いる HTML 要素を宣言しています。また、ロード時間の管理のため、loadingTimer というタイマーの配列を宣言・初期化しています。loadingMsgs はロード時間が長いときに表示されるメッセージのリストで、「遊び心あるロードメッセージの案を提示してください」という命令で ChatGPT に生成してもらったものです。
- HTML 要素の設定
    if (!loadingIndicator) {
      loadingIndicator = document.createElement('div');
      loadingIndicator.setAttribute('id', 'loadingIndicator');
      ...
      loadingIndicator.style.zIndex = '9999';
      loadingIndicatorImg = document.createElement('img');
      loadingIndicator.appendChild(loadingIndicatorImg);
      loadingIndicatorImg.setAttribute('id', 'loadingIndicatorImg');
      loadingIndicatorImg.src = 'loading-page.gif';
      ...
      loadingIndicatorImg.style.zIndex = '10000';
      loadingIndicatorTxt = document.createElement('div');
      loadingIndicator.appendChild(loadingIndicatorTxt);
      loadingIndicatorTxt.setAttribute('id','loadingIndicatorTxt');
      loadingIndicatorTxt.textContent = 'Loading is taking a long time...'; // テキストはカスタマイズ可能
      loadingIndicatorTxt.style.zIndex = '10001';
      ...
      loadingIndicator.style.pointerEvents = 'none'; // マウスイベントを無効化
      document.body.appendChild(loadingIndicator); // bodyに追加
    }
loadingIndicator がまだ作られていなかった、つまり onStateChange() の初回の呼び出しの際に、各要素の設定を行って初期化します。
- ロード開始時の処理
if (
      aStateFlags & nsIWebProgressListener.STATE_START &&
      aStateFlags & nsIWebProgressListener.STATE_IS_NETWORK
    ) {
      for (let i = 0; i < 10; i++) {
        loadingTimer[i] = setTimeout(() => {
          loadingIndicator.style.display = 'none';
          loadingIndicatorImg.style.opacity = 0.07*i;
          loadingIndicator.style.display = 'flex';
          if(i==9){
            loadingIndicatorTxt.textContent = loadingMsgs[Math.floor(Math.random() * loadingMsgs.length)];
            loadingIndicatorTxt.style.display = 'flex'
          }
        }, (i<9?200*(i+2):7000));
      }
ロード開始を nsIProgressListener で判断し、10個のタイマーについて setTimeout()でタイムアウト時の処理を設定します。loadingIndicator.style.display がロード画面の表示/非表示、loadingIndicatorImg.style.opacity がロード画面の透明度、loadingIndicatorTxt.textContent がメッセージのテキストを指します。
- ロード終了時の処理
} else if (aStateFlags & nsIWebProgressListener.STATE_STOP) {
	    // This (thanks to the filter) is a network stop or the last
	    // request stop outside of loading the document, stop throbbers
	    // and progress bars and such
	    for (let i = 0; i < 10; i++) {
	      clearTimeout(loadingTimer[i]);
	    }
	    loadingIndicator.style.display = 'none';
	    loadingIndicatorTxt.style.display = 'none'
	...
	}
ロード終了時にはタイマーをリセットし、ロード画面を非表示にします。
6. エラーページの見た目を変更する
背景
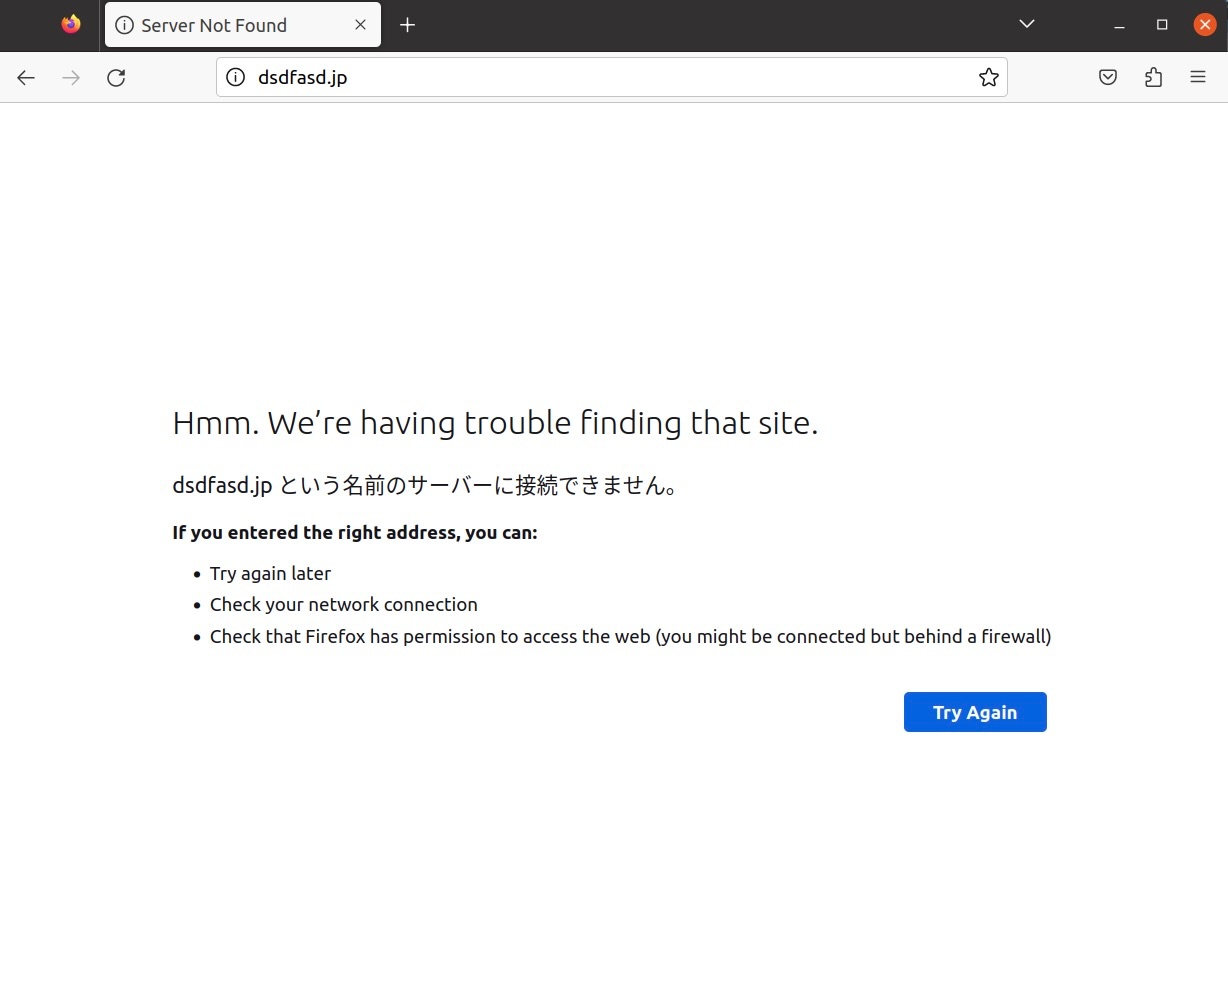
例えば無効なURLに飛んだときFirefoxでは以下のような画面が表示されます。
これではエラーページであるのにあまり危機感がない。
というわけでこのページの見た目を変更することにしました。
手探り方針
上の2つの機能と同じようにBrowser Toolboxで…と思い探していたところなかなか見つからず。
班員の指摘でエラーページのコメント”Hmm. We’re…”で検索してみたところ以下のような怪しいファイルが見つかりこれを呼び出しているファイルを検索してみたところ toolkit/content/aboutNetError.xhtml がエラーページの描画部分だと分かりました。
// certError.ftl

## Messages used for certificate error titles

connectionFailure-title = Unable to connect
deniedPortAccess-title = This address is restricted
# "Hmm" is a sound made when considering or puzzling over something.
# You don't have to include it in your translation if your language does not have a written word like this.
dnsNotFound-title = Hmm. We’re having trouble finding that site.
実装
以下のような画面に変更しました。
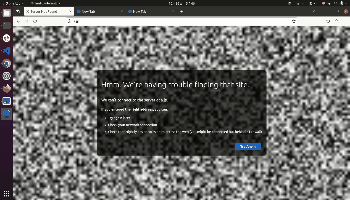
まず背景となっている砂嵐のGIFを表示するには、toolkit/content/neterro/suna.gif のように配置し以下のようなファイルにローカルのパスとビルドした後のブラウザ上でのパスを対応づける必要があります。
// toolkit/content/jar.mn
...
content/global/neterror/aboutNetErrorCodes.js                    (neterror/aboutNetErrorCodes.js)
content/global/neterror/supportpages/connection-not-secure.html  (neterror/supportpages/connection-not-secure.html)
content/global/neterror/supportpages/time-errors.html            (neterror/supportpages/time-errors.html)
content/global/suna.gif (neterror/suna.gif)
...
このパスが
- 上からもわかるようにそもそもそれぞれのパスが完全に対応しているわけではないため似たようなファイルから対応を調べる必要がある
- 相対パスで指定するとうまくいかない
ために一苦労しました。
しかしこれを設定してHTMLを書き換えるだけでは画像が読み込めず。
どうやら<meta http-equiv="Content-Security-Policy" content="default-src chrome:; object-src 'none'" />の部分のタグにより画像の読み込みが制限されているようで<meta http-equiv="Content-Type" content="text/html; charset=UTF-8" />のように変更して解決しました。
- 変更部分
// toolkit/content/aboutNetError.xhtml

<html xmlns="http://www.w3.org/1999/xhtml" data-l10n-sync="true">
  <head>
    <meta http-equiv="Content-Type" content="text/html; charset=UTF-8" />  <!--CSPの設定を削除 -->
    <meta name="color-scheme" content="light dark" />
    <title data-l10n-id="neterror-page-title"></title>
    <link rel="stylesheet" href="chrome://global/skin/aboutNetError.css" type="text/css" media="all" />
    <link rel="icon" id="favicon"/>
    <link rel="localization" href="branding/brand.ftl"/>
    <link rel="localization" href="toolkit/neterror/certError.ftl" />
    <link rel="localization" href="toolkit/neterror/netError.ftl"/>
    <style>
      body { /* 背景画像を設定 */
        background: url('chrome://global/content/suna.gif') no-repeat center center fixed;
        background-size: cover;
        margin: 0;
        text-align: center;
        color: #fff;
      }
      .title { /* タイトルのスタイルを指定 */
        font-size: 2em;
      }
      .container { /* ページ全体の幅を指定 */
        max-width: 800px;
        padding: 20px;
        margin: 0 auto;
        background: rgba(0, 0, 0, 0.7);
        border-radius: 10px;
        text-align: left;
      }
    </style>
  </head>
7. まとめ
思った以上に大規模で、所望の処理をしている箇所を見つけるところから大変でした。デバッガ(Browser ToolBox)が有用だったので、一つ怪しい関数を見つけると処理を追うことはできるのですが、新機能を追加しようとするといくつもの関数に手を加えなければならず、ハードルが高かったです。また、ソフトウェアの本質的な改善をするにはより低いレイヤに手を入れる必要があり、そこまでできなかったのが心残りです。例えば、ブックマーク機能を改善しようとしたらDBを触ったり非同期処理を実装したりする必要があり、自分たちの技術力では実装できませんでした。そのため今回の成果は、コードの一部分をいじったり、1つの関数内で完結している処理を追加したり、といった変更が主なものになっています。
ただ、タブをクリックした動作がどのように伝わって処理されるのかとか、エラーページがどのように設定されているのかとかを知れたのは面白く、新鮮でした。普段使っているソフトウェアの動作を1行1行追っていく、という初めての経験をできて良かったと思います。
Discussion