Raspberry PiとNFCでスマートフォンでタッチするとリクエストを送るようにする


必要なもの
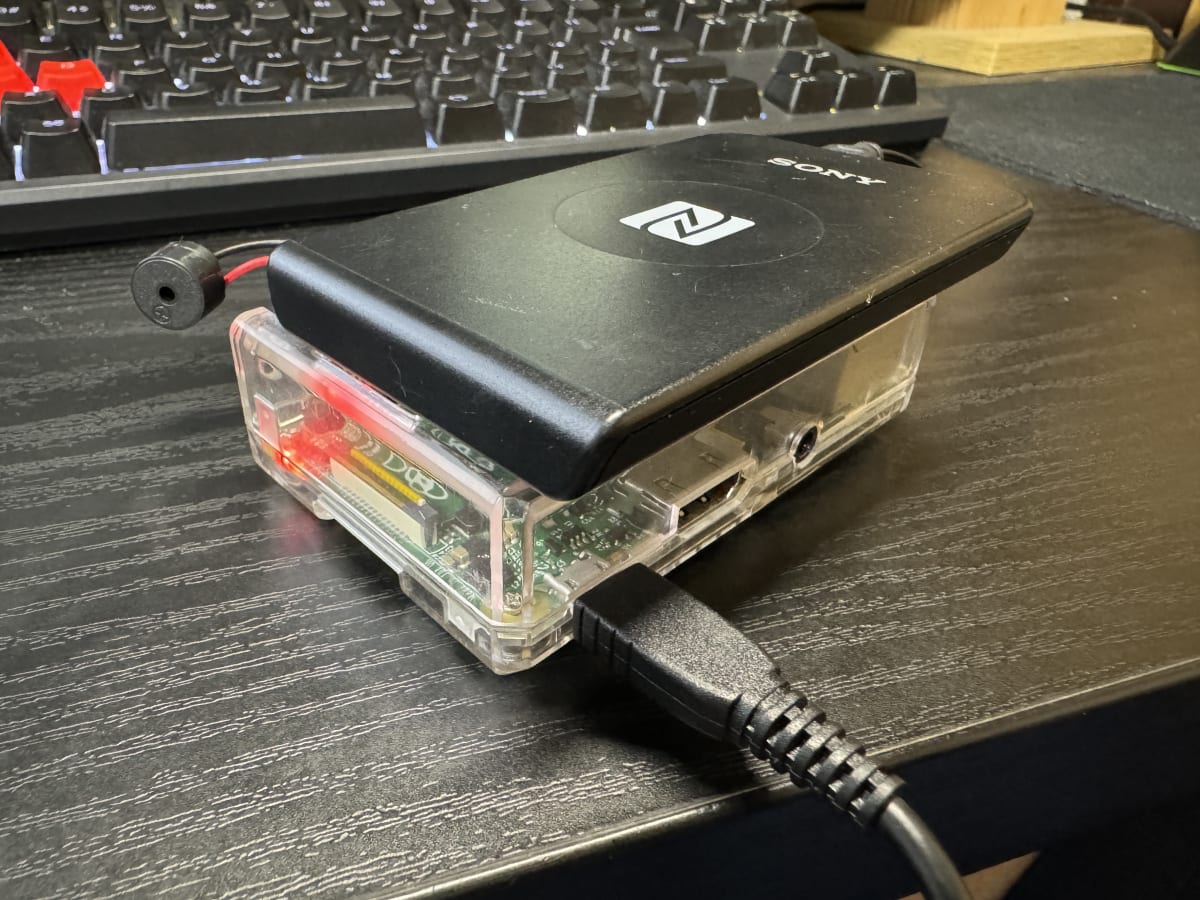
Raspberry Pi 2 model B v1.2

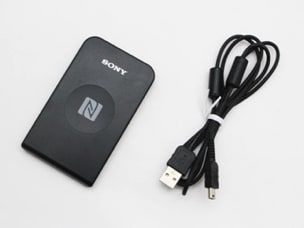
PaSoRi RC-S380
TP-Link TL-WN725N
(Raspberry Pi 2 model BにWifiが搭載されていないため)

電磁スピーカー
PCのビープ音を出すスピーカーを使いました

電磁スピーカー Amazon URL
Raspberry Pi にOSをインストールする
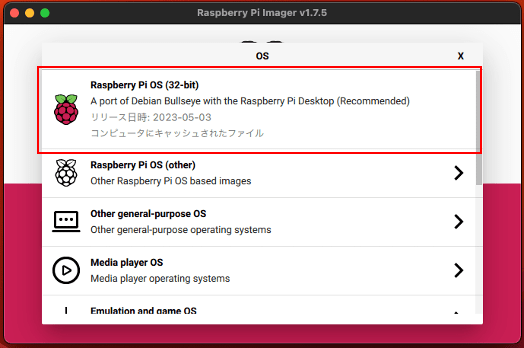
下記サイトから Raspberry Pi Imager をインストール
Raspberry Pi OS
Raspberry Pi Imagerを起動したら、「OSを選ぶ」から「Raspberry Pi OS」を選択
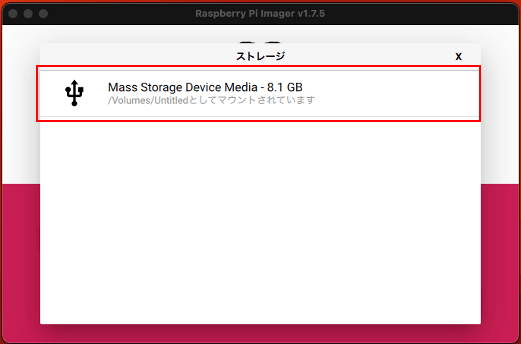
「ストレージ」からはRaspberry Piに読み込ませるmicro sdカードを選択する
「歯車」マークから詳細な設定を行う

設定は下記のように設定
SSHを有効化する
    有効化
ユーザー名とパスワードを設定する
    ユーザー名: user
    パスワード: password
Wi-Fiを設定する
    SSID: 接続先のSSIDを設定 (※ Wi-Fiドングルが2.4GHz帯のWi-Fiしか認識できないので注意)
    パスワード: 接続先のパスワード
    Wifiを使う国: JP
ロケール設定する
    タイムゾーン: Asia/Tokyo
    キーボードレイアウト: jp
その他項目はデフォルトのまま「保存」を押下

設定が完了したら、「書き込む」を押下

TP-Link TL-WN725 のドライバインストール
新しめのWi-Fiドングルの場合、この作業は必要なさそうです。
Raspberry PiにディスプレイとLANケーブルとキーボードを接続して作業します。
パッケージを最新状態に更新
sudo apt update
インストール
sudo apt -y upgrade
カーネルヘッダをインストール
sudo apt install raspberrypi-kernel-headers git
ドライバをコンパイルしてインストール
git clone https://github.com/lwfinger/rtl8188eu.git
cd rtl8188eu/
make all
sudo make install
/etc/wpa_supplicant/wpa_supplicant.conf に設定を記載
sudo vi /etc/network/interfaces.d/wlan0

# 下記を追加
allow-hotplug wlan0
iface wlan0 inet manual
wpa-conf /etc/wpa_supplicant/wpa_supplicant.conf
rasberry-pi の再起動
sudo reboot
これで、Wi-Fiドングルが認識されるようになります。
参考:https://heavymoon.org/2022/02/05/raspberrypi-tp-link-tl-wn725n/
SSH で Raspberry Pi に接続
ping で Raspberry Pi のIPを調べる
ping raspberrypi.local

SSHで接続
ssh user@192.168.0.188
# OSを書き込む際に設定したユーザー名を設定
# ssh ${ユーザー名}@${ラズパイのIP}
参考:https://sukiburo.jp/setup-raspberry-pi/
NFCリーダーとの接続
NFCが認識されているか確認
lsusb
Sony Corp. RC-380 が認識されていればOK

nfcpy のインストール
sudo pip3 install nfcpy
サンプルを実行してNFCが機能するか確認
nfcpyのサンプルをgit cloneする
git clone https://github.com/nfcpy/nfcpy.git
実行
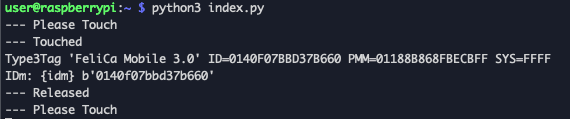
sudo python3 nfcpy/examples/tagtool.py show
スマホやNFCカードが読み込まれると下記のようなログが出ます

sudo 無しで実行できるように設定
sudo sh -c 'echo SUBSYSTEM==\"usb\", ACTION==\"add\", ATTRS{idVendor}==\"054c\", ATTRS{idProduct}==\"06c3\", GROUP=\"plugdev\" >> /etc/udev/rules.d/nfcdev.rules'
sudo udevadm control --reload-rules
sudo reboot
index.py でアプリを作成
vi index.py
下記をコピペ
※ 交通系のICカード、iPhone、Android のみ反応します。
※ iPhone の場合、エクスプレスカードに設定した交通系のICが読み取られます
import binascii
import nfc
import requests

class MyCardReader(object):
    # iPhoneのエクスプレスカードにアクセスするための処理
    def on_startup(self, targets):
        for target in targets:
            target.sensf_req=bytearray.fromhex("0000030000")
        return targets

    def on_connect(self, tag):
        #タッチ時の処理
        print("--- Touched")

        #タグ情報を全て表示
        print(tag)

        #IDmのみ取得して表示
        self.idm = binascii.hexlify(tag._nfcid)
        print("IDm: {idm}", str(self.idm))

        return True

    def read_id(self):
        clf = nfc.ContactlessFrontend('usb')
        try:
            # 交通系IDまたはモバイルSuicaのみに限定
            clf.connect(rdwr={'targets':['212F'], 'on-startup': self.on_startup, 'on-connect': self.on_connect})
        finally:
            clf.close()


if __name__ == '__main__':
    cr = MyCardReader()
    while True:
        #最初に表示
        print("--- Please Touch")

        #タッチ待ち
        cr.read_id()

        #リリース時の処理
        print("--- Released")
実行
python3 index.py
IDmがログに出力されていればOK
参考:https://monomonotech.jp/kurage/raspberrypi/nfc.html
https://qiita.com/xshell/items/55302a588b5927dde6b6
Google Apps Script(GAS)との連携
リクエスト元を作成するために、スプレッドシートにて「拡張機能」→「Apps Script」を選択

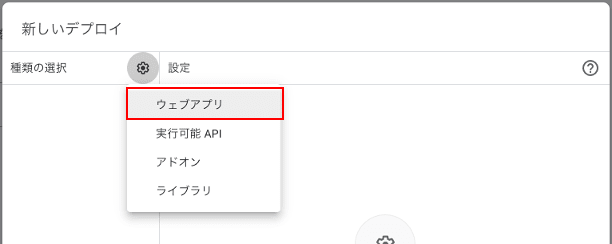
「デプロイ」→「新しいデプロイ」を選択

「種類の選択」→「ウェブアプリ」を選択
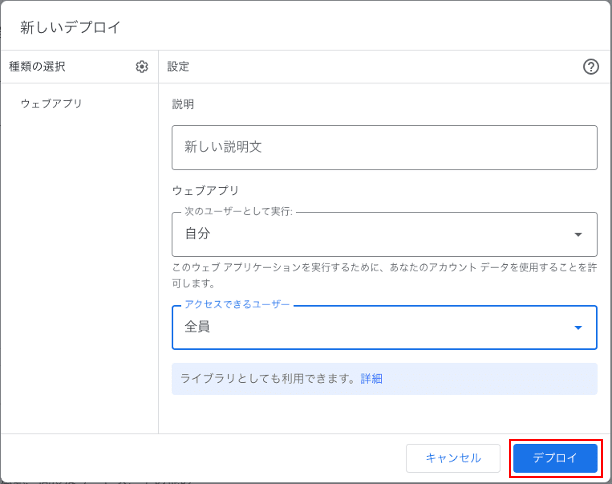
下記項目を入力し「デプロイ」を押下
ウェブアプリ
	自分
アクセスできるユーザー
	全員
デプロイが完了すると URL が発行されますので、メモって「完了」を押下

ソースコードを下記のように記述
リクエストが成功すると、status: '200' を返却します。
※ getSheetByNameのシート名を適宜書き換えてください
function doPost(e) {
  const idm = e.parameter.idm
  Logger.log('IDm: %s', idm)
  // シートオブジェ
  const sh = SpreadsheetApp.getActive().getSheetByName('シート名')
  sh.getRange(`A1`).setValue(idm)
  // レスポンス
  const output = ContentService.createTextOutput()
  output.setContent(JSON.stringify({status: '200'}))
  return output
}
「デプロイ」→「デプロイを管理」を押下

「鉛筆マーク」を押下し、バージョンを「新バージョン」を選択し「デプロイ」を押下
※ この方法じゃないとURLが変わってしまうため

NFCアプリの index.py を下記に書き換える
import binascii
import nfc
import requests

class MyCardReader(object):
    # スプレッドシートにリクエストを送る
    def request_gas(self, idm):
        url = 'https://xxxxxxxxxxxxxxxxxxxxxxxxxxxxxxxx' # 先程生成したGASのURLを設定
        res = requests.post(url, data={'idm': idm}).json()
        print('http status: {status}'.format(status=res['status']))

    # iPhoneのエクスプレスカードにアクセスするための処理
    def on_startup(self, targets):
        for target in targets:
            target.sensf_req=bytearray.fromhex("0000030000")
        return targets

    def on_connect(self, tag):
        #タッチ時の処理
        print("--- Touched")

        #タグ情報を全て表示
        print(tag)

        #IDmのみ取得して表示
        self.idm = binascii.hexlify(tag._nfcid)
        print("IDm: {idm}", str(self.idm))

        # リクエスト
        self.request_gas(str(self.idm))

        return True


    def read_id(self):
        clf = nfc.ContactlessFrontend('usb')
        try:
            # 交通系IDまたはモバイルSuicaのみに限定
            clf.connect(rdwr={'targets':['212F'], 'on-startup': self.on_startup, 'on-connect': self.on_connect})
        finally:
            clf.close()

if __name__ == '__main__':
    cr = MyCardReader()
    while True:
        #最初に表示
        print("--- Please Touch")

        #タッチ待ち
        cr.read_id()

        #リリース時の処理
        print("--- Released")
index.py を実行して、スマートフォンをかざす
ログに「http status: 200」が出力されていることを確認

スプレッドシートにIdmが書き込まれていることを確認

ブザー音を鳴らす
ブザーの端子の位置を替える。
端子がツメに引っかかっているだけなので、マイナスドライバーなどでツメを持ち上げてあげれば簡単に抜けます。

スピーカーのプラス端子を12番目にマイナス端子を14番目に接続する
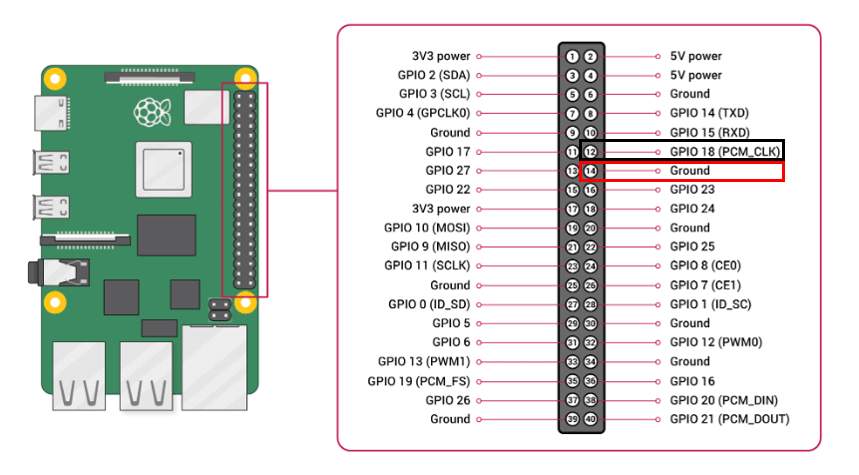
GPIO 画像:https://www.raspberrypi.com/documentation//computers/os.html#gpio-pinout
NFC読み取りの際に作成した index.py を修正
import binascii
import nfc
import requests
import buzzer

bz = buzzer.Buzzer()

class MyCardReader(object):
    # スプレッドシートにリクエストを送る
    def request_gas(self, idm):
        url = 'https://script.google.com/macros/s/AKfycbxV6byms_z8wFbfzF_Od6Pr2hVBsjXUm_j9PcrW9daH_GqdvgBcaHlvzar2lZu9zFgutg/exec' # 先程生成したGASのURLを設定
        res = requests.post(url, data={'idm': idm}).json()
        print('http status: {status}'.format(status=res['status']))

    # iPhoneのエクスプレスカードにアクセスするための処理
    def on_startup(self, targets):
        for target in targets:
            target.sensf_req=bytearray.fromhex("0000030000")
        return targets

    def on_connect(self, tag):
        #タッチ時の処理
        print("--- Touched")
        bz.touch()

        #タグ情報を全て表示
        print(tag)

        #IDmのみ取得して表示
        self.idm = binascii.hexlify(tag._nfcid)
        print("IDm: {idm}", str(self.idm))

        # リクエスト
        self.request_gas(str(self.idm))

        return True


    def read_id(self):
        clf = nfc.ContactlessFrontend('usb')
        try:
            # 交通系IDまたはモバイルSuicaのみに限定
            clf.connect(rdwr={'targets':['212F'], 'on-startup': self.on_startup, 'on-connect': self.on_connect})
        finally:
            clf.close()


if __name__ == '__main__':
    cr = MyCardReader()
    while True:
        #最初に表示
        print("--- Please Touch")

        #タッチ待ち
        cr.read_id()

        #リリース時の処理
        print("--- Released")
ブザーを鳴らすために下記のクラスを buzzer.py で作成
vi buzzer.py
下記をコピペ
import pigpio
from gpiozero import TonalBuzzer
from gpiozero.pins.pigpio import PiGPIOFactory
from time import sleep

# BUZZERのピン
BUZZER_PIN = 18

# TONEレベル
TONE_LV1 = "C4"
TONE_LV2 = "D4"
TONE_LV3 = "G4"
TONE_LV4 = "B4"
TONE_LV5 = "E5"

class Buzzer(object):
    def __init__(self):
        factory = PiGPIOFactory()
        self.bz = TonalBuzzer(BUZZER_PIN, pin_factory=factory)

    # ブザー音を鳴らす
    def ring(self, note, time):
        self.bz.play(note)
        sleep(float(time))
        self.bz.stop()

    # タッチ時
    def touch(self):
        self.ring(TONE_LV5, '0.2')
GPIOを制御するために、pigpioを有効化します
sudo pigpiod
動作確認
python3 index.py
タッチするとブザー音がなるようになっています。
Raspberry Pi 起動時に自動的にアプリを立ち上げる
NFCアプリをサービス化させる
sudo vi /usr/lib/systemd/system/nfc-touch.service
下記内容を記載
ExecStartに NFCアプリのパスを設定
[Unit]
Description=NFC Touch

[Service]
ExecStart=/usr/bin/python3 /home/user/index.py
Restart=always
Type=simple

[Install]
WantedBy=multi-user.target
サービスの起動
sudo systemctl daemon-reload
sudo systemctl start nfc-touch.service
サービスの起動確認
sudo systemctl status nfc-touch.service
Active: の項目が active(running) となっていることを確認

サービスの有効化
sudo systemctl enable nfc-touch.service
pigpioを起動時から有効にするためサービスを有効化
sudo systemctl enable pigpiod.service
Raspberry Pi を再起動
sudo reboot
これで電源を入れる際にNFCタッチアプリが起動するようになりました。
Discussion