GitHub PackagesにReactComponentをprivate npm packageとして公開する
概要
タイトルの通りですが、自作したReactComponentをnpm packageとして公開するまでの手順を記載します。
private packageなのに公開という日本語を使っているのは少々違和感がありますが、GitHub Organization内で共通利用できる状態にすると考えていただければ問題ありません。
この記事で説明すること
- GitHub OrganizationのGitHub Packagesにprivate npm packageを公開する手順を説明
- 公開されたprivate npm packageをVercel、GitHub Actionsで利用する方法を説明
- GitHub Packagesへの公開をGitHub Actionsで行なう方法を説明
プロジェクトの作成手順とサンプルコード
以下は具体的な手順になります。
下記は最終的なプロジェクト構造になります。
このリポジトリはサンプルコードとして公開するためにpublicリポジトリになっていますが、GitHubのリポジトリをprivateにすればnpm packageもprivateになります。
プロジェクトのひな形作成
以下を実行しプロジェクト用のディレクトリ構成とnpmの初期化を実施します。
mkdir react-sample-lib
cd react-sample-lib
npm init
React, TypeScriptのインストール
最初にReactとTypeScriptをインストールしていきます。
npm i -D react typescript @types/react
ReactをpeerDependenciesにも記載する
作成するpackageはReactに依存しており、利用する側もReactをインストールして利用しています。
その為、Reactが必須であることをpackageの利用者に伝えたいので peerDependencies にもReactを記載します。
最終的に package.json は下記のようになります。
{
  "name": "react-sample-lib",
  "version": "0.1.0",
  "description": "ReactComponentをnpm package化する為のテスト用",
  "main": "index.js",
  "scripts": {
    "test": "echo \"Error: no test specified\" && exit 1"
  },
  "repository": {
    "type": "git",
    "url": "git+https://github.com/nekochans/react-sample-lib.git"
  },
  "author": "keitakn",
  "license": "MIT",
  "bugs": {
    "url": "https://github.com/nekochans/react-sample-lib/issues"
  },
  "homepage": "https://github.com/nekochans/react-sample-lib#readme",
  "devDependencies": {
    "@types/react": "^17.0.33",
    "react": "^17.0.2",
    "typescript": "^4.4.4"
  },
  "peerDependencies": {
    "react": "^17.0.2"
  }
}
TypeScriptの初期設定
以下のコマンドを実行します。
npx tsc --init
tsconfig.json が作成されますので、以下の内容に変更します。
Reactを扱ううえで必要な設定を追加した形です。
{
  "compilerOptions": {
    "target": "es5",
    "module": "esnext",
    "jsx": "react",
    "sourceMap": true,
    "outDir": "dist",
    "strict": true,
    "moduleResolution": "node",
    "allowSyntheticDefaultImports": true,
    "esModuleInterop": true,
    "skipLibCheck": true,
    "forceConsistentCasingInFileNames": true,
  }
}
テスト用のComponentを作成
簡単なButtonComponentを作成します。
作成するComponentとその関連ファイルは以下のディレクトリを参考にしてください。
また package.json の scripts に "build": "tsc" を追加します。
npm run build で dist 配下に .js ファイルが出力される事を確認します。
Rollupの導入
tsc を使っても良いのですが、よりpackage向けのBuildを簡単に実現できるRollupを導入します。
以下のコマンドを実行します。
npm i -D rollup @rollup/plugin-node-resolve @rollup/plugin-commonjs @rollup/plugin-typescript rollup-plugin-peer-deps-external rollup-plugin-postcss rollup-plugin-terser tslib postcss
rollup.config.js を以下の内容で追加します。
import resolve from '@rollup/plugin-node-resolve';
import commonjs from '@rollup/plugin-commonjs';
import typescript from '@rollup/plugin-typescript';
import { terser } from 'rollup-plugin-terser';
import external from 'rollup-plugin-peer-deps-external';
import postcss from 'rollup-plugin-postcss';

const packageJson = require('./package.json');

export default {
  input: 'src/index.ts',
  output: [
    {
      file: packageJson.main,
      format: 'cjs',
      sourcemap: true,
      name: 'react-sample-lib'
    },
    {
      file: packageJson.module,
      format: 'esm',
      sourcemap: true
    }
  ],
  plugins: [
    external(),
    resolve(),
    commonjs(),
    typescript({ tsconfig: './tsconfig.json' }),
    postcss(),
    terser()
  ]
};
package.json の内容を以下のように修正します。
"main": "dist/cjs/index.js",
"module": "dist/esm/index.js",
package.json の scripts.build を rollup -c に変更します。
これでCommonJS、ESModules両方の形式でpackageがアウトプットされるようになります。
npm run build を実行します。
dist 配下にCommonJS、ESModulesそれぞれの形式でアウトプットされていることが確認できます。
TypeScriptの型定義を出力する
npm packageを利用する側もTypeScriptで開発したいので型定義を出力するようにします。
tsconfig.json の compilerOptions に以下の設定を追加します。
    "declaration": true,
    "declarationDir": "types",
    "emitDeclarationOnly": true
-
declaration(型定義を出力する) -
declarationDir(型定義を出力するディレクトリ) -
emitDeclarationOnly(型定義だけを出力する)
rollup-plugin-dts を利用することで型定義ファイルを1つにまとめることができます。
npm i -D rollup-plugin-dts でインストールを実施し rollup.config.js を以下のように変更します。
import resolve from '@rollup/plugin-node-resolve';
import commonjs from '@rollup/plugin-commonjs';
import typescript from '@rollup/plugin-typescript';
import { terser } from 'rollup-plugin-terser';
import external from 'rollup-plugin-peer-deps-external';
import postcss from 'rollup-plugin-postcss';
import dts from 'rollup-plugin-dts';

const packageJson = require('./package.json');

export default [
  {
    input: 'src/index.ts',
    output: [
      {
        file: packageJson.main,
        format: 'cjs',
        sourcemap: true,
        name: 'react-sample-lib'
      },
      {
        file: packageJson.module,
        format: 'esm',
        sourcemap: true
      }
    ],
    plugins: [
      external(),
      resolve(),
      commonjs(),
      typescript({ tsconfig: './tsconfig.json' }),
      postcss(),
      terser()
    ]
  },
  {
    input: 'dist/esm/types/index.d.ts',
    output: [{ file: 'dist/index.d.ts', format: "esm" }],
    external: [/\.css$/],
    plugins: [dts()],
  },
];
package.json の types に以下の内容を追加します。
"types": "dist/index.d.ts"
npm run build を実行すると型定義ファイルが出力されるようになっていることが確認できます。
npm への公開準備
package名をGitHub Organization名を含んだものに変更する
package.json の name を @nekochans/react-sample-lib に変更します。
nekochans の部分は @ + GitHub Organization名 に置き換えてください。
npm へのログイン
この時、ログインに利用するのはnpmのアカウントではなくGitHubアカウントです。
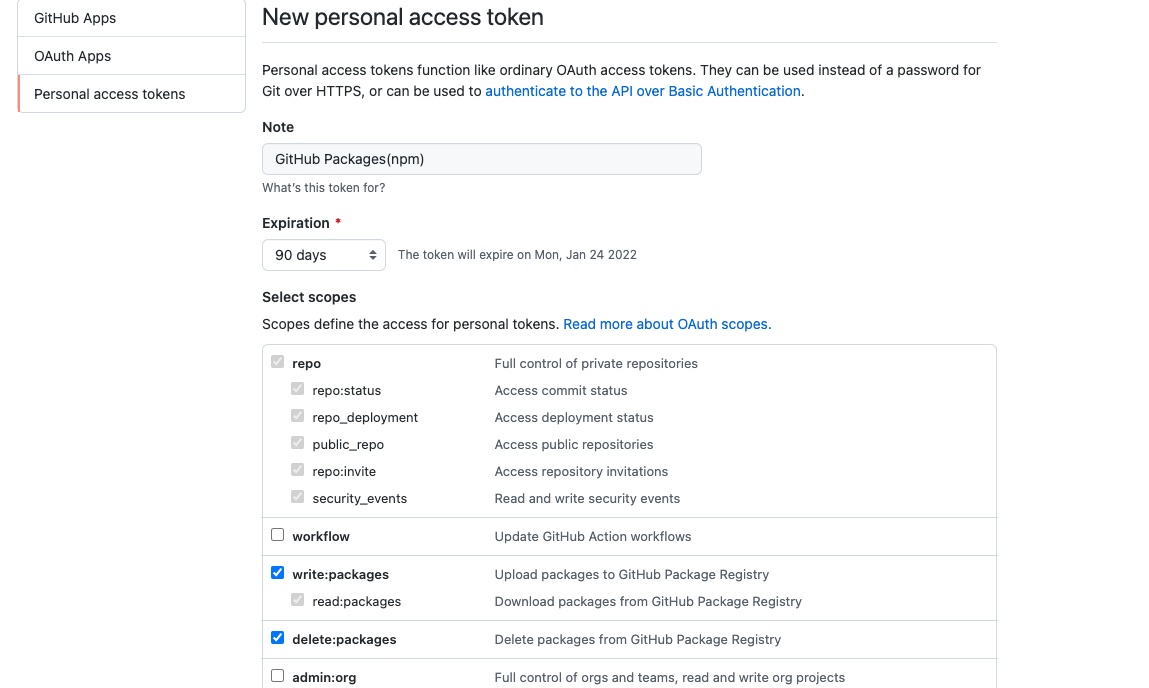
GitHubには二段階認証を設定していることが多いと思いますので、Personal Access Tokenを利用するのがオススメです。
こちら を参考に作成します。
Personal Access Tokenの権限は以下の権限が必要です。
- repo
- read:packages
- write:packages
- delete:packages
npmログインの際も以下のように --registry=https://npm.pkg.github.com を指定する必要があります。
npm login --registry=https://npm.pkg.github.com を実施します。
以下のようなメッセージが表示されたらログイン成功です。
Logged in as {あなたのGitHubアカウント名} on https://npm.pkg.github.com/.
package.json に publishConfig の設定を追加
以下の設定を追加します。
nekochans の部分はGitHub Organization名に合わせてください。
  "publishConfig": {
    "registry": "https://npm.pkg.github.com/nekochans"
  },
npm に公開する
npm publish を実行してpackageを公開します。
npm notice
npm notice 📦  @nekochans/react-sample-lib@0.1.0
npm notice === Tarball Contents ===
npm notice 1.1kB LICENSE
npm notice 60B   README.md
npm notice 1.1kB dist/cjs/index.js
npm notice 1.5kB dist/cjs/index.js.map
npm notice 159B  dist/cjs/types/components/Button/Button.d.ts
npm notice 196B  dist/cjs/types/components/Button/Button.types.d.ts
npm notice 36B   dist/cjs/types/components/Button/index.d.ts
npm notice 46B   dist/cjs/types/components/index.d.ts
npm notice 30B   dist/cjs/types/index.d.ts
npm notice 933B  dist/esm/index.js
npm notice 1.5kB dist/esm/index.js.map
npm notice 159B  dist/esm/types/components/Button/Button.d.ts
npm notice 196B  dist/esm/types/components/Button/Button.types.d.ts
npm notice 36B   dist/esm/types/components/Button/index.d.ts
npm notice 46B   dist/esm/types/components/index.d.ts
npm notice 30B   dist/esm/types/index.d.ts
npm notice 254B  dist/index.d.ts
npm notice 1.2kB package.json
npm notice 1.0kB rollup.config.js
npm notice 424B  tsconfig.json
npm notice === Tarball Details ===
npm notice name:          @nekochans/react-sample-lib
npm notice version:       0.1.0
npm notice filename:      @nekochans/react-sample-lib-0.1.0.tgz
npm notice package size:  3.7 kB
npm notice unpacked size: 10.0 kB
npm notice shasum:        xxxxxxxxxxxxxxxxxxxxxxxxxxxxxxxxxxxxxxxx
npm notice integrity:     xxxxxxxxxxxxxxxxxxxxxxxxxxxxxxxxxxxxxxxx
npm notice total files:   20
npm notice
+ @nekochans/react-sample-lib@0.1.0
以下のように表示されればpackageの公開が完了しています。
公開されたprivate packageを利用する
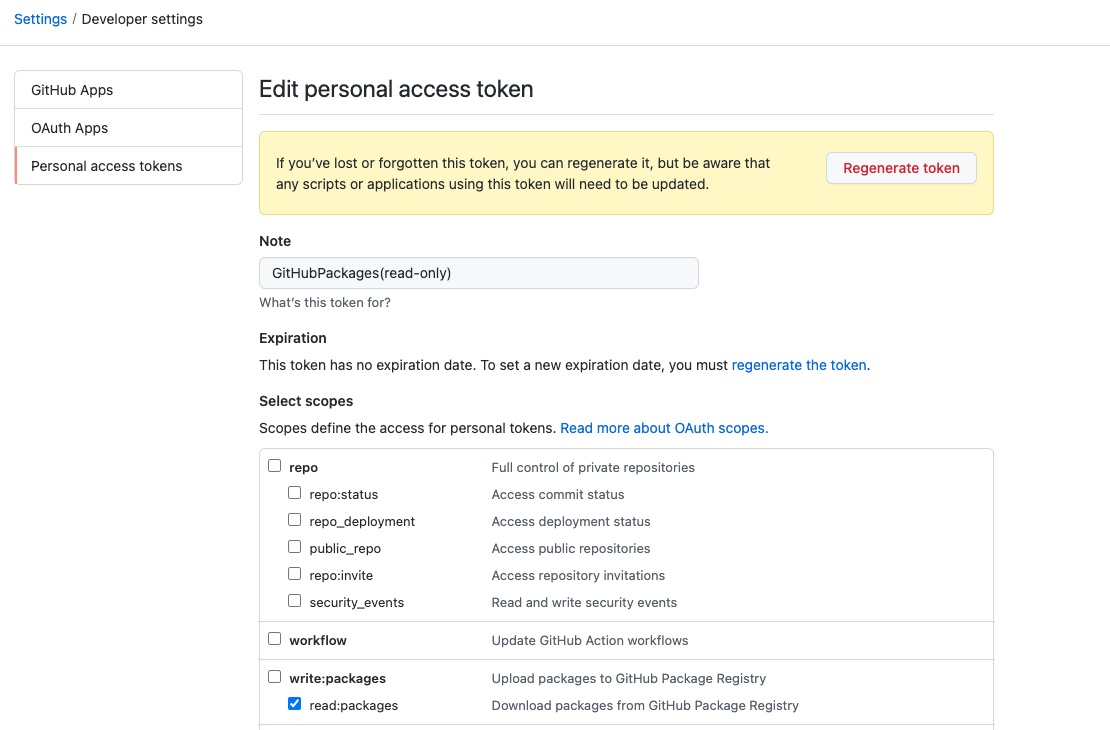
private packageを利用するためにはpackageを利用する側で .npmrc の設定が必要になります。
ghp_xxxxxxxxxxxxxxxxxxxxxxxxxxxxxxxxxxxx は発行したPersonal Access Tokenを利用します。
npmへの公開時とは違い read:packages の権限があれば十分なので別途発行することをオススメします。
packageを利用する側で .npmrc を以下の内容を追加します。
nekochans の部分は @ + GitHub Organization名 に置き換えてください。
@nekochans:registry=https://npm.pkg.github.com
//npm.pkg.github.com/:_authToken=ghp_xxxxxxxxxxxxxxxxxxxxxxxxxxxxxxxxxxxx
Vercel上でprivate packageを利用する設定を行なう
公式ドキュメント に書いてあるとおり、Environment Variablesに NPM_RC を追加します。

内容は .npmrc と同じく以下の通りになります。
@nekochans:registry=https://npm.pkg.github.com
//npm.pkg.github.com/:_authToken=ghp_xxxxxxxxxxxxxxxxxxxxxxxxxxxxxxxxxxxx
これでVercel上でもデプロイが成功するようになります。
.npmrc のコミットはあまりやりたくないのでこちらの方法がオススメです。
GitHub Actionsからprivate packageを利用する設定を行なう
private packageを利用する側の設定です。
https://github.com/actions/setup-node/blob/main/docs/advanced-usage.md#use-private-packages を参考に必要な設定をします。
-
registry-urlにhttps://npm.pkg.github.comを定義 -
scopeに@+GitHub Organization名を指定 -
NODE_AUTH_TOKENにGitHubのパーソナルトークンを指定(必要な権限はread:packagesだけでOK)
最終的には以下のような形になります。
name: ci

on:
  workflow_dispatch:
  pull_request:
    branches:
      - main
      - staging
  push:
    branches:
      - main
      - staging

jobs:
  build:
    name: Build And Test
    runs-on: ubuntu-latest
    timeout-minutes: 10
    strategy:
      matrix:
        node-version: [14.x, 15.x]
    steps:
      - uses: actions/checkout@v2
      - name: Use Node.js ${{ matrix.node-version }}
        uses: actions/setup-node@v2
        with:
          node-version: ${{ matrix.node-version }}
          cache: 'npm'
          registry-url: 'https://npm.pkg.github.com'
          scope: '@nekochans'
      - run: |
          npm ci
          npm run build
          npm run lint
          npm run test:ci
          npm run build:storybook
        env:
          NODE_AUTH_TOKEN: ${{ secrets.AUTH_TOKEN_FOR_GITHUB_PACKAGES }}
AUTH_TOKEN_FOR_GITHUB_PACKAGES はGithub ActionsのActions secretsとして登録しておきます。
npm packageは組織内の複数のアプリケーションから利用されるかと思うので、Organization secretsとして登録しても良いかもしれません。
GitHub Actionsで npm への公開を自動化する
https://github.com/actions/setup-node/blob/main/docs/advanced-usage.md#publish-to-npmjs-and-gpr-with-npm を参考に自動化します。
この記事では npm.pkg.github.com のみに登録をします。
ポイントは以下の通りです。
-
registry-urlにhttps://npm.pkg.github.comを定義 -
scopeに@+GitHubOrganization名を指定 -
GITHUB_TOKENにGitHubPackagesへの書き込み権限を与える設定を定義 -
NODE_AUTH_TOKENに${{ secrets.GITHUB_TOKEN }}を指定
最終的な内容は下記の通りになります。
以下の例ではreleaseのトリガーは こちら のようにGitHub上にリリースページが公開されたタイミングになります。
name: npm publish

on:
  release:
    types: [published]

jobs:
  build:
    runs-on: ubuntu-latest
    steps:
      - uses: actions/checkout@v2
      - uses: actions/setup-node@v2
        with:
          node-version: 16
      - run: |
          npm ci
          npm run build
  publish-gpr:
    needs: build
    runs-on: ubuntu-latest
    permissions:
      contents: read
      packages: write
    steps:
      - uses: actions/checkout@v2
      - uses: actions/setup-node@v2
        with:
          node-version: 16
          registry-url: 'https://npm.pkg.github.com'
          scope: '@nekochans'
      - run: |
          npm ci
          npm run build
          npm publish
        env:
          NODE_AUTH_TOKEN: ${{ secrets.GITHUB_TOKEN }}
反映対象が npm.pkg.github.com の場合はPersonal Access Tokenが不要なのが便利だと思いました。
npm packageのバージョンアップを行なう方法
package.json と package-lock.json の version を変更して npm publish を実行します。
こちらのコミット を参考にしてください。
手動で変更しても問題ないですが、以下のようにnpmのバージョンアップコマンドを利用すると楽です。
# パッチバージョンアップ時に利用
npm version patch

# マイナーバージョンアップ時に利用
npm version minor

# メジャーバージョンアップ時に利用
npm version major
例えばバージョンが 0.1.0 から npm version patch を実行します。
すると package.json と package-lock.json の version が 0.1.1 に変更され v0.1.1 というGItTagも自動で作成してくれます。
後はGitHub上でリリースページを作成して公開すれば npm publish を実行するGitHub Actionsが動作しGitHub Packagesへの公開が完了します。
あとがき
GitHub傘下になる前のnpmでもprivate packageを扱ったことがありますが、GitHub Packagesを利用するとより簡単にprivate packageを利用できることがわかりました。
ちなみに公開されたpackageは下記のようなページで確認できます。
今回の記事を書くにあたって以下の記事を参考にさせていただきました。
以上になります。最後まで読んでいただきありがとうございました。
Discussion