Playwright + reg-suit を使ったビジュアルリグレッションテストを導入する
ビジュアルリグレッションテストとは
ページのスクショを撮り、事前に用意しておいた画像と比較して、差分が意図したものとなっているかを確認するテスト。
今回試す組み合わせ
-
reg-suit
- 画像を比較して、差分を表示してくれるツール
-
Playwright
- E2E テストを自動化するフレームワークで、ページのスクショを撮ることも可能
その他
今回は下記で作成した環境を使う。
Vite + React で作った環境で Playwright は導入済み。
reg-suit の導入
下記を参考に進める。
reg-suit をインストール
yarn add --dev reg-suit
reg-suit のセットアップ
下記のコマンドを実行することで、いくつかプラグインもインストールされる。
yarn を使っている場合は、--use-yarnを使うと良い感じにインストールしてくれる。
npx reg-suit init --use-yarn
プラグインは下記の2つを入れた。
reg-publish-s3-plugin を入れることで、S3 のバケットからスナップショットを取得 & 配置できるようになります。そのため AWS のアクセスキーなどが必要になるので、事前に設定しておきます。
他はこんな感じの設定にした。
スナップショットを置くバケットは既に作ってあるので、ここでは作らず既存のバケットを指定した。
? Working directory of reg-suit. .reg
? Append ".reg" entry to your .gitignore file. Yes
? Directory contains actual images. directory_contains_actual_images
? Threshold, ranges from 0 to 1. Smaller value makes the comparison more sensi
tive. 0
[reg-suit] info Set up reg-publish-s3-plugin:
? Create a new S3 bucket No
? Existing bucket name <スナップショットを置くバケット名>
[reg-suit] info Configuration:
[reg-suit] info {
  "core": {
    "workingDir": ".reg",
    "actualDir": "directory_contains_actual_images",
    "thresholdRate": 0,
    "addIgnore": true,
    "ximgdiff": {
      "invocationType": "client"
    }
  },
  "plugins": {
    "reg-keygen-git-hash-plugin": true,
    "reg-publish-s3-plugin": {
      "bucketName": "<スナップショットを置くバケット名>"
    }
  }
}
? Update configuration file Yes
? Copy sample images to working dir No
[reg-suit] info Initialization ended successfully ✨

...
スクショした画像を置く場所などは後ほど検討する✍️
Playwright でスクショを撮る
スクショを撮る機能があるので、そちらを使用する。
fullPage で撮ることもできるみたい。
ルートのページに遷移して、スクショを撮るようにしてみた。
import { test } from '@playwright/test';

test.beforeEach(async ({ page }) => {
  await page.goto('http://localhost:3000');
});

test('スクショを撮る', async ({ page }) => {
  await page.screenshot({ path: './directory_contains_actual_images/example.png', fullPage: true });
});
この状態でテストを実行してみる。(E2Eのテストを流す npm scripts がなければ playwright test --project=chromium などで)
yarn test:e2e:chromium src/tests/example.spec.ts
directory_contains_actual_images/example.pngに見慣れた画面のスクショが格納されてた📸
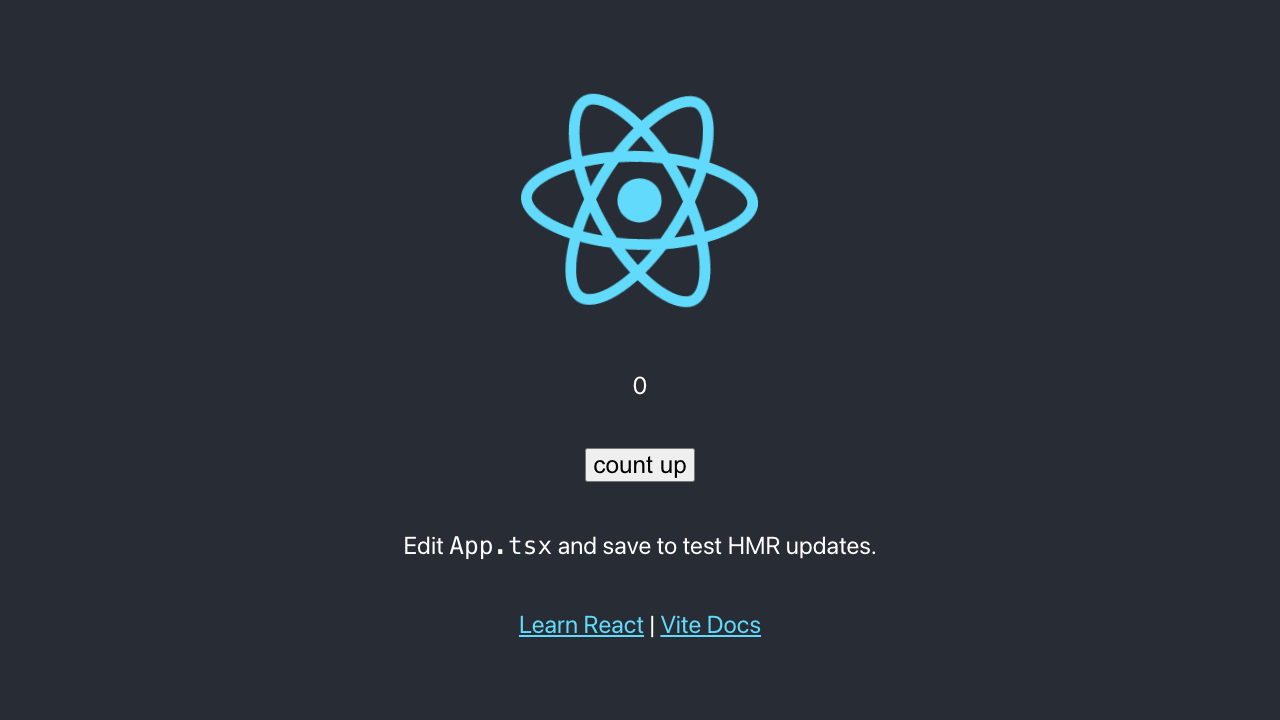
React のロゴは動きがあり、ビジュアルリグレッションテストを試す上でノイズになりそうなので、非表示にしよう...
import { useState } from 'react'
import logo from './logo.svg'
import './App.css'

function App() {
  const [count, setCount] = useState(0)

  return (
    <div className="App">
      <header className="App-header">
-       <img src={logo} className="App-logo" alt="logo" />
        <p data-testid="count">{count}</p>
        <p>
          <button type="button" data-testid="count-up-button" onClick={() => setCount((count) => count + 1)}>
          count up
          </button>
        </p>
        <p>
          Edit <code>App.tsx</code> and save to test HMR updates.
        </p>
        <p>
          <a
            className="App-link"
            href="https://reactjs.org"
            target="_blank"
            rel="noopener noreferrer"
          >
            Learn React
          </a>
          {' | '}
          <a
            className="App-link"
            href="https://vitejs.dev/guide/features.html"
            target="_blank"
            rel="noopener noreferrer"
          >
            Vite Docs
          </a>
        </p>
      </header>
    </div>
  )
}

export default App
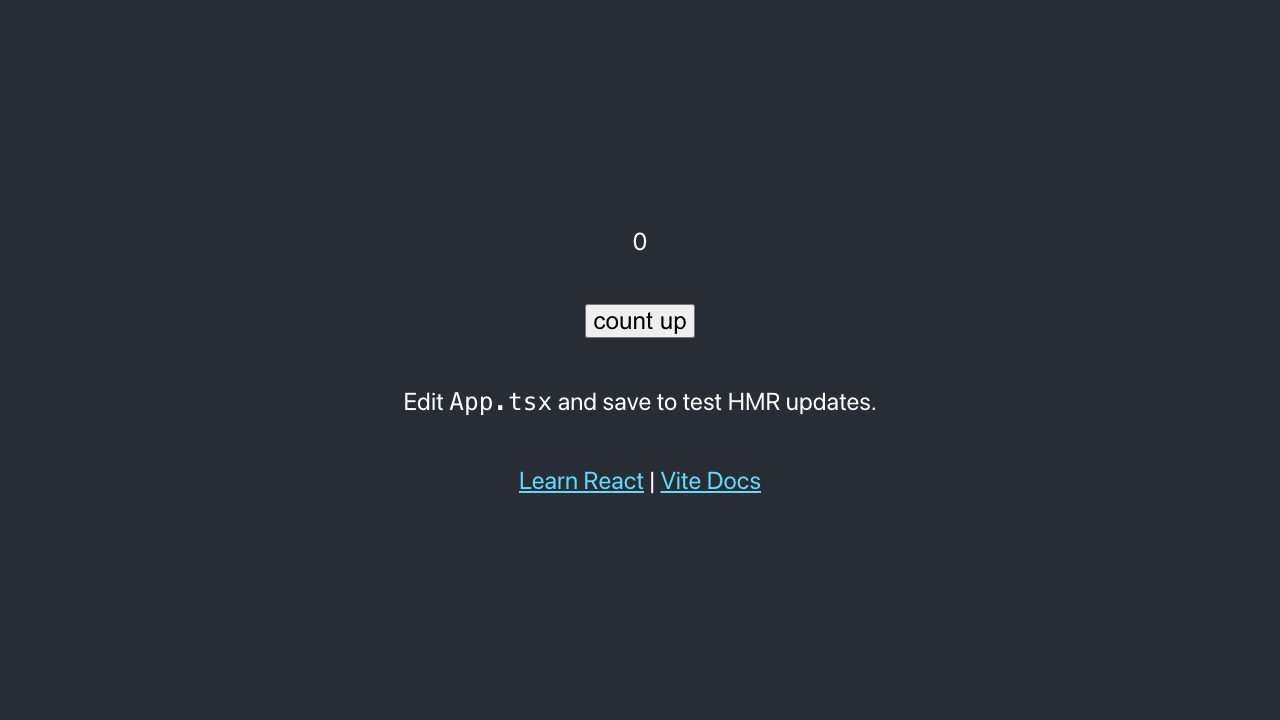
この状態で再度スクショを撮る。
yarn test:e2e:chromium src/tests/example.spec.ts
最終的にはこんな感じに。
ビジュアルリグレッションテストを実行する
実行してみる。
npx reg-suit run
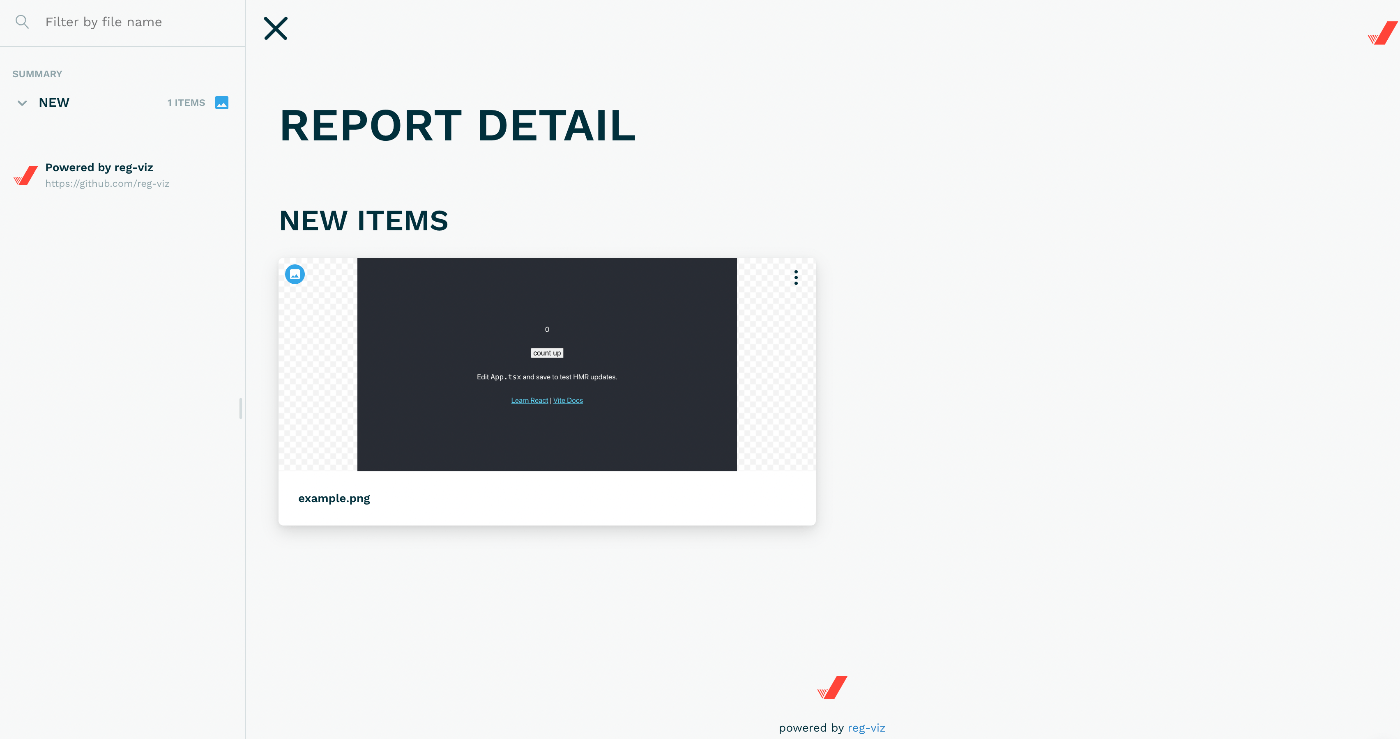
結果はこんな感じ。

Report URL が表示されているので、開いてみる。
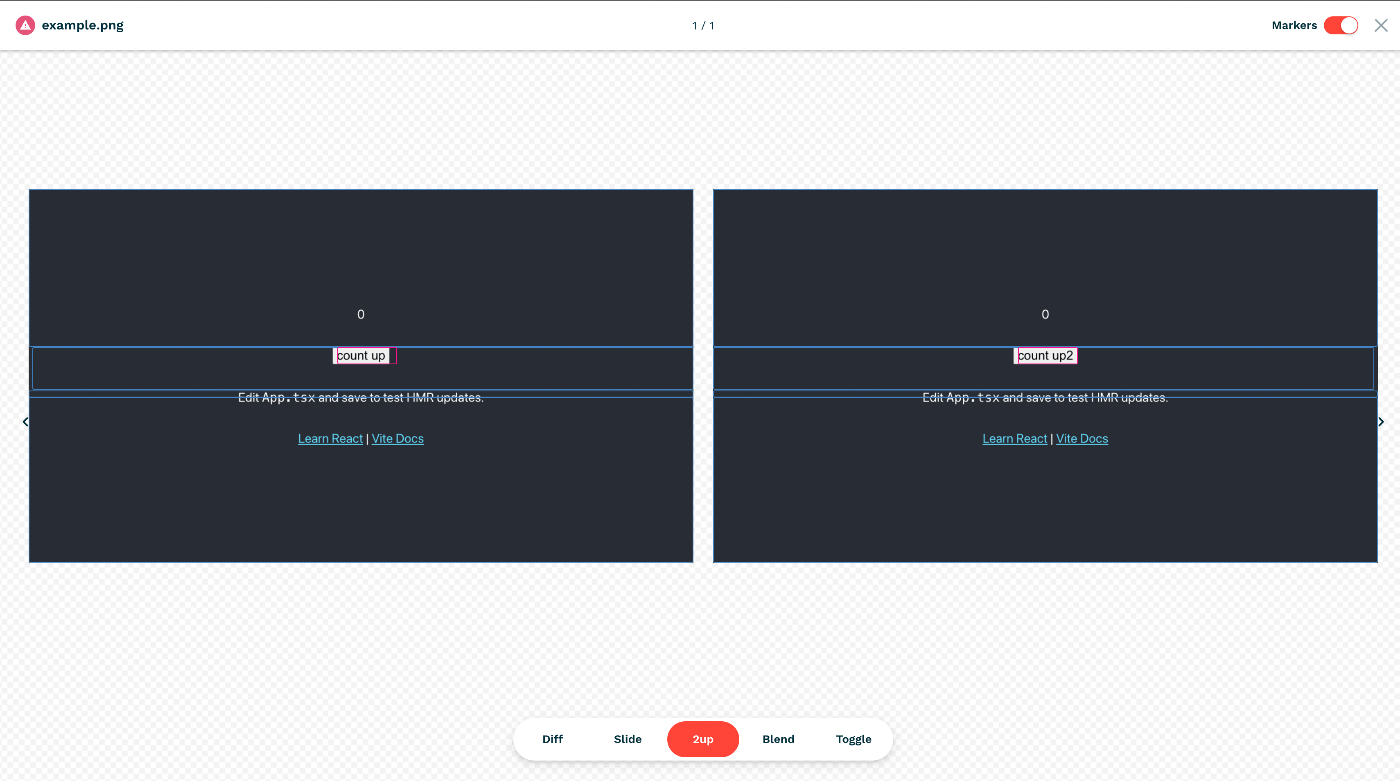
次は差分を出してみる。
先ほど、reg-keygen-git-hash-pluginを入れたので、比較対象は親ブランチのコミットになる。
そのため、今までの作業を一旦コミットして、ブランチを切る。
git checkout -b hoge
次は差分が出るようにアプリケーションコード側を修正する。
import { useState } from 'react'
import logo from './logo.svg'
import './App.css'

function App() {
  const [count, setCount] = useState(0)

  return (
    <div className="App">
      <header className="App-header">
        <p data-testid="count">{count}</p>
        <p>
          <button type="button" data-testid="count-up-button" onClick={() => setCount((count) => count + 1)}>
-         count up
+         count up2
          </button>
        </p>
        <p>
          Edit <code>App.tsx</code> and save to test HMR updates.
        </p>
        <p>
          <a
            className="App-link"
            href="https://reactjs.org"
            target="_blank"
            rel="noopener noreferrer"
          >
            Learn React
          </a>
          {' | '}
          <a
            className="App-link"
            href="https://vitejs.dev/guide/features.html"
            target="_blank"
            rel="noopener noreferrer"
          >
            Vite Docs
          </a>
        </p>
      </header>
    </div>
  )
}

export default App
この状態で再度、スクショを撮る & ビジュアルリグレッションテストを実行する。
yarn test:e2e:chromium src/tests/example.spec.ts
npx reg-suit run
Changed items が 1 になってる👍

再度、Report URL を開いてみる。
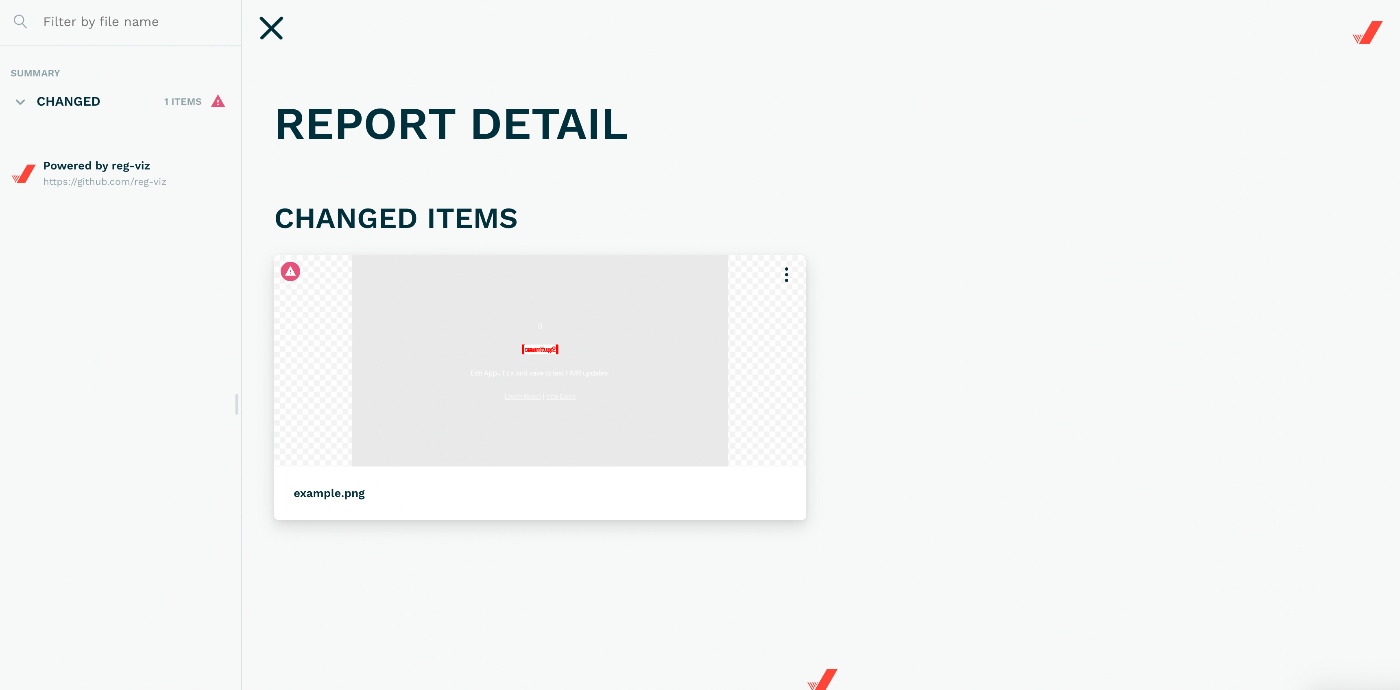
差分を確認できた🎉
GitHub Actions でビジュアルリグレッションテストを実行する
TODO