Django Ninjaで認証機能を追加
前回まではDjango Ninjaで基本的なCRUDを実装してきましたが、今回は認証機能を実装していきます。
※前回までの記事はこちら※
スキーマの設定
schemaは前回までに作成したCustomUserモデルをベースに作成し、後から利用するTokenに関するschemaも設定しておきます。
CustomUserの設定はこちらの記事を参照してください。
コードはこちら
from .models import CustomUser
from ninja import ModelSchema, Schema

class CustomUserSchema(ModelSchema):
  class Meta:
    model = CustomUser
    exclude = ['password', 'last_login', 'birth_date']

class CustomUserOut(ModelSchema):
  class Meta:
    model = CustomUser
    fields = ['uuid', 'username', 'email', 'first_name', 'last_name']

class CreateCustomUser(Schema):
  username: str
  email: str
  password: str
  first_name: Optional[str]
  last_name: Optional[str]

class UpdateUser(Schema):
  username: Optional[str]
  email: Optional[str]
  first_name: Optional[str]
  last_name: Optional[str]
  is_active: Optional[bool]
  is_staff: Optional[bool]
  is_superuser: Optional[bool]

# token
class TokenSchema(Schema):
  access_token: str
  refresh_token: str
  token_type: str
CustomUserSchemaは基本的なschemaとして設定しています。
そしてDjango Ninjaの最大のメリットである、Djangoモデルからschemaを生成をするため、ModelSchemaクラスを渡して、schemaを作成しています。
詳細は公式ドキュメントを参照してください。
ModelSchemaクラスを渡すことで、Djangoで設定したモデルとそのフィールドを利用してschemaを生成できます。
また、今回のCustomUserSchemaは、DjangoのモデルであるCustomUserを使用しているため、json形式で出力するときに含めたくないフィールドも含まれています。
そのため、json形式に含めたくない(=外部に出したくないフィールド)をexcludeに配列で指定し、json形式での出力からは除いています。
このようにすることで、不要なフィールドや外部に出したくないフィールドを制限することができます。
また、CustomUserOutのschemaでは、同じようにModelSchemaを渡して、Djangoのモデルからschemaを生成していますが、fieldsを指定し、json形式で返したいフィールドだけを指定しています。
ここでは、5つのフィールドのみを指定しています。
Tokenスキーマについては、この後使用するために3つのフィールドを設定しています。
これはDjnagoのモデルを使用しませんので、Schemaクラスを渡しています。
認証のための処理
次に、認証を行うための処理を書いていきます。
Django Ninjaでの認証は、以下の公式ドキュメントとChatGPTを参考に設定しました。
必ずしも正解というわけではありませんので、適宜最適な方法で実装してください。
それでは、認証に必要なクラスを設定していきます。
コードはこちら
from .models import CustomUser
from ninja.security import HttpBearer
from jose import jwt

class JWTBearer(HttpBearer):
  def authenticate(self, request, token):
    try:
      # tokenを検証してペイロードを取得
      payload = jwt.decode(
        token,
        os.environ['SECRET_KEY'],
        algorithms = os.environ['ALGORITHM']
      )
      # uuidを取得してuserを取得
      user = CustomUser.objects.get(uuid = payload['uuid'])
      return user
    except Exception as e:
      return {
        'status_code': 401,
        'detail': 'トークンタイプが一致していません'
      }
公式ドキュメントにあるHTTP Bearerを使用して設定しています。
また、python-joseを使用したjwtの処理を追記し、渡されたtokenをdecodeして、ユーザー取得のためuuidを取り出しています。
そして、このように設定したクラスをAPI作成時に、各APIにauth引数として渡すことで設定したAPIに認証を必須とすることができるようになります。
また、Routerにauth引数を渡すことで、routerに紐づくすべてのAPIに認証機能を設定することができます。
from .crud import JWTBearer
router = Router(auth = JWTBearer())

(上記の例はauthorに関するAPIに認証を必須としたものです)
tokenの生成
認証にはjwtを使用したtoken認証としていますので、これに必要なaccess_tokenとrefresh_tokenを作成していきます。
コードはこちら
from datetime import datetime, timedelta

from .models import CustomUser

from ninja.security import HttpBearer

from jose import jwt

import os
from dotenv import load_dotenv # add

load_dotenv()

def create_access_token(user):
  # access_tokenの有効期限を3時間に設定
  expire = datetime.now() + timedelta(hours = 3)
  return encode_token(user, expire)

def create_refresh_token(user):
  # refresh_tokenの有効期限を1週間に設定
  expire = datetime.now() + timedelta(weeks = 1)
  return encode_token(user, expire)

def encode_token(user, expire):
  # JWTトークンのpayloadを設定
  payload = {
    'uuid':user.uuid,
    'exp': expire
  }

  # JWTトークンを生成して返す
  return jwt.encode(
    payload,
    os.environ['SECRET_KEY'],
    algorithm = os.environ['ALGORITHM']
  )
access_tokenの生成:create_access_token
refresh_tokenの生成:create_refresh_token
JWTtokenの生成:encode_token
としています。
APIの処理はこの後になりますが、ログインAPIを叩いた時に、userを取得することにするので、そのuserをこれらの関数に渡し、userからuuidを取り出し、tokenの生成に使用しています。
また、SECRET_KEYとALGORITHMは、使い回しができるようにかつ外部に漏れないように、.envファイルに記載しています。
なお、SECRET_KEYの生成は、以下のコマンドを実行します。
openssl rand -hex 32
これで生成されたSECRET_KEYを.envファイルに記録します。
APIの作成
それではAPIを作成していきます。
今回は、authorアプリケーション内に作成したapi.pyに書いていきAPIに原則認証が必要となるような設定にしていきます。
コードはこちら
from typing import List

from .models import CustomUser
from django.shortcuts import get_object_or_404
from django.contrib.auth import get_user

from ninja import Router
from .schemas import CustomUserOut, TokenSchema

from .crud import create_access_token, create_refresh_token, JWTBearer

router = Router(auth = JWTBearer())

@router.get('/author/{uuid}', response = CustomUserOut)
def get_author(request, uuid: str):
  author = get_object_or_404(CustomUser, uuid = uuid)
  return author

@router.get('/authors', response = List[CustomUserOut], auth = JWTBearer())
def get_authors(request):
  authors = CustomUser.objects.all()
  return authors

@router.post('/auth/login', response = TokenSchema, auth = None)
def login(request, email: str, password: str):
  user = CustomUser.objects.get(email = email)
  if user.check_password(password):
    access_token = create_access_token(user)
    refresh_token = create_refresh_token(user)
    return {
      'access_token': access_token,
      'refresh_token': refresh_token,
      'token_type': 'bearer'
    }
  else:
    return {
      'detail': 'Incorrect email or password'
    }

@router.get('/auth/get_login_user', auth = JWTBearer())
def get_login_user(request):
  login_user = get_user(request)
  if login_user.is_authenticated:
    return login_user
  else:
    return {
      'detail': 'User not authenticated.'
    }
ログインAPI
@router.post('/auth/login', response = TokenSchema, auth = None)
def login(request, email: str, password: str):
  user = CustomUser.objects.get(email = email)
  if user.check_password(password):
    access_token = create_access_token(user)
    refresh_token = create_refresh_token(user)
    return {
      'access_token': access_token,
      'refresh_token': refresh_token,
      'token_type': 'bearer'
    }
  else:
    return {
      'detail': 'Incorrect email or password'
    }
ログイン用のAPIではresponseとしてtokenを返す(取得する)ようにしますので、response引数にTokenSchemaを指定しています。
また、上記のとおり、ログイン用のAPIに関しては認証を不要とするので、auth引数にはNoneを指定し、認証を適用していません。
一方、routerではauthに先ほど書いたJWTBearerを指定していますので、ログイン用のAPI以外には、個別にauth引数を指定しなくても、基本的に認証が必要な設定となります。
処理の流れとしては、
- emailとpasswordを受け取りログイン処理をする
- ログインはemailに紐づくデータをCustomUserモデルから取得している
- userのpasswordをチェック(Djangoにデフォルトであるcheck_passwordを使用)し、問題なければ、access_tokenとrefresh_token、token_typeを返す
- passwordのチェックが通らなければ、emailまたはpasswordに誤りがあることを通知してる
という流れです。
authorの取得
authorの取得は、6種類用意しました。
(R6.4.1:post, put, deleteメソッドを追加しました)
コードはこちら
@router.get('/author/{uuid}', response = CustomUserOut)
def get_author(request, uuid: str):
  author = get_object_or_404(CustomUser, uuid = uuid)
  return author

@router.get('/authors', response = List[CustomUserOut])
def get_authors(request):
  authors = CustomUser.objects.all()
  return authors

@router.get('/auth/get_login_user', response = CustomUserOut)
def get_login_user(request: HttpRequest):
  login_user = request.auth
  if login_user.is_authenticated:
    return login_user
  else:
    return {
      'detail': 'User not authenticated.'
    }

@router.post('/create', response = CustomUserOut, auth = None)
def create_user(request, payload: CreateCustomUser):
  if CustomUser.objects.filter(email = payload.email).exists():
    return {
      'message': 'Email is already used. Please change email address.'
    }
  if CustomUser.objects.filter(username = payload.username).exists():
    return {
      'message': 'Username is already used. Please other username set.'
    }

  user = CustomUser(
    uuid = str(uuid.uuid4()) # uuidはデフォルトでuuid型になるためstrに変換
    username = payload.username,
    email = payload.email,
    first_name = payload.first_name,
    last_name = payload.last_name
  )
  user.set_password(payload.password)
  user.save()
  return user

@router.put('/author/{uuid}', response = CustomUserOut)
def update_author(request, uuid: str, payload: UpdateUser):
  author = get_object_or_404(CustomUser, uuid = uuid)
  for attr, value in payload.dict().items():
    setattr(author, attr, value)
  author.save()
  return author

@router.delete('/author/{uuid}')
def delete_author(request, uuid: str):
  author = get_object_or_404(CustomUser, uuid = uuid)
  author.delete()
  return {'message': 'success'}
いずれもGETメソッドなので特に難しいことはしていません。
認証が通ればauthorに関するデータを取得できるようにしています。
また、最後のget_login_userは、request.authを使用してログイン中のユーザーを取得しています(認証の確認はDjangoのis_authenticatedを使用)。
post, put, deleteはarticleで使用したAPIを流用しています。
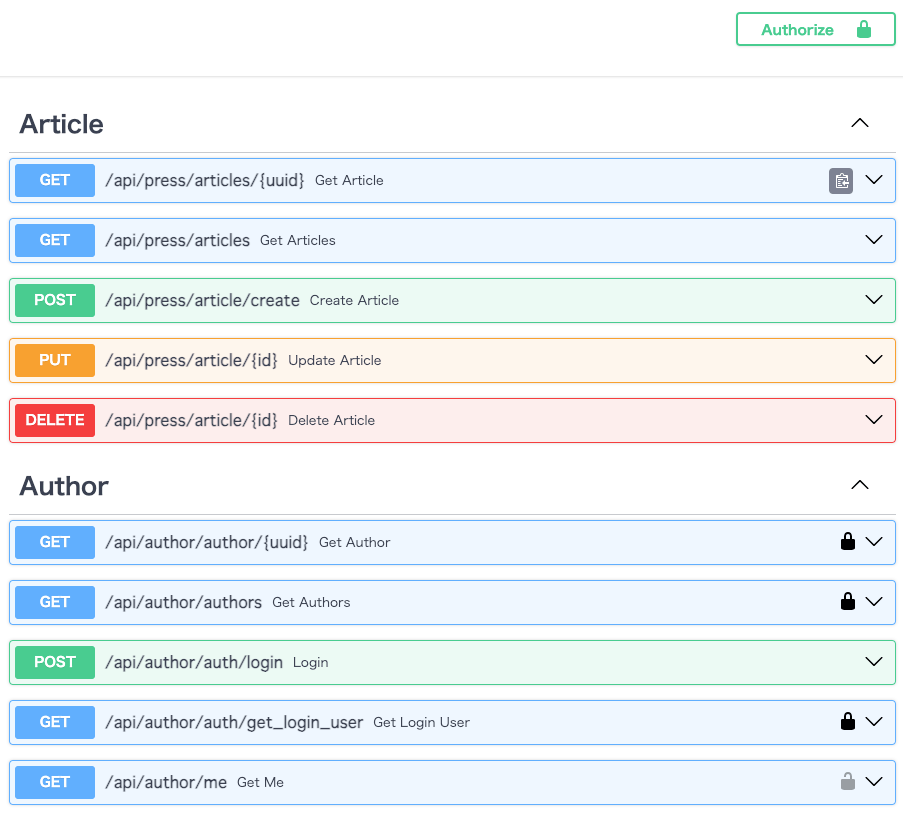
このような画面になればOKです(画像は認証後のものです)。
最後に
Django Ninjaでログイン処理を実装してみました。
まだ、refresh_tokenを使用していないことと、authorの更新や削除などのauthorに関するCRUD処理を設定できていないのがまだまだといったところです(今後この記事を更新していく予定です)。
CRUD処理を作ったならば、その後はフロントエンド(Next.jsかSveltkitまたはhonoxを検討中)から実際に情報を送信して、データの取得ができるかも試してみたいと思っています。
Discussion
能更新一下author的CRUD操作么?