StripeのFirebase ExtensionをEmulatorで起動する


StripeのFirebase Extension、Run Payments with Stripe。
Firebaseで作ったアプリにかんたんに決済機能をつけることができて、すごく便利ですよね。
ただ、以前まではEmulatorでExtensionを起動することができず、動作の確認に毎回デプロイする必要があり、デバッグが非常に困難でした。
ですが先日のFirebaseのイベントで、EmulatorがExtensionに対応することが発表されました🎉
本記事では、Run Payments with Stripeを例にFirebaseExtensionをEmulatorで起動する方法をご紹介します。
バージョン
firebase-tools: 11.14.1
firestore-stripe-payments: 0.3.1
以下のステップで進めていきます。
① Extensionの設定をエクスポート
② ngrokの起動とWebhookの設定
③ Webhookの作成とWebhook Secretの取得
④ Stripe APIキーの取得
⑤ .env.localを設定
⑥ 動作確認
① Extensionの設定をエクスポート
まず、ext:exportを使って、FirebaseプロジェクトからExtensionの設定をexportします。
まだプロジェクトにExtensionを追加していない場合は、こちらより追加してください。
# プロジェクトを切り替え
$ firebase use {{プロジェクトのID}}
Now using project {{プロジェクトのID}}
# 拡張機能をExport
$ yarn run firebase ext:export
...
✔  Wrote extensions to firebase.json...
✔  Wrote extensions/firestore-stripe-payments.env
インストールに成功すると、firebase.json にextensions が追加、設定ファイルがextensions/firestore-stripe-payments.env に作成されます。
{
  ...
+  "extensions": {
+    "firestore-stripe-payments": "stripe/firestore-stripe-payments@0.3.1"
+  }
}
CREATE_CHECKOUT_SESSION_MIN_INSTANCES=0
...
SYNC_USERS_ON_CREATE=Do not sync
この時点で、emulatorを起動すると、Extensionの関数が読み込まれることが確認できます🎉
$ firebase emulators:start
✔  functions[asia-northeast1-ext-firestore-stripe-payments-createCustomer]: auth function initialized.
✔  functions[asia-northeast1-ext-firestore-stripe-payments-createCheckoutSession]: firestore function initialized.
✔  functions[asia-northeast1-ext-firestore-stripe-payments-createPortalLink]: http function initialized (http://localhost:5001/nitte-dev/asia-northeast1/ext-firestore-stripe-payments-createPortalLink).
✔  functions[asia-northeast1-ext-firestore-stripe-payments-handleWebhookEvents]: http function initialized (http://localhost:5001/nitte-dev/asia-northeast1/ext-firestore-stripe-payments-handleWebhookEvents).
✔  functions[asia-northeast1-ext-firestore-stripe-payments-onUserDeleted]: auth function initialized.
✔  functions[asia-northeast1-ext-firestore-stripe-payments-onCustomerDataDeleted]: firestore function initialized.
② ngrokの起動とWebhookの設定
後ほど設定するWebhookを受け取るために、ngrokを起動しておきます。ポートはCloud Functionのポートを指定してください。
$ ngrok http -region=jp -host-header=\"localhost:5001\" 5001
...
Forwarding https://d49685931407.jp.ngrok.io -> http://localhost:5001
ローカルで起動したhandleWebhookEvents のURLのドメインをngrokのドメインで差し替えたものがWebhookを受け取るURLです。
http://localhost:5001/nitte-dev/asia-northeast1/ext-firestore-stripe-payments-handleWebhookEvents
↓
https://xxxxxx.jp.ngrok.io/nitte-dev/asia-northeast1/ext-firestore-stripe-payments-handleWebhookEvents
このURLをコピーしておいてください。
次のステップで使用します。
③ Webhookの作成とWebhook Secretの取得
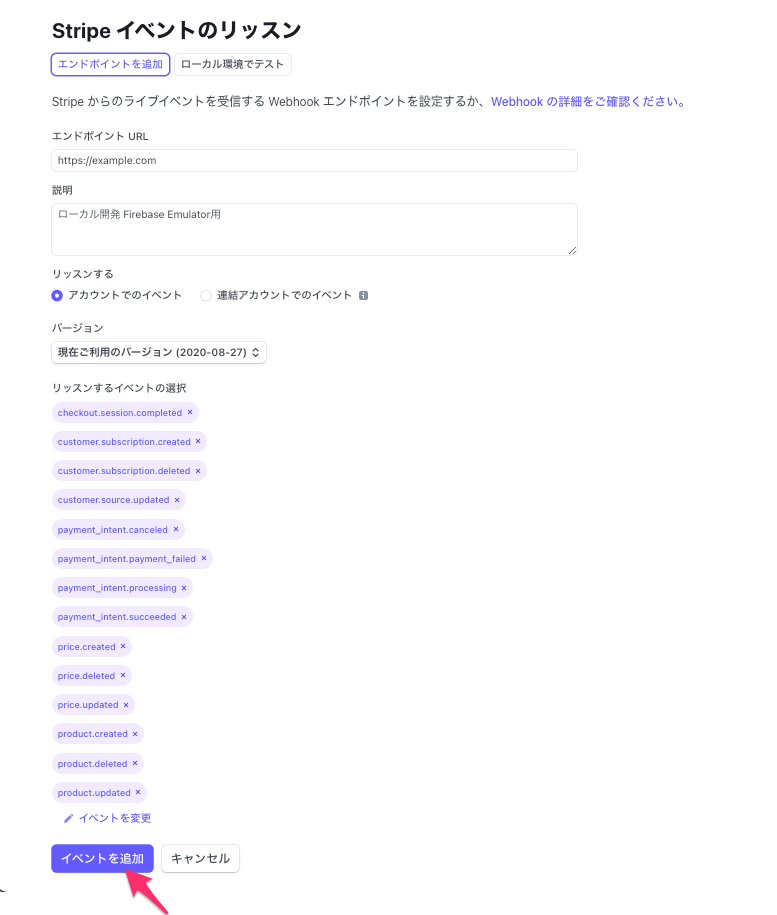
続いて、イベントを受け取るWebhookを作成します。
テスト環境用のWebhookのページにアクセスし、+エンドポイントを追加 を選択します。

Webhookを設定して、イベントを追加を選択します。
-
エンドポイントURL: ②で設定したngrokのURL
-
説明: なんでも
-
リッスンする: アカウントでのイベント
-
バージョン: デフォルト
-
リッスンするイベントの選択:
- checkout.session.completed
- customer.subscription.created
- customer.subscription.deleted
- customer.subscription.updated
- payment_intent.canceled
- payment_intent.payment_failed
- payment_intent.processing
- payment_intent.succeeded
- price.created
- price.deleted
- price.updated
- product.created
- product.deleted
- product.updated
— 請求書のデータをFirestoreと同期したい場合 —
- invoice.paid
- invoice.payment_succeeded
- invoice.payment_failed
- invoice.upcoming
- invoice.marked_uncollectible
- invoice.payment_action_required
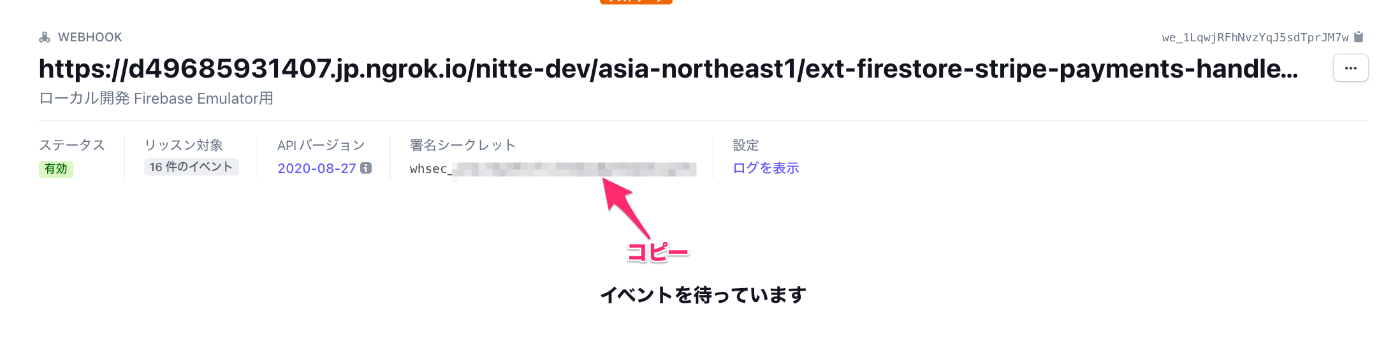
Webhookが作成できたら、署名シークレット > 表示 を選択して、WebhookSecretをコピーします。後ほど使うので、控えておいてください。
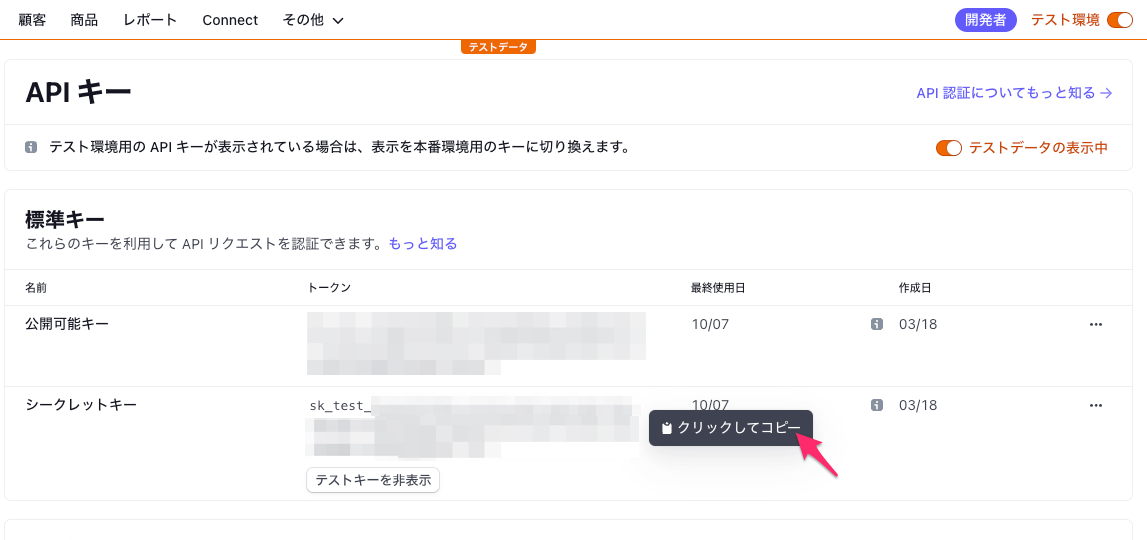
④ Stripe APIキーの取得
次にStripeのAPIキーを取得します。
テスト環境用のAPIキーのページにアクセスしてシークレットキー > テキストキーを表示 > 表示されたキーをクリックしてコピーします。後ほど使うので、控えておいてください。
⑤ .env.localを設定
EmulatorからWebhook SecretとStripe APIキーを取得できるように、extensionsディレクトリにfirestore-stripe-payments.secret.local を作成します。
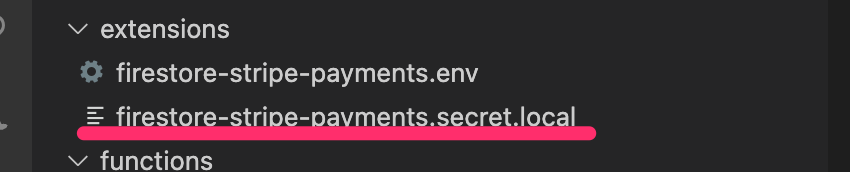
中身は先ほど取得したAPI KeyとWebhook Secretを入れます。
STRIPE_API_KEY=sk_test_xxxxx
STRIPE_WEBHOOK_SECRET=whsec_xxxxx
〜⚠.evvのSecretManagerからよしなに読んではくれない⚠️〜
.env.localを作成しなくても、.envに記載されているSecretManagerからよしなに読み込んでくれそうですが、筆者が試した時点では読み込み権限があるFirebaseアカウントでも読み込まれませんでした。
また、シークレットが読み込まれなくても、Emulator側では何のエラーも出さずに抜けてしまい、Stripe側でAPI Keyがないのでこけてしまいます。
>  {"severity":"INFO","message":"⚙️ Creating checkout session for doc [nNEzStB2wCK3QbX9FAg7]."}
>  {"severity":"INFO","message":"⚙️ Creating customer object for [0uwT7MhNb8pjHjJZ1DMPhW8z9Wct]."}
>  {"severity":"ERROR","message":"❗️[Error]: Failed to create customer for [0uwT7MhNb8pjHjJZ1DMPhW8z9Wct]: You did not provide an API key. You need to provide your API key in the Authorization header, using Bearer auth (e.g. 'Authorization: Bearer YOUR_SECRET_KEY'). See https://stripe.com/docs/api#authentication for details, or we can help at https://support.stripe.com/."}
>  {"severity":"ERROR","message":"❗️[Error]: Checkout session creation failed for doc [nNEzStB2wCK3QbX9FAg7]: Cannot read properties of null (reading 'stripeId')"}
今後修正されるとは思いますが、現時点では.local を作成する必要があります。
(Issueは起票しておきました。)
⑥ 動作確認
全ての準備が整いました!
エミュレータを起動して、Stripeの決済を行ってみましょう。
Emulatorのログに以下のようなログが表示されれば成功です🎉

少し手間ですが、大幅に開発効率が上がるのでやっておいて損はないでしょう!
Stripe以外のExtensionについても、同様の方法でEmulatorで起動できるので、試してみてください👍
Discussion