GoでTUIを作るためのtviewのレイアウトを試す
はじめに
マルチプラットフォームかつ、ターミナルで動作するツールを作るのにTUI(text user interface)を使おうと考え、Goではtviewというライブラリがメジャーなようなので使ってみることにしました。
自分へのメモ用も含めて、自分が作りたかったレイアウト構成を実現するにはどういったレイアウト設定をすればよいかを簡単な例から変更していった内容をまとめておきます。
この記事では、最終的にこんなTUIをサンプルとして作ります。
レイアウト構成
TextViewを1つだけ表示
一番基本的な例から徐々にレイアウトのパーツを追加していきます。
1つだけTextViewがあるような構成のコードです。

func createLayout() (layout *tview.Flex) {
	header := tview.NewTextView()
	header.SetBorder(true)
	header.SetText("tview study")
	header.SetTextAlign(tview.AlignCenter)

	layout = tview.NewFlex().SetDirection(tview.FlexRow).
		AddItem(header, 0, 1, false)

	return layout
}

func createApplication() (app *tview.Application) {
	app = tview.NewApplication()
	pages := tview.NewPages()

	layout := createLayout()
	pages.AddPage("main", layout, true, true)

	app.SetRoot(pages, true)
	return app
}

func main() {
	runewidth.DefaultCondition = &runewidth.Condition{EastAsianWidth: false}

	app := createApplication()

	if err := app.Run(); err != nil {
		panic(err)
	}
}
header.SetBorder(true)で枠付き、falseにすると枠無しになります。
	layout = tview.NewFlex().SetDirection(tview.FlexRow).
		AddItem(header, 0, 1, false)
のAddItem(header, 0, 1, false)の第2引数の0を0以外にすると指定された行数に限定できます。
例えばこれはheaderとしてタイトルの表示に使うので、[AddItem(header, 3, 1, false)](https://pkg.go.dev/github.com/rivo/tview#Flex.AddItem)とすると表示はこうなります。

また、runewidth.DefaultCondition = &runewidth.Condition{EastAsianWidth: false}は
文字のサイズ設定用に実行していますが、tviewのレイアウトには関係ないです。
ListとTableの追加
TUIの画面上では、左側にコマンドのList、右側に情報表示用のTableを表示します。
そこまで追加した場合のコードです。

func createCommandList() (commandList *tview.List) {
	commandList = tview.NewList()
	commandList.SetBorder(true).SetTitle("Command")
	return commandList
}

func createInfoPanel(app *tview.Application) (infoPanel *tview.Flex) {

	infoTable := tview.NewTable()
	infoTable.SetBorder(true).SetTitle("Information")

	cnt := 0
	infoTable.SetCellSimple(cnt, 0, "Data1:")
	infoTable.GetCell(cnt, 0).SetAlign(tview.AlignRight)
	info1 := tview.NewTableCell("aaa")
	infoTable.SetCell(cnt, 1, info1)
	cnt++

	infoTable.SetCellSimple(cnt, 0, "Data2:")
	infoTable.GetCell(cnt, 0).SetAlign(tview.AlignRight)
	info2 := tview.NewTableCell("bbb")
	infoTable.SetCell(cnt, 1, info2)
	cnt++

	infoTable.SetCellSimple(cnt, 0, "Time:")
	infoTable.GetCell(cnt, 0).SetAlign(tview.AlignRight)
	info3 := tview.NewTableCell("0")
	infoTable.SetCell(cnt, 1, info3)
	cnt++

	infoPanel = tview.NewFlex().SetDirection(tview.FlexRow).
		AddItem(infoTable, 0, 1, false)

	return infoPanel
}

func createLayout(cList tview.Primitive, recvPanel tview.Primitive) (layout *tview.Flex) {
	bodyLayout := tview.NewFlex().SetDirection(tview.FlexColumn).
		AddItem(cList, 20, 1, true).
		AddItem(recvPanel, 0, 1, false)

	header := tview.NewTextView()
	header.SetBorder(true)
	header.SetText("tview study")
	header.SetTextAlign(tview.AlignCenter)

	layout = tview.NewFlex().SetDirection(tview.FlexRow).
		AddItem(header, 3, 1, false).
		AddItem(bodyLayout, 0, 1, true)

	return layout
}

func createApplication() (app *tview.Application) {
	app = tview.NewApplication()
	pages := tview.NewPages()

	infoPanel := createInfoPanel(app)

	commandList := createCommandList()
	commandList.AddItem("Test", "", 'p', nil)
	commandList.AddItem("Quit", "", 'q', func() {
		app.Stop()
	})
	layout := createLayout(commandList, infoPanel)
	pages.AddPage("main", layout, true, true)

	app.SetRoot(pages, true)
	return app
}
	commandList := createCommandList()
	commandList.AddItem("Test", "", 'p', nil)
	commandList.AddItem("Quit", "", 'q', func() {
		app.Stop()
	})
この部分でコマンドのリストを作成します。
AddItem()の第4引数で関数を指定するとList選択時に関数の呼び出しができます。
Quitを選択するとTUI自体が終了します。
例えばここで
commandList.AddItem("Test", "", 'p', testCommand(pages))と変更して、以下のコードを追加すると
func createModalForm(pages *tview.Pages, form tview.Primitive, height int, width int) tview.Primitive {
	modal := tview.NewFlex().SetDirection(tview.FlexColumn).
		AddItem(nil, 0, 1, false).
		AddItem(tview.NewFlex().SetDirection(tview.FlexRow).
			AddItem(nil, 0, 1, false).
			AddItem(form, height, 1, true).
			AddItem(nil, 0, 1, false), width, 1, true).
		AddItem(nil, 0, 1, false)
	return modal
}

func testCommand(pages *tview.Pages) func() {
	return func() {
		cancelFunc := func() {
			pages.SwitchToPage("main")
			pages.RemovePage("modal")
		}

		onFunc := func() {
			pages.SwitchToPage("main")
			pages.RemovePage("modal")
		}

		form := tview.NewForm()
		form.AddButton("ON", onFunc)
		form.AddButton("Cancel", cancelFunc)
		form.SetCancelFunc(cancelFunc)
		form.SetButtonsAlign(tview.AlignCenter)
		form.SetBorder(true).SetTitle("Test")
		modal := createModalForm(pages, form, 13, 55)
		pages.AddPage("modal", modal, true, true)
	}
}
コマンドごとのメニューを表示し、そこでボタンごとの関数を呼び出すことができます。

Information側の表示は、既出のcreateInfoPanel()で行っています。

これで基本的な表示の構成はできました。
さらに細かく分割したい場合には、
	infoPanel = tview.NewFlex().SetDirection(tview.FlexRow).
		AddItem(infoTable, 0, 1, false)
とするときなどに、AddItem()で追加すればいいです。
例えば、createInfoPanel()に
	outputTable := tview.NewTable()
	outputTable.SetBorder(true).SetTitle("Information")

	cnt = 0
	outputTable.SetCellSimple(cnt, 0, "Output:")
	outputTable.GetCell(cnt, 0).SetAlign(tview.AlignRight)
	output := tview.NewTableCell("123")
	outputTable.SetCell(cnt, 1, output)

	infoPanel = tview.NewFlex().SetDirection(tview.FlexRow).
		AddItem(infoTable, 0, 1, false).
		AddItem(outputTable, 0, 1, false)
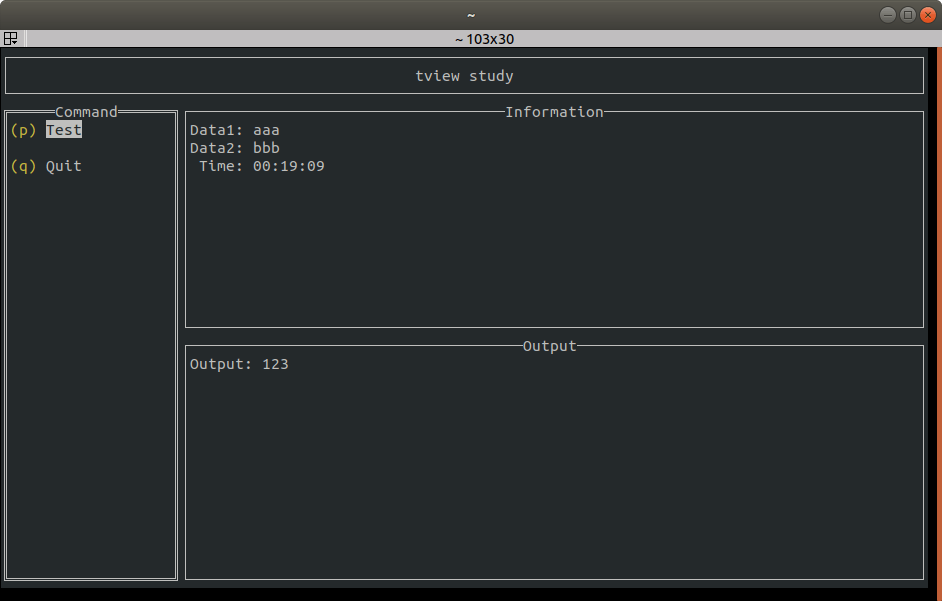
を追加すると、このようになります。

informationのパラメータ更新
最後に、information内のパラメータの更新を行います。
例として、現在時刻を表示するためのコードを追加します。
QueueUpdateDraw()で表示するパラメータを更新してTUIの表示を更新できます。
type ui struct {
	app     *tview.Application
	curTime *tview.TableCell
}

const refreshInterval = 500 * time.Millisecond

func currentTimeString() string {
	t := time.Now()
	return fmt.Sprintf(t.Format("15:04:05"))
}

func updateTime(u *ui) {
	for {
		time.Sleep(refreshInterval)
		u.app.QueueUpdateDraw(func() {
			u.curTime.SetText(currentTimeString())
		})
	}
}
createInfoPanel()のTimeの表示だけ変更します。
	infoTable.SetCellSimple(cnt, 0, "Time:")
	infoTable.GetCell(cnt, 0).SetAlign(tview.AlignRight)
	u.curTime = tview.NewTableCell("0")
	infoTable.SetCell(cnt, 1, u.curTime)
goroutineでupdateTime()を実行します。
func createApplication() (app *tview.Application) {
	app = tview.NewApplication()
	pages := tview.NewPages()

	ui := &ui{}
	ui.app = app
	infoPanel := createInfoPanel(app, ui)

	commandList := createCommandList()
	commandList.AddItem("Test", "", 'p', testCommand(pages))
	commandList.AddItem("Quit", "", 'q', func() {
		app.Stop()
	})
	layout := createLayout(commandList, infoPanel)
	pages.AddPage("main", layout, true, true)

	go updateTime(ui)
	app.SetRoot(pages, true)
	return app
}
これで500msごとに時刻(Time)が更新されるようになりました。
さいごに
TUIちょっとやってみると簡単なメニュー的な構成は結構シンプルに作れそうでしたし、Goならそれでもマルチプラットフォームで使えるのは良さそうです。
このコードもgoosでwindows指定にすれば、powershellでも.exe付きのバイナリであれば同様に動作しました。
ただ表示と時間がかかる処理の実行が混在するとgoroutineを正しく使わないと池無さそうな印象です。
今回のソースコードはこちらです。
参考情報
tviewの使い方はこちらの方の記事が参考になりました。
tviewのwikiに具体的なDemoがあります。
Discussion