内部実装から理解するKotlin Coroutines:suspend関数・Continuation編
本記事は、Kotlin Coroutinesの基礎をすでに理解している中級者以上の開発者を対象とし、さらに理解を深めることを目的としたシリーズの一部です。
今回は、suspend関数と、それを支える概念であるContinuationについて解説します。
suspend関数は、Kotlin開発者であればほとんどの方が利用したことがあるでしょう。しかし、その仕組みがどのように実現されているかを正しく説明できる方は多くないのではないでしょうか。
本記事を通じて、読者がsuspend関数の内部実装をイメージできるようになり、より効率的に実装・デバッグ・レビューを行えるようになることを目指しています。
suspend関数とは何か
suspend関数は、Coroutineあるいは他のsuspend関数から呼び出すことができ、中断・再開可能な関数です。
以下にsuspend関数の一例を示します。
import kotlinx.coroutines.*

suspend fun helloWorld() {
    println("Hello")
    delay(1000)
    println("World!")
}
出力:
Hello
World!
これは、"Hello"と出力し、1秒後に"World!"と出力するsuspend関数です。
delay(1000)は1秒間待機する処理ですが、似た挙動を示すThread.sleep(1000)とは異なり、実行スレッドをブロックしません。中断されている間は、実行スレッドを別の処理に明け渡すことができます。また、再開時には、中断前のスレッドで再開されるとは限りません。
suspend関数の中断・再開を可能とする仕組み
では、先述したsuspend関数の仕組みがどのように実現されているのかを見ていきましょう。
suspend関数を中断・再開可能にしているのは、Continuation[2]と呼ばれるインスタンスです。
Kotlinコンパイラは、suspend関数をJava bytecodeへとコンパイルする際に、Continuationを用いた関数へと変換します。
冒頭に示した以下のコードをsuspendを使わない形に変えていくことによって、Continuationとは何かを解説していきます。
import kotlinx.coroutines.*

suspend fun helloWorld() {
    println("Hello")
    delay(1000)
    println("World!")
}
手始めに、Continuationを使わず、多くの方々に馴染み深いであろうCallback関数を使って、上記のサンプルコードを書き換えてみます。
import java.util.Timer
import java.util.concurrent.CountDownLatch
import kotlin.concurrent.schedule

fun helloWorld(onCompleted: () -> Unit) {
    println("Hello")
    delay(millis = 1000) {
        println("World!")
        onCompleted()
    }
}

private fun delay(millis: Long, onCompleted: () -> Unit) {
    Timer().schedule(delay = millis) { onCompleted() }
}

fun main() {
    val latch = CountDownLatch(1)
    helloWorld() {
        latch.countDown()
    }
    latch.await() // `latch.countDown()`が呼ばれるまでブロックする。
}
出力:
Hello
World!
Callback関数であるonCompletedを、非同期処理を行う下位の関数に渡すことで、呼び出し元での処理の中断・再開が可能となっています。この場合でも、suspend関数を使ったコードと同様の出力が得られています。
なお、上記のサンプルコードでは便宜上、"World!"が出力される前にmain関数が終了してしまわないよう、CountDownLatchを使って待機しています。
Continuationを使った方式も「下位の関数にオブジェクトを渡し、それに対する呼び出しを元に処理を再開する」という点において、Callback関数を使う方式と本質的には類似しています。
以下に、Continuationを用いた実装を示します。
ここでは、Callback関数の代わりに、Continuationのインスタンスを下位の関数に渡しています。
なお、このサンプルコードは、説明を分かりやすくするために極限まで簡略化した、いわば擬似コードです。実際のKotlinコンパイラが生成するコードはもっと複雑であることをご留意ください。
import java.util.Timer
import java.util.concurrent.CountDownLatch
import kotlin.concurrent.schedule
import kotlin.coroutines.Continuation
import kotlin.coroutines.CoroutineContext
import kotlin.coroutines.EmptyCoroutineContext

const val COROUTINE_SUSPENDED = -1

fun helloWorld(continuation: Continuation<Unit>): Any {
    return HelloWorldContinuation(continuation).resumeWith(Result.success(Unit))
}

private class HelloWorldContinuation(
    private val completion: Continuation<Unit>
) : Continuation<Unit> {
    private var label = 0

    override val context: CoroutineContext
        get() = completion.context

    override fun resumeWith(result: Result<Unit>) {
        when (label) {
            0 -> {
                println("Hello")
                label = 1
                delay(millis = 1000, continuation = this)
            }
            1 -> {
                println("World!")
                completion.resumeWith(Result.success(Unit))
            }
            else -> {
                throw IllegalStateException()
            }
        }
    }
}

private fun delay(millis: Long, continuation: Continuation<Unit>): Any {
    Timer().schedule(delay = millis) {
        continuation.resumeWith(Result.success(Unit))
    }
    return COROUTINE_SUSPENDED
}

fun main() {
    val latch = CountDownLatch(1)
    helloWorld(object : Continuation<Unit> {
        override val context: CoroutineContext
            get() = EmptyCoroutineContext

        override fun resumeWith(result: Result<Unit>) {
            latch.countDown()
        }
    })
    latch.await() // `latch.countDown()`が呼ばれるまでブロックする。
}
出力:
Hello
World!
元のsuspend関数、あるいはCallback関数を使ったケースと比べると、同様の出力は得られているものの、複雑なコードになっています。次のセクションで、このコードが実際に何をしているのか、そしてContinuationとは何であるのかを解説していきます。
Continuationを利用した中断・再開の流れ
上記のContinuationを使ったコードが何をおこなっているのか、順を追って解説していきましょう。
1. 関数が呼び出される
はじめに、helloWorld関数が呼び出されます。
元のsuspend関数と異なるのは、引数にContinuationが足されていることです。
実際のKotlinコンパイラも、このようにsuspend関数の引数にContinuationを追加します。
fun helloWorld(continuation: Continuation<Unit>): Any {
    return HelloWorldContinuation(continuation).resumeWith(Result.success(Unit))
}
まずは、関数定義のhelloWorld(continuation: Continuation<Unit>)の部分に着目します。
Continuationとは、端的に言えば「suspend関数の状態マシンを保持するインスタンス」と言えます。suspend関数は、中断・再開可能であるため、どこまで処理が進んだのか・次にどの処理に進むべきか、といった状態を管理する必要があります。「現在の状態」や「どのように状態遷移すべきか」を保持するのが、Continuationです。
Kotlinは、言語レベルでContinuationを定義しています[3]
ここで、helloWorld関数に渡されているContinuationは、呼び出し元のCoroutineあるいはsuspend関数に紐づくContinuationです。
helloWorld関数が中断あるいは完了したタイミングで、このContinuationに対してメソッドを呼び出すことで、呼び出し元のCoroutineあるいはsuspend関数を中断・完了することが可能となります。
2. 関数に紐づくContinuationオブジェクトが作られる
続いて、bodyのHelloWorldContinuation(continuation)の部分に着目すると、HelloWorldContinuationというオブジェクトが作られています。
suspend関数がbytecodeへとコンパイルされる際には、関数に紐づくContinuationクラスが定義されます。今回のサンプルコードでは、このクラスをHelloWorldContinuationと名づけています。
private class HelloWorldContinuation(
    private val completion: Continuation<Unit>
) : Continuation<Unit> {
}
3. 関数に紐づくContinuationインスタンスが起動される
続いて、作成されたHelloWorldContinuationに対してresumeWithメソッドが呼ばれています。これはsuspend関数の実行を開始・再開するためのメソッドです。
先ほども触れたように、Continuationとは、suspend関数の状態マシンを保持するインスタンスです。状態マシンを管理する上で要となっているのが、labelフィールドと、resumeWithメソッド内のswitch文の2つです。
private class HelloWorldContinuation(
    private val completion: Continuation<Unit>
) : Continuation<Unit> {
    private var label = 0

    override fun resumeWith(result: Result<Unit>) {
        when (label) {
            0 -> {
                println("Hello")
                label = 1
                delay(millis = 1000, continuation = this)
            }
            1 -> {
                println("World!")
                completion.resumeWith(Result.success(Unit))
            }
            else -> {
                throw IllegalStateException()
            }
        }
    }
}
デフォルトでは、labelは0となっています。そのため、初回のresumeWithメソッドの呼び出し時には、以下の範囲のコードのみが実行されます。つまり、delayを呼び出すところまで実行した後、helloWorldメソッドは中断されることが分かります。
また、label=0に紐づく範囲の処理が完了すると、labelが1になるということも、処理の再開時のキーポイントとなるため、頭の片隅に置いておいてください。
delayが内部で何をしているのかは、次のステップで解説します。
    override fun resumeWith(result: Result<Unit>) {
        when (label) {
            0 -> {
                println("Hello")
                label = 1
                delay(millis = 1000, continuation = this)
            }
        }
    }
4. 別のsuspend関数を呼び出す
delayもsuspend関数の一種であるため、Continuationを引数とする形で、bytecodeへとコンパイルされます。呼び出し元である、helloWorld関数に紐づくContinuation (HelloWorldContinuation) が、ここではContinuationとして渡されています。
今回のサンプルコードでは、説明のために簡略化したdelayメソッドを定義しました。
private fun delay(millis: Long, continuation: Continuation<Unit>): Any {
    Timer().schedule(delay = millis) {
        continuation.resumeWith(Result.success(Unit))
    }
    return COROUTINE_SUSPENDED
}
Timer().scheduleで、所定時間後にContinuationのresumeWithメソッドが呼ばれるよう、スケジューリングしています。
その後、即座にCOROUTINE_SUSPENDEDを返しています。つまり、3.のステップでdelayを呼び出した際には、返り値としてCOROUTINE_SUSPENDEDが返されることになります。
ここまで実行された後、一度helloWorld関数は中断されます。
その後、delayメソッド内で、ContinuationのresumeWithメソッドが呼ばれることで、再びhelloWorld関数の実行が再開されます。
5. 関数に紐づくContinuationインスタンスが再開される
前ステップで、delayメソッド内からContinuationのresumeWithメソッドが呼ばれました。
着目すべき点として、初回実行時とは異なり、今回はlabelが1に変わった状態でresumeWithが呼ばれます。
そのため、label=1に紐づく以下の範囲のコードが実行されることとなります。
    override fun resumeWith(result: Result<Unit>) {
        when (label) {
            1 -> {
                println("World!")
                completion.resumeWith(Result.success(Unit))
            }
        }
    }
}
ここでは、"World!"を出力したのち、これは呼び出し元のContinuationであるcompletionに対して、resumeWithを呼び出しています。
これによって、helloWorldメソッドの呼び出し元 (今回のサンプルコードではmain関数) に対して、再開を促すことができます。
以上の5つのステップで、helloWorld関数の実行が完了します。
この処理の流れを、模式図を用いて整理してみましょう。
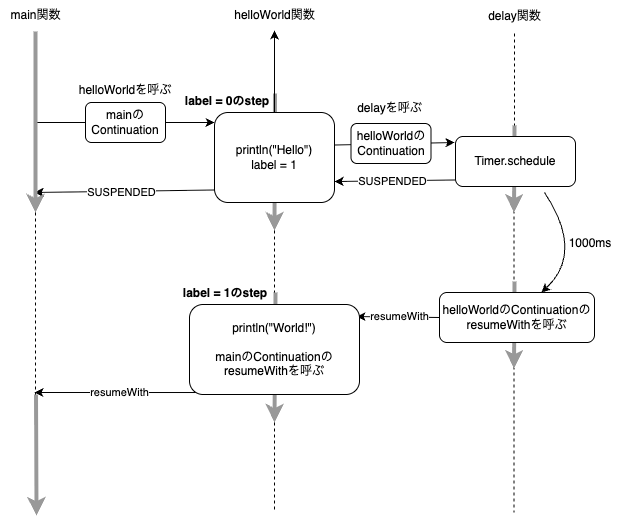
helloWorld関数の実行の流れ
この模式図を見ると、では大元のmain関数のContinuationはどのように作られるのか、という疑問が湧きます。これに関しては、後のセクションで解説します。
以上、suspend関数として定義されていたhelloWorldが、Kotlinコンパイラによってどのような関数へと変わるのか、そしてContinuationを用いることによってどのように中断・再開処理が実現されているのかを説明しました。要点を整理します。
- Kotlinコンパイラによって、suspend関数は、Continuationを引数に取る形へと変換される。
- suspend関数に紐づくContinutationが、Kotlinコンパイラによって生成される。このContinuationは、suspend関数の状態マシンを保持する。
-
Continuationは、labelフィールドによって、そのsuspend関数の処理がどこまで進んだかを管理する。 - 下位の関数へとContinuationが渡され、そのContinuationの
resumeWithメソッドが呼ばれることで、呼び出し元での処理が再開される。
suspend関数は実際にどのようなbytecodeへとコンパイルされるのか
前のセクションでは、擬似コードを使ってCSPの動作原理を解説しました。ただ、実際にKotlinコンパイラが生成するbytecodeは、もっと複雑なものです。
IntelliJ IDEAには、Kotlinコードから生成されるbytecodeをプレビュー表示し、さらにそれをJavaコードへとdecompileする機能があります。
そこで、Kotlinコンパイラによって、suspend関数が実際にはどのようなbytecodeへと変換されるのかも確認してみましょう
以下のKotlinコードをbytecodeに変換し、さらにdecompileしてJavaコード化します。
import kotlinx.coroutines.delay

suspend fun helloWorld() {
    println("Hello")
    delay(1000)
    println("World!")
}
すると、以下のようなJavaコードが得られます。
public final class HelloWorldKt {
   @Nullable
   public static final Object helloWorld(@NotNull Continuation $completion) {
      Continuation $continuation;
      label20: {
         if ($completion instanceof <undefinedtype>) {
            $continuation = (<undefinedtype>)$completion;
            if (($continuation.label & Integer.MIN_VALUE) != 0) {
               $continuation.label -= Integer.MIN_VALUE;
               break label20;
            }
         }

         $continuation = new ContinuationImpl($completion) {
            // $FF: synthetic field
            Object result;
            int label;

            @Nullable
            public final Object invokeSuspend(@NotNull Object $result) {
               this.result = $result;
               this.label |= Integer.MIN_VALUE;
               return HelloWorldKt.helloWorld((Continuation)this);
            }
         };
      }

      Object $result = $continuation.result;
      Object var3 = IntrinsicsKt.getCOROUTINE_SUSPENDED();
      switch ($continuation.label) {
         case 0:
            ResultKt.throwOnFailure($result);
            System.out.println("Hello");
            $continuation.label = 1;
            if (DelayKt.delay(1000L, $continuation) == var3) {
               return var3;
            }
            break;
         case 1:
            ResultKt.throwOnFailure($result);
            break;
         default:
            throw new IllegalStateException("call to 'resume' before 'invoke' with coroutine");
      }

      System.out.println("World!");
      return Unit.INSTANCE;
   }
}
深く説明しませんが、「suspend関数の引数にContinuationが足されていること」「labelフィールドで処理をswitchしていること」「delayメソッドに、helloWorld関数に紐づくContinuationを引数として渡されていること」など、以前に説明した要素が実際に含まれていることが分かります。
suspendCoroutineの内部実装
Kotlin Coroutineに馴染みがある方であれば、Callbackベースの非同期処理をsuspend関数へと変換するために、suspendCoroutineあるいはsuspendCancellableCoroutineを使えることはご存知でしょう。
例えば、以下のような、Callbackベースの非同期処理が存在するとします。
private fun <T> someAsyncFunc(onCompleted: (result: Result<T>) -> Unit) {
    // implementation goes here
}
suspendCoroutineを用いることで、以下のようにsuspend関数としてインタフェースを公開することができます。
private fun <T> someAsyncFunc(onCompleted: (result: Result<T>) -> Unit) {
    // implementation goes here
}

suspend fun <T> someAsyncFunc(): T = suspendCoroutine { cont ->
    someAsyncFunc<T> { result ->
        result.onSuccess { value ->
            cont.resume(value)
        }.onFailure { exception ->
            cont.resumeWithException(exception)
        }
    }
}
他の例として、kotlinx.coroutines内で定義されているdelay関数も、内部的にはsuspendCancellableCoroutineを使っています。delay関数のソースコードを以下に示します[4]。
public suspend fun delay(timeMillis: Long) {
    if (timeMillis <= 0) return // don't delay
    return suspendCancellableCoroutine sc@ { cont: CancellableContinuation<Unit> ->
        // if timeMillis == Long.MAX_VALUE then just wait forever like awaitCancellation, don't schedule.
        if (timeMillis < Long.MAX_VALUE) {
            cont.context.delay.scheduleResumeAfterDelay(timeMillis, cont)
        }
    }
}
このように、suspendCoroutineあるいはsuspendCancellableCoroutineは、suspend関数に関わる重要なパーツです。
このセクションでは、suspend関数への理解を更に深めるべく、suspendCoroutineの内部実装を追っていきます。
suspendCoroutineのソースコードを以下に示します[5]。
public suspend inline fun <T> suspendCoroutine(crossinline block: (Continuation<T>) -> Unit): T {
    contract { callsInPlace(block, InvocationKind.EXACTLY_ONCE) }
    return suspendCoroutineUninterceptedOrReturn { c: Continuation<T> ->
        val safe = SafeContinuation(c.intercepted())
        block(safe)
        safe.getOrThrow()
    }
}
内部ではsuspendCoroutineUninterceptedOrReturnを利用して、Continuationを取得していることが分かります。
このsuspendCoroutineUninterceptedOrReturnのソースコードを見ると、 NotImplementedErrorが投げられており、ソースコード上には実装が存在しません[6]
public suspend inline fun <T> suspendCoroutineUninterceptedOrReturn(crossinline block: (Continuation<T>) -> Any?): T {
    contract { callsInPlace(block, InvocationKind.EXACTLY_ONCE) }
    throw NotImplementedError("Implementation of suspendCoroutineUninterceptedOrReturn is intrinsic")
}
例外のメッセージにはImplementation of suspendCoroutineUninterceptedOrReturn is intrinsicとあり、Kotlinコンパイラがビルド時に変換を加えるものと考えられます。
ソースコードからはsuspendCoroutineの内部実装が判明しなかったため、アプローチを変えましょう。
代替案として、リバースエンジニアリング的に、suspendCoroutineを使った関数をbytecodeに変換し、そのbytecodeをdecompileしたコードを見てみることとします。
以下のsuspendCoroutineを使ったサンプルコードで実験します。
コールバック関数を取る非同期処理 (ただし、簡略化のため実際は同期処理) をwrapして、suspend関数へと変換しているという想定です。
import kotlin.coroutines.resume
import kotlin.coroutines.suspendCoroutine

private fun someAsyncFunc(onCompleted: () -> Unit) {
    onCompleted()
}

suspend fun mySuspendFunc() {
    suspendCoroutine { cont ->
        someAsyncFunc { cont.resume(Unit) }
    }
}
IntelliJ IDEAの機能を利用して、上記のサンプルコードをbytecodeに変換し、更にそれをJavaコードへとdecompileしたところ、以下のようなコードが得られました。
public final class MySuspendFuncKt {
   private static final void someAsyncFunc(Function0 onCompleted) {
      onCompleted.invoke();
   }

   @Nullable
   public static final Object mySuspendFunc(@NotNull Continuation $completion) {
      SafeContinuation var2 = new SafeContinuation(IntrinsicsKt.intercepted($completion));
      final Continuation cont = (Continuation)var2;
      int var4 = 0;
      someAsyncFunc(new Function0() {
         public final void invoke() {
            Result.Companion var10001 = Result.Companion;
            cont.resumeWith(Result.constructor-impl(Unit.INSTANCE));
         }

         public Object invoke() {
            this.invoke();
            return Unit.INSTANCE;
         }
      });
      Object var10000 = var2.getOrThrow();
      if (var10000 == IntrinsicsKt.getCOROUTINE_SUSPENDED()) {
         DebugProbesKt.probeCoroutineSuspended($completion);
      }

      return var10000 == IntrinsicsKt.getCOROUTINE_SUSPENDED() ? var10000 : Unit.INSTANCE;
   }
}
以前説明したように、suspend関数がコンパイルされると、引数にContinuationが追加されます。
今回のmySuspendFuncの引数にも、Continuationが追加されていることが分かります。
また、suspendCoroutineのソースコードと見比べても、suspendCoroutineUninterceptedOrReturnに特有のロジックは見当たりません。
これらのことから、suspendCoroutineUninterceptedOrReturnは、本来はコンパイル時に追加されるContinuation引数を、コンパイル前のソースコード上で参照できるようにしているもの、と推察することができます。
大元のContinuationはどのように作られるのか
ここまでの説明で「コンパイル時にsuspend関数の引数にContinuationが足されること」ならびに「呼び出し元のContinuationが渡されること」を述べました。
では、大元のContinuationは、どのように作られるのでしょうか。
例えば、以下のようなコードでは、どこでsomeSuspendFuncに渡されるContinuationが作られるのでしょうか。
import kotlin.coroutines.*
import kotlinx.coroutines.*

suspend fun someSuspendFunc(/* コンパイル後には、Continuationを受け取る */) {
    suspendCoroutine { cont ->
        println(cont) // 受け取ったContinuationを出力する
        cont.resume(Unit)
    }
}

fun main() {
    runBlocking {
        launch {
            someSuspendFunc(/* コンパイル後には、Continuationが渡される */)
        }
    }
}
先に答えを述べると、runBlockingやlaunchのようなCoroutine Builderで大元のContinuationが作成されます。Coroutine Builderとは、Coroutineを起動する関数です。
一例として、launchのソースコードを以下に示します[8]。
public fun CoroutineScope.launch(
    context: CoroutineContext = EmptyCoroutineContext,
    start: CoroutineStart = CoroutineStart.DEFAULT,
    block: suspend CoroutineScope.() -> Unit
): Job {
    val newContext = newCoroutineContext(context)
    val coroutine = if (start.isLazy)
        LazyStandaloneCoroutine(newContext, block) else
        StandaloneCoroutine(newContext, active = true)
    coroutine.start(start, coroutine, block)
    return coroutine
}
LazyStandaloneCoroutineあるいはStandaloneCoroutine (いずれもAbstractCoroutineを継承する) に対して、startメソッドが呼び出されていることが分かります。
その後、細部は省略しますが、以下のような流れで、最終的にはcreateCoroutineUninterceptedメソッドが呼ばれます。
AbstractCoroutine.start[9] -> CoroutineStart.invoke[10] -> startCoroutineCancellable[11] -> createCoroutineUnintercepted[12]
createCoroutineUninterceptedのソースコードを以下に示します。
public actual fun <R, T> (suspend R.() -> T).createCoroutineUnintercepted(
    receiver: R,
    completion: Continuation<T>
): Continuation<Unit> {
    val probeCompletion = probeCoroutineCreated(completion)
    return if (this is BaseContinuationImpl)
        create(receiver, probeCompletion)
    else {
        createCoroutineFromSuspendFunction(probeCompletion) {
            (this as Function2<R, Continuation<T>, Any?>).invoke(receiver, it)
        }
    }
}
createCoroutineUninterceptedは、返り値としてContinuation<Unit>を返しています。
createCoroutineUninterceptedのDocumentationコメントを見ると、以下のようにあります。
To start executing the created coroutine, invoke
resume(Unit)on the returned [Continuation] instance.
The [completion] continuation is invoked when coroutine completes with result or exception.
このコメントから、createCoroutineUninterceptedで返されるContinuationが、launchが起動するCoroutineに紐づくContinuationであると考えられます。
すなわち、createCoroutineUninterceptedで返されたContinuationが、そのCoroutine内で呼ばれたsuspend関数に渡される、大元のContinuationであると推測されます。
次の学習ステップ
本記事では、suspend関数がどのように中断・再開可能となっているのかを、その内部実装から明らかにしました。
一方で、suspend関数に関わるトピックとして、本記事では触れていないものもあります。
例えば、suspend関数の中断・再開時には、何らかのスレッドあるいはスレッドプールへの割り当てが行われており、それはCoroutineContextやCoroutineDispatcherといった概念に支えられています。
これらについて更に詳しく学びたい方は、以下の記事も一読されることをお勧めします[13]。
-
Coroutines: https://kotlinlang.org/docs/coroutines-overview.html ↩︎
-
Continuation - Wikipedia: https://en.wikipedia.org/wiki/Continuation ↩︎
-
Continuationのインタフェース: https://github.com/JetBrains/kotlin/blob/bc0801e5de83f80756816a6428d66a802e2f9f18/libraries/stdlib/src/kotlin/coroutines/Continuation.kt#L16 ↩︎
-
delayのソースコード: https://github.com/Kotlin/kotlinx.coroutines/blob/f4f519b36734238ec686dfaec1e174086691781e/kotlinx-coroutines-core/common/src/Delay.kt#L121 ↩︎ -
suspendCoroutineのソースコード: https://github.com/JetBrains/kotlin/blob/2d95ece640699335b06372d76eae1eb31a357c7b/libraries/stdlib/src/kotlin/coroutines/Continuation.kt#L142 ↩︎ -
suspendCoroutineUninterceptedOrReturnのソースコード: https://github.com/JetBrains/kotlin/blob/2d95ece640699335b06372d76eae1eb31a357c7b/libraries/stdlib/src/kotlin/coroutines/intrinsics/Intrinsics.kt#L41 ↩︎ -
Kotlin Coroutinesの核心:Builder・CoroutineScope・Job・CoroutineContextの関係: https://zenn.dev/kaseken/articles/99d92a128cbc9a ↩︎
-
launchのソースコード: https://github.com/Kotlin/kotlinx.coroutines/blob/f4f519b36734238ec686dfaec1e174086691781e/kotlinx-coroutines-core/common/src/Builders.common.kt#L44 ↩︎ -
AbstractCoroutine.startのソースコード: https://github.com/Kotlin/kotlinx.coroutines/blob/f4f519b36734238ec686dfaec1e174086691781e/kotlinx-coroutines-core/common/src/AbstractCoroutine.kt#L133 ↩︎ -
CoroutineStart.invokeのソースコード: https://github.com/Kotlin/kotlinx.coroutines/blob/f4f519b36734238ec686dfaec1e174086691781e/kotlinx-coroutines-core/common/src/CoroutineStart.kt#L356 ↩︎ -
startCoroutineCancellableのソースコード: https://github.com/Kotlin/kotlinx.coroutines/blob/f4f519b36734238ec686dfaec1e174086691781e/kotlinx-coroutines-core/common/src/intrinsics/Cancellable.kt#L15 ↩︎ -
createCoroutineUninterceptedのソースコード: https://github.com/JetBrains/kotlin/blob/211397c931b69d467248d53fcaafe76d155f3ed4/libraries/stdlib/jvm/src/kotlin/coroutines/intrinsics/IntrinsicsJvm.kt#L157 ↩︎ -
内部実装から理解するKotlin Coroutines:CoroutineDispatcher編: https://zenn.dev/kaseken/articles/7d5531a8eb1eae ↩︎
Discussion