GitHub ActionsでDart Packageを公開する方法
本記事では、GitHub ActionsでDart Packageを公開する方法として、3つのパターンを紹介します。
基本編:タグを切った際に自動的に公開する
公式ドキュメントに沿うことで、「タグを切った際にDart Packageを自動的に公開する」という仕組みは、非常に簡単に作ることができます。
この方式は、以下の2つの手順でセットアップ可能です。
1. pub.dev上の、該当のDart PackageのAdminページで、GitHub Actionsからの公開を有効化
「Enable publishing from GitHub Actions」にチェックを入れ、必要な設定を行います。
詳細はDartの公式ドキュメントをご参照ください。
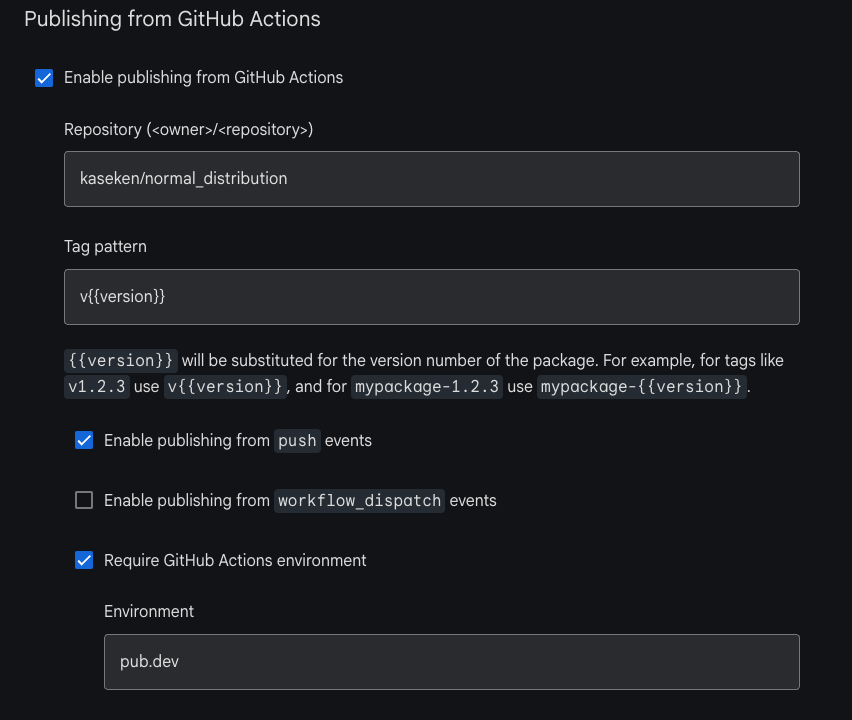
pub.devの設定の例
2. GitHub Actionsのworkflowを作成
Dartチームがメンテナンスしているdart-lang/setup-dart/.github/workflows/publish.ymlを利用すると、以下のようなシンプルなworkflowで済みます。
タグのパターンは、個々のパッケージのルールに応じて変更しましょう。
name: Publish to pub.dev

on:
  push:
    tags:
      - 'v[0-9]+.[0-9]+.[0-9]+' # tag-pattern on pub.dev: 'v{{version}}'

jobs:
  publish:
    runs-on: ubuntu-latest
    permissions:
      id-token: write # Required for authentication using OIDC
    uses: dart-lang/setup-dart/.github/workflows/publish.yml@v1
dart-lang/setup-dart/.github/workflows/publish.yml自体[1]も、中身は単純です。
Dart SDKとFlutter SDKのセットアップを行ったのち、dart pub publishコマンドでPackageの公開を行なっています。
jobs:
  publish:
    name: 'Publish to pub.dev'
    environment: ${{ inputs.environment }}
    permissions:
      id-token: write # This is required for requesting the JWT
    runs-on: ubuntu-latest
    steps:
      # Checkout repository
      - uses: actions/checkout@v4
      # Set up the Dart SDK and provision the OIDC token used for publishing.
      # The `dart` command from this step will be shadowed by the one from the
      # Flutter SDK below.
      - uses: dart-lang/setup-dart@e51d8e571e22473a2ddebf0ef8a2123f0ab2c02c
      # Download flutter SDK - needed for publishing Flutter packages. Can also
      # publish pure Dart packages.
      #
      # The dart binary from a Flutter SDK facilitates publishing both Flutter
      # and pure-dart packages.
      - uses: flutter-actions/setup-flutter@54feb1e258158303e041b9eaf89314dcfbf6d38a
      # Minimal package setup and dry run checks.
      - name: Install dependencies
        run: dart pub get
        working-directory: ${{ inputs.working-directory }}
      - name: Publish - dry run
        run: dart pub publish --dry-run
        working-directory: ${{ inputs.working-directory }}
      # Publishing...
      - name: Publish to pub.dev
        run: dart pub publish -f
        working-directory: ${{ inputs.working-directory }}
認証はOIDCで行われますが、permissionでid-token: writeを指定する以外の設定は不要です。OIDCのセットアップは、dart-lang/setup-dart内で行われます[2]。
Packageを公開可能なメンバーの制限方法
補足として、上に示したワークフローでは、リポジトリのwrite権限を持つメンバーであれば、誰でもPackageの公開が可能な状態となります。Packageを公開可能なメンバーを制限する方法として、公式ドキュメントでは以下の2つの方法が言及されています。
- GitHubの「tag protection rule」[3]により、所定のパターンのタグを切れるメンバーを限定する。
- GitHub Actionsのworkflowを所定のEnvironment[4]で実行し、そのEnvironment下のworkflow実行に制約を加える。
以上、「タグを切った際にDart Packageを自動的に公開する」という仕組みを構築する方法を解説しました。これは非常に簡単、かつ公式の推奨する認証方法に沿ったセキュアな方法です。
ただし、この方法には一つ問題点があります。
このworkflowの実行をトリガーするためには、GitHubのGUI上でタグを手動で作成する、あるいはCLIでgit tagおよびgit push --tagsを手動で行う必要があります。
タグの作成を別のGitHub Actions workflowで自動化した場合には、workflowがトリガーされません。このことを問題提起したのが、以下のissueです。
次のセクションでは、タグの作成も自動化したい場合の手段を紹介します。
応用編:タグの作成を自動化する場合
このセクションでは、Packageのversionが上がった際に、タグを自動的に作成し、同時にPackageの公開も行う仕組みの構築方法を紹介します。
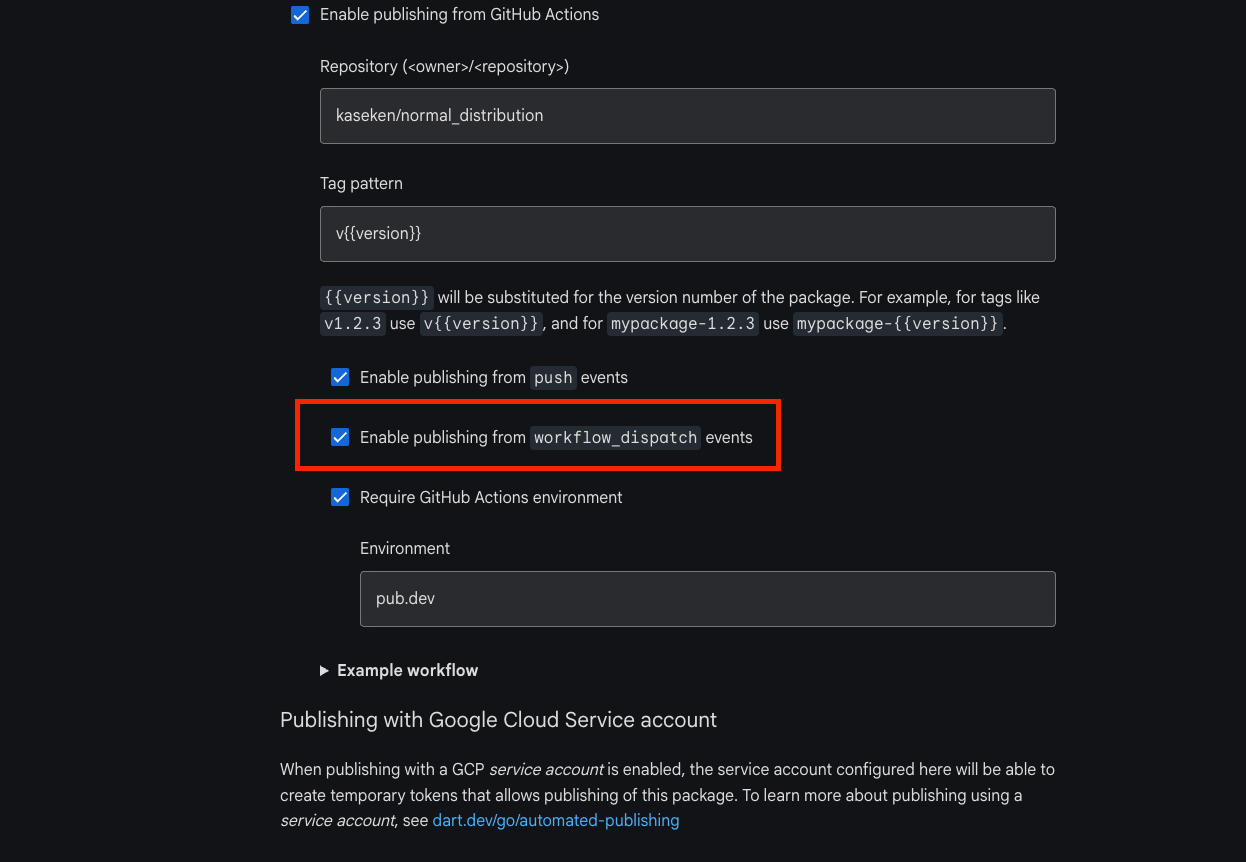
まず、pub.devのAdminページで、「Enable publishing from workflow_dispatch events」を有効化します。
続いて、以下の2つのGitHub Actions workflowを作成します。
- Packageのバージョンが上がった際に、新しいタグを切るworkflow
- Packageの公開を行うworkflow
1. Packageのバージョンが上がった際に、新しいタグを切るworkflow
以下にworkflowの例を示します。
name: Create Git Tag on Version Change
on:
  push:
    branches:
      - master
jobs:
  create-tag:
    runs-on: ubuntu-latest
    permissions:
      contents: write
      actions: write
    steps:
      - uses: actions/checkout@v4
        with:
          fetch-depth: 0
      - name: Check if version changed
        id: version_check
        run: |
          # Get current version from pubspec.yaml
          CURRENT_VERSION=$(grep '^version:' pubspec.yaml | cut -d' ' -f2)
          echo "Current version: $CURRENT_VERSION"

          # Check if this version tag already exists
          if git tag | grep -q "^v$CURRENT_VERSION$"; then
            echo "Tag v$CURRENT_VERSION already exists"
            echo "create_tag=false" >> $GITHUB_OUTPUT
          else
            echo "New version detected: $CURRENT_VERSION"
            echo "create_tag=true" >> $GITHUB_OUTPUT
            echo "version=$CURRENT_VERSION" >> $GITHUB_OUTPUT
          fi
      - name: Create Git tag
        if: steps.version_check.outputs.create_tag == 'true'
        run: |
          VERSION=${{ steps.version_check.outputs.version }}
          git config user.name "github-actions[bot]"
          git config user.email "github-actions[bot]@users.noreply.github.com"
          git tag -a "v$VERSION" -m "Release version $VERSION"
          git push origin "v$VERSION"
      - name: Trigger publish workflow
        if: steps.version_check.outputs.create_tag == 'true'
        run: |
          gh workflow run publish.yml --ref "refs/tags/v${{ steps.version_check.outputs.version }}"
        env:
          GH_TOKEN: ${{ secrets.GITHUB_TOKEN }}
まず、pubspec.yaml内のバージョンに相当するタグが存在するかをチェックします。存在しない場合には、そのバージョンは未リリースと見なされます。そして、リリースするバージョンのタグを作成します。
最後に、gh workflow run publish.yml --ref "refs/tags/v${{ steps.version_check.outputs.version }}"コマンドで、Packageの公開を行うworkflowを呼び出します。
2. Packageの公開を行うworkflow
トリガーをworkflow_dispatchに変更することで、他のworkflow経由での実行を可能とします。
この際、pub.devのAdminページで「Enable publishing from workflow_dispatch events」が有効化されている必要があります。
name: Publish to pub.dev
on:
  workflow_dispatch: # Enables to be triggered from other workflows.
jobs:
  publish:
    permissions:
      id-token: write # Required for authentication using OIDC
    uses: dart-lang/setup-dart/.github/workflows/publish.yml@v1
以上、タグの作成とPackageの公開の両方を自動化する方法を紹介しました。
最後に補足として、melos[5]を使用するプロジェクトにおける、タグの作成およびPackage公開の自動化方法について紹介します。
Appendix:melosでタグの作成・Package公開を自動化する方法
melosとは、複数のDart Projectをmonorepoとして管理するためのツールです。
このセクションでは、すでにmelosを使用しているプロジェクトにおいて、タグの作成・Package公開を自動化する方法を紹介します。
melosを使う場合のCIの構築方法に関しては、bluefireteam/melos-actionを利用する (あるいはこれを参考に実装する) のが簡単です。
前セクションと同様に、「タグの作成」「Packageの公開」という2つのworkflowを作成します。
1. Packageのバージョンが上がった際に、新しいタグを切るworkflow
melos-actionを利用することで、未公開のタグを探し、それらのタグに対してPackageを公開するworkflowを呼び出すことが可能です。melos-actionのリポジトリにサンプルコードが用意されています。
name: Tag and start release
on:
  push:
    branches: [main]

jobs:
  publish-packages:
    name: Create tags for release
    permissions:
      actions: write
      contents: write
    runs-on: [ ubuntu-latest ]
    if: contains(github.event.head_commit.message, 'chore(release)')
    steps:
      - uses: actions/checkout@v4
        with:
          fetch-depth: 0
      - uses: subosito/flutter-action@v2
      - uses: bluefireteam/melos-action@v3
        with:
          tag: true
      - run: |
          melos exec -c 1 --no-published --no-private --order-dependents -- \
          gh workflow run release-publish.yml \
          --ref \$MELOS_PACKAGE_NAME-v\$MELOS_PACKAGE_VERSION
        env:
          GH_TOKEN: ${{ secrets.GITHUB_TOKEN }}
tag: trueを指定してbluefireteam/melos-actionを実行することで、バージョンが更新されたDart Packageを抽出し、それらのタグを作成しています。
tag: trueでmelos-actionを実行した場合、内部では以下のようなステップが実行されています[6]。
    - name: 'Create and push tags to the repository'
      if: ${{ inputs.tag == 'true' }}
      run: |
        # We don't care about errors due to creating new tags (`|| true`)
        # since for all packages that didn't get a new release, the tag already exists.
        melos exec -c 1 ${{ (inputs.include-private == 'true' && '--private') || '--no-private' }} -- git tag \$MELOS_PACKAGE_NAME-v\$MELOS_PACKAGE_VERSION || true
        git push --tags
続いて、以下の部分で、新たに作成されたタグに対して、Packageの公開用のworkflowを順次呼び出しています。「応用編」で紹介した仕組みと、本質的には同様です。
melos exec -c 1 --no-published --no-private --order-dependents -- \
gh workflow run release-publish.yml \
--ref \$MELOS_PACKAGE_NAME-v\$MELOS_PACKAGE_VERSION
2. Packageの公開を行うworkflow
Packageの公開に関しても、melos-actionのリポジトリにサンプルコードが用意されています。
name: Publish packages
on:
  workflow_dispatch:

jobs:
  publish-packages:
    name: Publish packages
    permissions:
      contents: write
      id-token: write # Required for authentication using OIDC
    runs-on: [ ubuntu-latest ]
    steps:
      - uses: actions/checkout@v4
        with:
          fetch-depth: 0
      - uses: subosito/flutter-action@v2
      - uses: bluefireteam/melos-action@v3
        with:
          publish: true
publish: trueでbluefireteam/melos-actionが実行されています。
publish: trueでmelos-actionを実行した場合、内部では以下のようなステップが実行されています[7]。
    - name: 'Extract tag info'
      if: ${{ inputs.publish == 'true' }}
      env:
        GITHUBREF: ${{ github.ref }}
      # Support semver, e.g.: "refs/tags/my_package-v1.2.3+alpha.1"
      run: |
        PACKAGE_NAME=$(sed -E 's/refs\/tags\/([a-z0-9_]+)-v([0-9]+\.[0-9]+\.[0-9]+.*)$/\1/' <<< $GITHUBREF) && \
        echo "PACKAGE_NAME=$PACKAGE_NAME" >> $GITHUB_ENV
        echo "Package name: $PACKAGE_NAME"
      shell: bash
    - name: 'Installs the Dart SDK and sets up the pipeline for usage with pub.dev (this sets up OIDC)'
      if: ${{ inputs.publish == 'true' }}
      uses: dart-lang/setup-dart@v1
      with
        sdk: ${{ inputs.dart-version }}
    - name: 'Publish package related to tag to pub.dev'
      if: ${{ inputs.publish == 'true' }}
      run: melos publish -y --no-dry-run --scope=$PACKAGE_NAME
      shell: bash
まず、タグからpackage名を抽出します。続いて、melos publish -y --no-dry-run --scope=$PACKAGE_NAMEにより、そのタグに紐づくpackageに絞って、packageの公開を実行します。
melos publishコマンドは、デフォルトでは全ての未公開のタグに対して、Packageの公開を実行します。ただ、1つ目のステップで、各packageに対してこのworkflowが順次呼び出されているため、ここでは--scope=$PACKAGE_NAMEによって単一のPackageに範囲を限定する必要があります。
なお、melos publishは、内部的にはdart pub publishを利用しているため、基礎編・応用編と同様の仕組みに則ってPackageの公開が行われます。
-
dart-lang/setup-dart/.github/workflows/publish.yml: https://github.com/dart-lang/setup-dart/blob/fe21d53e1e27c70b5c8e8273d4bcc0d23c071577/.github/workflows/publish.yml#L22 ↩︎ -
dart-lang/setup-dartのcreatePubOIDCTokenメソッド: https://github.com/dart-lang/setup-dart/blob/fe21d53e1e27c70b5c8e8273d4bcc0d23c071577/lib/main.dart#L166 ↩︎ -
tag protection rule: https://docs.github.com/en/enterprise-server@3.15/repositories/managing-your-repositorys-settings-and-features/managing-repository-settings/configuring-tag-protection-rules ↩︎
-
Environment: https://docs.github.com/en/actions/how-tos/deploy/configure-and-manage-deployments/manage-environments#creating-an-environment ↩︎
-
melos: https://melos.invertase.dev ↩︎
-
tags: https://github.com/bluefireteam/melos-action/blob/9bcdb36f9a5556a10467a78aed2cc2e220f54035/action.yml#L116 ↩︎
-
publish: https://github.com/bluefireteam/melos-action/blob/9bcdb36f9a5556a10467a78aed2cc2e220f54035/action.yml#L124 ↩︎
Discussion