🌐
appsmithからWordPressへ記事投稿(REST API利用)


要旨
- ローコードツール「appsmith」で作成したフォームからWordPressへ記事投稿する
(WordPress提供の REST APIを利用)- 投稿用のAPI: wp/v2/posts
ゴール
- appsmithからWordPressへの記事投稿
この記事に書いてあること
- WordPress API有効化
- appsmithでのWordPress APIコールの設定内容
この記事に詳しく書いていないこと
- WordPressサーバ構築、インストール
- appsmithサーバ構築、インストール
- appsmithウィジェット作成
- 「test.local」名前解決のためのローカルDNSサーバ設定
環境・バージョン(2022/12/12 執筆時点)
WordPressサーバ
  OS          Ubuntu 22.04
  IP address  192.168.1.15/24  (test.localで名前解決できるようにしておく)

appsmithサーバ(Docker利用)
  OS          CentOS Linux release 7.9.2009 (Core)
  IP address  192.168.1.30/24

クライアント
  OS         macOS Ventura 13.0.1(22A400)
 Chrome     108.0.5359.98(Official Build) (x86_64)
構成イメージ

手順
0. 準備
0-1. WordPressサーバ構築 [WordPressサーバ]
- 以下記事の内容の通り、OSインストールやWordPressの導入・自己証明書の設定等を実施。
0-2. appsmithサーバ構築 [appsmithサーバ]
- サーバを用意。CentOS7のインストール。
- Dockerの導入。 docker-composeを利用したappsmithの導入。
http://192.168.1.30:8880 でappsmithの管理画面に入れるように設定。
docker-compose設定
docker-compose.yml
version: "3"

services:
  appsmith:
    image: index.docker.io/appsmith/appsmith-ce
    container_name: appsmith
    ports:
      - "8880:80"
    volumes:
      - ./stacks:/appsmith-stacks
    restart: unless-stopped
コマンド
docker-compose up -d
- appsmithの管理画面でアプリケーションを新規作成
0-3. DNS設定 [ローカルDNSサーバ]
- ローカルDNSサーバを設定して
「test.local」で「192.168.1.15」を名前解決できるようにしておく
1. WordPress設定 [WordPressサーバ]
- こちらを参考にWordPressでREST APIを有効化・設定。
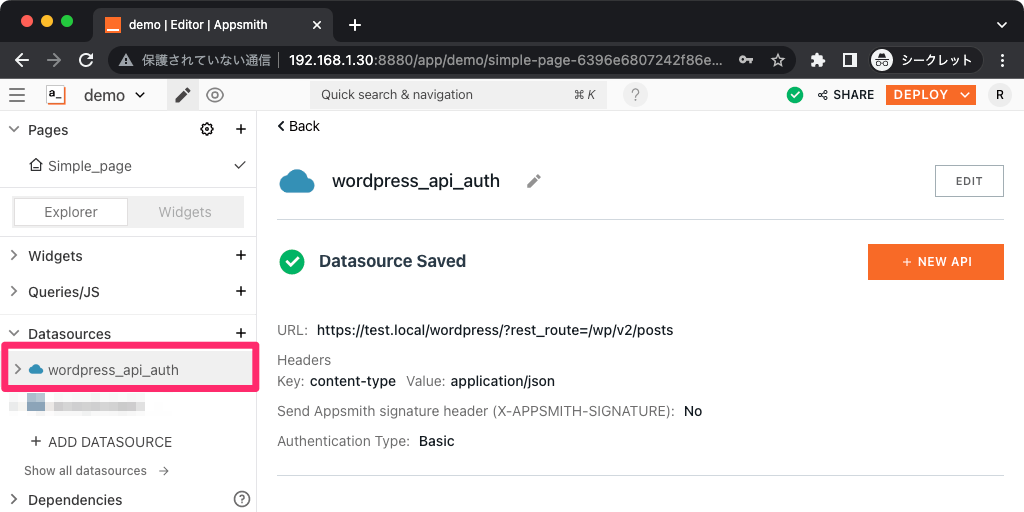
2. WordPress認証情報設定 [appsmithサーバ]
- 作成したappsmithアプリケーションで「Datasources」 > 「Authenticated API」を選択。
- 必要な情報を入力後、「Save」を押下して設定。
設定内容
■ 名前(例)
wordpress_api_auth

■ URL
https://test.local/wordpress/?rest_route=/wp/v2/posts
※ 「https://test.local/wordpress/"wp-json"/wp/」〜では404 NotFoundが返ってきた。

■ Headers
content-type  application/json

■ Authentication Type
Basic

■ Authentication (例)
Username : admin
Password : aaaa1111BBBB2222cccc3333

■ Certificate Details
[WordPressサーバ]で作成したルート証明書ファイル「rootCA.pem」をアップロードする
3. WordPress投稿設定 [appsmithサーバ]
- 作成したappsmithアプリケーションで
「Queries/JS」 > 「+」ボタン > 「New Blank API」を選択。 - 必要な情報を入力後、「Save」を押下して設定。
設定内容(例)
■ API名
Api1

■ Headers
設定無し (wordpress_api_authのHeaderを継承)

■ Params
なし

■ Body
{{
      {
          'title'   : "ここはタイトル",
          'content' : "ここは本文",
          'status'  : "publish"
      };
}}

- API単体で動作するか確認する。
Api1の編集画面右上の「Run」をクリックすると、WordPressのAPIをコールする。
APIコールが正常終了すると、記事ID等のresponseが返ってくる。

4. APIコールの仕組みを作成 [appsmithサーバ]
- 作成したアプリから作成したAPIをコールする。
ここでは、ButtonウィジェットのOnClickイベントでAPIをコールするようにする。 - ButtonウィジェットのOnClickイベントのリストをクリックし、
「Execute a query」 > 「Api1」を選択。

- アプリケーションをデプロイ。
5. 動作確認 [appsmithサーバ]
- 先程設定したボタンウィジェットをクリックし、
APIのコール・WordPressへの投稿を確認する。
参考
WordPressのAPIエンドポイント設定内容
WordPress API リファレンス
WordPress API有効化
docker-composeによるappsmith導入
Discussion