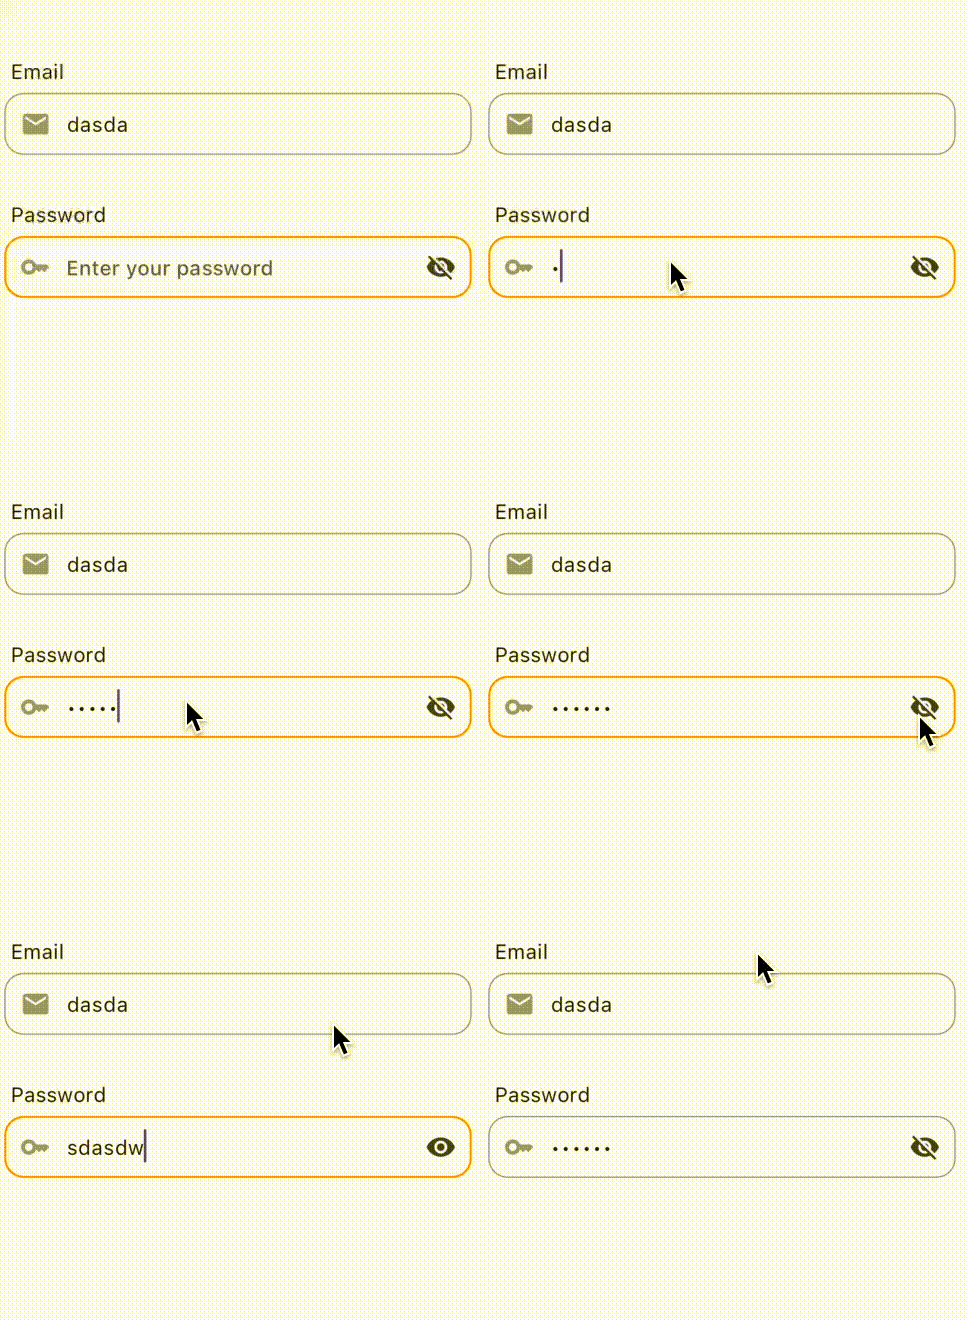
Flutterでログイン時のパスワードを目隠しする
今回のお題
Flutterでログイン画面を作るとき、パスワードを入力するTextFieldに目隠し機能を実装したいですよね。そんなわけで今回はログイン時に使えるTextFieldウィジェット(UIのみ)を作っていきます。
筆者のレベル
Flutter歴3週間くらいの駆け出しモバイルエンジニアです。玄人さんにはあまり参考にならないかもしれないです。
Step1.メールアドレスを入力できるUIを作成
まずはUIのみのWidgetを作成します。
import 'package:flutter/material.dart';
import 'package:flutter_hooks/flutter_hooks.dart';
class UiTextField extends HookWidget {
final String label;
final String placeholder;
final Function(String value) onChange;
final IconData icon;
final bool disabled;
const UiTextField({
Key? key,
required this.label,
required this.placeholder,
required this.onChange,
required this.icon,
this.disabled = false,
}) : super(key: key);
Widget build(BuildContext context) {
return Padding(
padding: const EdgeInsets.all(15),
child: Column(
crossAxisAlignment: CrossAxisAlignment.start,
children: [
Padding(
padding: const EdgeInsets.all(5),
child: Row(
crossAxisAlignment: CrossAxisAlignment.end,
children: [
Text(
label,
style: const TextStyle(
fontSize: 16,
),
),
],
),
),
TextField(
onChanged: (value) => onChange(value),
enabled: !disabled,
decoration: InputDecoration(
labelText: label,
hintText: placeholder,
floatingLabelBehavior: FloatingLabelBehavior.never,
contentPadding: const EdgeInsets.symmetric(
vertical: 10,
horizontal: 20,
),
enabledBorder: OutlineInputBorder(
borderSide: const BorderSide(
width: 1,
color: Colors.grey,
),
borderRadius: BorderRadius.circular(15),
),
focusedBorder: OutlineInputBorder(
borderSide: const BorderSide(
width: 1.5,
color: Colors.orange,
),
borderRadius: BorderRadius.circular(15),
),
disabledBorder: OutlineInputBorder(
borderSide: BorderSide(
width: 1,
color: Colors.grey.withOpacity(0.5),
),
borderRadius: BorderRadius.circular(15),
),
)),
],
),
);
}
}
ここまで作ると見た目はこんな感じ

これで呼び出すことができます。
UiTextField(
	label: 'Email',
	placeholder: 'Enter here',
	onChange: (value) => debugPrint("print"),
	icon: Icons.email
)
Step2.入力モードを変えられるようにして目隠し機能を追加
今回はメールアドレスのみでなくパスワードにも同じWidgetで入力できるようにしたいので、
引数inputModeを追加して切り替え可能にしましょう。
新しくlogin_text_field_widget.dartファイルを作成してui_text_field_widget.dartをコピーしたものに追加で実装していきます。
今回は通常モードtextとパスワードモードpasswordを設定します。
タイポ防止や可読性のことを考えてenumを使ってみます。
enum InputMode {
  text,
  password,
}
これをlogin_text_field_widget.dartでimportしてpropsに追加します。
class LoginTextField extends HookWidget {
  final String label;
  final String placeholder;
  final Function(String value) onChange;
  final IconData icon;
  final bool disabled;
  final InputMode inputMode; //追加!!

  const LoginTextField({
    Key? key,
    required this.label,
    required this.placeholder,
    required this.onChange,
    required this.icon,
    this.disabled = false,
    this.inputMode = InputMode.text, //追加!!
  }) : super(key: key);
obscureTextを使おう
「目隠しを有効にするか」を管理するuseStateのisObsucureを定義します。
final isObscure = useState(inputMode == InputMode.password);
パスワードモードの時はisObscureに応じてTextFieldのプロパティobscureTextが変わるようにします。
TextField(
	obscureText:
		isObscure.value == true
		&&
		inputMode == InputMode.password,
	onChanged: (value) => onChange(value),
isObscureを切り替えるためにプロパティsuffixIconにIconButtonを追加します。
suffixIcon: inputMode == InputMode.password
	? IconButton(
		icon: Icon(isObscure.value == true
			? Icons.visibility_off
			: Icons.visibility),
		onPressed: iconOnPressed,
	)
	: null),
ここは少し複雑ですね。
passwordモード?切り替えボタン:null
という三項演算子になってます。
さらにIconButtonの中の割り当てるアイコンの部分は
isObscureがtrue?閉じた目のアイコン:開いた目のアイコン
という三項演算子になっています。
次は押された時の関数も用意します!!!
void iconOnPressed() {
      isObscure.value = !isObscure.value;
      //debugPrint(isObscure.value.toString()); これはデバック用
    }
ここでWidgetを呼び出してみます
LoginTextField(
	label: 'Password',
	placeholder: 'Enter your password',
	onChange: (value) => debugPrint(value),
	icon: Icons.key,
	inputMode: InputMode.password,
       )


お!うまく隠せていますね!!
Step3.TextFieldの外側をタップした時に再び目隠しする
これだけでも良いんですが、他の部分をタップした時に目隠しになる方がセキュリティ的に強くなりますし。カッコいい!!
ということで実装していきましょう。
TapRegionを使おう
TapRegionを使えばchildの外側、内側のタップを検出して関数を走らせることができます。
TapRegion(
	onTapInside:(e) => {//childの内側をタップした時の処理}
	onTapOutside:(e) => {//childの外側をタップした時の処理}
	child:Widget
)
今回はTextField部分より外をタップした時に動作して欲しいのでTextFieldをラップしてonTapOutsideを採用します。
...
),
          TapRegion(
            onTapOutside: (e) => onTapOutside(e),
            child: TextField(
              obscureText:
...
onTapOutside(e)関数はこのようにします。
void onTapOutside(e) {
      isObscure.value = true; //目隠しを有効にする
      FocusScope.of(context).unfocus(); //フォーカス解除
    }
関数の中でisObscureにtrueを代入しています。
ついでにフォーカスを解除するための処理も入れておきました。
完成しました‼️

感想
Flutter歴が浅いこともあって躓くことも多かったですが公式ドキュメントで書くウィジェットの仕組みやプロパティを確認すれば理解できることが分かりました。
今回はUIのみでロジックを書かなかったので、次は以前教えてもらったuseTextEditingControllerを使ってSubmitできるようにロジックも組みたいです。
最後まで読んでいただきありがとうございました!!
コード全体も載せておきます。
import 'package:flutter/material.dart';
import 'package:flutter_hooks/flutter_hooks.dart';
import 'package:myapp/enums/input_enum.dart';
class LoginTextField extends HookWidget {
final String label;
final String placeholder;
final Function(String value) onChange;
final IconData icon;
final bool disabled;
final InputMode inputMode;
const LoginTextField({
Key? key,
required this.label,
required this.placeholder,
required this.onChange,
required this.icon,
this.disabled = false,
this.inputMode = InputMode.text,
}) : super(key: key);
Widget build(BuildContext context) {
final isObscure = useState(inputMode == InputMode.password);
void iconOnPressed() {
isObscure.value = !isObscure.value;
debugPrint(isObscure.value.toString());
}
void onTapOutside(e) {
isObscure.value = true;
FocusScope.of(context).unfocus();
}
return Padding(
padding: const EdgeInsets.all(15),
child: Column(
crossAxisAlignment: CrossAxisAlignment.start,
children: [
Padding(
padding: const EdgeInsets.all(5),
child: Row(
crossAxisAlignment: CrossAxisAlignment.end,
children: [
Text(
label,
style: const TextStyle(
fontSize: 16,
),
),
],
),
),
TapRegion(
onTapOutside: (e) => onTapOutside(e),
child: TextField(
obscureText:
isObscure.value == true && inputMode == InputMode.password,
onChanged: (value) => onChange(value),
enabled: !disabled,
decoration: InputDecoration(
labelText: label,
hintText: placeholder,
floatingLabelBehavior: FloatingLabelBehavior.never,
prefixIcon: Icon(
icon,
color: Colors.grey,
),
contentPadding: const EdgeInsets.symmetric(
vertical: 10,
horizontal: 20,
),
enabledBorder: OutlineInputBorder(
borderSide: const BorderSide(
width: 1,
color: Colors.grey,
),
borderRadius: BorderRadius.circular(15),
),
focusedBorder: OutlineInputBorder(
borderSide: const BorderSide(
width: 1.5,
color: Colors.orange,
),
borderRadius: BorderRadius.circular(15),
),
disabledBorder: OutlineInputBorder(
borderSide: BorderSide(
width: 1,
color: Colors.grey.withOpacity(0.5),
),
borderRadius: BorderRadius.circular(15),
),
suffixIcon: inputMode == InputMode.password
? IconButton(
icon: Icon(isObscure.value == true
? Icons.visibility_off
: Icons.visibility),
onPressed: iconOnPressed,
)
: null),
),
)
],
),
);
}
}

Discussion
LGTM🍖
こんな使い方知らなかったです😅
Tetsuさんご苦労様です🍵
あまり綺麗ではないですがuseStateの初期値を=演算子の結果として置いてみました。
マニアックです!
才能ありますよ。ふふふ