ElmでフローチャートUIを実装してみてわかったElmの良さ


はじめに
本記事では、下の記事を参考にElmでフローチャートUIを実装してみました
実装していく中で、Elmで実装することのメリットを感じたので、本記事ではそのメリットについても触れていきます
本記事の目的
本記事の目的は以下のとおりです
- Elmを用いたフローチャートUIの実装方法を理解する
- Elmを用いて実装することで、Elmで実装する良さを理解する
また、本記事でやらないことは以下のとおりです
- Elmのセットアップ
- Elmの基本的な仕様の理解 (Model, View, Update, 型エイリアスや型注釈など)
この記事の要約
Elmで実装してみることで、次のメリットがあると感じました
- 型エイリアスや型注釈を用いることで、コードの流れが理解しやすい
- Model・Update・Viewがそれぞれ一箇所にまとまることで、コードの見通しが良くなる
- ユーザー操作や状態を新しく追加しても、Elm特有のパターンマッチで処理の追加漏れが起こりにくい (追加漏れがある場合コンパイルエラーが出る)
- 直和型を用いることでフローチャートUIの状態遷移が理解しやすい
今回つくるものの仕様
-
フローチャートUIの機能
(記事参照)
- ノード同士を接続できる
- ノードをドラッグ&ドロップで移動できる
-
フローチャートUIの要素

(記事参照)
- ボード:フローチャートを描画する板
- ノード:フローチャート内のオブジェクト
- コネクター:ノードのエッジ接続部分
- エッジ:ノード同士を接続する線
いざ実装
実際にElmで実装してみましょう!
STEP 0 : Model, View, Updateを仮作成
とりあえず、Model、View、Updateを作成しHello Worldを出力するMain.elmと、型の定義を書いたType.elmを作成する
Main.elm
module Main exposing (..)

import Browser
import Html exposing (Html, div, text)
import Type exposing (Msg)


-- MAIN


main =
    Browser.sandbox { init = init, update = update, view = view }


-- MODEL


type alias Model =
    {}


init : Model
init =
    {}


-- UPDATE


update : Msg -> Model -> Model
update msg model =
    model


-- VIEW


view : Model -> Html Msg
view model =
    div [] [ text "Hello World" ]
Type.elm
module Type exposing (..)

-- 型

type Msg
    = Grab -- 仮置き
STEP 1 : UI要素と対応する型を作成
1-1 : ノード&コネクターの作成
まずはノードとコネクターの型エイリアスを用意します。
- Node型には、ノード同士を識別するidフィールドと、ノードの位置を表すpositionフィールドを用意します
- Connector型には、どのノードのコネクターか識別するためのNodeフィールドと、ノードの左右どちらのコネクターかを識別するためのleftAndRightフィールドを用意しています
...

+ type alias Position =
+     { x : Float, y : Float }
+
+ type alias Node =
+     { id : String, position : Position }
+
+ type LeftAndRight
+     = Left
+     | Right
+
+ type alias Connector =
+     { node : Node
+     , leftAndRight : LeftAndRight
+     }
次に、Node型のレコードを受け取り、ノードを描画する関数を作成します
nodeComponent : Node -> Html Msg
nodeComponent node = ...
NodeComponet.elm
module NodeComponent exposing (..)

import Html exposing (Html, div, node, text)
import Html.Attributes exposing (style)
import Type exposing (Msg, Node)


nodeComponent : Node -> Html Msg
nodeComponent node =
    div
        [ style "position" "absolute"
        , style "transform" ("translate(" ++ String.fromFloat node.position.x ++ "px," ++ String.fromFloat node.position.y ++ "px)")
        ]
        [ div
            [ style "display" "flex"
            , style "align-items" "center"
            ]
            [ connectorComponent
            , div
                [ style "border" "solid 1px"
                , style "width" "100px"
                , style "height" "40px"
                , style "border-radius" "6px"
                , style "padding" "8px 16px"
                , style "display" "flex"
                , style "justify-content" "center"
                , style "align-items" "center"
                , style "cursor" "grab"
                ]
                [ text node.id ]
            , connectorComponent
            ]
        ]


connectorComponent : Html Msg
connectorComponent =
    div
        [ style "width" "10px"
        , style "height" "10px"
        , style "border" "solid 1px"
        , style "border-radius" "50%"
        , style "cursor" "pointer"
        ]
        []
1-2 : エッジの作成
エッジでも同様に、まずはエッジの型エイリアスを用意します
- Edge型には、エッジ同士を識別するためのIdフィールドと、エッジの始点のコネクターと終点のコネクターとそれぞれの位置を格納するフィールドを用意します
...

+ type alias Edge =
+     { edgeId : String
+     , fromPosition : Position
+     , toPosition : Position
+     , fromConnector : Connector
+     , toConnector : Connector
+     }
次に、Edge型のレコードを受け取り、エッジを描画する関数を作成します
edgeComponent : Edge -> Html Msg
edgeComponent edge = ...
EdgeComponent.elm
まず、elm/svg をローカルにインストール
elm install elm/svg
その後、以下のようにエッジを描画する関数を作成します
module EdgeComponent exposing (..)

import Html exposing (Html, div)
import Html.Attributes exposing (style)
import Svg exposing (path, svg)
import Svg.Attributes
import Type exposing (Edge, Msg)


edgeComponent : Edge -> Html Msg
edgeComponent edge =
    let
        c1x =
            edge.fromPosition.x + abs (edge.toPosition.x - edge.fromPosition.x)

        c1y =
            edge.fromPosition.y

        c2x =
            edge.toPosition.x - abs (edge.toPosition.x - edge.fromPosition.x)

        c2y =
            edge.toPosition.y
    in
    div
        [ style "position" "absolute"
        , style "pointer-events" "none"
        ]
        [ svg
            [ style "width" "100vw"
            , style "height" "100vh"
            ]
            [ path
                [ Svg.Attributes.d ("M " ++ String.fromFloat edge.fromPosition.x ++ " " ++ String.fromFloat edge.fromPosition.y ++ " C " ++ String.fromFloat c1x ++ " " ++ String.fromFloat c1y ++ " " ++ String.fromFloat c2x ++ " " ++ String.fromFloat c2y ++ " " ++ String.fromFloat edge.toPosition.x ++ " " ++ String.fromFloat edge.toPosition.y)
                , Svg.Attributes.stroke "black"
                , Svg.Attributes.strokeWidth "2"
                , Svg.Attributes.fill "none"
                ]
                []
            ]
        ]
1-3 : ボードの作成
Node型のListとEdge型のListを受け取り、それらをボード上に描画する関数を作成します
また、このコードの最後の行の処理について説明すると、
List.map nodeComponent nodesでList (Html Msg)が返され、List.map edgeComponent edgesも同様にList (Html Msg)を返すので、この配列同士を++演算子で結合して、divの第二引数に渡しています
boardComponent : List Node -> List Edge -> Html Msg
boardComponent nodes edges =
    div
        [ style "position" "relative"
        , style "width" "100vw"
        , style "height" "100vh"
        ]
        (List.map nodeComponent nodes ++ List.map edgeComponent edges)
BoardComponent.elm
module BoardComponent exposing (..)

import EdgeComponent exposing (edgeComponent)
import Html exposing (Html, div)
import Html.Attributes exposing (style)
import NodeComponent exposing (nodeComponent)
import Type exposing (Edge, Msg, Node)


boardComponent : List Node -> List Edge -> Html Msg
boardComponent nodes edges =
    div
        [ style "position" "relative"
        , style "width" "100vw"
        , style "height" "100vh"
        ]
        (List.map nodeComponent nodes ++ List.map edgeComponent edges)
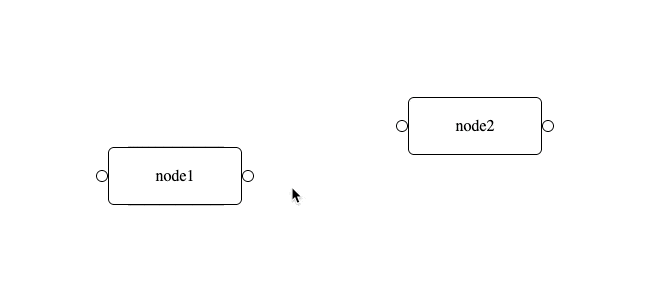
1-4 : ボード上にノードが出力されることを確認する
ModelにNodeのListとEdgeのListを追加し、View関数を変更して、ボード上にノードが出力されることを確認します
...

type alias Model =
-     {}
+     { nodes : List Node
+     , edges : List Edge
+     }

init : Model
init =
-     {}
+     Model [ Node "node1" (Position 100 100), Node "node2" (Position 400 100) ] []

...

view : Model -> Html Msg
view model =
-     div [] [ text "Hello World" ]
+     boardComponent model.nodes model.edges
Main.elm
module Main exposing (..)

import BoardComponent exposing (boardComponent)
import Browser
import Html exposing (Html)
import Type exposing (Edge, Msg, Node, Position)


 -- MAIN


main =
    Browser.sandbox { init = init, update = update, view = view }


 -- MODEL


type alias Model =
    { nodes : List Node
    , edges : List Edge
    }


init : Model
init =
    Model [ Node "node1" (Position 100 100), Node "node2" (Position 400 100) ] []


 -- UPDATE


update : Msg -> Model -> Model
update msg model =
    model


 -- VIEW


view : Model -> Html Msg
view model =
    boardComponent model.nodes model.edges
ターミナル上でelm reactorを実行し、http://localhost:8000/src/Main.elmにアクセスすると、以下のようにノードが表示されることを確認できます

STEP 2 : ユーザー操作の作成
まずは、package (mpizenberg/elm-pointer-events) をインストールします
elm install mpizenberg/elm-pointer-events
2-1 : ノードのドラッグ&ドロップ
ユーザー操作として、以下のMsgを追加します
- ノード上でマウスを押下 (Grab) → ノードを掴む
- ノードを掴んでいる際にマウスを放す (Release) → ノードをその場で放す
- ボード上でマウスを動かす (Move):
- ノードを掴んでいる場合 → ノードを動かす
- ノードを掴んでいない場合 → 何もしない
また、ユーザーがノードを掴んでいるかどうかを表すStatus型を追加します
...

type Msg
-     = Grab -- 仮置き
+     = Grab String
+     | Move Position
+     | Release

...

+ type Status
+     = Grabbed String
+     | Default

...
次に、掴んだノードの位置を更新するupdateGrabbedNodePosition関数を作成します
...

+ updateGrabbedNodePosition : String -> Position -> Node -> Node
+ updateGrabbedNodePosition nodeId position node =
+     if node.id == nodeId then
+         { node | position = position }
+
+     else
+         node
...
そして、ModelにStatusフィールドを追加し、update関数にMsg (Grab, Release, Move) に応じた処理を追加します
...

type alias Model =
-   { nodes : List Node
+   { status : Status
+   , nodes : List Node
    , edges : List Edge
    }


init : Model
init =
-     Model [ Node "node1" (Position 100 100), Node "node2" (Position 400 100) ] []
+     Model Default [ Node "node1" (Position 100 100), Node "node2" (Position 400 100) ] []

...

update : Msg -> Model -> Model
update msg model =
-     model
+     case msg of
+         Grab nodeId ->
+             { model | status = Grabbed nodeId }
+
+         Move position ->
+             case model.status of
+                 Grabbed nodeId ->
+                     let
+                         updatedNodes =
+                             List.map
+                                 (updateGrabbedNodePosition nodeId position)
+                                 model.nodes
+                     in
+                     { model | nodes = updatedNodes }
+
+                 Default ->
+                     model
+
+         Release ->
+             { model | status = Default }
+

...
ボードのHTML要素に、マウス移動時 (Mouse.onMove) とマウスを放した時 (Mouse.onUp) にMsg (Move, Release) を生成する処理を追加します
boardComponent : List Node -> List Edge -> Html Msg
boardComponent nodes edges =
    div
        [ style "position" "relative"
        , style "width" "100vw"
        , style "height" "100vh"
+       , Mouse.onMove (\e -> Move (Position (Tuple.first e.clientPos) (Tuple.second e.clientPos)))
+       , Mouse.onUp (\_ -> Release)
        ]
        (List.map nodeComponent nodes ++ List.map edgeComponent edges)
また、ノードのHTML要素に、ボタン押下時 (Mouse.onDown) にMsg (Grab) を生成する処理を追加します
nodeComponent : Node -> Html Msg
nodeComponent node =
    div
        [ style "position" "absolute"
        , style "transform" ("translate(" ++ String.fromFloat node.position.x ++ "px," ++ String.fromFloat node.position.y ++ "px)")
        ]
        [ div
            [ style "display" "flex"
            , style "align-items" "center"
            ]
            [ connectorComponent
            , div
                [ style "border" "solid 1px"

                ...

                , style "cursor" "grab"
+               , Mouse.onDown (\_ -> Grab node.id)
                ]
                [ text node.id ]
            , connectorComponent
            ]
        ]
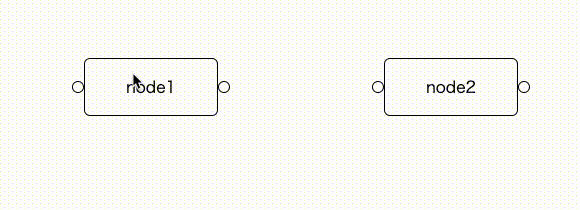
これで、ノードをドラッグ&ドロップできるようになりました!
2-2 : コネクターをエッジで接続
ユーザー操作として、以下のMsgを追加します
- コネクターをクリック (SelectConnector):
- エッジを伸ばしていなければ → コネクターからエッジを生やす
- エッジを伸ばしている最中であれば → エッジをコネクターに接続する
- ボード上でマウスを動かす (Move):
- 何もなければ → 何もしない
- エッジを伸ばしている最中であれば → エッジを伸ばす
また、エッジを伸ばしている最中かどうかを表すために、Status型に新しくConnectingを追加します
さらに、エッジを伸ばしている最中はエッジの終点のコネクターが決まらないので、エッジの終点のコネクターの型をMaybe Connector型に変更します
...

type Msg
    = Grab String
    | Move Position
    | Release
+   | SelectConnector Connector


type Status
    = Grabbed String
+   | Connecting String
    | Default

...

type alias Edge =
    { edgeId : String
    , fromPosition : Position
    , toPosition : Position
    , fromConnector : Connector
-   , toConnector : Connector
+   , toConnector : Maybe Connector
    }

...
次に、エッジの始点と終点の位置を更新するupdateEdgePosition関数と、コネクターの位置を計算するcalculateConnectorPosition関数を作成します
+ updateEdgePosition : String -> Position -> Maybe Connector -> Edge -> Edge
+ updateEdgePosition edgeId position toConnector edge =
+     if edge.edgeId == edgeId then
+         { edge | toPosition = position, toConnector = toConnector }
+
+     else
+         edge
+
+
+ calculateConnectorPosition : Position -> LeftAndRight -> Position
+ calculateConnectorPosition nodePosition leftAndRight =
+     case leftAndRight of
+         Left ->
+             Position (nodePosition.x + 6) (nodePosition.y + 29)
+
+         Right ->
+             Position (nodePosition.x + 152) (nodePosition.y + 29)
connectorComponent関数をConnector型のレコードを引数に受け取るように変更し、コネクターの中のHTML要素に、クリック時 (Mouse.onClick) にMsg (SelectConnector) を生成する処理を追加します
nodeComponent : Node -> Html Msg
nodeComponent node =
    div
        [ style "position" "absolute"
        , style "transform" ("translate(" ++ String.fromFloat node.position.x ++ "px," ++ String.fromFloat node.position.y ++ "px)")
        ]
        [ div
            [ style "display" "flex"
            , style "align-items" "center"
            ]
-           [ connectorComponent
+           [ connectorComponent (Connector node Left)
            , div
                [ style "border" "solid 1px"

                ...

                , Mouse.onDown (\_ -> Grab node.id)
                ]
                [ text node.id ]
-           , connectorComponent
+           , connectorComponent (Connector node Right)
            ]
        ]


- connectorComponent : Html Msg
- connectorComponent =
+ connectorComponent : Connector -> Html Msg
+ connectorComponent connector =
    div
        [ style "width" "10px"

        ...

        , style "cursor" "pointer"
+       , Mouse.onClick (\_ -> SelectConnector connector)
        ]
        []
エッジを伸ばしている最中にノードを掴む処理などが走るのを防ぐため、 現状のMsgであるGrabとMoveとReleaseは、Statusに応じて処理を分岐させます
さらにSelectConnectorの処理をupdate関数に追加します
update : Msg -> Model -> Model
update msg model =
    case msg of
        Grab nodeId ->
+           case model.status of
+               Default ->
                    { model | status = Grabbed nodeId }

+               Grabbed _ ->
+                   model
+
+               Connecting _ ->
+                   model

        Move position ->
            case model.status of
                Grabbed nodeId ->
                    let
                        updatedNodes =
                            List.map
                                (updateGrabbedNodePosition nodeId position)
                                model.nodes
                    in
                    { model | nodes = updatedNodes }

+               Connecting edgeId ->
+                   let
+                       updateEdges =
+                           List.map (updateEdgePosition edgeId position Noting) model.edges
+                   in
+                   { model | edges = updateEdges }

                Default ->
                    model

        Release ->
+           case model.status of
                Grabbed _ ->
                    { model | status = Default }

+               Connecting _ ->
+                   model
+
+               Default ->
+                   model
+
+       SelectConnector connector ->
+           case model.status of
+               Default ->
+                   let
+                       edgeId =
+                           "edge" ++ String.fromInt (List.length model.edges)
+
+                       fromAndToPosition = calculateConnectorPosition connector.node.position connector.leftAndRight
+
+                       updateEdges =
+                           Edge edgeId fromAndToPosition fromAndToPosition connector Nothing :: model.edges
+                   in
+                   { model | status = Connecting edgeId, edges = updateEdges }
+
+               Connecting edgeId ->
+                   let
+                       toPosition =
+                           calculateConnectorPosition connector.node.position connector.leftAndRight
+
+                       updateEdges =
+                           List.map (updateEdgePosition edgeId toPosition (Just connector)) model.edges
+                   in
+                   { model | status = Default, edges = updateEdges }
+
+               Grabbed _ ->
+                   model
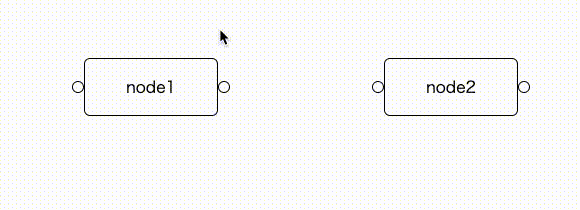
これで、コネクターをクリックすることでエッジを接続できるようになりました!
2-3 : ノードをドラッグした際にエッジも追従するようにする
ノードをドラッグしてもエッジが追従するようにするために、ノードの位置に応じてエッジの始点と終点の位置を更新する関数を作成します
+ calculateEdgePositionWhenNodeMove : String -> Position -> Edge -> Edge
+ calculateEdgePositionWhenNodeMove nodeId newNodePosition edge =
+     if edge.fromConnector.node.id == nodeId then
+         { edge | fromPosition = calculateConnectorPosition newNodePosition edge.fromConnector.leftAndRight }
+
+     else
+         case edge.toConnector of
+             Just toConnector ->
+                 if toConnector.node.id == nodeId then
+                     { edge | toPosition = calculateConnectorPosition newNodePosition toConnector.leftAndRight }
+
+                 else
+                     edge
+
+             Nothing ->
+                 edge
そして、ノードをドラッグする処理の中に、エッジの位置を更新する処理も追加します
update : Msg -> Model -> Model
update msg model =
    case msg of
        Grab nodeId ->

            ...

        Move position ->
            case model.status of
                Grabbed nodeId ->
                    let
                        updatedNodes =
                            List.map
                                (updateGrabbedNodePosition nodeId position)
                                model.nodes

+                       updateEdges =
+                           List.map (calculateEdgePositionWhenNodeMove nodeId position) model.edges
                    in
-                   { model | nodes = updatedNodes }
+                   { model | nodes = updatedNodes, edges = updateEdges }

                Connecting edgeId ->

                    ...
これで、ノードをドラッグしてもエッジが追従するようになりました!

まとめ
以上で、ElmでフローチャートUIを実装することができました!
Elmで実装してみることで、次のメリットがあると感じました
- 型エイリアスや型注釈を用いることで、コードの流れが理解しやすい
- Model・Update・Viewがそれぞれ一箇所にまとまることで、コードの見通しが良い
- ユーザー操作や状態を新しく追加しても、Elm特有のパターンマッチで処理の追加漏れが起こりにくい (追加漏れがある場合コンパイルエラーが出る)
- フローチャートUIの状態遷移が理解しやすくなった (状態遷移図を実際に描いてみました (下図))

Elmで実装してみることでコードの見通しが良くなるため、思考が整理されていく感覚がありとても楽しかったです
また、型エイリアスや型注釈、パターンマッチの便利さを感じることができたので、ReactやVueなどの他のフレームワークでもこの経験を活かしていきたいと思います!(主にTypescriptやESLintを活用しながら)
Discussion