🙌
はじめてのCircle CI その3:パイプラインの完了をWebhookで受け取る
過去2回の記事で、はじめてのCircleCIと称して、AWS Lambda関数のデプロイをGitHub連携で行ってきました。
この記事ではパイプラインにより起動されたワークフローの完了通知をWebhookで受け取る手順です。
さっそくやってみる
0. Webhook受信用エンドポイントの作成
へアクセスします。テスト用Webhook受信URLを作成してくれる神サイトです。
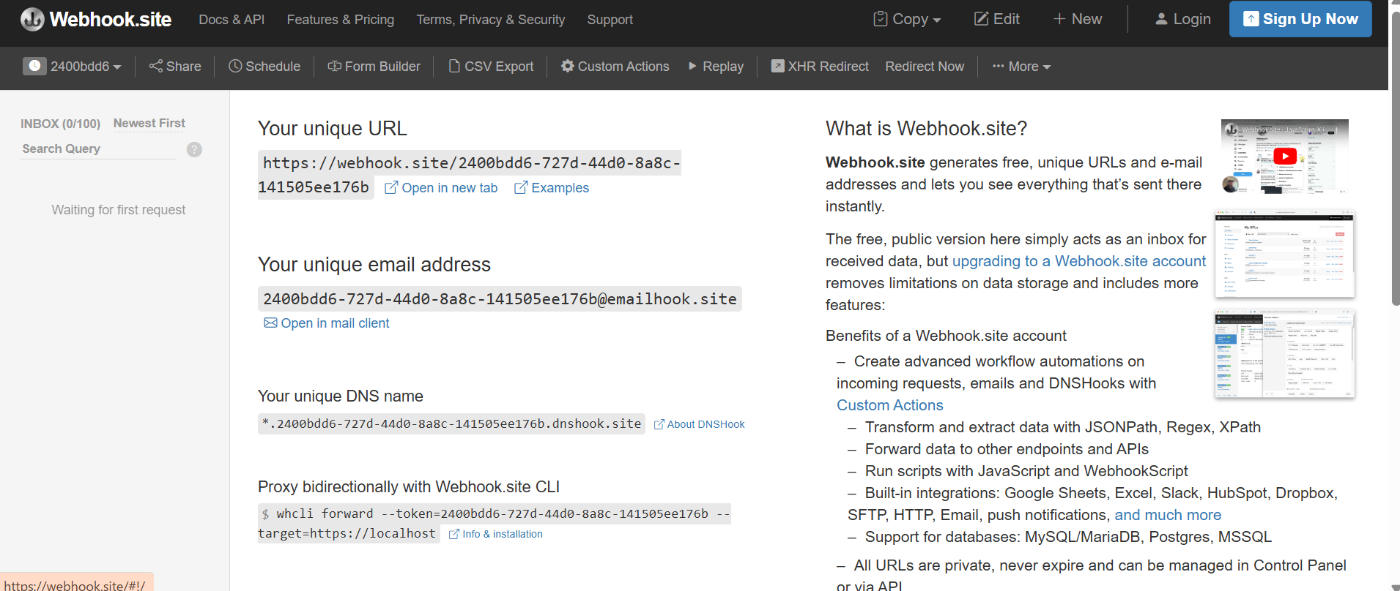
表示されたURLをコピーしておきます。
https://webhook.site/xxxxxxxxxxxxxxxxxxxx
1. CircleCIへのWebhook組み込み
Project詳細画面から画面右上のSettingsをクリックします。

左ペインからWebhooksをクリックし、Add Webhookをクリックします。

必要な情報を入力してAdd Webhookをクリックします。先ほどのテストサイトでは認証が不要ですので空欄にしますが、例えばSlackやDiscordなどで受信する場合はクレデンシャルを登録します。


ワークフローが完了すると以下の通りWebhook通知を受信します。
{"type":"workflow-completed","id":"be11813e-8d1c-3a67-9779-426801927fd0","happened_at":"2025-04-07T03:20:36.114826714Z","webhook":{"id":"2ef06e48-4bb3-4187-97d7-87e5d707d4a5","name":"deploy completed"},"workflow":{"id":"190316e2-754c-4867-94a6-3c7f2f98da3f","name":"deploy","created_at":"2025-04-07T03:20:09.467Z","stopped_at":"2025-04-07T03:20:35.786Z","url":"https://app.circleci.com/pipelines/circleci/RiEjBBK8Y1Cb1MYj655Xax/N88hL2n6kjQAb9XhrgAz9S/22/workflows/190316e2-754c-4867-94a6-3c7f2f98da3f","status":"success"},"pipeline":{"id":"cd84344f-032d-4271-868c-a9711a9223d5","number":22,"created_at":"2025-04-07T03:20:09.347Z","trigger":{"type":"webhook"},"trigger_parameters":{"circleci":{"event_action":"push","event_time":"2025-04-07T12:20:06+09:00","provider_actor_id":"13639796","provider_name":"3505736a-c360-4792-a3dc-58a5689ed089","provider_login":"harunobukameda","actor_id":"57fbb5d7-df27-4d3d-a591-818629cf8343","event_type":"push","trigger_type":"github_app"},"github_app":{"web_url":"https://github.com/harunobukameda/firstcci","commit_author_name":"Harunobu Kameda","owner":"harunobukameda","user_id":"13639796","full_ref":"refs/heads/prod","user_name":"harunobukameda","pull_request_merged":"false","forced":"false","user_username":"harunobukameda","branch":"prod","repo_id":"960246861","commit_title":"Merge pull request #5 from harunobukameda/prod-5\n\nUpdate index.mjs","commit_message":"Merge pull request #5 from harunobukameda/prod-5\n\nUpdate index.mjs","repo_url":"https://github.com/harunobukameda/firstcci","user_avatar":"https://avatars.githubusercontent.com/u/13639796?v=4","pull_request_draft":"false","ref":"prod","repo_name":"firstcci","commit_author_email":"harunobukameda@gmail.com","checkout_sha":"21eace0bc71f7cb685e95053ab6633fa7f7517b8","commit_timestamp":"2025-04-07T12:20:06+09:00","default_branch":"main","repo_full_name":"harunobukameda/firstcci","commit_sha":"21eace0bc71f7cb685e95053ab6633fa7f7517b8"},"git":{"commit_author_name":"Harunobu Kameda","repo_owner":"harunobukameda","branch":"prod","commit_message":"Merge pull request #5 from harunobukameda/prod-5\n\nUpdate index.mjs","repo_url":"https://github.com/harunobukameda/firstcci","ref":"refs/heads/prod","author_avatar_url":"https://avatars.githubusercontent.com/u/13639796?v=4","checkout_url":"git@github.com:harunobukameda/firstcci.git","author_login":"harunobukameda","repo_name":"firstcci","commit_author_email":"harunobukameda@gmail.com","checkout_sha":"21eace0bc71f7cb685e95053ab6633fa7f7517b8","default_branch":"main"},"webhook":{"body":"{}"}}},"project":{"id":"ab0edc53-da4b-4b29-988d-e9425afb2865","name":"githublambda","slug":"circleci/RiEjBBK8Y1Cb1MYj655Xax/N88hL2n6kjQAb9XhrgAz9S"},"organization":{"id":"c81d4836-0d80-412d-b6b8-01625e4b5ae9","name":"kameoncloud"}}
余談:ワークフローとジョブの違い
先ほどの設定画面でWorkflowとJobそれぞれの設定が存在していました。最後にこの2つの違いを整理してこの記事は終わりにしたいと思います。

config.yml
<snip>
workflows:
  version: 2
  deploy:
    jobs:
      - deploy_lambda:
          context:
            - aws-credentials
          filters:
            branches:
              only:
                - /prod*/
パプラインが起動するとまずこの設定ファイルを読み込みワークフローが開始されます。この例でいえばdeploy_lambdaです。このワークフローの中には複数のjobを設定可能です。deploy_lambdaは同じ設定ファイルに以下の様に複数ステップが定義されています。
config.yml
<snip>
jobs:
  deploy_lambda:
    executor: node-executor
    steps:
      - checkout
      - run:
          name: Create Lambda ZIP
          command: |
            # Lambda用のコードをZIP圧縮
            zip -r lambda.zip .  # カレントディレクトリ(Lambda関数のコード)をZIP圧縮
      - run:
          name: Deploy Lambda function
          command: |
<snip>
Discussion