Postman CLI を使ってみる
Postman には Postman CLIというコマンドラインツールが準備されています。Postman によって開発され、サポートされています。Postman CLI を使用すると、コレクションの実行が可能となるため、その他ツールからの起動が簡単になります。
いままでこのブログでは、コレクションの起動はFlowsで設定されたwebhookかMonitorによる自動起動について纏めてきましたが、CLIを用いることでその他スクリプトなどからコレクションを起動する、ということが可能になります。
似たようなツールにNewmanというものがあります。Postmanのマネージメントコンソールでも以下のようにNewmanがサポートされています。

Postman CLI と Newman
こちらにその違いがまとまっています。
両方ともPostmanによって開発されていますが、Postman CLIはPostmanの製品としてメンテナンスされています。一方NewmanはOSSとしてコミュニティでサポートされています。またNewmanはライブラリとして提供されるため、プログラムへの組み込みが可能になっています。
機械があればNewmanにも触れていきたいと思います。
さっそくやってみる
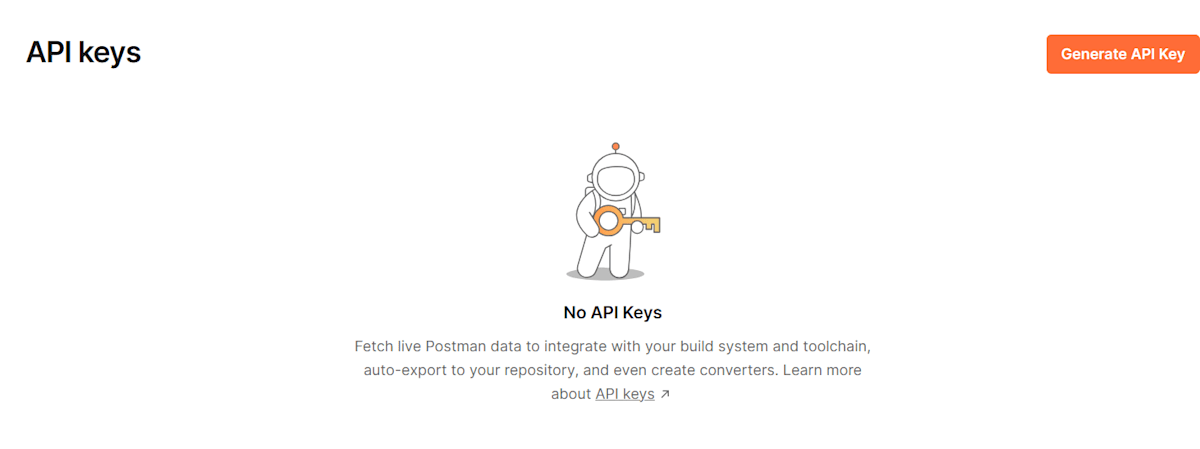
1. API キーの準備
まずはPostmanマネージメントコンソールでAPIキーを作成します。
APIキーをクリックします。
Generate API Keyをクリックします。
名前を入力してGenerate API Keyをクリックします。

生成されたキーをコピーしておきます。

2. CLIのインストール
以下のコマンドを実行してインストールを行います。
powershell.exe -NoProfile -InputFormat None -ExecutionPolicy AllSigned -Command "[System.Net.ServicePointManager]::SecurityProtocol = 3072; iex ((New-Object System.Net.WebClient).DownloadString('https://dl-cli.pstmn.io/install/win64.ps1'))"
curl -o- "https://dl-cli.pstmn.io/install/osx_arm64.sh" | sh
curl -o- "https://dl-cli.pstmn.io/install/osx_64.sh" | sh
curl -o- "https://dl-cli.pstmn.io/install/linux64.sh" | sh
以下が表示されればインストール完了です。
The Postman CLI has been installed
3. CLIのテスト
postman -v
を実行するとバージョンが出てくれば動作しています。
次にログインを行います。
postman login --with-api-key ABCD-1234-1234-1234-1234-1234
ABCD-1234-1234-1234-1234-1234は先ほど作成したものに置き換えてください。
Logged in using api key of user: kameman
Logged in successfully.
ログインが完了しました。
4. Collections の実行
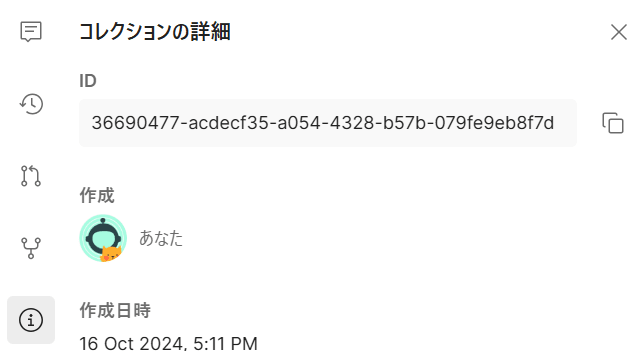
画面右の情報アイコンをクリックします。

コレクションIDをコピーします。
5. 実行
postman collection run <さっきコピーしたコレクションID>
を実行してみます。
実行結果が以下のように表示されます。
GET https://test.requestcatcher.com [200 OK, 1.74kB, 535ms]

┌─────────────────────────┬────────────────────┬───────────────────┐
│                         │           executed │            failed │
├─────────────────────────┼────────────────────┼───────────────────┤
│              iterations │                  1 │                 0 │
├─────────────────────────┼────────────────────┼───────────────────┤
│                requests │                  1 │                 0 │
├─────────────────────────┼────────────────────┼───────────────────┤
│            test-scripts │                  0 │                 0 │
├─────────────────────────┼────────────────────┼───────────────────┤
│      prerequest-scripts │                  0 │                 0 │
├─────────────────────────┼────────────────────┼───────────────────┤
│              assertions │                  0 │                 0 │
├─────────────────────────┴────────────────────┴───────────────────┤
│ total run duration: 637ms                                        │
├──────────────────────────────────────────────────────────────────┤
│ total data received: 1.55kB (approx)                             │
├──────────────────────────────────────────────────────────────────┤
│ average response time: 535ms [min: 535ms, max: 535ms, s.d.: 0µs] │
└──────────────────────────────────────────────────────────────────┘
�w�肳�ꂽ�p�X��������܂���B

Postman CLI run data uploaded to Postman Cloud successfully.
You can view the run data in Postman at: https://go.postman.co/workspace/6892d91e-ca58-4389-982b-ba9bb32dd8f9/run/36690477-b7f9612d-9213-4bde-962c-f18651a42b40
5. Collection API Key
API Keyとは別にCollection API Keyというものが準備されています。これはコレクションの実行は行えませんが、ReadOnlyでコレクションの情報をJSONで取得可能なものです。
共有を選択します。

API 経由タブを選びます。

新しいキーを生成ボタンをクリックします。

APIキーの画面に移動すると
Collection access keysというものが生成されURLが表示されます。
https://api.postman.com/collections/36690477-764f011f-92c7-4af4-be1c-ad120a1a4fab?access_key=PMAT-01JAC7ZESS83XPQ1EHA3NJ5QZ0
これをブラウザから読み込むとコレクションの情報が取得できます。
{
   "collection":{
      "info":{
         "_postman_id":"764f011f-92c7-4af4-be1c-ad120a1a4fab",
         "name":"New Collection",
         "schema":"https://schema.getpostman.com/json/collection/v2.1.0/collection.json",
         "updatedAt":"2024-10-17T03:17:50.000Z",
         "createdAt":"2024-10-17T03:17:50.000Z",
         "lastUpdatedBy":"36690477",
         "uid":"36690477-764f011f-92c7-4af4-be1c-ad120a1a4fab"
      },
      "item":[
         {
            "name":"private.requestcatcher.com",
            "id":"3a4f9ce4-1880-41b5-bed9-e26b158db8af",
            "protocolProfileBehavior":{
               "disableBodyPruning":true
            },
            "request":{
               "method":"GET",
               "header":[

               ],
               "url":{
                  "raw":"private.requestcatcher.com",
                  "host":[
                     "private",
                     "requestcatcher",
                     "com"
                  ]
               }
            },
            "response":[

            ],
            "uid":"36690477-3a4f9ce4-1880-41b5-bed9-e26b158db8af"
         }
      ]
   }
}
次回の記事ではもう少しいろいろなオプションを触ってみたいと思います。
Discussion