uvx と MCPServer のお勉強 : 可能な限りシンプルな構成でMCP Serverをuvx経由で起動する
いままで MCP Server を触るときはJavaScript/TypeScriptのみをやってきました。Pythonというものをほぼ理解していないためです。
友人からAWSが提供しているServerless MCPについて相談をもらい触って見たところPythonで構築されていました。 AWS Serverless MCPを理解する前に、基本的なPython/uvx で起動するMCPについてまず理解しないといけないので、お勉強がてら最もシンプルなものを作成してみました。
uv と uvx
まずuvとuvxについて知る必要があります。Claudeが整理するところでは以下のようです。
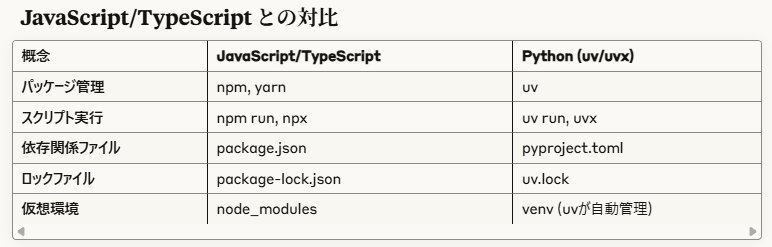
これはわかりやすく、おおよそ理解できた気がします。(気がするだけね!)
要はuvxはアプリケーションを、インストールせずに即座に実行する機能を提供しており、JavaScript/TypeScriptでいうnpxと似たものと理解しました。uvxを使ってMCP Serverを起動する場合シンプルに言えばuvx hello-mcp-serverでいいようです。
javascriptの場合今まで以下の形式でMCP Serverを起動していました。
{
  "mcpServers": {
    "my-server": {
      "command": "node",
      "args": ["C:\\path\\to\\my-mcp-server\\dist\\index.js"]
    }
  }
}
これを以下の様にするのと同じものと理解しました。
{
  "mcpServers": {
    "my-server": {
      "command": "npx",
      "args": ["my-mcp-server-package"]
    }
  }
}
逆に言えば
{
  "mcpServers": {
    "hello-world": {
      "command": "uvx",
      "args": ["hello-mcp-server"]
    }
  }
}
は
{
  "mcpServers": {
    "hello-world": {
      "command": "python",
      "args": ["C:\\path\\to\\hello_mcp_server.py"]
    }
  }
}
と基本同じことができると理解しました。ではなぜわざわざuvxを今回使うかといえばAWS Serverless MCPのドキュメントがそれを用いているから、なのですが、uvxを使うことでコマンド毎に仮想化された専用の実行環境自動で作成してくれるため、MCPの本来の思想(いろいろなベンダーが開発したものが入ってくる)でいえばやっぱりuvxを使う方がよさそうです。
さっそくやってみる
私はWindows環境なのでまずはPython3とuvをインストールします。それぞれ必要なpipとuvxはその過程で自動でインストールされます。
Python3
uv
winget install astral-sh.uv
次にMCP Serverを作成します。
mkdir hello-mcp-server
cd hello-mcp-server
ディレクトリにhello_mcp_server.pyとpyproject.tomlを配置します。
#!/usr/bin/env python3
"""
最もシンプルなMCP Server - Hello World
"""

import asyncio
import json
import sys
from typing import Any, Dict

from mcp.server import Server
from mcp.server.stdio import stdio_server
from mcp.types import Tool, TextContent


# MCP Serverインスタンスを作成
server = Server("hello-world-server")


@server.list_tools()
async def list_tools() -> list[Tool]:
    """利用可能なツールのリストを返す"""
    return [
        Tool(
            name="hello_world",
            description="シンプルなHello Worldメッセージを返します",
            inputSchema={
                "type": "object",
                "properties": {
                    "name": {
                        "type": "string",
                        "description": "挨拶する相手の名前(オプション)"
                    }
                }
            }
        )
    ]


@server.call_tool()
async def call_tool(name: str, arguments: Dict[str, Any]) -> list[TextContent]:
    """ツールの実行"""
    if name == "hello_world":
        target_name = arguments.get("name", "World")
        message = f"Hello, {target_name}! これはuvxで起動されたMCP Serverからのメッセージです。"

        return [
            TextContent(
                type="text",
                text=message
            )
        ]
    else:
        raise ValueError(f"不明なツール: {name}")


def main():
    """メイン関数 - エントリーポイント"""
    asyncio.run(run_server())


async def run_server():
    """非同期でサーバーを起動"""
    # stdio経由でMCP Serverを起動
    async with stdio_server() as (read_stream, write_stream):
        await server.run(
            read_stream,
            write_stream,
            server.create_initialization_options()
        )


if __name__ == "__main__":
    main()
[build-system]
requires = ["hatchling"]
build-backend = "hatchling.build"

[project]
name = "hello-mcp-server"
version = "0.1.0"
description = "シンプルなHello World MCP Server"
authors = [{name = "Your Name", email = "your.email@example.com"}]
dependencies = [
    "mcp>=1.0.0",
]
requires-python = ">=3.8"

[project.scripts]
hello-mcp-server = "hello_mcp_server:main"
ファイルの作成が終われば必要な依存関係を持つライブラリをインストールします。
uv pip install -e .
uv tool install .
Windows環境の場合パスを通すコマンドを次に実行します。
uv tool update-shell
最後にclaude_desktop_config.jsonをいかに書き換えてClaudeDesktopを再起動します。
{
  "mcpServers": {
    "hello-world": {
      "command": "uvx",
      "args": ["hello-mcp-server"]
    }
  }
}

無事動作しました!
STDIO と HTTPS
MCP Serverとの通信方式は2種類定義されています。STDIOとHTTPSです。そしてその電文はJSON-RPCです。
今回試した方式はuvxで起動したものにSTDIOで通信を行っているという形態ですので結局のところ以下と同じです。
echo '{"jsonrpc": "2.0", "id": 1, "method": "initialize", "params": {"protocolVersion": "2024-11-05", "capabilities": {}, "clientInfo": {"name": "test", "version": "1.0.0"}}}' | uvx hello-mcp-server
次回はいよいよ大物のAWS Serverless MCP Server に挑みます。
Discussion
とてもわかりやすく参考になりました。ありがとうございました。
一部、uvxをuxvと記述されていた部分がありました。
失礼しました!修正済です。ありがとうございます。