Cloudflare Workers から TiDB Serverlessに接続する
今日はCloudflare Workers からTiDB Serverlessに接続する手順をやってみます。
TiDB Serverless とは
chatGPT先生によると
TiDBは、オープンソースの分散型NewSQLデータベースで、水平スケーリング、リアルタイムトランザクション、分散トランザクション、分散SQL処理、分散ストレージなどの機能を提供します。一方、TiDB Serverlessは、完全なHTAP機能を備えたTiDBデータベースを提供するフルマネージドで自動スケーリングのデプロイメントです。データベースの使用をすぐに開始し、基盤となるノードを気にせずにアプリケーションを開発および実行し、アプリケーションのワークロードの変化に基づいて自動的にスケーリングすることができます
TiDB Serverlessは、従量課金制で、使用されたデータ処理とストレージの料金のみ支払う必要があります。TiDB Serverlessは、手動による介入を不要にし、ワークロードの変化に合わせて自動的に対応することで、インフラ全体のコストを削減します2.
TiDB Serverlessは、消費するリソースに応じて課金される従量制料金を採用しており、課金内容には以下が含まれます。なお、最新の料金表は英語ページをご覧ください。
とのことです。TiDB Serverlessは TiDB CloudでホスティングされるMySQL互換サーバレスデータベースであり、TiDB CloudはAWSかGCP上で稼働さえる形態ととりますが、現時点でTiDB ServerlessはAWS限定のようです。
さっそくやってみる
1. TiDB Serverlessの起動
データベースの起動は非常に簡単で数クリックで起動できます。
TiDB CloudのマネージメントコンソールからClustersをクリックします。

Create Clusterを押します。
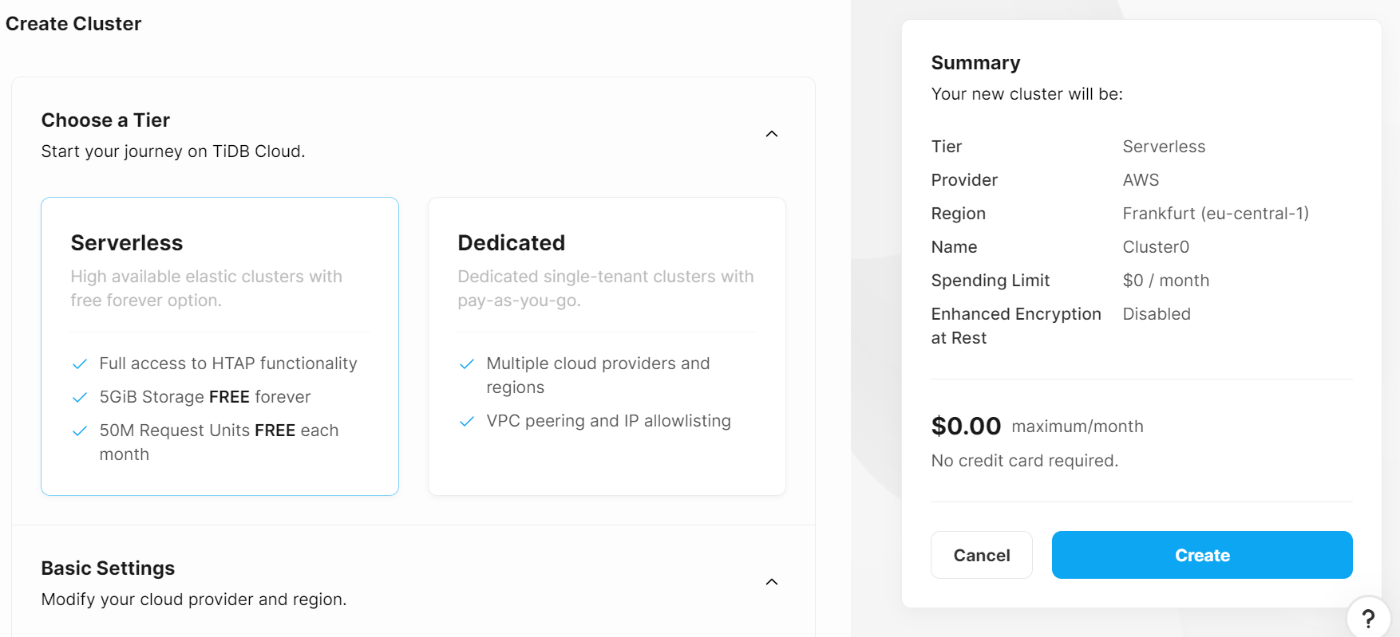
Serverless型とDedicated型があります。Dedicated型にはAWSかGCPを選択できますが
無料利用枠が設定されていないため、今回はAWS限定のServerless型を選択しCreateを押します。
数十秒程度でステータスがAvailableになります。

右上のConnectを押します。
Create passwordボタンを押します。

mysql --comments --connect-timeout 15 -u 'xxxxxxxxxxxxxxx.root' -h gateway01.eu-central-1.prod.aws.tidbcloud.com -P 4000 -D test --ssl-mode=VERIFY_IDENTITY --ssl-ca=<path_to_ca_cert> -pxxxxxxxxxxxxxxxx
このような接続文字列が表示されますのでコピーしておきます。
2. Workersの準備
こちらの手順を試していきます。 現在Cloudflare WorkersはアウトバウンドのDB通信としてPostgresはサポートしていますが、MySQLはサポートしていません。このため日本語の手順ではPrisma経由での接続となりますが、ドキュメントを英語に切り替えると直接MySQLへ接続する手順に切り替わりますので、英語版の手順を試していきます。
import { connect } from '@tidbcloud/serverless'
として'@tidbcloud/serverless'をインポートしています。このモジュールがTiDBへの接続を処理する形態を取っています。
Cloudflareのドキュメントでも'@tidbcloud/serverless'を推奨接続方法として記載されていますので、こちらの方が新しい方式と思われます。

まずはWorkersプロジェクトを作成します。Wrangler環境が無い方はこちらを参照してください。
wrangler init tidb-cloud-cloudflare
入力パラメータは以下を参考にして下さい。注意点としてはJavaScriptではなくTypeScriptでイニシャライズを行っています。
Delegating to locally-installed wrangler@3.10.0 over global wrangler@2.14.0...
Run `npx wrangler init tidb-cloud-cloudflare` to use the local version directly.

 ⛅️ wrangler 3.10.0 (update available 3.17.1)
-------------------------------------------------------
Using npm as package manager.
▲ [WARNING] The `init` command is no longer supported. Please use `npm create cloudflare@2 -- tidb-cloud-cloudflare` instead.

  The `init` command will be removed in a future version.


Running `npm create cloudflare@2 -- tidb-cloud-cloudflare`...

using create-cloudflare version 2.0.9

╭ Create an application with Cloudflare Step 1 of 3
│
├ Where do you want to create your application?
│ dir tidb-cloud-cloudflare
│
├ What type of application do you want to create?
│ type "Hello World" script
│
├ Do you want to use TypeScript?
│ typescript yes
│
├ Copying files from "simple" template
│
├ Do you want to use git?
│ git no
│
╰ Application created

╭ Installing dependencies Step 2 of 3
│
├ Installing dependencies
│ installed via `npm install`
│
╰ Dependencies Installed

╭ Deploy with Cloudflare Step 3 of 3
│
├ Do you want to deploy your application?
│ no deploying via `npm run deploy`
│
├  APPLICATION CREATED  Deploy your application with npm run deploy
│
│ Run the development server npm run start
│ Deploy your application npm run deploy
│ Read the documentation https://developers.cloudflare.com/workers
│ Stuck? Join us at https://discord.gg/cloudflaredev
│
╰ See you again soon!
次に以下を実行し、必要なライブラリをインストールします。
cd tidb-cloud-cloudflare
npm install @tidbcloud/serverless
次にindex.tsを以下に置き換えます。デフォルトで存在しているtsファイルがworkers.tsとなっているのはwranglerのバージョンの違いですので気にせず読み替えて作業を進めて下さい。
import { connect } from '@tidbcloud/serverless'


export interface Env {
   DATABASE_URL: string;
}

export default {
   async fetch(request: Request, env: Env, ctx: ExecutionContext): Promise<Response> {
      const conn = connect({url:env.DATABASE_URL})
      const resp = await conn.execute("show databases")
      return new Response(JSON.stringify(resp));
   },
};
env.DATABASE_URLのパラメータを使ってWorkersからTiDB Serverlessへ接続を行います。このため以下のコマンドで環境変数DATABASE_URLをセットしておくことでWorkersからenv.DATABASE_URLで値の取得が可能となります。
wrangler secret put DATABASE_URL
このコマンドを実行すると値の入力が求められますので以下の文字列をペーストして値をセットします。
mysql://xxxxuserid.root:xxxxpassword@gateway01.eu-central-1.prod.aws.tidbcloud.com:4000
xxxxの部分は勿論皆さんの環境に置き換えてください。1個注意点ですが、passwordの部分(2つめのxxxxの部分)は小文字のpが頭についていると思いますので削除してください。
この辺りの手順は公式ドキュメントと少し異なりますが、公式の手順だとエラーとなるので注意してください。
ではデプロイを行います。
npx wrangler deploy
表示されるURLにブラウザでアクセスすると以下が表示されるはずです。
[{"Database":"INFORMATION_SCHEMA"},{"Database":"PERFORMANCE_SCHEMA"},{"Database":"mysql"},{"Database":"test"}]
3. SQLの実行
TiDBのコンソールでChat2Queryを起動します。
以下のSQLを実行してください。
USE test;

CREATE DATABASE IF NOT EXISTS `bookshop`;
CREATE TABLE `bookshop`.`users` (
  `id` bigint,
  `nickname` varchar(100),
  `balance` decimal(15,2)
);
INSERT INTO `bookshop`.`users` (`id`, `nickname`, `balance`) VALUES (1, 'John', 100.00);
select * from `bookshop`.`users`;

Workersのコードを以下のように書き換え、再度Deployすることで画面に値が表示されます。
const resp = await conn.execute("select * from `bookshop`.`users`;")

Discussion