Cloudflare Workers AI のハンズオン手順
今週はCloudflare BirthDay Week とうことで、Cloudflareは14年目に入りました。その中で多くのサービス発表やアップデートがありました。
その中でもやはり話題となったのは生成AI関連のアップデートです。
Workers AI
WorkresのWebGPUサポート
Vectorize(Vector データベース)
AI Gateway
あたりでしょうか。
10-17のCloudflare Meetup OnlineでBirthDay Weekのまとめをやる予定ですので興味がある方は参加してください!
この記事ではWorkers AIを使ってチャットボットの原型を作る手順を紹介します。
WebGPU と Workers AI の関係
まずWorkersはService Workers/Web Workersで実装されており、Chroniumのv8エンジンを使用しています。このためブラウザと深いつながりを持っています。
WebGPUとはchatGPT先生によると以下とあります。
WebGPUは、画像処理と計算処理のアクセラレーションのための将来のウェブ標準およびJavaScript APIのためのワーキングネームであり、モダンな3D画像処理と計算機能を提供することを目的としています1。WebGPUは、Apple、Mozilla、Microsoft、Googleなどの組織のエンジニアが協力して、W3CのGPU for the Webコミュニティグループで開発されています。
WebGPUは、既存のネイティブAPIを直接ポートするものではなく、Vulkan、Metal、Direct3D 12にある概念をベースにしており、これらのモダンなグラフィックAPI上で高性能を提供することを目指しています1。WebGLとは異なります。WebGPUは、ウェブプラットフォーム上で高速かつ効率的なグラフィックスおよび計算処理を実現するために設計されています。
WebGPUはまだリリース前ですが、Apple、Mozilla、Microsoft、Googleなどが既にWebGPU APIをサポートしています。
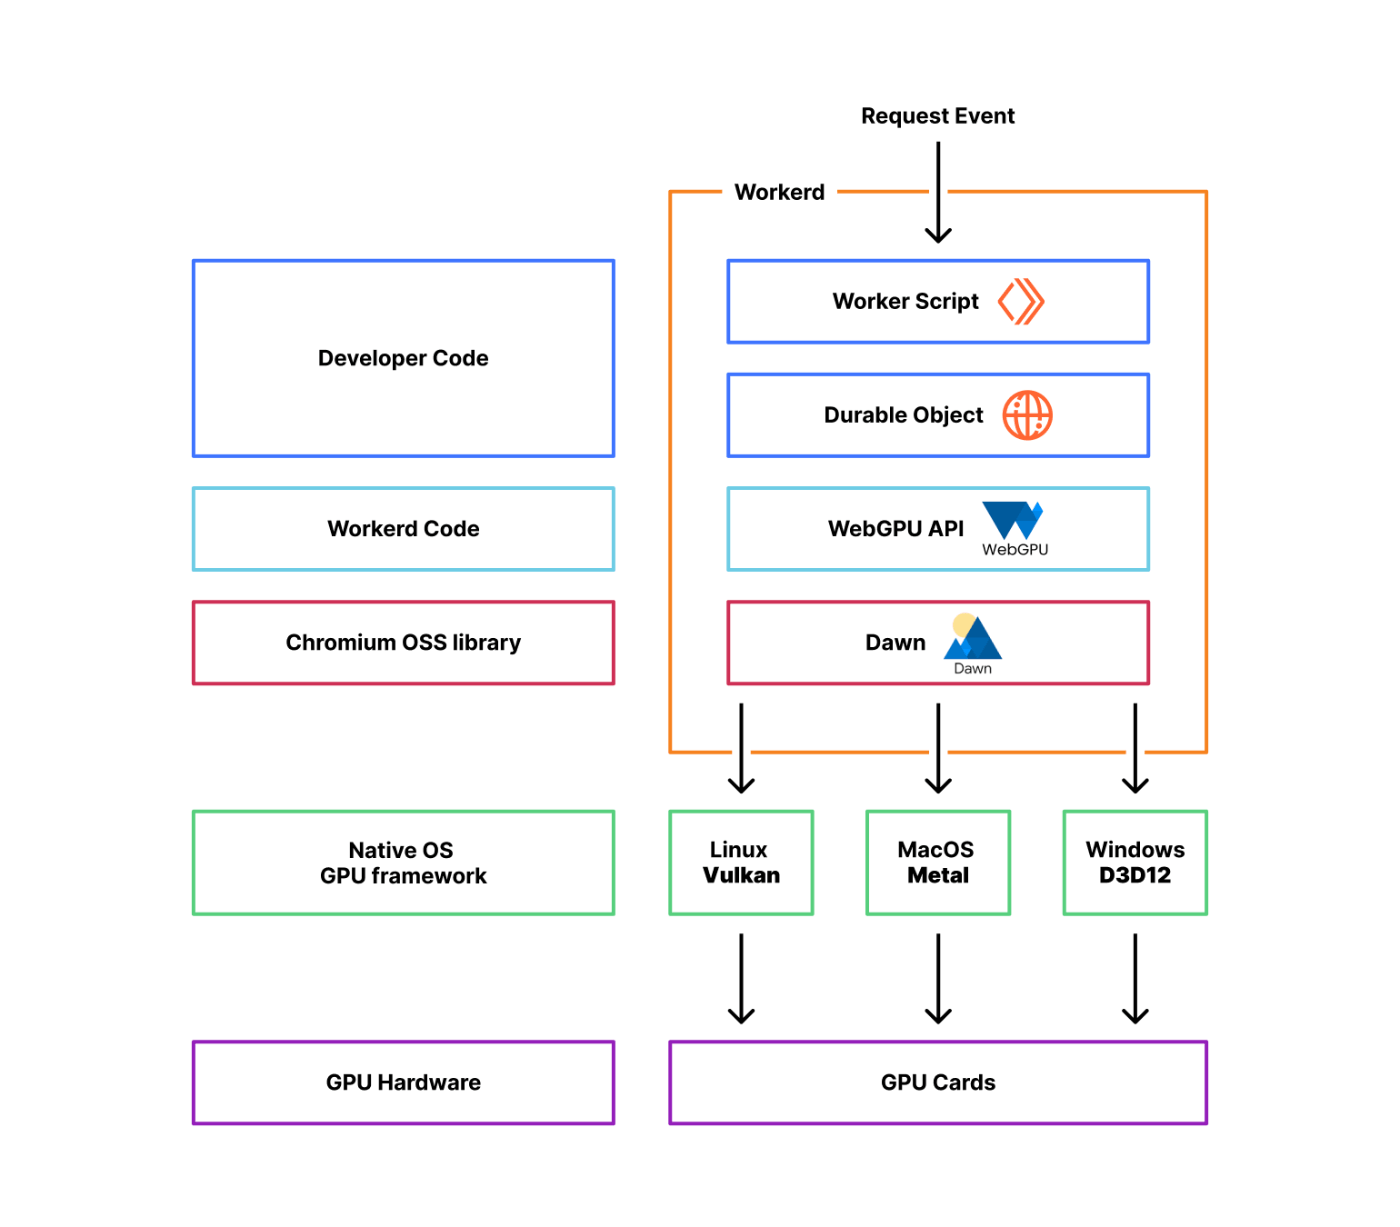
単純にはブラウザからアクセス可能なGPU用APIと言えます。従来存在していた規格(WebGL)より、GPU への下位レベルの直接アクセスを提供するため、より細かい制御を行うことが出来ます。またグラフィックス機能に限定されず汎用GPU機能が提供されるため、機械学習への利用が可能となります。またWebGLと比べ並列処理を得意とするためWorkersの実装は以下のようになっています。

シンプルには、HWであるGPUを仮想化&共用化させ、個別ブラウザインスタンスや近しい存在であるWorkersからGPUへのアクセスを実現させることが出来ます。これによりWorkers AIが成立しています。
Workers AI
Workers AI とは機械学習の推論用プラットフォームです。学習基盤をCloudflareが提供しているわけではないことに注意してください。その代わりビルトインのモデルをいくつか提供しています。リリース時点では以下のモデルがサポートされています。
テキスト生成 (大規模言語モデル): meta/llama-2-7b-chat-int8
自動音声認識 (ASR): openai/whisper
翻訳:メタ/m2m100-1.2
テキスト分類:ハグフェイス/distilbert-sst-2-int8
画像分類: microsoft/resnet-50
埋め込み: baai/bge-base-en-v1.5
やってみる
では早速やってみましょう。動作にはWorkersのUnboundモデルが必要です。Workersの無償プランではCPU時間が50msまでであり、推論結果を待つ間にタイムアウトしてしまいます。5ドル/月、と高くない費用ですのでアップグレードしてしまいましょう! アップデートがかかりたぶん大丈夫なはずです。
基本的な手順はここにあります。
まず以下のコマンドを実行します。
mkdir workers-ai
cd workers-ai
npm create cloudflare@latest
途中いくつか入力が求められますが、
dir:デフォルトのまま
type:"Hello World" Worker
TypeScript:Yes
git:No
deploy:No
を指定します。
フォルダが一つできていますので移動しておきます。
wrangler.tomlに以下を記載します。
[ai]
binding = "AI" #available in your worker via env.AI
name = "long-band-e056"
main = "src/index.ts"
compatibility_date = "2023-09-22"

[ai]
binding = "AI" #available in your worker via env.AI
次に
npm install @cloudflare/ai
を実行してWorkers AIのクライアントライブラリをインストールします。
src/index.tsを以下に置換します。
import { Ai } from '@cloudflare/ai'
export default {
  async fetch(request, env) {
    const ai = new Ai(env.AI);
    const input = { prompt: "What's the origin of the phrase 'Hello, World'" };
    const output = await ai.run('@cf/meta/llama-2-7b-chat-int8', input );
    return new Response(JSON.stringify(output));
  },
};
完了したらDeployを行います。
npx wrangler deploy
ブラウザでアクセスすると以下のような出力がされています。
{"response":"?\n\nThe phrase \"Hello, World!\" is a common greeting used to test the output of a computer program or to demonstrate its functionality. It is often used as the first program in a programming language tutorial or course, as it is simple and easy to understand.\n\nThe origin of the phrase \"Hello, World!\" is unclear, but it is believed to have originated in the 1970s as a way to test the output of a computer program. The phrase was likely chosen because it is a simple and common greeting that is easy to understand and use.\n\nThe use of \"Hello, World!\" as a test phrase has become widespread in the computer programming community, and it is now used in many different programming languages and contexts. It is often used as a way to introduce new programmers to the basics of programming, as it is a simple and easy-to-understand example that can be used to demonstrate the basic principles of programming."}
これはソースの中にあるWhat's the origin of the phrase 'Hello, World'という質問に対する回答です。コードは驚くほどシンプルで以下の3行がメインです。使用したモデルは@cf/meta/llama-2-7b-chat-int8です。
const ai = new Ai(env.AI);
const input = { prompt: "What's the origin of the phrase 'Hello, World'" };
const output = await ai.run('@cf/meta/llama-2-7b-chat-int8', input );
少しだけ改造してみる
このままだと質問をソースコード内で記載しDeployしなければならないので少し遊ぶには不便です。以下のようにURLパラメータで質問を取るように改造します。
(前)
const input = { prompt: "What's the origin of the phrase 'Hello, World'" };
(後)
const urlParams = new URLSearchParams(request.url.split('?')[1]);
const input = { prompt: urlParams.get('input') };
こうすることにより
https://<Workers URL>/?input=xxxxxxx
の形式で質問を出せるようになります。勿論日本語でも質問を出すことができます。
また、出力について、例えば伊丹空港の場所を聞いた場合以下のように見づらいです。
{"response":"\n\n* 兵庫県伊丹市高塚町1000番地\n\n## 概要\n\n* 滑走路:1本(1,500m×30m)\n* 駐機場:10機\n* 管理:神戸空港事務所伊丹空港出張所\n\n## 沿革\n\n* 1971年(昭和46年):伊丹空港が開港。\n* 1972年(昭和47年):運輸省(現・国土交通省)により、空港施設の管理が開始。\n* 1980年(昭和55年):滑走路を延伸(1,500m×30m)。\n* 1990年(平成2年):管理を神戸空港事務所に移管"}
以下のように変更して文字列を操作します。
(前)
return new Response(JSON.stringify(output));
(後)
const convertedText = JSON.stringify(output).replace(/\\n/g, "").replace(/\\u/g, "\\u").replace(/\\u/g, "\\u");
return new Response(convertedText);
2024/08/16 更新
のイベントに参加される方は最後にソースを以下に変更してwranglre deployを実行した後、三浦さんパートに移行して下さい!
export default {
	async fetch(request, env, ctx) {
		const url = new URL(request.url);
		const content = url.searchParams.get('content') || 'What is the square root of 9?'; // Default value if content is not provided
console.log(content)

	  const answer = await env.AI.run(
		'@cf/meta/llama-3-8b-instruct',
		{
		  messages: [
			{ role: 'user', content: content}
		  ]
		}
	  )

	  return new Response(JSON.stringify(answer))
	}
  }
Discussion