devise を導入する手順とその後の運用
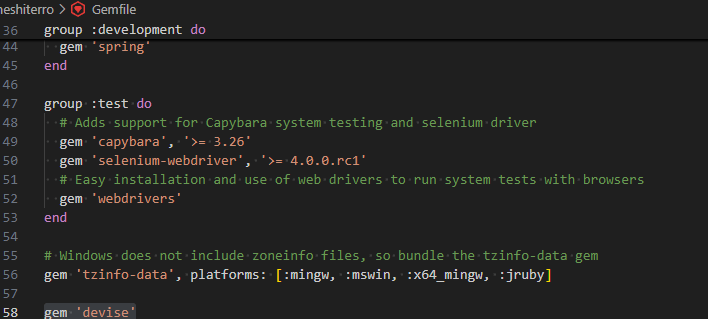
1.Gemファイルの最後に
gem 'devise'
を追加する

2.インストールを行う
rails g devise:install

createと描かれているので成功している
deviseはモデル、ビュー、コントローラを作成するための独自のコマンドを持つ
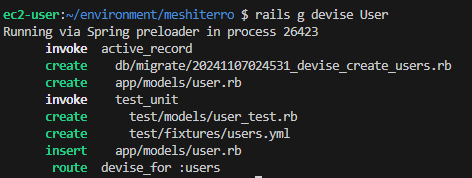
それに対応したコマンドでモデルを作成する
rails g devise User
rails g devise モデル名の記述は、devise 独自のルール

作成された Model ファイルを確認
class User < ApplicationRecord
  # Include default devise modules. Others available are:
  # :confirmable, :lockable, :timeoutable, :trackable and :omniauthable
  devise :database_authenticatable, :registerable,
         :recoverable, :rememberable, :validatable
end
<!--  作成した User モデルに devise で使用する機能が記述されている-->
作成された migration ファイルを確認
ユーザ登録の際に名前を登録する場合
## 名前を保存するカラム
t.string :name

t.string :name を追加することで、名前を保存できるようにします。
このファイルを使って、データベースへマイグレーションを行います。
rails db:migrate
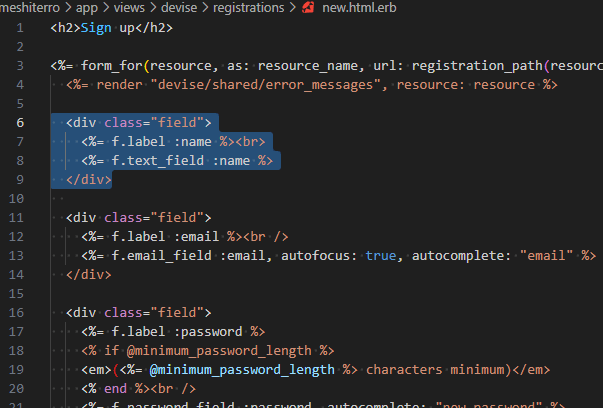
初期のままだと入力画面にはnameが無いので
基本的な View をカスタマイズして、name を入力させる必要があります
name を入力するフォームを作成するためには View ファイルが必要
devise の機能を使って View ファイルを作成することで、
上書きしてカスタマイズすることができます。
rails g devise:views

作成が完了したら
編集をする
app/views/devise/registrations/new.html.erb

deviseで提供される画面では、
フォームを作成するヘルパーとしてform_forが使用されています。
form_forは現在は非推奨ですので、form_withへと変更します。
変更するファイルはユーザー登録画面とログイン画面です。
app/views/devise/registrations/new.html.erb
<%= form_with model: @user, url: user_registration_path do |f| %>
app/views/devise/sessions/new.html.erb
<%= form_with model: @user, url: user_session_path do |f| %>
この二つを変える
app/views/devise/registrations/new.html.erb
<h2>Sign up</h2>

<%= form_for(resource, as: resource_name, url: registration_path(resource_name)) do |f| %>
  <%= render "devise/shared/error_messages", resource: resource %>

  <div class="field">
    <%= f.label :name %><br>
    <%= f.text_field :name %>
  </div>

  <div class="field">
    <%= f.label :email %><br />
    <%= f.email_field :email, autofocus: true, autocomplete: "email" %>
  </div>

  <div class="field">
    <%= f.label :password %>
    <% if @minimum_password_length %>
    <em>(<%= @minimum_password_length %> characters minimum)</em>
    <% end %><br />
    <%= f.password_field :password, autocomplete: "new-password" %>
  </div>

  <div class="field">
    <%= f.label :password_confirmation %><br />
    <%= f.password_field :password_confirmation, autocomplete: "new-password" %>
  </div>

  <div class="actions">
    <%= f.submit "Sign up" %>
  </div>
<% end %>

<%= render "devise/shared/links" %>
<h2>Sign up</h2>

<%= form_with model: @user, url: user_registration_path do |f| %>
  <%= render "devise/shared/error_messages", resource: resource %>

  <div class="field">
    <%= f.label :name %><br>
    <%= f.text_field :name %>
  </div>

  <div class="field">
    <%= f.label :email %><br />
    <%= f.email_field :email, autofocus: true, autocomplete: "email" %>
  </div>

  <div class="field">
    <%= f.label :password %>
    <% if @minimum_password_length %>
    <em>(<%= @minimum_password_length %> characters minimum)</em>
    <% end %><br />
    <%= f.password_field :password, autocomplete: "new-password" %>
  </div>

  <div class="field">
    <%= f.label :password_confirmation %><br />
    <%= f.password_field :password_confirmation, autocomplete: "new-password" %>
  </div>

  <div class="actions">
    <%= f.submit "Sign up" %>
  </div>
<% end %>

<%= render "devise/shared/links" %>
app/views/devise/sessions/new.html.erb
<h2>Log in</h2>

<%= form_for(resource, as: resource_name, url: session_path(resource_name)) do |f| %>
  <div class="field">
    <%= f.label :email %><br />
    <%= f.email_field :email, autofocus: true, autocomplete: "email" %>
  </div>

  <div class="field">
    <%= f.label :password %><br />
    <%= f.password_field :password, autocomplete: "current-password" %>
  </div>

  <% if devise_mapping.rememberable? %>
    <div class="field">
      <%= f.check_box :remember_me %>
      <%= f.label :remember_me %>
    </div>
  <% end %>

  <div class="actions">
    <%= f.submit "Log in" %>
  </div>
<% end %>

<%= render "devise/shared/links" %>
<h2>Log in</h2>

<%= form_with model: @user, url: user_session_path do |f| %>
  <div class="field">
    <%= f.label :email %><br />
    <%= f.email_field :email, autofocus: true, autocomplete: "email" %>
  </div>

  <div class="field">
    <%= f.label :password %><br />
    <%= f.password_field :password, autocomplete: "current-password" %>
  </div>

  <% if devise_mapping.rememberable? %>
    <div class="field">
      <%= f.check_box :remember_me %>
      <%= f.label :remember_me %>
    </div>
  <% end %>

  <div class="actions">
    <%= f.submit "Log in" %>
  </div>
<% end %>

<%= render "devise/shared/links" %>
次にコントローラーの編集
⇒初期状態の devise は、「email」と「パスワード」しか受け取ることを許可されていません。
ストロングパラメータと同様
deviseのコントローラは直接修正できないため、
全てのコントローラに対する処理を行える権限を持つ、
ApplicationControllerに記述する必要があります。
  before_action :configure_permitted_parameters, if: :devise_controller?

  protected

  def configure_permitted_parameters
    devise_parameter_sanitizer.permit(:sign_up, keys: [:name])
  end

この時点で一回試しにサインアップしてみよう!
⇒トップページに飛べば成功
ログインとログアウトをさせるリンクを用意する
  <header>
    <% if user_signed_in? %>
      <li>
        <%= link_to "ログアウト", destroy_user_session_path, method: :delete %>
      </li>
    <% else %>
      <li>
        <%= link_to "新規登録", new_user_registration_path %>
      </li>
      <li>
        <%= link_to "ログイン", new_user_session_path %>
      </li>
    <% end %>
  </header>
このヘッダーをapplication.html.erbにはる

ログイン後の画面を指定したい。
現段階は初期のdeviseの設定のままになっている
⇒aboutのページに飛ぶようにする
app/controllers/application_controller.rbを以下のように記述します
  def after_sign_in_path_for(resource)
    about_path
  end
⇓追加したコード全文
class ApplicationController < ActionController::Base
  before_action :configure_permitted_parameters, if: :devise_controller?

  def after_sign_in_path_for(resource)
    about_path
  end

  protected

  def configure_permitted_parameters
    devise_parameter_sanitizer.permit(:sign_up, keys: [:name])
  end

end
サインアウトの場合は
  def after_sign_out_path_for(resource)
    about_path
  end
これを追加すればよい
after_sign_out_path_forはafter_sign_in_path_forと同じく
Deviseが用意しているメソッドでサインアウト後にどこに遷移するかを設定するメソッド
Deviseのデフォルトはroot_pathになっています
ActiveStorage の機能を使って画像をアップロードさせる方法
まずはモデルを用意する
投稿画像の管理用テーブルを作成するためのコマンドは以下のようになります。
PostImage モデルを作成し、必要なカラムを含むマイグレーションファイルを生成します。
rails generate model PostImage shop_name:string caption:text user_id:integer
説明
-
rails generate model: モデルとマイグレーションファイルを生成するためのコマンド。 -
PostImage: モデル名。Railsの慣例により、テーブル名はpost_imagesとなります。 -
shop_name:string: お店の名前を保存するためのstring型カラム。 -
caption:text: 画像の説明を保存するためのtext型カラム。 -
user_id:integer: 投稿したユーザを識別するためのinteger型の外部キー。
次の手順
- コマンドを実行した後、生成されたマイグレーションファイル (
db/migrate/タイムスタンプ_create_post_images.rb) を確認し、必要であれば修正します。 - マイグレーションを実行して、テーブルをデータベースに作成します。
rails db:migrate
これで、post_images テーブルがデータベースに作成され、
指定したカラムを持つようになります。
これでPostImage モデルが作成された。
このPostImage モデルはどういうデータ?何のためのデータだったか?
⇒投稿画像の管理用テーブルを作成するため
PostImage モデルの設定ファイルに、記述を追加する必要がある
has_one_attached :image

PostImage モデルの設定ファイルに has_one_attached :imageを追加することで、
ActiveStorage を使って画像をアップロード・管理できるようになる
コントローラを用意する
PostImages コントローラを作成し、
new、index、show アクションも同時に追加するためには、
以下のコマンドを実行します。
rails generate controller PostImages new index show
説明
-
rails generate controller: コントローラを作成するためのコマンドです。 -
PostImages: 作成するコントローラの名前。 -
new index show: 一緒に作成するアクションを指定しています。
実行後に生成されるファイル
-
app/controllers/post_images_controller.rb:PostImagesControllerクラスが作成され、new、index、showアクションが定義されます。 -
app/views/post_images/new.html.erb:newアクション用のビュー。 -
app/views/post_images/index.html.erb:indexアクション用のビュー。 -
app/views/post_images/show.html.erb:showアクション用のビュー。
このコマンドを実行したら、コントローラに必要なロジックを追加し、ビューを編集して投稿機能、一覧画面、詳細画面、削除機能を作成していきましょう。


resources メソッドをつかってルーティングを書き直す
resources :post_images, only: [:new, :index, :show]
このメソッドで作成されるルーティングは
new(投稿を作成する画面)
show(投稿の詳細画面)
index(投稿の一覧画面)
edit(投稿の編集画面)
create(投稿作成)
destroy(投稿削除)
update(投稿更新)
これだと多いのでonlyオプションを使用することで、生成するルーティングを限定する
アソシエーションしていく
今回は、
投稿者⇒User
投稿⇒PostImage
この2つの関連付け(アソシエーション)を考える
(自分個人の考え方だが、生み出されるのはどっちか考える⇒生産者はUserになる)
User モデル(1)に対して、PostImage モデル(N)が 1:N になるよう関連付け
has_many :post_images, dependent: :destroy #追加
belongs_to :user #追加
投稿できるようにする
form_with を利用する
<%= form_with model: @post_image do |f| %> は、
Rails でフォームを作成するための便利なヘルパーメソッドです。
これを使用することで、モデルオブジェクトに基づいたフォームを簡単に生成できます。
以下で仕組みと詳しい解説をします。
form_with の仕組み
form_with は、フォームのHTMLを生成し、データをサーバーに送信する仕組みを持っています。model: @post_image を指定することで、
@post_image の状態(新規作成か編集か)に応じて、適切なフォームが自動的に生成されます。
この状態はコントローラーのアクション内で指定される
例
  def new
    @post_images = PostImage.new
  end
具体的な解説
-
model: @post_image:- この指定により、
@post_imageオブジェクトをフォームに関連付けます。 - 新規作成 (
@post_image.new_record?がtrue) の場合、form_withはPOSTメソッドを使用し、/post_imagesのURLに送信するフォームを生成します。
- この指定により、
-
do |f|ブロック:-
|f|はフォームオブジェクトのブロック引数で、フォーム内で使うタグを生成するために使用されます。 -
fを使って、フォーム内でtext_field、textarea、file_fieldなどの入力タグを生成できます。
-
実際のコード例
<h1>画像投稿フォーム</h1>
<%= form_with model: @post_image do |f| %>
  <h4>画像</h4>
  <%= f.file_field :image, accept: "image/*" %>
  <h4>ショップ名</h4>
  <%= f.text_field :shop_name %>
  <h4>説明</h4>
  <%= f.text_area :caption %>
  <%= f.submit '投稿' %>
<% end %>
各部分の解説
-
f.file_field: 画像のアップロード用のフィールドを生成します。 -
f.text_field:shop_name属性の入力フィールドを生成します。 -
f.text_area:caption属性のテキストエリア(複数行入力欄)を生成します。 -
f.submit: フォームの送信ボタンを生成します。
フォーム送信の流れ
- ユーザーがフォームにデータを入力して送信ボタンを押します。
-
form_withによって生成されたフォームが、そのデータを指定されたURLに送信します。 - コントローラで該当のアクション(
createまたはupdate)が呼ばれ、受け取ったデータをもとに処理を行います。
自動的な利便性
-
ルーティングの自動生成:
model: @post_imageを指定すると、form_withは適切なパスを自動で選択するため、URLを手動で指定する必要がありません。 - CSRF 対策: フォーム内に CSRF トークンが自動的に埋め込まれ、セキュリティを確保します。
これらによって、form_with は非常に簡潔に、かつ安全なフォームを構築できる便利なヘルパーメソッドとなっています。
画像アップロードフィールドは、
<%= f.file_field :image, accept: "image/*" %>
で実装しています。
次に PostImage をデータベースに登録する機能を作成します。
現段階のコントローラーのアクションは⇓
class PostImagesController < ApplicationController
      def new
        @post_images = PostImage.new
      end

      def index
      end

      def show
      end

  end
これだと、newのページ(新規投稿画面)に来た時に空のPostImageのデータが作成されているだけ
投稿データを保存するために追記します(newのページに来て投稿内容を入力して保存するということ)
⇓
class PostImagesController < ApplicationController

    def new
        @post_image = PostImage.new
      end

      # 投稿データの保存
      def create
        @post_image = PostImage.new(post_image_params)
        @post_image.user_id = current_user.id
<!-- current_user.idでログインしている人のIDを取得して@post_imageのuser_idカラムに代入 -->
        @post_image.save
        redirect_to post_images_path
      end

      def index
      end

      def show
      end

      # 投稿データのストロングパラメータ
      private

      def post_image_params
        params.require(:post_image).permit(:shop_name, :image, :caption)
      end


end
post_image_paramsメソッドでは、フォームで入力されたデータが、
投稿データとして許可されているパラメータ
かどうかをチェックしています。
※この時点で投稿すると投稿一覧画面が存在しないためエラーになります。
最後にルーティングの追加をします。
resources に create を追加し完了です。
resources :post_images, only: [:new, :create, :index, :show]
ルーティングを変更したらサーバーを再起動!
投稿フォームへのリンクを追加しましょう。
<%= link_to '投稿フォーム', new_post_image_path %>
new アクションと create アクションの両方で @post_image を使っていますが、
それぞれ異なる目的があります。
new アクションの役割
new アクションでは、フォームを表示するために
空の PostImage オブジェクトを生成しています。
この @post_image = PostImage.new は、新規投稿フォームで使うための
空のインスタンスを用意して、ビューに渡す役割を担っています。
- 役割: 新規投稿フォームを表示するための空のオブジェクトを準備。
- 使用タイミング: ユーザーがフォームにアクセスしたときにビューで使われる。
create アクションの役割
create アクションは、フォームから送信されたデータを受け取って、
新しい PostImage オブジェクトを生成し、データベースに保存します。
- 役割: フォームから送られてきたデータを元に新しい投稿を作成し、データベースに保存する。
- 使用タイミング: ユーザーがフォームを送信した後、データを受け取って処理するとき。
同じ変数名の使用について
@post_image は、new アクションと create アクションで
それぞれ異なる処理を行っていますが、同じ名前の変数を使用しているため、
混乱するかもしれません。これは、Rails の各アクションが呼ばれたときに
独立して処理されるため問題ありません。
-
newアクション での@post_imageは、ビューでフォームに使うための空のオブジェクト。 -
createアクション での@post_imageは、フォームから送られたデータを使って新たに作成され、データベースに保存されるオブジェクト。
各アクションはリクエストごとに実行されるため、new で生成した @post_image が create に影響を与えることはありません。
ActiveStorageで画像を表示する際に注意する点
画像が投稿されていない場合はエラーが出る
⇒ない場合のパターンのためにif文を使って分岐させる
<% if list.image.attached? %>
    <%= image_tag list.image, size: "200x200" %>
<% else %>
    <%= image_tag 'no_image', size: "200x200" %>
<% end %>
しかし、この分岐はビューでなく、そのモデルで行うことができる!
 def get_image
    unless image.attached?
      file_path = Rails.root.join('app/assets/images/no_image.jpg')
      image.attach(io: File.open(file_path), filename: 'default-image.jpg', content_type: 'image/jpeg')
    end
    image
  end
このget_imageメソッドは、以下のように動作します:
1. 画像が添付されていない場合
-
image.attached?を使って、画像が添付されているかどうかを確認します。 - もし画像が添付されていなければ、次の処理が行われます。
-
Rails.root.join('app/assets/images/no_image.jpg')で、no_image.jpgというデフォルト画像のパスを取得します。これはapp/assets/imagesディレクトリ内に保存されている画像です。 -
image.attachを使って、そのデフォルト画像をimageカラムに添付します。この時、画像ファイルがno_image.jpgという名前で保存され、content_typeには'image/jpeg'が設定されます。
-
2. 画像が添付されている場合
- もし画像がすでに添付されていれば、そのまま
imageを返します。
詳しい動作
-
画像が添付されていない場合
- デフォルト画像 (
no_image.jpg) をファイルシステムから読み込む。 - 読み込んだ画像を
imageフィールドに添付する。 - 添付した画像オブジェクト(
image)を返す。
- デフォルト画像 (
-
画像が添付されている場合
- すでに添付されている画像をそのまま返す。
コードの動作例
def get_image
  # 画像が添付されていない場合
  unless image.attached?
    # デフォルト画像のパスを取得
    file_path = Rails.root.join('app/assets/images/no_image.jpg')
    # デフォルト画像を画像フィールドに添付
    image.attach(io: File.open(file_path), filename: 'default-image.jpg', content_type: 'image/jpeg')
  end
  # 添付された画像またはデフォルト画像を返す
  image
end
使いどころ
- このメソッドは、画像投稿機能があるモデル(例えば、
PostImage)で使われることが多いです。画像がアップロードされていない場合でも、デフォルト画像を表示したい場合に便利です。
コントローラーやビューでの使用
コントローラー内では、@post_image.get_image を呼び出して画像を取得し、その結果をビューに渡して表示することができます。
class PostImagesController < ApplicationController
  def show
    @post_image = PostImage.find(params[:id])
    # 画像を取得(デフォルト画像も含む)
    @image = @post_image.get_image
  end
end
ビューでは、以下のように@imageを使って画像を表示できます。
<%= image_tag @image %>
注意点
-
image.attachはデフォルト画像をデータベースに保存する操作です。そのため、最初に画像が添付されていない場合のみ、デフォルト画像を添付することになります。
投稿一覧を作成するためにコントローラーのindexアクションを編集する
class PostImagesController < ApplicationController
  def index
    @post_images = PostImage.all
  end
end
@post_imagesにはpost_imagesテーブル内に存在する全てのレコードのインスタンスを代入
投稿一覧を作成するためにViewを編集する
<% @post_images.each do |post_image| %>
  <div>
    <%= image_tag post_image.get_image %>
    <p>投稿ユーザー画像:<%= image_tag post_image.user.get_profile_image(100,100) %></p>
    <p>ショップ名:<%= post_image.shop_name %></p>
    <p>説明:<%= post_image.caption %></p>
    <p>ユーザーネーム:<%= post_image.user.name %></p>
  </div>
<% end %>
<%= image_tag post_image.get_image %>は、post_image.get_imageメソッドを呼び出して、その結果を画像として表示するためのRailsのビューコードです。以下で詳しく解説します。
1. image_tagメソッド:
-
image_tagは、Railsのヘルパーメソッドで、指定された画像のタグを生成します。このタグは、HTMLで<img>タグとして出力されます。 -
image_tagには、画像のパス(URL)を引数として渡します。そのパスの画像がブラウザに表示されます。
<%= image_tag "sample.jpg" %>
上記の例では、sample.jpgという画像ファイルがブラウザに表示されます。
2. post_image.get_imageの役割:
-
post_image.get_imageは、PostImageモデル内に定義されたメソッドです。このメソッドが何をしているかは、前述の通りです。主に、post_imageに画像が添付されているかどうかを確認し、もし画像が添付されていなければデフォルト画像(no_image.jpg)を表示する処理を行います。
以下がその例です:
def get_image
  unless image.attached?
    file_path = Rails.root.join('app/assets/images/no_image.jpg')
    image.attach(io: File.open(file_path), filename: 'default-image.jpg', content_type: 'image/jpeg')
  end
  image
end
-
post_image.get_imageは、imageが添付されていない場合にデフォルト画像(no_image.jpg)を返し、もし画像が添付されていれば、その画像を返します。 - この結果、
image_tag post_image.get_imageは、PostImageに添付された画像、またはデフォルト画像を表示することになります。
3. 全体の流れ:
-
@post_images.each do |post_image|で@post_images(投稿の画像データ)の配列を順に処理しています。 - 各
post_imageについて、post_image.get_imageが呼ばれ、その画像(またはデフォルト画像)のURLが返されます。 -
image_tagがそのURLを使って画像を表示するため、画像がブラウザに表示されます。
結果:
- 投稿画像が添付されていれば、その画像が表示され、添付されていなければ
no_image.jpgが表示されます。
ログイン後をここの一覧ページに変更したいなら
app/controllers/application_controller.rbのafter_sign_in_path_forを編集する

  def after_sign_in_path_for(resource)
    post_images_path
  end
投稿の詳細画面を作成する
コントローラーのアクションを書く
class PostImagesController < ApplicationController

  def show
    @post_image = PostImage.find(params[:id])
  end

end
ビューのコードを書く
<div>
  <%= image_tag @post_image.get_image %>
  <p>ショップ名:<%= @post_image.shop_name %></p>
  <p>説明:<%= @post_image.caption %></p>
  <p>投稿ユーザー画像:<%= image_tag @post_image.user.get_profile_image(100,100) %></p>
  <p>ユーザーネーム:<%= @post_image.user.name %></p>
  <p>投稿日:<%= @post_image.created_at.strftime('%Y/%m/%d') %></p>
</div>
<%= @post_image.created_at.strftime('%Y/%m/%d') %>
これは
@post_imageというデータのcreated_atというカラムを
年/月/日のフォーマットへ変換する記述
投稿の詳細ページに飛ばすには?
投稿一覧の中にある各投稿の投稿画像をリンクにすればよい
<% @post_images.each do |post_image| %>
  <div>
    <%= image_tag post_image.get_image %>
    <p>投稿ユーザー画像:<%= image_tag @post_image.user.get_profile_image(100,100) %></p>
    <p>ショップ名:<%= post_image.shop_name %></p>
    <p>説明:<%= post_image.caption %></p>
    <p>ユーザーネーム:<%= post_image.user.name %></p>
  </div>
<% end %>
<% @post_images.each do |post_image| %>
  <div>
    <%= link_to post_image_path(post_image.id) do %>
      <%= image_tag post_image.get_image %>
    <% end %>
    <p>投稿ユーザー画像:<%= image_tag @post_image.user.get_profile_image(100,100) %></p>
    <p>ショップ名:<%= post_image.shop_name %></p>
    <p>説明:<%= post_image.caption %></p>
    <p>ユーザーネーム:<%= post_image.user.name %></p>
  </div>
<% end %>
link_toでは、doからendの間が、aタグで囲まれた状態になります。
結果、image_tagは、aタグに囲まれたimgタグになります。
投稿の削除機能を作成する
  def destroy
    post_image = PostImage.find(params[:id])  # 削除するPostImageレコードを取得
    post_image.destroy  # 投稿画像を削除
    redirect_to post_images_path  # 投稿画像の一覧ページへ遷移
  end
ルーティングを編集
resources :post_images, only: [:new, :create, :index, :show, :destroy]
削除リンクを追加する
  <% if @post_image.user == current_user %>
    <%= link_to "削除", post_image_path(@post_image), method: :delete %>
  <% end %>
これを詳細画面に削除を実行するためのリンクを追記します。
<div>
  <%= image_tag @post_image.get_image %>
  <p>ショップ名:<%= @post_image.shop_name %></p>
  <p>説明:<%= @post_image.caption %></p>
  <p>投稿ユーザー画像:<%= image_tag 'sample-author1.jpg' %></p>
  <p>ユーザーネーム:<%= @post_image.user.name %></p>
  <p>投稿日時:<%= @post_image.created_at.strftime('%Y/%m/%d') %></p>
  <% if @post_image.user == current_user %>
<!-- ↑もし、投稿者 == 現在ログインしているユーザ だったら -->
    <%= link_to "削除", post_image_path(@post_image), method: :delete %>
  <% end %>
</div>
プロフィール写真をアップロードできるようにする!
PostImageモデルの時はActiveStorageに対応させたコードを書いていた

今回はプロフィール写真⇒ユーザーにも追記していく(追加分だけ記述)
  has_one_attached :profile_image


def get_profile_image(width, height)
  unless profile_image.attached?
    file_path = Rails.root.join('app/assets/images/sample-author1.jpg')
    profile_image.attach(io: File.open(file_path), filename: 'default-image.jpg', content_type: 'image/jpeg')
  end
  profile_image.variant(resize_to_limit: [width, height]).processed
end
has_one_attached :profile_imageという記述により、
profile_imageという名前でActiveStorageで
プロフィール画像を保存できるように設定しました。
get_profile_imageというメソッドはPostImageモデルの時と同じ要領
異なる点は、画像サイズの変換を行なっている点です。
このメソッドを実行する際にget_profile_image(100, 100)のように引数を設定すると
100x100の画像にリサイズが行われ
get_profile_image(200, 200)のように引数を設定すると200x200の画像に
リサイズが行われるということになります。
上記のコードを使っての画像サイズの変更には、
ImageMagick というライブラリが必要
インストール方法
$ sudo yum update -y
 $ sudo amazon-linux-extras install epel -y
$ sudo yum install -y ImageMagick
終わった後に成功か確認したいときは
$ convert --version
これを実行して
username:~/environment/meshiterro (main) $ convert --version
Version: ImageMagick 6.9.10-97 Q16 x86_64 2024-05-13 https://imagemagick.org
Copyright: © 1999-2020 ImageMagick Studio LLC
License: https://imagemagick.org/script/license.php
Features: Cipher DPC Modules OpenMP(4.5)
Delegates (built-in): bzlib cairo fftw fontconfig freetype gslib gvc jbig jng jp2 jpeg lcms ltdl lzma openexr pangocairo png ps raw rsvg tiff webp wmf x xml zlib
username:~/environment/meshiterro (main) $
ユーザーに関する機能を追加するためには、コントローラが必要
$ rails g controller users show edit
ユーザーに関するルーティングをresoucesを使用して修正する
resources :users, only: [:show, :edit]
ユーザーの詳細ページを作成
コントローラーのアクションから作成する
      def show
        @user = User.find(params[:id])
        @post_images = @user.post_images
      end
これを追記する
@user.post_images これの意味は@userに紐づいた⇒
User.find(params[:id])で特定されたUserに関連付けられたpost_images を習得してる
これは、アソシエーションを持っているモデル同士の記述方法
アソシエーションしている関係性は注意、どちらがNで1なのか・・・
ビューの作成
<!-- ユーザーの詳細 -->
<div>
  <h3><%= @user.name %></h3>
  <%= image_tag @user.get_profile_image(100,100) %>
</div>

<!-- ユーザーの投稿一覧 -->

<% @post_images.each do |post_image| %>
<div>
  <%= link_to post_image_path(post_image.id) do %>
    <%= image_tag post_image.get_image %>
  <% end %>
  <p>投稿ユーザー画像:<%= image_tag post_image.user.get_profile_image(100,100) %></p>
  <p>ショップ名:<%= post_image.shop_name %></p>
  <p>説明:<%= post_image.caption %></p>
  <p>ユーザーネーム:<%= post_image.user.name %></p>
</div>
<% end %>
リンクを作成する
<%= link_to 'マイページ', user_path(current_user.id) %>
ユーザーの編集画面の作成
コントローラーのアクションから作成
@user には、URLに含まれる id をもとに特定のユーザーを取得するためのコードを記述します。
show アクションで行ったように、params[:id] を使用して
特定の User モデルのレコードを取得できます。
edit アクション内で、@user を特定のユーザーに設定するための記述は以下のとおりです。
    def edit
      @user = User.find(params[:id])
    end
説明
-
User.find(params[:id])は、URLパラメータからidを取得して、
該当するUserレコードを見つけます。 -
@userに見つかったUserレコードが代入され、ビューで使用できるようになります。
編集画面のビューのコードを書く
<h2>プロフィール編集</h2>
<%= form_with model: @user do |f| %>
  <label for="inputName">Name</label>
  <%= f.text_field :name, autofocus: true, id:"inputName", placeholder:"名前"%>
  <label for="inputImage">ProfileImage</label>
  <%= f.file_field :profile_image, placeholder: "プロフィール画像", accept: "image/*" %>
  <%= f.submit "変更を保存" %>
<% end %>
form_with の model オプションには、プロフィールを編集する対象である
ユーザーのインスタンスを渡します。この場合、コントローラの edit アクションで
@user を設定しているので、@user を使用します。
このフォームは、update アクションに送信されるリクエストを構築します。
f.text_field と f.file_field により、ユーザー名とプロフィール画像を編集可能にしています。
編集画面へのリンクを設定する
<p><%= link_to "プロフィール編集", edit_user_path(@user) %></p>
説明
-
edit_user_path(@user)は、特定のユーザーの編集ページへのパスを生成します。 -
@userは、現在表示しているユーザーのインスタンスです。 - このリンクにより、クリックするとそのユーザーの編集画面に遷移できます。
しかし!この段階では変更画面の作成だけで
編集された内容を保存する機能が無い
以下のように update アクションを実装することで、
ユーザー情報を更新し、詳細ページにリダイレクトさせることができます。
編集後のコード例
class UsersController < ApplicationController

  # 他のアクション省略

  def update
    @user = User.find(params[:id])  # ユーザーの取得
    if @user.update(user_params)    # ユーザーのアップデート
      redirect_to user_path(@user)  # ユーザーの詳細ページへのパス
    else
      render :edit                  # 更新に失敗した場合は編集ページを再表示
    end
  end

  private

  def user_params
    params.require(:user).permit(:name, :profile_image)
  end

end
コードの説明
-
User.find(params[:id]): URL パラメータに基づいて特定のユーザーを取得します。 -
@user.update(user_params):user_paramsで許可されたパラメータを使ってユーザー情報を更新します。更新が成功した場合はtrueを返し、失敗した場合はfalseを返します。 -
redirect_to user_path(@user): ユーザーの詳細ページへリダイレクトします。 -
render :edit: 更新に失敗した場合、editビューを再表示します。
この update アクションにより、ユーザーのプロフィール情報が
編集フォームから送信されると、データベースに保存され、詳細ページにリダイレクトされます。
新しい機能を追加したので、ルーティングを確認して
resources :users, only: [:show, :edit, :update]
編集する(updateの追加)
ユーザーの編集画面へのリンクを本人のみに表示させたい
Devise のヘルパーメソッド current_user を使用します。
current_user は現在ログインしているユーザーを取得するために使われるので、
このヘルパーメソッドを使って条件を満たすかどうかを確認できます。
<!-- ユーザーの詳細 -->
<div>
  <h3><%= @user.name %></h3>
  <%= image_tag @user.get_profile_image(100,100) %>
  <% if @user == current_user %>
    <p><%= link_to "プロフィール編集", edit_user_path(@user) %></p>
  <% end %>
</div>

<!-- ユーザーの投稿一覧 -->

<% @post_images.each do |post_image| %>
  :
  :
<% end %>
説明
-
current_userはログインしているユーザーを示します。 -
@user == current_userは、表示しているユーザーがログイン中のユーザーであるかを確認 - 一致する場合のみ、「プロフィール編集」リンクが表示
URLを直接入力しても他のユーザーの編集ページにアクセスできないように
コントローラでアクセス制御を実装する必要があります。
これを防ぐために、before_actionフィルタを使って、
特定のアクションで本人確認を行いましょう。
例えば、users_controller.rbに以下のようなコードを追加します:
class UsersController < ApplicationController
  # 指定のアクションが実行される前に、ensure_correct_userメソッドを呼び出してアクセス制限を確認
  before_action :ensure_correct_user, only: [:edit, :update]

  # 編集画面を表示するためのアクション
  def edit
    # URLパラメータからIDを取得し、該当するユーザーを検索
    @user = User.find(params[:id])
  end

  # ユーザー情報を更新するためのアクション
  def update
    # URLパラメータからIDを取得し、該当するユーザーを検索
    @user = User.find(params[:id])
    # ユーザー情報の更新に成功した場合
    if @user.update(user_params)
      # 更新後、ユーザーの詳細ページへリダイレクト
      redirect_to user_path(@user)
    else
      # 更新に失敗した場合、編集画面を再表示
      render :edit
    end
  end

  private

  # 現在のユーザーが正しいユーザーか確認するメソッド
  def ensure_correct_user
    # URLパラメータからIDを取得し、該当するユーザーを検索
    @user = User.find(params[:id])
    # 現在のログインユーザーと一致しない場合
    unless @user == current_user
      # 他のユーザーの編集ページへのアクセスを拒否し、自分の詳細ページにリダイレクト
      redirect_to user_path(current_user), alert: '他のユーザーの編集ページにはアクセスできません。'
    end
  end

  # ユーザー情報の更新を許可するパラメータを定義するメソッド
  def user_params
    # nameとprofile_imageフィールドの更新を許可
    params.require(:user).permit(:name, :profile_image)
  end
end
このコードにより、editおよびupdateアクションにアクセスする際に、
ログイン中のユーザーと一致するかどうか確認し、
一致しない場合は自分の詳細ページにリダイレクトされます。
アラートを表示させる方法
Railsのアクションで設定したalertメッセージを表示するには、ビュー側にフラッシュメッセージを表示するコードを追加する必要があります。通常、application.html.erbなどのレイアウトファイルに以下のコードを追加することで、全ページでフラッシュメッセージを表示できるようになります。
フラッシュメッセージを表示するコード例
<% if flash[:alert] %>
  <div class="alert alert-danger">
    <%= flash[:alert] %>
  </div>
<% end %>

<% if flash[:notice] %>
  <div class="alert alert-success">
    <%= flash[:notice] %>
  </div>
<% end %>
解説
-
flash[:alert]は、コントローラでalertキーを使って設定したメッセージを取得します。 -
flash[:notice]は、通常の通知メッセージ用です。 -
<div class="alert alert-danger">や<div class="alert alert-success">は、BootstrapなどのCSSフレームワークを使用する場合に役立ちます。alert-dangerは警告、alert-successは成功メッセージのスタイルです。 - Railsの
flashはリダイレクト後に一度だけ表示され、ページを再読み込みすると消えます。
これをapplication.html.erbに配置すれば、ensure_correct_userメソッドでredirect_to user_path(current_user), alert: '他のユーザーの編集ページにはアクセスできません。'と設定したアラートが適切に表示されます。