RemixのuseBlockerを使って離脱防止ポップアップを表示しよう
これはなに
Remixで特定のページからブラウザバッグしようとした際に、離脱防止のポップアップを表示する方法です。
popstate等を使って実装しようとしていましたが、Remixのフックを使って簡単に実装できたのでまとめます。
各バージョンは以下になります。
| Remix | 2.15.3 |
| React | 18.2.0 |
| ReactHookForm | 7.54.2 |
useBlockerはRemixの公式Hooksです。
やりたいこと
- フォームにが入力されている場合にブラウザバッグすると、離脱防止のポップアップを表示する
- フォームが未入力の場合にブラウザバッグすると、ポップアップは表示しない
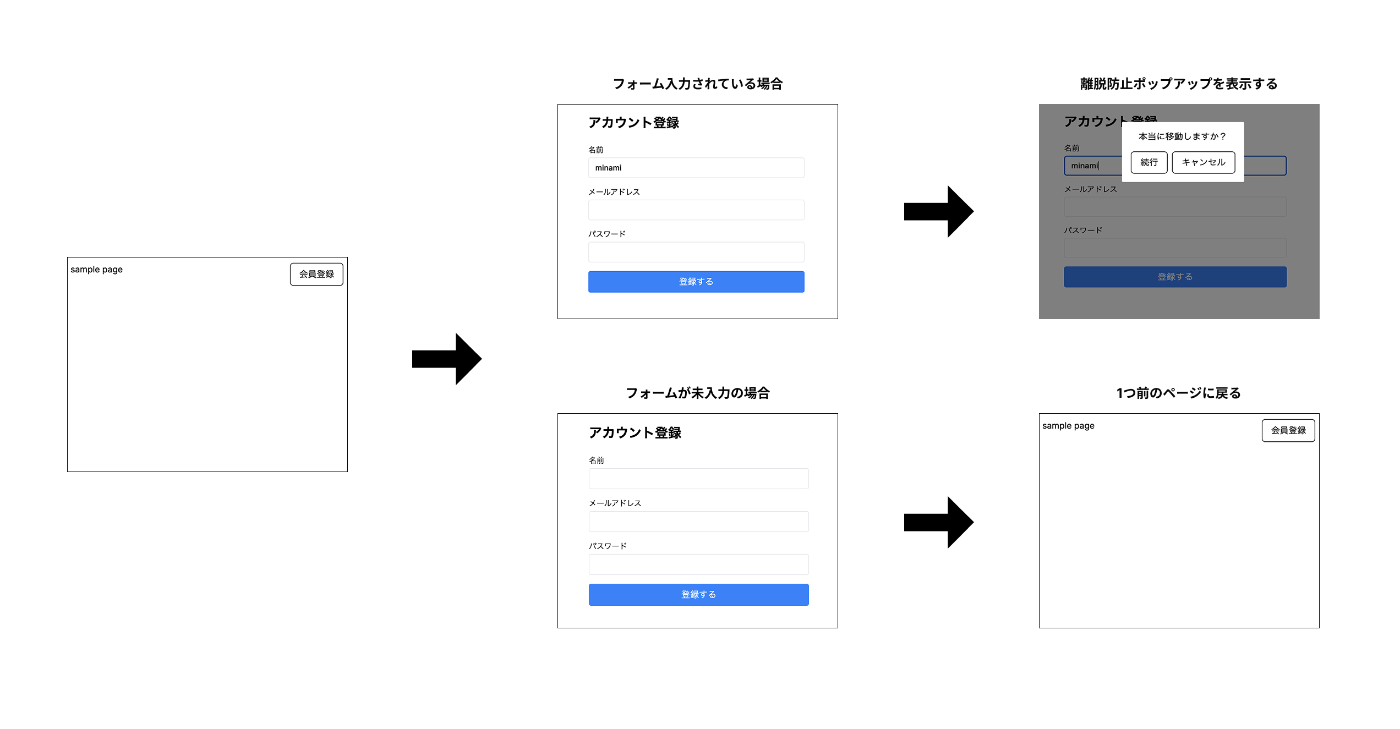
完成物
コード全文
import type { MetaFunction } from "@remix-run/node";
import { Link } from "@remix-run/react";

export const meta: MetaFunction = () => {
	return [
		{ title: "New Remix App" },
		{ name: "description", content: "Welcome to Remix!" },
	];
};

export default function Index() {
	return (
		<>
			<header className="flex justify-between p-4">
				<h1>sample page</h1>
				<nav className="flex">
					<ul>
						<li className="border border-black hover:border-white hover:bg-black hover:text-white py-2 px-4 rounded-md transition duration-500 ease-in-out">
							<Link to="/signup">会員登録</Link>
						</li>
					</ul>
				</nav>
			</header>
			<div className="flex h-screen items-center justify-center"></div>
		</>
	);
}
import { useBlocker } from "@remix-run/react";
import { useForm } from "react-hook-form";

type FormData = {
	email: string;
	password: string;
	name: string;
};

export default function SignUp() {
	const {
		register,
		handleSubmit,
		formState: { errors },
		watch,
	} = useForm<FormData>();

	const onSubmit = (data: FormData) => {
		console.log(data);
	};

	const name = watch("name", "");
	const email = watch("email", "");
	const password = watch("password", "");

	const isNameEmpty = name.trim() === "";
	const isEmailEmpty = email.trim() === "";
	const isPassword = password.trim() === "";

	const isEmpty = isNameEmpty && isEmailEmpty && isPassword;

	const blocker = useBlocker(
		({ currentLocation, nextLocation }) =>
			!isEmpty && currentLocation.pathname !== nextLocation.pathname,
	);

	return (
		<div className="mx-auto max-w-md p-6 relative">
			<h1 className="mb-6 text-2xl font-bold">アカウント登録</h1>

			<form onSubmit={handleSubmit(onSubmit)} className="space-y-4">
				<div>
					<label className="block text-sm font-medium">
						名前
						<input
							{...register("name", { required: "名前は必須です" })}
							className="mt-1 block w-full rounded border px-3 py-2"
						/>
					</label>
					{errors.name && (
						<p className="mt-1 text-sm text-red-500">{errors.name.message}</p>
					)}
				</div>

				<div>
					<label className="block text-sm font-medium">
						メールアドレス
						<input
							{...register("email", {
								required: "メールアドレスは必須です",
								pattern: {
									value: /^[A-Z0-9._%+-]+@[A-Z0-9.-]+\.[A-Z]{2,}$/i,
									message: "正しいメールアドレスを入力してください",
								},
							})}
							type="email"
							className="mt-1 block w-full rounded border px-3 py-2"
						/>
					</label>
					{errors.email && (
						<p className="mt-1 text-sm text-red-500">{errors.email.message}</p>
					)}
				</div>

				<div>
					<label className="block text-sm font-medium">
						パスワード
						<input
							{...register("password", {
								required: "パスワードは必須です",
								minLength: {
									value: 8,
									message: "パスワードは8文字以上である必要があります",
								},
							})}
							type="password"
							className="mt-1 block w-full rounded border px-3 py-2"
						/>
					</label>
					{errors.password && (
						<p className="mt-1 text-sm text-red-500">
							{errors.password.message}
						</p>
					)}
				</div>

				<button
					type="submit"
					className="w-full rounded bg-blue-500 px-4 py-2 text-white hover:bg-blue-600"
				>
					登録する
				</button>
			</form>
			{blocker.state === "blocked" ? (
				<>
					<div className="fixed top-0 right-0 left-0 bottom-0 bg-black opacity-50" />
					<div className="absolute bg-white z-10 flex flex-col p-4 items-center rounded-sm gap-4 top-10 left-32">
						<p>本当に移動しますか?</p>
						<div className="flex gap-2">
							<button
								type="button"
								onClick={() => blocker.proceed()}
								className="border border-black hover:border-white hover:bg-black hover:text-white py-2 px-4 rounded-md transition duration-500 ease-in-out"
							>
								続行
							</button>
							<button
								type="button"
								onClick={() => blocker.reset()}
								className="border border-black hover:border-white hover:bg-black hover:text-white py-2 px-4 rounded-md transition duration-500 ease-in-out"
							>
								キャンセル
							</button>
						</div>
					</div>
				</>
			) : null}
		</div>
	);
}
useBlockerについて
useBlockerでは各状態と、その状態を変化させるメソッドを利用できます。まとめると以下の通りです。
状態
| 状態 (state) | 説明 |
|---|---|
| unblocked | ナビゲーションが自由に行える(ブロックされていない) |
| blocked | 条件によりナビゲーションがブロックされている |
| proceeding | ユーザーがブロック解除を選択し、ナビゲーションが進行中 |
メソッド
-
proceed()-
blockedのときに呼び出すことで、ブロックされた場所に移動できる
-
-
reset()-
blockedのときに呼び出すことで、unblockedに戻し、ユーザーを現在の場所に残すことができます。
-
以上を踏まえて今回のコードについて解説します。
コード解説
メインでない部分は省いていますが、構成は以下の通りです。
export default function SignUp() {
  // フォームの中身が空かどうか
  const isEmpty = isNameEmpty && isEmailEmpty && isPassword;

  const blocker = useBlocker(
    ({ currentLocation, nextLocation }) =>
    !isEmpty && currentLocation.pathname !== nextLocation.pathname,
  );
  return (
    <div>
     <form>
     {/* フォームについて記述 */}
     </form>
     {blocker.state === "blocked" ? (
       <>
         <div>
           <p>本当に移動しますか?</p>
           <div>
             <button
               type="button"
               onClick={() => blocker.proceed()}
             >
               続行
             </button>
             <button
               type="button"
               onClick={() => blocker.reset()}
               >
                 キャンセル
             </button>
           </div>
         </div>
       </>
      ) : null}
    </div>
  );
}
最初に、以下の部分でuseBlockerを呼び出しています。
const blocker = useBlocker(
  ({ currentLocation, nextLocation }) =>
  // フォームが空ではない かつ ブラウザバッグ先のパスが異なるとき
  !isEmpty && currentLocation.pathname !== nextLocation.pathname,
);
currentLocation、nextLocationはそれぞれ現在のパス、ブラウザバッグ先のパスを示します。
useBlockerの引数にはuseBlockerのstateがblockedとなる条件を記述しています。
次に、以下で実際に離脱防止ポップアップを呼び出しています。
{/* blockerのstateがblockedのときに離脱防止ポップアップを表示 */}
{blocker.state === "blocked" ? (
  <>
    <div>
      <p>本当に移動しますか?</p>
        <div>
          <button
           type="button"
           onClick={() => blocker.proceed()}
          >
            続行
          </button>
          <button
            type="button"
            onClick={() => blocker.reset()}
          >
            キャンセル
          </button>
        </div>
    </div>
  </>
) : null}
「続行」ボタンを押したときは、blocked状態でproceed()を呼び、ブロックされた場所に移動できます。
また、「キャンセル」ボタンを押したときは、reset()を呼び、現在いるページに留まります。このときblocker.stateはunblocked状態に戻ります。そのため、再度ブラウザバッグしたときは再度ポップアップが表示されます。
まとめ
RemixのuseBlockerを活用すると、特定の条件下で離脱防止ポップアップを簡単に実装できました✊
ただ、公式ドキュメントでは、離脱ポップアップを出さず、再度同じページに戻ってきたときにフォームの入力状態が保持されているような実装が推奨されています。実装の際はこちらの方法も検討してください。
Blocking a user from navigating is a bit of an anti-pattern, so please carefully consider any usage of this hook and use it sparingly. In the de-facto use case of preventing a user navigating away from a half-filled form, you might consider persisting unsaved state to
sessionStorageand automatically re-filling it if they return instead of blocking them from navigating away.
Discussion