EKS で ADOT Collector から Prometheus メトリクスをスクレイプして AMP -> AMG で可視化する
この記事について
- AWS Distro for OpenTelemetry (ADOT) を使用して、アプリケーションが発行する Prometheus メトリクスを収集して可視化するまでの設定を整理します。
- Prometheus のリモートストレージとして、Amazon Managed Service for Prometheus(AMP) を使用します。AMP で収集したメトリクスの可視化では Grafana を使用することが多いと思いますが、すべて AWS 環境で完結させてみようと Amazon Managed Grafana (AMG)を使用します。
- あくまでも各ツールの連携を試すデモであるため、アプリケーションは公式のサンプルを使用します。
EKS で ADOT Collector, AMP を設定する方法について、公式 docs である以下の方法で進めていきます。
こちらの方法ではアドオン、Helm を使った ADOT Collector インストールではありません。簡単にインストールするならアドオン、Helm を使った方が早いかなと思います。
アドオン、Helm を使用する場合についても今後見ていきたいと思います。
どんなコンポートネントが動いているのかを見るため、手動で ADOT Collector をインストールしていきましょう。
事前準備
以下にある事前準備を済ませます。
- AMP ワークスペースの作成
- EKS クラスターの準備(ノードにはマネージド型ノードグループを利用)
- ADOT コレクターがメトリクスをスクレイピングしてエクスポートするために使用するサービスアカウントの IAM ロールを作成
1. AMP ワークスペースの作成
コンソール画面からもぽちぽちと作れますが、AWS CLI だと以下で作成可能です。
aws amp create-workspace --alias sample-workspace
2. EKS クラスターの準備(ノードにはマネージド型ノードグループを利用)
こちらはすでに作成済みであるものとします。
3. ADOT コレクターがメトリクスをスクレイピングしてエクスポートするために使用するサービスアカウントの IAM ロールを作成
ADOT コレクターの Pod から AWS サービスである AMP へメトリクスをエクスポートするための権限が必要となります。
IRSA の機能により、Pod へ IAM ロールを関連づけます。
こちらに必要な IAM ロールの作成、クラスターの IAM OIDC ID プロバイダーの作成を行うスクリプトが用意されています。
サンプルアプリのデプロイ
aws-otel-community の github リポジトリにはサンプルアプリが多く掲載されています。
今回は、4つの Prometheus メトリクス(counter,gauge,histogram,summary)を出力してくれるアプリを使用します。
上記のリポジトリにあるコンテナイメージをビルドし、ECR へプッシュしておきます(リポジトリは事前に作成してください)。
$ cd ./sample-apps/prometheus-sample-app
$ aws ecr get-login-password --region ap-northeast-1 | docker login --username AWS --password-stdin <YOUR_ACCOUNT_ID>.dkr.ecr.ap-northeast-1.amazonaws.com
$ docker build . -t prometheus-sample-app:latest
$ docker tag prometheus-sample-app:latest <YOUR_ACCOUNT_ID>.dkr.ecr.ap-northeast-1.amazonaws.com/prometheus-sample-app:latest
$ docker push <YOUR_ACCOUNT_ID>.dkr.ecr.ap-northeast-1.amazonaws.com/prometheus-sample-app:latest
アプリをデプロイします。
このサンプルアプリをデプロイする manifest は以下から取得可能です。
$ curl https://raw.githubusercontent.com/aws-observability/aws-otel-collector/main/examples/eks/aws-prometheus/prometheus-sample-app.yaml -o prometheus-sample-app.yaml
$ kubectl apply -f prometheus-sample-app.yaml
Namespace: aoc-prometheus-pipeline-demo、Service、Deployment を作成しています。
prometheus-sample-app.yaml
---
# create a namespace
apiVersion: v1
kind: Namespace
metadata:
  name: aoc-prometheus-pipeline-demo
  labels:
    name: prometheus-sample-app
---
apiVersion: apps/v1
kind: Deployment
metadata:
  name: prometheus-sample-app
  namespace: aoc-prometheus-pipeline-demo
  labels:
    app: prometheus-sample-app
spec:
  replicas: 1
  selector:
    matchLabels:
      app: prometheus-sample-app
  template:
    metadata:
      labels:
        app: prometheus-sample-app
    spec:
      containers:
      - name: prometheus-sample-app
        image: <ここにアプリイメージをプッシュした ECR URI を指定します>
        command: ["/bin/main", "-listen_address=0.0.0.0:8080", "-metric_count=10"]
        ports:
        - name: web
          containerPort: 8080
---
apiVersion: v1
kind: Service
metadata:
  name: prometheus-sample-app-service
  namespace: aoc-prometheus-pipeline-demo
  labels:
    app: prometheus-sample-app
  annotations:
    scrape: "true"
spec:
  ports:
  - name: web
    port: 8080
    targetPort: 8080
    protocol: TCP
  selector:
    app: prometheus-sample-app
---
ADOT Collector のセットアップ
サンプルテンプレートが用意されているためそちらを使用します。
$ curl https://raw.githubusercontent.com/aws-observability/aws-otel-collector/main/examples/eks/aws-prometheus/prometheus-daemonset.yaml -o eks-prometheus-daemonset.yaml
$ kubectl apply -f eks-prometheus-daemonset.yaml
細かく見ていきます。
ADOT Collector の設定ファイルを読む
ADOT の設定ファイルは configMap: adot-collector-conf で設定されていることがわかります。
apiVersion: apps/v1
kind: DaemonSet
...
spec:
  ...
  template:
    metadata:
      labels:
        app: aws-adot
        component: adot-collector
    spec:
      serviceAccountName: amp-iamproxy-ingest-service-account
      containers:
      - command:
          - "/awscollector"
          - "--config=/conf/adot-collector-config.yaml"
        ...
      volumes:
        - configMap:
            name: adot-collector-conf
            items:
              - key: adot-collector-config
                path: adot-collector-config.yaml
          name: adot-collector-config-vol
exporters には prometheusremotewrite を指定し、AMP のリモート書き込み URLをエンドポイントに指定します。
apiVersion: v1
kind: ConfigMap
...
    exporters:
      prometheusremotewrite:
        endpoint: https://aps-workspaces.ap-northeast-1.amazonaws.com/workspaces/ws-99e48522-f30f-472b-aee8-9079d2803cfc/api/v1/remote_write
        auth:
          authenticator: sigv4auth
        namespace: "" //指定した値がメトリクスのプレフィックスにつきます。
      logging:
        loglevel: debug
prometheusremotewrite の細かい設定はこちらで確認できます。
Receivers について、prometheus を使用して Prometheus メトリクスをスクレイプしています。
サンプルでは kubernetes-service-endpoints ジョブのみですが、cAdvisor からのメトリクスも収集するようにカスタマイズしてみました。
apiVersion: v1
kind: ConfigMap
...
data:
  adot-collector-config: |
    receivers:
      prometheus:
        config:
          ...
          scrape_configs:
          - job_name: 'kubernetes-service-endpoints'
            kubernetes_sd_configs:
            - role: endpoints
            tls_config:
              ca_file: /var/run/secrets/kubernetes.io/serviceaccount/ca.crt
              insecure_skip_verify: true
            bearer_token_file: /var/run/secrets/kubernetes.io/serviceaccount/token

            relabel_configs:
            - source_labels: [__meta_kubernetes_service_annotation_scrape]
              action: keep
              regex: true

         // 以下の job で cAdvisor のメトリクスを取得します
          - job_name: 'kubernetes-cadvisor'
            sample_limit: 10000
            scheme: https
            metrics_path: /metrics/cadvisor

            kubernetes_sd_configs:
            - role: node
            tls_config:
              ca_file: /var/run/secrets/kubernetes.io/serviceaccount/ca.crt
              insecure_skip_verify: true
            bearer_token_file: /var/run/secrets/kubernetes.io/serviceaccount/token

            relabel_configs:
              - action: labelmap
                regex: __meta_kubernetes_node_label_(.+)
ご注意いただきたいのが、cAdvisor からのメトリクスを収集する場合、サービスアカウントが nodes/metrics にアクセスできるように ClusterRole を修正する必要があります。
To scrape Node or cAdvisor metrics, we need to provide the service account access to nodes/metrics. As an example, the following ClusterRole and ClusterRoleBinding should work for Pod, Node, Service, and cAdvisor metrics.
kind: ClusterRole
apiVersion: rbac.authorization.k8s.io/v1
metadata:
  name: adotcol-admin-role
rules:
  - apiGroups: [""]
    resources:
    ...
    - nodes/metrics
    ...
    verbs: ["get", "list", "watch"]
  - apiGroups:
    - extensions
    resources:
    - ingresses
    verbs: ["get", "list", "watch"]
  - nonResourceURLs: ["/metrics"]
    verbs: ["get"]
ADOT Collector により Prometheus メトリクスが取得できているかを確認
今回のサンプルアプリでは、test_gauge0, test_counter1 などのメトリクスを以下の部分で実装されています。
アプリが起動する Pod の /metrics へアクセスしてみて、Prometheus メトリクスが発行されているかを確認します。
$ k get pod -o wide
NAME                                     READY   STATUS    RESTARTS   AGE   IP               NODE                                                NOMINATED NODE   READINESS GATES
prometheus-sample-app-56d79c6bf4-fpxwg   1/1     Running   0          17h   172.31.141.223   ip-172-31-128-138.ap-northeast-1.compute.internal   <none>           <none>

// デバッグ用に curl pod 起動
$ kubectl run curl --image=curlimages/curl -it --rm -- /bin/sh

~ $ curl 172.31.141.223:8080/metrics
# HELP test_counter0 This is my counter
# TYPE test_counter0 counter
test_counter0{datapoint_id="0",foo_0="bar_0"} 5787.371148573153
# HELP test_counter1 This is my counter
# TYPE test_counter1 counter
test_counter1{datapoint_id="0",foo_0="bar_0"} 5805.399440371476
...
AMP へクエリしてみて、メトリクスが AMP へ送られているかを確認します。
$ awscurl --service="aps" --region="ap-northeast-1" "https://{AMP_ENDPOINT}/api/v1/query?query=test_gauge0"
{"status":"success","data":{"resultType":"vector","result":[{"metric":{"__name__":"test_gauge0","datapoint_id":"0","foo_0":"bar_0","instance":"172.31.141.223:8080","job":"kubernetes-service-endpoints"},"value":[1717640995,"0.3725022694331494"]}]}}
AMP で取得したメトリクスを Amazon Managed Grafana (AMG)で可視化する
こちらを参考に進めていきます。
Organizations, IAM Identity Center の設定はすでに済んでいる前提で進めていきます。
設定するポイントとしては以下の2点のみです。
- Grafana ワークスペースへのアクセス権を SSO ユーザーに割り当てる
- データソースにて、ここまで使用した AMP ワークスペースを指定する
そこまで作業はないのですが、以下の点でハマったので書き残しておきます。
ハマりポイント:データソースを選択できない
基本的に上記の docs の通り進めていけば良いのですが、Amazon Managed Service for Prometheus (AMP) やその他のデータソースとの統合 にて、データソースを選択することができない状態になっていました。
というより、そもそもデータソースがメニューに現れません。

調べたところ、ログインしている SSO ユーザーに権限がありませんでした。
AMG のワークスペースから、ユーザーとユーザーグループの設定 を選択

ログインするユーザーについて、権限を「編集者」or「管理者」に設定する必要があります。
(コンソールの日本語が変ですが、「エディタを作成する」が「編集者」権限でした)

再度ログインしてみると、データソースの選択が可能になりました。

完成品
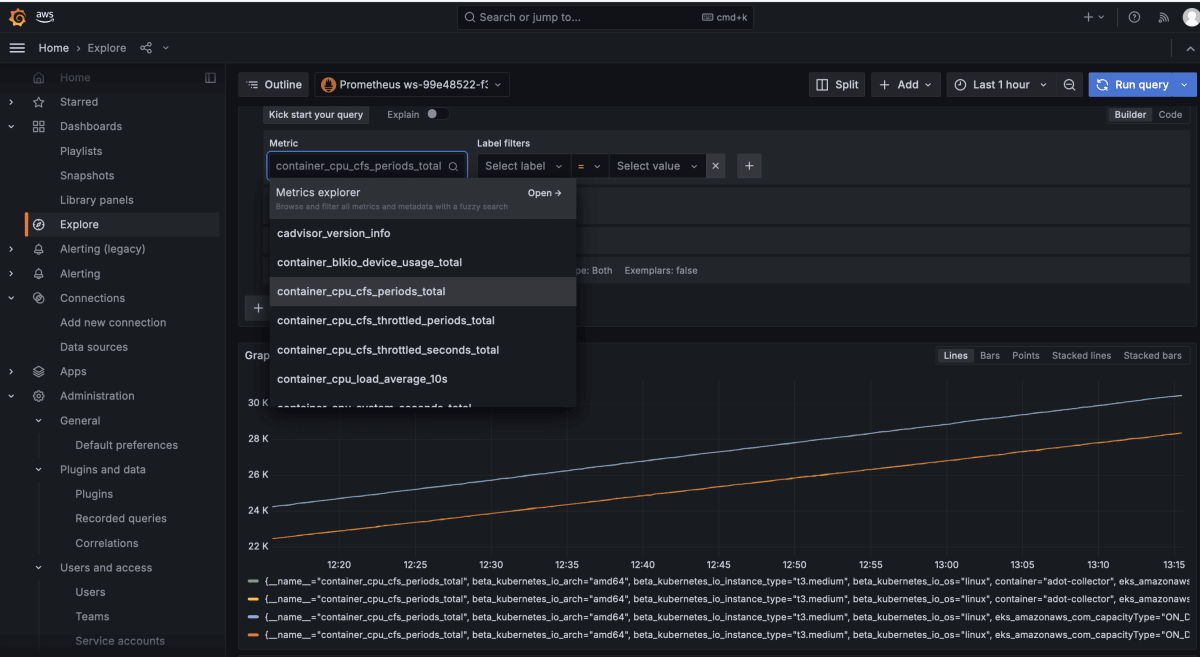
Grafana の操作方法は扱いませんが、Explore から取得できているメトリクスやターゲットを確認し、クエリを投げてデータを可視化することに成功しました。

最後に
今回は公式に挙げられているサンプルアプリや設定ファイルを用いて、ADOT Collector のセットアップから、Prometheus メトリクスの取得・可視化までを行いました。
Helmやアドオンの場合のセットアップ方法も試してみたいですね。
Grafana 触ったのが初だったので、使い方が全然わかってません...


Discussion