Appium環境構築(Android編)
はじめに
本文書は、「Appiumで実機のAndroid端末に接続し、Androidアプリを起動できるようにする」までの環境構築手順をまとめたものである。
環境
本文書は、以下の環境で実際に構築にした手順に基づき記載した。
- macOS 13.6.7
- Zsh 5.9
また、本文書の手順では、以下のパッケージ管理および、ランタイム管理ツールを使用しています。
構築手順
Node.jsのインストール
公式ドキュメントにシステム要件としてNode.jsが記載されているため以下のコマンドでインストールする。
mise install node@18.17.1
Appiumのインストール
以下のコマンドを実行してAppiumをインストールする。
npm i appium
Appium doctorのインストール
@appium/doctorを使用すると、Appiumの環境が正しく構築できているかを確認できる。以下のコマンドを実行してインストールする。
npm i -D @appium/doctor
Appium Inspectorのインストール
Appium Inspectorは、以下のコマンドを実行してインストールする。
brew install --cask appium-inspector
Android Studioのインストール
UiAutomator2の必要要件にはAndroid SDK Platform toolsが記載されている。Android Studioをインストールすれば、この要件を満たせる。以下のコマンドを実行して、Android Studioをインストールする。
brew install --cask android-studio
ANDROID_HOMEの環境変数を設定するために、$HOME/.zprofileに以下を記述する。
if [ -d $HOME/Library/Android/sdk ]; then
    export ANDROID_HOME=$HOME/Library/Android/sdk
    export PATH="$ANDROID_HOME/platform-tools:$ANDROID_HOME/tools:$PATH"
fi
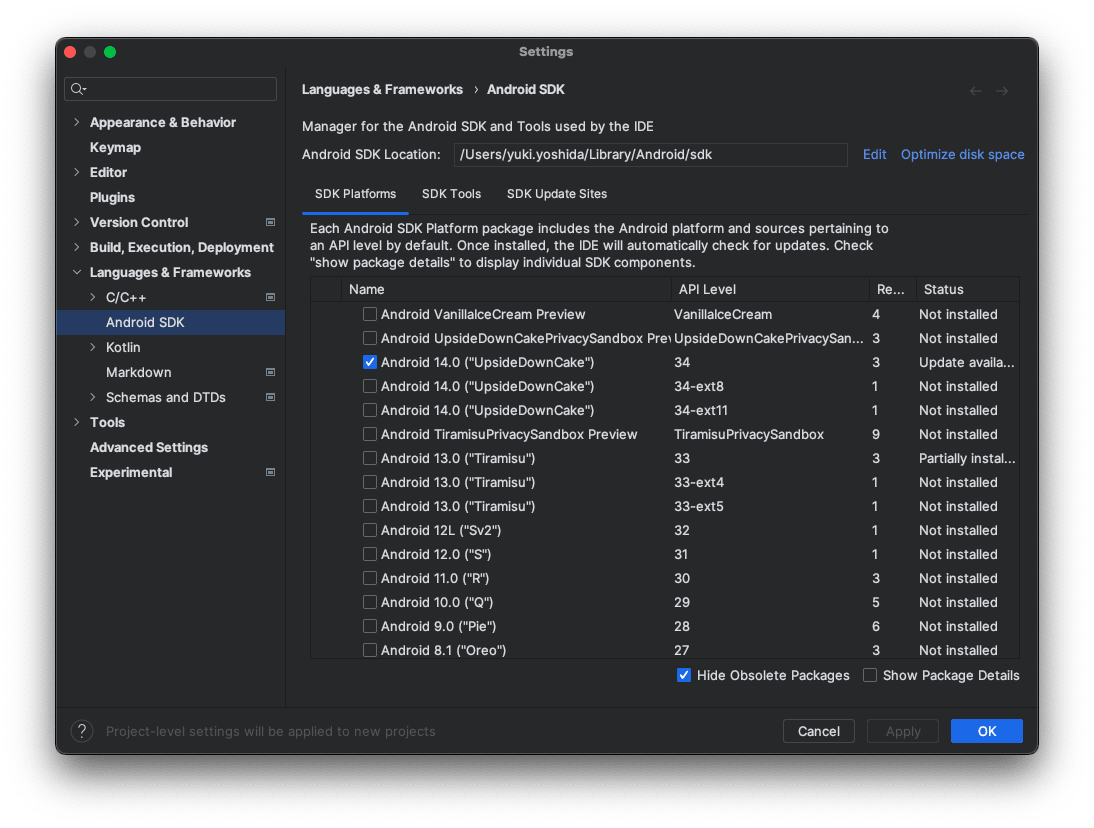
Android SDK Command-line Toolsのインストール
Android Studioを起動し、以下の手順でAndroid SDK Command-line Toolsをインストールする。
- Settings を開く
- サイドペインの
Languages & Frameworks > Android SDKを選択する -
SDK Toolsタブを選択する -
Android SDK Command-line Tools (latest)にチェックを入れる -
OKをクリックする
OpenJDKのインストール
以下のコマンドを実行して、インストールする。
mise plugins install java https://github.com/halcyon/asdf-java.git
mise install java@openjdk-22.0.1
Appium doctorの実行
以下にAppium doctorの実行結果を示す。Diagnostic for necessary dependencies completed, no fix needed.と表示されているため、必要な依存関係は問題なくインストールされている。
% npx appium-doctor --android
info AppiumDoctor Appium Doctor v.2.0.36
WARN AppiumDoctor This package is deprecated since the Appium server version 2.4.0 and will be removed in the future.
WARN AppiumDoctor Use doctor checks (if any exist) integrated into your installed driver or plugin by running `appium driver doctor <driver_name>` or `appium plugin doctor <plugin_name>`.
info AppiumDoctor ### Diagnostic for necessary dependencies starting ###
info AppiumDoctor  ✔ APPIUM_HOME is /Users/yuki.yoshida/Works/appium-android
info AppiumDoctor  ✔ The Node.js binary was found at: /Users/yuki.yoshida/.local/share/mise/installs/node/18.17.1/bin/node
info AppiumDoctor  ✔ Node version is 18.17.1
info AppiumDoctor  ✔ ANDROID_HOME is set to: /Users/yuki.yoshida/Library/Android/sdk
info AppiumDoctor  ✔ JAVA_HOME is set to: /Users/yuki.yoshida/.local/share/mise/installs/java/openjdk-22.0.1
info AppiumDoctor    Checking adb, emulator, apkanalyzer
info AppiumDoctor      'adb' is in /Users/yuki.yoshida/Library/Android/sdk/platform-tools/adb
info AppiumDoctor      'emulator' is in /Users/yuki.yoshida/Library/Android/sdk/emulator/emulator
info AppiumDoctor      'apkanalyzer' is in /Users/yuki.yoshida/Library/Android/sdk/cmdline-tools/latest/bin/apkanalyzer
info AppiumDoctor  ✔ adb, emulator, apkanalyzer exist: /Users/yuki.yoshida/Library/Android/sdk
info AppiumDoctor  ✔ 'bin' subfolder exists under '/Users/yuki.yoshida/.local/share/mise/installs/java/openjdk-22.0.1'
info AppiumDoctor ### Diagnostic for necessary dependencies completed, no fix needed. ###
info AppiumDoctor
info AppiumDoctor ### Diagnostic for optional dependencies starting ###
info AppiumDoctor  ✔ ffmpeg is installed at: /opt/homebrew/bin/ffmpeg. ffmpeg version 7.0 Copyright (c) 2000-2024 the FFmpeg developers
WARN AppiumDoctor  ✖ mjpeg-consumer cannot be found.
WARN AppiumDoctor  ✖ bundletool.jar cannot be found
WARN AppiumDoctor  ✖ gst-launch-1.0 and/or gst-inspect-1.0 cannot be found
info AppiumDoctor ### Diagnostic for optional dependencies completed, 3 fixes possible. ###
info AppiumDoctor
info AppiumDoctor ### Optional Manual Fixes ###
info AppiumDoctor The configuration can install optionally. Please do the following manually:
WARN AppiumDoctor  ➜ mjpeg-consumer module is required to use MJPEG-over-HTTP features. Please install it with 'npm i -g mjpeg-consumer'.
WARN AppiumDoctor  ➜ bundletool.jar is used to handle Android App Bundle. Please read http://appium.io/docs/en/writing-running-appium/android/android-appbundle/ to install it
WARN AppiumDoctor  ➜ gst-launch-1.0 and gst-inspect-1.0 are used to stream the screen of the device under test. Please read https://appium.io/docs/en/writing-running-appium/android/android-screen-streaming/ to install them and for more details
info AppiumDoctor
info AppiumDoctor ###
info AppiumDoctor
info AppiumDoctor Bye! Run appium-doctor again when all manual fixes have been applied!
info AppiumDoctor
UiAutomator2のインストール
以下のコマンドを実行して、インストールする。
npx appium driver install uiautomator2
appium driver doctorのコマンドを実行して、0 required fixes needed表示されているため、必要な依存関係は問題なくインストールされている。
% npx appium driver doctor uiautomator2
Running 7 doctor checks for the "uiautomator2" driver
info Doctor ### Starting doctor diagnostics  ###
info Doctor  ✔ ANDROID_HOME is set to: /Users/yuki.yoshida/Library/Android/sdk
info Doctor    Checking adb, emulator, apkanalyzer
info Doctor      'adb' exists in /Users/yuki.yoshida/Library/Android/sdk/platform-tools/adb
info Doctor      'emulator' exists in /Users/yuki.yoshida/Library/Android/sdk/emulator/emulator
info Doctor      'apkanalyzer' exists in /Users/yuki.yoshida/Library/Android/sdk/cmdline-tools/latest/bin/apkanalyzer
info Doctor  ✔ adb, emulator, apkanalyzer exist in '/Users/yuki.yoshida/Library/Android/sdk'
info Doctor  ✔ JAVA_HOME is set to: /Users/yuki.yoshida/.local/share/mise/installs/java/openjdk-22.0.1
info Doctor  ✔ 'bin/java' exists under '/Users/yuki.yoshida/.local/share/mise/installs/java/openjdk-22.0.1'
WARN Doctor  ✖ bundletool.jar cannot be found
WARN Doctor  ✖ ffmpeg cannot be found
WARN Doctor  ✖ gst-launch-1.0 and/or gst-inspect-1.0 cannot be found
info Doctor ### Diagnostic completed, 0 required fixes needed, 3 optional fixes possible. ###
info Doctor
info Doctor ### Optional Manual Fixes ###
info Doctor To fix these optional issues, please do the following manually:
WARN Doctor  ➜ bundletool.jar is used to handle Android App bundles. Please download the binary from https://github.com/google/bundletool/releases/ and store it to any folder listed in the PATH environment variable. Folders that are currently present in PATH: /Users/yuki.yoshida/Works/qa/linkit/mobile_testing/node_modules/.bin:/Users/yuki.yoshida/Works/qa/linkit/mobile_testing/node_modules/.bin:/Users/yuki.yoshida/Works/qa/linkit/node_modules/.bin:/Users/yuki.yoshida/Works/qa/node_modules/.bin:/Users/yuki.yoshida/Works/node_modules/.bin:/Users/yuki.yoshida/node_modules/.bin:/Users/node_modules/.bin:/node_modules/.bin:/Users/yuki.yoshida/.local/share/mise/installs/node/18.17.1/lib/node_modules/npm/node_modules/@npmcli/run-script/lib/node-gyp-bin:/Users/yuki.yoshida/.local/share/mise/installs/node/18.17.1/bin:/Users/yuki.yoshida/.local/share/mise/installs/java/openjdk-22.0.1/bin:/Users/yuki.yoshida/.local/share/mise/installs/python/3.11.9/bin:/Users/yuki.yoshida/.rd/bin:/Users/yuki.yoshida/Library/Android/sdk/platform-tools:/Users/yuki.yoshida/Library/Android/sdk/tools:/opt/homebrew/opt/openjdk/bin:/opt/homebrew/opt/icu4c/bin:/opt/homebrew/opt/icu4c/sbin:/opt/homebrew/sbin:/opt/homebrew/opt/openssl/bin:/opt/homebrew/opt/curl/bin:/opt/homebrew/opt/gnu-getopt/bin:/opt/homebrew/opt/grep/libexec/gnubin:/opt/homebrew/opt/gnu-tar/libexec/gnubin:/opt/homebrew/opt/gawk/libexec/gnubin:/opt/homebrew/opt/gnu-sed/libexec/gnubin:/opt/homebrew/opt/findutils/libexec/gnubin:/opt/homebrew/opt/coreutils/libexec/gnubin:/opt/homebrew/bin:/opt/homebrew/sbin:/usr/local/bin:/System/Cryptexes/App/usr/bin:/usr/bin:/bin:/usr/sbin:/sbin:/opt/X11/bin:/Library/Apple/usr/bin:/var/run/com.apple.security.cryptexd/codex.system/bootstrap/usr/local/bin:/var/run/com.apple.security.cryptexd/codex.system/bootstrap/usr/bin:/var/run/com.apple.security.cryptexd/codex.system/bootstrap/usr/appleinternal/bin:/Users/yuki.yoshida/.local/share/mise/shims
WARN Doctor  ➜ ffmpeg is used to capture screen recordings from the device under test. Please read https://www.ffmpeg.org/download.html.
WARN Doctor  ➜ gst-launch-1.0 and gst-inspect-1.0 are used to stream the screen of the device under test. Please read https://gstreamer.freedesktop.org/documentation/installing/index.html?gi-language=c.
info Doctor
info Doctor Bye! All issues have been fixed!
info Doctor
実機との接続確認
サンプルアプリの用意
以下のコマンドでappium/android-apidemosをcloneして、ビルドする。ビルドしたapkファイルはapks/ApiDemos-debug.apkとして生成される。
git clone git@github.com:appium/android-apidemos.git
npm install
接続確認
-
Android端末で開発者モードを有効にする。
-
Android端末とPCをUSBケーブルで接続する。Android端末でUSBデバッグを有効にする。
-
プロジェクトルートにサンプルアプリのapkファイルを配置する。
-
Appium Serverを起動する。
npx appium -
Appium Inspectorを起動する。
-
Appium Inspectorでのサーバー接続設定を以下のようにする。ここではAppiumサーバーのURLが
http://127.0.0.1:4723/である場合の設定を示す。- Remote Host:
127.0.0.1 - Remote Port:
4723 - Remote Path:
/
- Remote Host:
-
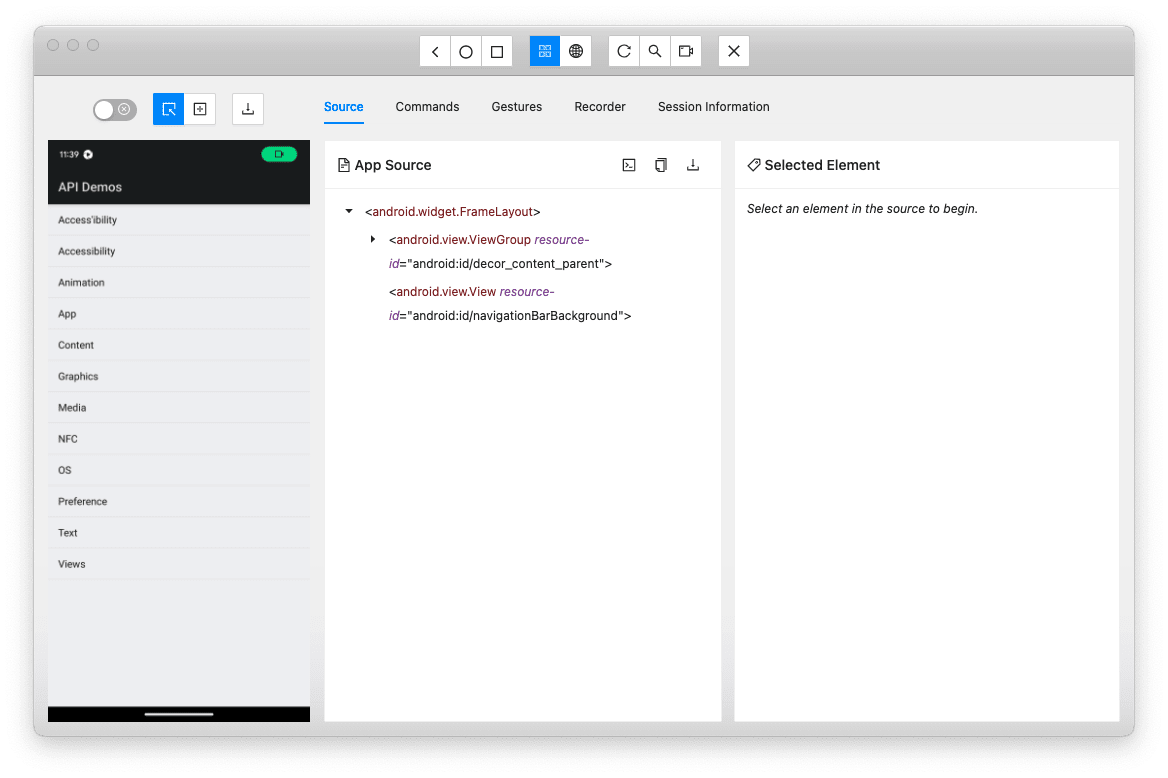
Appium Inspectorで、capabilitesの設定を以下のようにする。
{ "platformName": "Android", "appium:platformVersion": <Android端末のOSバージョン>, "appium:deviceName": <Android端末の端末名>, "appium:automationName": "UIAutomator2", "appium:udid": <Android端末のUUID>, "appium:app": "ApiDemos-debug.apk" } -
Appium Inspectorの、
Start Sessionをクリックする。Appium Inspectorの画面でサンプルアプリが表示されれば接続成功である。
Discussion