ガチャシュミレーションスクリプトをシェルスクリプトとzx(Bun)で書き比べてみた話
シェルスクリプトを今まで雰囲気で書いてきたのでいい加減ちゃんと基礎から学ぼうと思い、こちらの技術書で基礎文法を学習しました。その総まとめ的に簡単なスクリプトを書いたのですがせっかくなので前から気になっていたzxで書き直してみてシェルスクリプトと比べてみたのでその備忘録です。また、ちょうどバージョン1.0.0がリリースされたJavaScriptのランタイムであるBunをせっかくなので使用してみました。
今回作成した成果物はこちらです
作成するスクリプトの内容
何かデモ的なものを作る時に何も思いつかなかった時はガチャのシュミレーション実装をすることが多いので、今回も実行するとガチャのシュミレーションを実行するスクリプトを作成することにしました。スクリプトの仕様的なものは以下のような感じで設定しました。
- どのガチャを引くか選択する
- 選択したガチャに含まれるアイテムデータは事前に用意しておき、スクリプト内で読み込む
- アイテムにはそれぞれ重みを設定して重み付け抽選する
- 抽選したアイテム内容をコンソールに出力する
シェルスクリプトを作成する
ガチャテーマを取得する
有効なガチャテーマはthemes.txtというファイルを作成し、スクリプト内で読み込むようにしました。
theme1 これはtheme1のガチャです
theme2 これはtheme2のガチャです
theme3 これはtheme3のガチャです
ファイルをスクリプト内で読み込み、上記の選択肢をそのままターミナルに表示させ、テーマの入力を待機します。
  current_dir=$(dirname "$0")
  readonly current_dir

  readonly themes_path="$current_dir"'/themes.txt'

  # テーマ選択
  while read -r theme description; do
    echo '- '"$theme"' '"$description"
  done <"$themes_path"

  echo
  echo 'テーマを選択してください. ex) theme1'

  read -r theme
  echo
アイテムデータを読み込む
テーマが決まったのでそのガチャテーマに含まれるアイテム情報を読み込みます。アイテム情報は<ガチャテーマ>.csvのファイル名で事前に配置しているのでそれを読み込みます。
id,name,rarity,weight
1,item1,N,10
2,item2,N,10
3,item3,N,10
4,item4,N,10
5,item5,N,10
6,item6,R,5
7,item7,R,5
8,item8,R,5
9,item9,R,5
10,item10,SR,1
重み付け抽選
読み込んだデータにアイテムそれぞれに設定した重みがあるので、それを使用し重み付け抽選をします。重み付け抽選はトータルの重みを計算し、その範囲内で疑似乱数を生成しアイテムの重みをその乱数に達するまで足していくような抽選方法です。
  # トータルの重み
  while IFS=, read -r _ _ _ weight; do
    # 1行目はヘッダーなので飛ばしたい
    if [ "$size" -gt 0 ]; then
      total_weight=$((total_weight + weight))
    fi
    size=$((size + 1))
  done <"$gacha_path"

  # 抽選
  random=$(awk 'BEGIN { srand(); print int(rand()*32768) }' /dev/null)
  readonly rand=$((random % total_weight + 1))

  total_weight=0
  result_id=
  result_name=
  result_rarity=
  is_first=0
  while IFS=, read -r id name rarity weight; do
    # ヘッダー行飛ばす
    if [ "$is_first" -eq 0 ]; then
      is_first=1
      continue
    fi

    total_weight=$((total_weight + weight))
    if [ "$total_weight" -ge "$rand" ]; then
      result_id="$id"
      result_name="$name"
      result_rarity="$rarity"
      break
    fi
  done <"$gacha_path"
ポイントはまずcsvファイルの読み込みですがcsvファイルの各行をwhileで順番に処理していくのですが、IFS=,として一時的に単語分割のキーワードをカンマに変更しています。これで各列のフィールドの値を変数に格納して使うことができるようになっています。
もう一つのポイントとしては疑似乱数の生成ですがawkコマンドを使用して乱数を生成しています。srand()で疑似乱数を生成するためのseedの設定をし、rand()で0から1未満の数値をランダムに生成しています。かける数値はなんでもよかったのですが今回は32768をかけることで0-32768未満の数値がランダムに生成されるようにしています。またawkには入力ファイルが必要ですが疑似乱数の生成に入力ファイルは不要なので/dev/nullを指定しています。
結果を出力する
そのままechoすればいいのですが、せっかくなので抽選したアイテムのレア度に応じて出力文字の色が変わるようにしてみました。以下の関数は引数の文字列を一文字ずつ色を変更して虹色っぽく表示するための関数です。SRの結果出力に設定しました。
print_rainbow() {
  # ANSIカラーコードの定義
  colors_0=31
  colors_1=33
  colors_2=32
  colors_3=36
  colors_4=34
  colors_5=35
  colors_6=93
  colors_7=96
  colors_8=95
  size=9

  # 虹色で表示する文字列
  message="$1"

  # 文字列の各文字に色を割り当てて表示
  i=0
  for char in $(echo "$message" | fold -w1); do
    eval color=\"\$"colors_$i"\"
    printf "\033[1;%sm%s\033[0m" "$color" "$char"
    i=$(((i + 1) % size))
  done
  echo
}
シェルスクリプトでは配列の使用がbashシェルに限られてしまうので配列を使用せず、変数名_<index>みたいな変数を作成し、この変数に設定したカラーコードを引数の文字列に順に設定するようにしています。
最終的なmain.sh
#!/bin/sh

print_notfound_file() {
  printf "\033[31mError: %s not found or not readable\033[0m\n" "$1"
}

print_magenta() {
  printf "\033[95m%s\033[0m\n" "$1"
}

print_rainbow() {
  # ANSIカラーコードの定義
  colors_0=31
  colors_1=33
  colors_2=32
  colors_3=36
  colors_4=34
  colors_5=35
  colors_6=93
  colors_7=96
  colors_8=95
  size=9

  # 虹色で表示する文字列
  message="$1"

  # 文字列の各文字に色を割り当てて表示
  i=0
  for char in $(echo "$message" | fold -w1); do
    eval color=\"\$"colors_$i"\"
    printf "\033[1;%sm%s\033[0m" "$color" "$char"
    i=$(((i + 1) % size))
  done
  echo
}

main() {
  current_dir=$(dirname "$0")
  readonly current_dir

  readonly themes_path="$current_dir"'/themes.txt'

  if [ ! -r "$themes_path" ]; then
    print_notfound_file "$themes_path"
    exit 1
  fi

  # テーマ選択
  while read -r theme description; do
    echo '- '"$theme"' '"$description"
  done <"$themes_path"

  echo
  echo 'テーマを選択してください. ex) theme1'

  read -r theme
  echo

  # アイテムファイルを読み込んで重み付け抽選
  readonly gacha_path="$current_dir"'/gacha/'"$theme"'.csv'
  total_weight=0
  size=0

  if [ ! -r "$gacha_path" ]; then
    print_notfound_file "$gacha_path"
    exit 1
  fi

  # トータルの重み
  while IFS=, read -r _ _ _ weight; do
    # 1行目はヘッダーなので飛ばしたい
    if [ "$size" -gt 0 ]; then
      total_weight=$((total_weight + weight))
    fi
    size=$((size + 1))
  done <"$gacha_path"

  # 抽選
  random=$(awk 'BEGIN { srand(); print int(rand()*32768) }' /dev/null)
  readonly rand=$((random % total_weight + 1))

  total_weight=0
  result_id=
  result_name=
  result_rarity=
  is_first=0
  while IFS=, read -r id name rarity weight; do
    # ヘッダー行飛ばす
    if [ "$is_first" -eq 0 ]; then
      is_first=1
      continue
    fi

    total_weight=$((total_weight + weight))
    if [ "$total_weight" -ge "$rand" ]; then
      result_id="$id"
      result_name="$name"
      result_rarity="$rarity"
      break
    fi
  done <"$gacha_path"

  # result
  echo 'result item🚀'

  case "$result_rarity" in
  R)
    print_magenta "ID: $result_id"
    print_magenta "Name: $result_name"
    print_magenta "Rarity: $result_rarity"
    ;;
  SR)
    print_rainbow "ID: $result_id"
    print_rainbow "Name: $result_name"
    print_rainbow "Rarity: $result_rarity"
    ;;
  *)
    echo "ID: $result_id"
    echo "Name: $result_name"
    echo "Rarity: $result_rarity"
    ;;
  esac
}

main
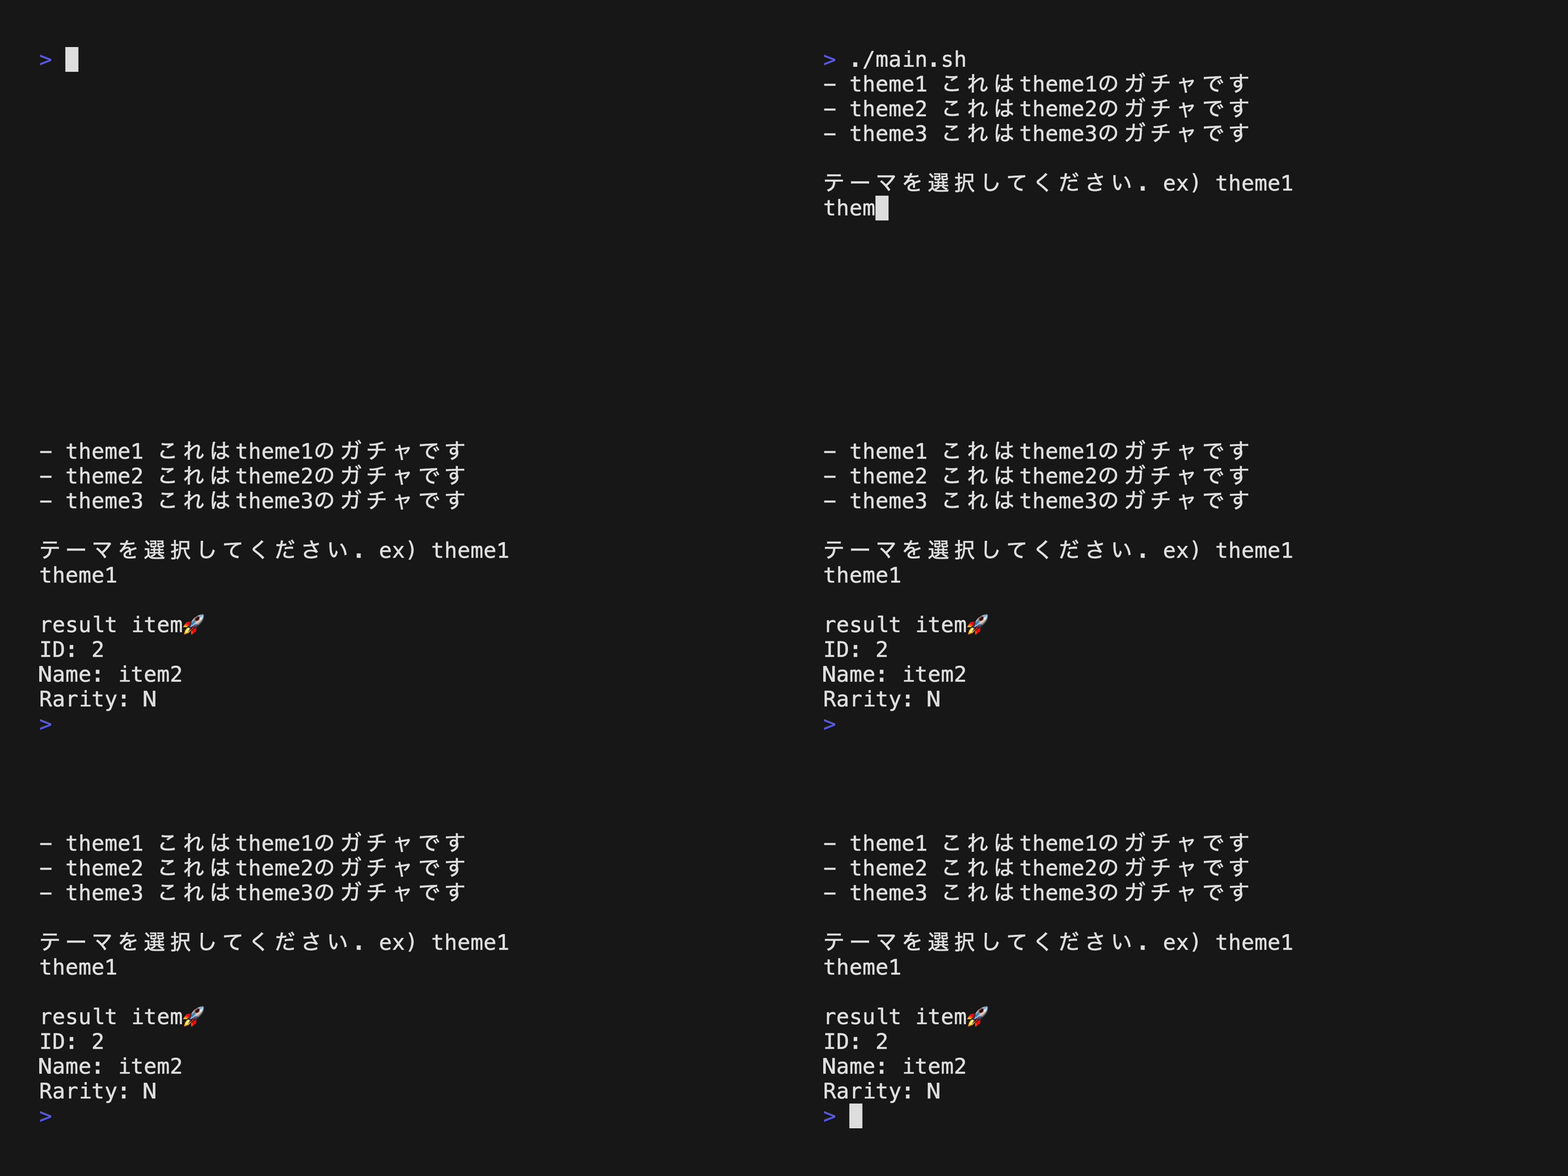
スクリプトを実行すると以下のような感じになります。
chmod +x main.sh
./main.sh

zxでスクリプトを作成する
ここまでで目的のスクリプトを作成することはできましたがかなり大変でした。普段書く言語と制御構文が微妙に違い、シェルスクリプト独特の構文やルールがあるのと特に移植性のことを考えて実装するのがしんどかったです。
というわけで、本命のzxを使用してTypeScriptで同じスクリプトを書いてみたいと思います。
Bunのインストール
Bunを今回は使用するのでインストールもろもろやってきます。
curl -fsSL https://bun.sh/install | bash -s "bun-v1.0.2"
Bun init
bun init
.
├── README.md
├── bun.lockb
├── index.ts
├── node_modules
├── package.json
├── tsconfig.json
install module
今回はスクリプトを実装するにあたり、以下のモジュールを使用しています。
- zx ^7.2.3 シェルコマンドをTypeScriptから実行するのに
- inquirer ^9.2.11 ターミナルに選択肢を表示するのに使用
- papaparse ^5.4.1 csvファイルをいい感じに使うのに使用
bun add zx inquirer papaparse
bun add -d @types/inquirer @types/papaparse
スクリプトの実装
作成したシェルスクリプトをそのままTypeScriptで書き直したものが以下になります。直感的にだいぶ読みやすくなったと思います。
最終的なTypeScriptの実装
#!/usr/bin/env bun

import { path, chalk } from "zx";
import inquirer from "inquirer";
import { BunFile } from "bun";
import Papa from "papaparse";

type Rarity = "N" | "R" | "SR";

type GachaCsvData = {
  id: number;
  name: string;
  rarity: Rarity;
  weight: number;
};

const main = async () => {
  const args = Bun.argv;
  const baseDir = path.dirname(args[1]);

  // themes.txt読み込み
  const themesFile = await openFile(`${baseDir}/themes.txt`);
  const themesTxt = await themesFile.text();
  const choices = themesTxt.split("\n").filter((row) => row.length !== 0);
  if (choices.length < 1) {
    throw new Error("fail to read theme from themes.txt.");
  }

  // テーマ選択肢表示
  const { choiced } = await inquirer.prompt<{ choiced: string }>([
    {
      type: "list",
      name: "choiced",
      message: "テーマを選択してください.",
      choices,
    },
  ]);

  // 選択されたテーマからガチャデータファイル読み込み
  const theme = choiced.split(" ").shift() || "";
  const gachaFile = await openFile(`${baseDir}/gacha/${theme}.csv`);

  // csvを扱いやすいように変換
  const results = Papa.parse<GachaCsvData>(await gachaFile.text(), {
    header: true,
    dynamicTyping: true,
    skipEmptyLines: true,
  });
  const gachaFileData = results.data;

  // トータルの重みを計算
  const totalWeight = gachaFileData.reduce((previous, current) => {
    return previous + current.weight;
  }, 0);

  // 疑似乱数の取得
  const rand = Math.floor(Math.random() * totalWeight) + 1;

  // 重み付け抽選
  let currentWeight = 0;
  let result: GachaCsvData | undefined;
  for (const data of gachaFileData) {
    currentWeight += data.weight;
    if (currentWeight >= rand) {
      result = data;
      break;
    }
  }

  // result

  if (!result) {
    throw new Error("The gacha lottery failed.");
  }

  console.log("result item🚀");

  const msg = JSON.stringify(result, null, 2);
  switch (result.rarity) {
    case "R":
      console.log(chalk.magenta(msg));
      break;
    case "SR":
      console.log(rainbow(msg));
      break;
    default:
      console.log(msg);
      break;
  }
};

const openFile = async (filepath: string): Promise<BunFile> => {
  const file = Bun.file(filepath);
  if (!(await file.exists())) {
    throw new Error(`not found file. ${filepath}`);
  }
  return file;
};

const rainbow = (msg: string): string => {
  const rainbowColors = [
    chalk.red,
    chalk.yellow,
    chalk.green,
    chalk.blue,
    chalk.cyan,
    chalk.magenta,
    chalk.white,
  ];

  let coloredText = "";
  for (let i = 0; i < msg.length; i++) {
    // Apply rainbow colors in sequence to each character
    coloredText += rainbowColors[i % rainbowColors.length](msg[i]);
  }
  return coloredText;
};

await main();
実行するとこう(確率変えて無理やりSR出してレインボー演出確認してみたけど思ってたのとなんか違う。)
chmod +x index.ts
./index.ts

まとめ
今回はガチャのシュミレーションスクリプトをシェルスクリプトとzxを使用してTypeScriptで書いたものと比べてみました。本記事のまとめは以下です!!
- ガチャシュミレーションのスクリプトを作成しました。
- シェルスクリプトでテキストやCSVファイルを1行ずつ読み込んで処理する方法を紹介しました。
- シェルスクリプト内で疑似乱数を生成する方法を紹介しました。
- Bunとzxを組み合わせてスクリプトを作成する方法を紹介しました。
Bunというかzxがかなり強力でめちゃくちゃ体験良よかったです。これから個人的なものでスクリプト書きたくなったら積極的に使っていこうと思います。
今回は以上です🐼
本当にやりたかったこと
BunはAuto-Installという機能があるためnode_modulesが無いとNodeでのモジュール解決方法を諦めてBunのモジュール解決を試みるようです。なので、Bunがインストールされていればindex.tsだけ用意すればスクリプト実行できるかなというのが理想でした。さらに、ファイルの先頭に#!/usr/bin/env bunと記載しファイルに実行権限を与えれば./index.tsのように実行できるので実行権限を与えたシェルスクリプトを実行しているのとほぼ同じ感じになります。
実際にnode_modulesを削除して実行してみたところ、実行はできたのですが以下のような警告が表示されました。
[bun] Warning: async_hooks.createHook is not implemented in Bun. Hooks can still be created but will never be called.
Nodeのasync_hooks.createHookがBunでは実装されてないという警告だと思うのですがそれがどのような影響があるのかまでわからなかったので誰かわかる方いたらコメントで教えてください🙇♂️
ただ、node_modulesやpackage.jsonがなくても実行はできたのでtsファイル一つあれば実行できる状態ではあります。
もう一つの問題として、コードを書いている時にnode_modulesがないとモジュールが見つからなくてエラー表示されてしまう問題があります。DenoはVSCode拡張とsetting.jsonで解決できた気がするのでBunもそういった対応を待つ必要があるのかもしれないです。
Denoは上記のような問題はないので実際のところDenoをインストールしていてファイルの先頭に#!/usr/bin/env -S deno run -Aと記載すればtsファイル一つあれば十分な環境はたぶん整うと思います。
加えて、Denoなら以下の記事のようなCLIツール的な使い方もできるようで可能性広がるなと思いました。
とりあえずzxが個人的にアツいです。


Discussion