現実の世界の空をキャンバスに!?
12月16日、WebARを簡単に開発することができるプラットフォーム「8th Wall」の開発者がWebARで空をキャンバスに、アプリ不要で上空の世界に没入できるインタラクティブな体験を実現できるようになった「Sky Effects」を発表しました。
実際のブログはこちらです!
そもそも8th Wallって何?
8th Wallについては、別の記事で紹介をしました。
ぜひ読んでみてください!
Sky Effectsとは...
Sky Effects は、Nianticのセマンティック機能を利用して、空を識別し、セグメント化します。
これにより、開発者は空をキャンバスとして、3Dコンテンツを追加したり、空を完全に置き換えたりすることができます。
8th Wall Engineは、スマートフォンのカメラに空が映ったことを検知し、シーンの一部を画像や動画に置き換える処理を行います。
これを利用して、天気や時間帯を変えたり、スマートフォンで空を見ることでユーザーを新しい世界に連れて行くこともできます。
また、ユーザーが画面を1回タップするだけで、用意したさまざまなオプションと空を入れ替えることも可能です。
実際に触ってみよう!
公式テンプレートのクローン
Sky Effectsを使用したテンプレートが公開されています。
A-Frameを使用した場合のテンプレートと、three.jsを使用した場合のテンプレートがあります。
今回はthree.jsを使用した場合のテンプレートを使用していきます。
まずは、プロジェクトをクローンしていきます。
こちらにアクセスしてClone Projectを選択してください。
URLとプロジェクト名を設定したらCreateをクリックしてください。
すると、プロジェクトのエディターに遷移すると思います。

プロジェクトのプレビュー
Previewをして表示されたQRコードを読み込み、実際に触れてみてください!

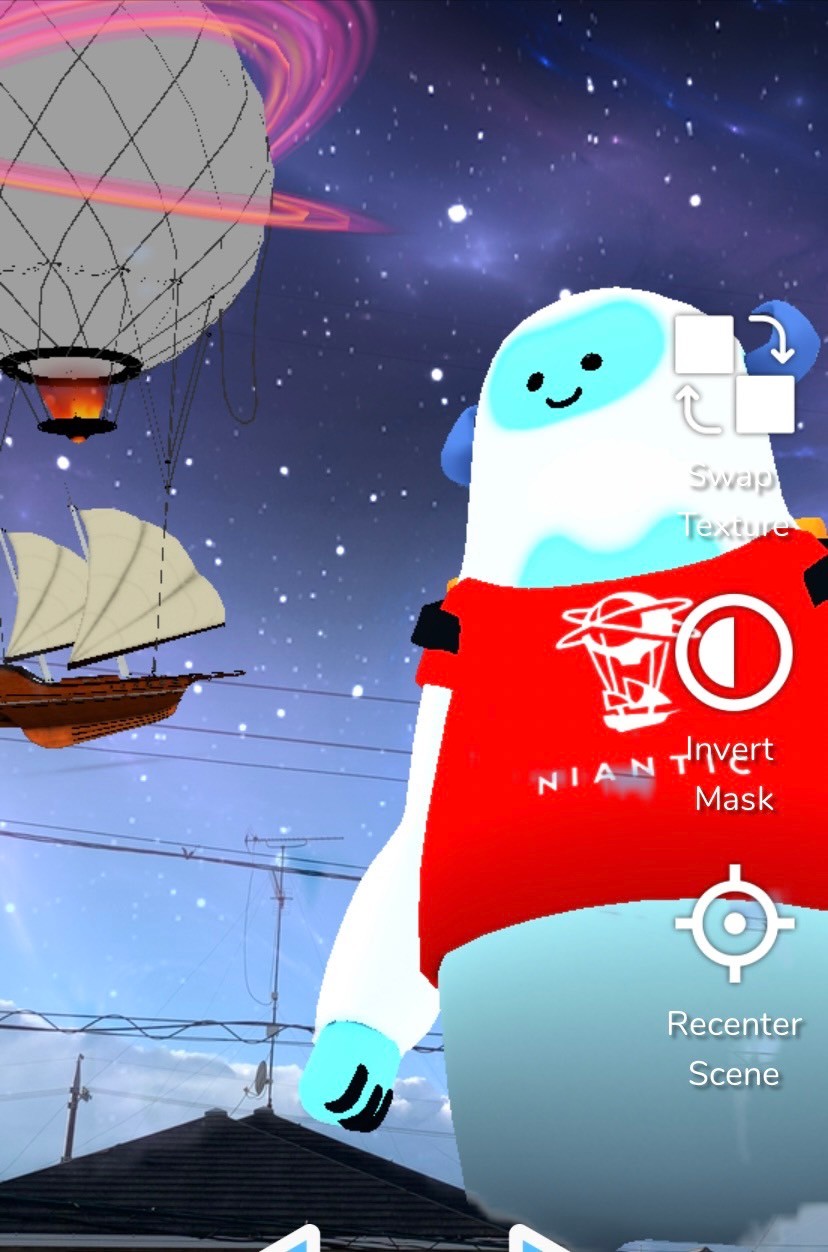
実際の画面

現実の世界の空に、キャラクターや、星空、3Dモデルのオブジェクト(気球)が写っているのはとても面白くて魅力的ですね!

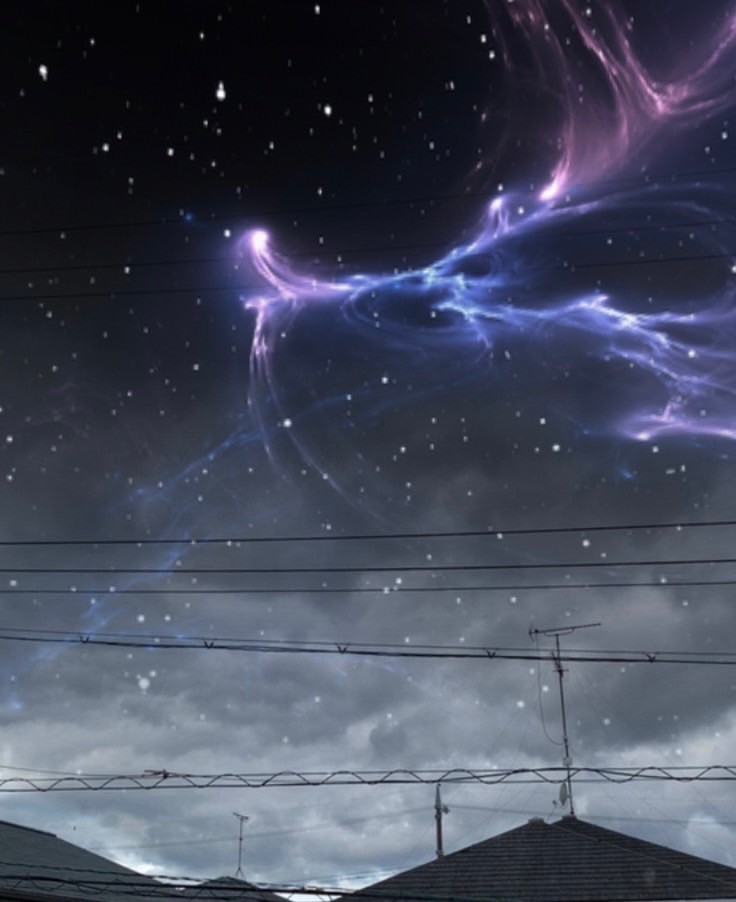
この日は、曇りで空が雲でおおわれていたため、少しきれいには描画されなかったのですが、それでも曇り空に、ここまできれいに星空が描画されているのはすごいですね...
Sky Effectsのテンプレートの説明
buttons-pipeline-module.js
デバッグ用のUIを追加して、テクスチャ(星空)の交換、セグメンテーションマスクの反転、空のシーンの再調節(リセット)などの機能を設定します。
code
export let buttonsPipelineModulePresent = false

export const buttonsPipelineModule = () => {
  let invertMaskBoolean = false

  const swapTextureIcon = require('./assets/UI/swapTexture.png')
  const invertMaskIcon = require('./assets/UI/invertMask.png')
  const recenterIcon = require('./assets/UI/recenter.png')

  const handleInvertMask = () => {
    invertMaskBoolean = !invertMaskBoolean
    XR8.LayersController.configure({layers: {sky: {invertLayerMask: invertMaskBoolean}}})
  }

  const handleRecenter = () => {
    XR8.LayersController.recenter()
  }

  return {
    name: 'buttons',
    onStart: () => {
      buttonsPipelineModulePresent = true

      const debugOptions = document.createElement('div')
      debugOptions.style.width = '100%'
      debugOptions.style.height = '100%'
      debugOptions.style.display = 'grid'
      debugOptions.style.position = 'absolute'
      debugOptions.style.top = '0'
      debugOptions.style.right = '0'
      debugOptions.style.gridTemplateColumns = '26fr 3fr 1fr'
      debugOptions.style.gridTemplateRows = '5fr 1fr 1fr 1fr 5fr'
      debugOptions.style.zIndex = '10'
      debugOptions.style.alignItems = 'center'
      debugOptions.id = 'debugOptions'
      debugOptions.style.zIndex = '10'

      document.body.appendChild(debugOptions)

      // Swap Texture Button
      const swapTextureGrid = document.createElement('div')
      debugOptions.appendChild(swapTextureGrid)
      swapTextureGrid.style.width = '100%'
      swapTextureGrid.style.height = '100%'
      swapTextureGrid.style.display = 'grid'
      swapTextureGrid.style.gridTemplateRows = '1fr 1fr'
      swapTextureGrid.style.gridTemplateColumns = '1fr'
      swapTextureGrid.style.gridRow = 2
      swapTextureGrid.style.gridColumn = 2
      swapTextureGrid.style.rowGap = '.5vh'
      swapTextureGrid.id = 'swapTextureGrid'

      const swapTextureImg = document.createElement('div')
      swapTextureGrid.appendChild(swapTextureImg)
      swapTextureImg.style.width = '100%'
      swapTextureImg.style.height = '100%'
      swapTextureImg.style.gridRow = 1
      swapTextureImg.style.gridColumn = 1
      // swapTextureImg.setAttribute("src", swapTextureIcon);
      swapTextureImg.style.backgroundRepeat = 'no-repeat'
      swapTextureImg.style.backgroundSize = 'contain'
      swapTextureImg.style.backgroundPosition = 'bottom'
      swapTextureImg.style.backgroundImage = `url('${swapTextureIcon}')`

      const swapTextureTxt = document.createElement('p')
      swapTextureGrid.appendChild(swapTextureTxt)
      swapTextureTxt.innerHTML = 'Swap <br> Texture'
      swapTextureTxt.style.gridRow = 2
      swapTextureTxt.style.gridColumn = 1
      swapTextureTxt.style.fontFamily = 'Nunito, sans-serif'
      swapTextureTxt.style.fontSize = '2vh'
      swapTextureTxt.style.color = 'white'
      swapTextureTxt.style.textAlign = 'center'
      swapTextureTxt.style.marginTop = 0
      swapTextureTxt.style.textShadow = '2px 2px 2px rgba(0, 0, 0, 0.5)'

      // Invert Mask Button
      const invertMaskGrid = document.createElement('div')
      debugOptions.appendChild(invertMaskGrid)
      invertMaskGrid.style.width = '100%'
      invertMaskGrid.style.height = '100%'
      invertMaskGrid.style.display = 'grid'
      invertMaskGrid.style.gridTemplateRows = '1fr 1fr'
      invertMaskGrid.style.gridTemplateColumns = '1fr'
      invertMaskGrid.style.gridRow = 3
      invertMaskGrid.style.gridColumn = 2
      invertMaskGrid.style.rowGap = '.5vh'

      const invertMaskImg = document.createElement('div')
      invertMaskGrid.appendChild(invertMaskImg)
      invertMaskImg.style.width = '100%'
      invertMaskImg.style.height = '100%'
      invertMaskImg.style.gridRow = 1
      invertMaskImg.style.gridColumn = 1
      invertMaskImg.style.backgroundRepeat = 'no-repeat'
      invertMaskImg.style.backgroundSize = 'contain'
      invertMaskImg.style.backgroundPosition = 'bottom'
      invertMaskImg.style.backgroundImage = `url('${invertMaskIcon}')`

      const invertMaskTxt = document.createElement('p')
      invertMaskGrid.appendChild(invertMaskTxt)
      invertMaskTxt.innerHTML = 'Invert <br> Mask'
      invertMaskTxt.style.gridRow = 2
      invertMaskTxt.style.gridColumn = 1
      invertMaskTxt.style.fontFamily = 'Nunito, sans-serif'
      invertMaskTxt.style.fontSize = '2vh'
      invertMaskTxt.style.color = 'white'
      invertMaskTxt.style.textAlign = 'center'
      invertMaskTxt.style.marginTop = 0
      invertMaskTxt.style.textShadow = '2px 2px 2px rgba(0, 0, 0, 0.5)'

      // Recenter Button
      const recenterGrid = document.createElement('div')
      debugOptions.appendChild(recenterGrid)
      recenterGrid.style.width = '100%'
      recenterGrid.style.height = '100%'
      recenterGrid.style.display = 'grid'
      recenterGrid.style.gridTemplateRows = '1fr 1fr'
      recenterGrid.style.gridTemplateColumns = '1fr'
      recenterGrid.style.gridRow = 4
      recenterGrid.style.gridColumn = 2
      recenterGrid.style.rowGap = '.5vh'
      recenterGrid.id = 'recenterGrid'

      const recenterImg = document.createElement('div')
      recenterGrid.appendChild(recenterImg)
      recenterImg.style.width = '100%'
      recenterImg.style.height = '100%'
      recenterImg.style.gridRow = 1
      recenterImg.style.gridColumn = 1
      recenterImg.style.backgroundRepeat = 'no-repeat'
      recenterImg.style.backgroundSize = 'contain'
      recenterImg.style.backgroundPosition = 'bottom'
      recenterImg.style.backgroundImage = `url('${recenterIcon}')`

      const recenterTxt = document.createElement('p')
      recenterGrid.appendChild(recenterTxt)
      recenterTxt.innerHTML = 'Recenter<br> Scene'
      recenterTxt.style.gridRow = 2
      recenterTxt.style.gridColumn = 1
      recenterTxt.style.fontFamily = 'Nunito, sans-serif'
      recenterTxt.style.fontSize = '2vh'
      recenterTxt.style.color = 'white'
      recenterTxt.style.textAlign = 'center'
      recenterTxt.style.marginTop = 0
      recenterTxt.style.textShadow = '2px 2px 2px rgba(0, 0, 0, 0.5)'

      invertMaskGrid.addEventListener('touchstart', handleInvertMask)
      recenterGrid.addEventListener('touchstart', handleRecenter)
    },
    onDetach: () => {
      buttonsPipelineModulePresent = false
      invertMaskGrid.removeEventListener('ontouchstart', handleInvertMask)
      recenterGrid.removeEventListener('ontouchstart', handleRecenter)
    },
  }
}
XR8.LayersController.configure({layers: {sky: {invertLayerMask:invertMaskBoolean}}})
XR8.LayersController.configure()について
XR8.LayersController が行う処理を設定します。
Parameters
任意で各パラメータを渡すことができます。
- nearClip ... シーンオブジェクトが見えるカメラに最も近い距離。
- farClip ... シーンオブジェクトが見えるカメラまでの最短距離。
- coordinates ... カメラの設定。引数:
{origin, scale, axes, mirroredDisplay}(原点, スケール, 軸, 反転) - layers ... 検出するセマンティックレイヤ。
レイヤーを削除するには、レイヤーの値としてnullを渡します。
レイヤーオプションをデフォルトに戻すには、そのオプションの値にnullを渡します。
2022年12月22日現在、サポートされているレイヤーはskyのみです。
layersにはさらに任意のプロパティがあります。以下の通りです。
◦ layerName ... 検出するセマンティックレイヤ。現時点でサポートされているレイヤーはskyのみです。
◦ invertLayerMask ...trueの場合、シーンに配置されたコンテンツは、空以外の領域を覆い隠します。falseを指定すると、シーンに配置されたコンテンツは空の部分を覆い隠します。デフォルトはfalseです。
XR8.LayersController.recenter()
カメラを原点/向いている方向に再配置します。
sky-scene-pipeline-module.js
code
import {buttonsPipelineModulePresent} from './buttons-pipeline-module'

// Returns a pipeline module that initializes a sky scene with models and textures along with simple interactivity.
export const skySampleScenePipelineModule = () => {
  const TEXTURE = require('./assets/sky-textures/space.png')
  const DOTY_MODEL = require('./assets/sky-models/doty.glb')
  const AIRSHIP_MODEL = require('./assets/sky-models/airship.glb')

  const loader = new THREE.GLTFLoader()  // This comes from GLTFLoader.js.
  const dracoLoader = new THREE.DRACOLoader()  // DRACOLoader for Draco Compressed Models
  dracoLoader.setDecoderPath('https://www.gstatic.com/draco/versioned/decoders/1.3.6/')
  dracoLoader.preload()  // Pre-fetch Draco WASM/JS module.
  loader.setDRACOLoader(dracoLoader)

  let dotyAnimationMixer
  let airshipAnimationMixer

  let skyBox

  const dotyPositioningPivot = new THREE.Group()
  const airshipPositioningPivot = new THREE.Group()

  let airshipLoadedModel
  let dotyLoadedModel

  let idleClipAction
  let walkingClipAction
  let rightWalkingInterval
  let leftWalkingInterval

  const clock = new THREE.Clock()

  // Create a sky scene
  const initSkyScene = ({scene, renderer}) => {
    renderer.outputEncoding = THREE.sRGBEncoding

    // Add soft white light to the scene.
    scene.add(new THREE.AmbientLight(0x404040, 7))

    // Add sky dome.
    const skyGeo = new THREE.SphereGeometry(1000, 25, 25)

    const textureLoader = new THREE.TextureLoader()
    const texture = textureLoader.load(TEXTURE)
    texture.encoding = THREE.sRGBEncoding
    texture.mapping = THREE.EquirectangularReflectionMapping
    const skyMaterial = new THREE.MeshPhongMaterial({
      map: texture,
      toneMapped: true,
    })

    skyBox = new THREE.Mesh(skyGeo, skyMaterial)
    skyBox.material.side = THREE.BackSide
    scene.add(skyBox)
    skyBox.visible = false

    // Load Airship
    loader.load(
      // Resource URL
      AIRSHIP_MODEL,
      // Called when the resource is loaded
      (gltf) => {
        airshipLoadedModel = gltf.scene
        // Animate the model
        airshipAnimationMixer = new THREE.AnimationMixer(airshipLoadedModel)
        const idleClip = gltf.animations[0]
        idleClipAction = airshipAnimationMixer.clipAction(idleClip.optimize())
        idleClipAction.play()

        // Add the model to a pivot to help position it within the circular sky dome
        airshipPositioningPivot.add(airshipLoadedModel)
        scene.add(airshipPositioningPivot)

        const horizontalDegrees = -25  // Higher number moves model right (in degrees)
        const verticalDegrees = 30  // Higher number moves model up (in degrees)
        const modelDepth = 35  // Higher number is further depth.

        airshipLoadedModel.position.set(0, 0, -modelDepth)
        airshipLoadedModel.rotation.set(0, 0, 0)
        airshipLoadedModel.scale.set(10, 10, 10)
        airshipLoadedModel.castShadow = true

        // Converts degrees into radians and adds a negative to horizontalDegrees to rotate in the direction we want
        airshipPositioningPivot.rotation.y = -horizontalDegrees * (Math.PI / 180)
        airshipPositioningPivot.rotation.x = verticalDegrees * (Math.PI / 180)
      }
    )

    // Load Doty
    loader.load(
      // Resource URL
      DOTY_MODEL,
      // Called when the resource is loaded
      (gltf) => {
        dotyLoadedModel = gltf.scene
        // Animate the model
        dotyAnimationMixer = new THREE.AnimationMixer(dotyLoadedModel)
        const idleClip = gltf.animations[0]
        const walkingClip = gltf.animations[1]
        idleClipAction = dotyAnimationMixer.clipAction(idleClip.optimize())
        walkingClipAction = dotyAnimationMixer.clipAction(walkingClip.optimize())
        idleClipAction.play()

        // Add the model to a pivot to help position it within the circular sky dome
        dotyPositioningPivot.add(dotyLoadedModel)
        dotyPositioningPivot.rotation.set(0, 0, 0)
        dotyPositioningPivot.position.set(0, 0, 0)
        scene.add(dotyPositioningPivot)

        const horizontalDegrees = 0  // Higher number moves model right (in degrees)
        const verticalDegrees = 0  // Higher number moves model up (in degrees)
        const modelDepth = 25  // Higher number is further depth.

        dotyLoadedModel.position.set(0, 0, -modelDepth)
        dotyLoadedModel.rotation.set(0, 0, 0)
        dotyLoadedModel.scale.set(100, 100, 100)
        dotyLoadedModel.castShadow = true

        // Converts degrees into radians and adds a negative to horizontalDegrees to rotate in the direction we want
        dotyPositioningPivot.rotation.y = -horizontalDegrees * (Math.PI / 180)
        dotyPositioningPivot.rotation.x = verticalDegrees * (Math.PI / 180)

        // Need to apply the pivot's rotation to the model's position and reset the pivot's rotation
        // So that you can use the rotation to move Doty in a straight and not a tilted walking path
        const modelPos = new THREE.Vector3(0, 0, -modelDepth).applyEuler(dotyPositioningPivot.rotation)
        dotyLoadedModel.position.copy(modelPos)
        dotyPositioningPivot.rotation.set(0, 0, 0)
      }
    )

    // Moving Doty
    const bottomBar = document.getElementById('bottomBar')
    bottomBar.style.display = 'grid'

    const rightButton = document.getElementById('rightButton')
    rightButton.addEventListener('touchstart', (e) => {
      rightWalkingInterval = setInterval(() => {
        dotyPositioningPivot.rotation.y -= 0.01
      }, 25)
      dotyLoadedModel.rotation.y = Math.PI / 3
      idleClipAction.stop()
      walkingClipAction.play()
      e.returnValue = false
    })

    rightButton.addEventListener('touchend', () => {
      walkingClipAction.stop()
      idleClipAction.play()
      dotyLoadedModel.rotation.y = 0
      clearInterval(rightWalkingInterval)
    })

    const leftButton = document.getElementById('leftButton')
    leftButton.addEventListener('touchstart', (e) => {
      leftWalkingInterval = setInterval(() => {
        dotyPositioningPivot.rotation.y += 0.01
      }, 25)
      dotyLoadedModel.rotation.y = -(Math.PI / 3)
      idleClipAction.stop()
      walkingClipAction.play()
      e.returnValue = false
    })

    leftButton.addEventListener('touchend', () => {
      walkingClipAction.stop()
      clearInterval(leftWalkingInterval)
      idleClipAction.play()
      dotyLoadedModel.rotation.y = 0
    })
  }

  const layerFound = ({detail}) => {
    if (detail?.name === 'sky') {
      XR8.LayersController.recenter()
    }
  }

  return {
    // Pipeline modules need a name. It can be whatever you want but must be unique within your app.
    name: 'sky-scene',

    // onStart is called once when the camera feed begins. In this case, we need to wait for the
    // XR8.Threejs scene to be ready before we can access it to add content. It was created in
    // XR8.Threejs.pipelineModule()'s onStart method.
    onStart: ({canvas}) => {
      const {layerScenes, camera, renderer} = XR8.Threejs.xrScene()
      initSkyScene({scene: layerScenes.sky.scene, camera, renderer})

      // Set the initial camera position
      camera.position.set(0, 3, 0)

      // Sync the xr controller's 6DoF position and camera paremeters with our scene.
      XR8.LayersController.configure({
        coordinates: {
          origin: {
            position: camera.position,
            rotation: camera.quaternion,
          },
        },
      })

      // Prevent scroll/pinch gestures on canvas
      canvas.addEventListener('touchmove', (event) => {
        event.preventDefault()
      })

      // Prevent double tap zoom
      document.ondblclick = function (e) {
        e.preventDefault()
      }
    },

    onAttach: () => {
      if (buttonsPipelineModulePresent) {
        const swapTextureButton = document.getElementById('swapTextureGrid')
        swapTextureButton.addEventListener('touchstart', () => {
          skyBox.visible = !skyBox.visible
        })
      }
    },

    onUpdate: () => {
      const delta = clock.getDelta()

      // Animate the models.
      if (dotyAnimationMixer && airshipAnimationMixer) {
        dotyAnimationMixer.update(delta)
        airshipAnimationMixer.update(delta)
      }
    },

    listeners: [
      {event: 'layerscontroller.layerfound', process: layerFound},
    ],
  }
}
40行目~55行目
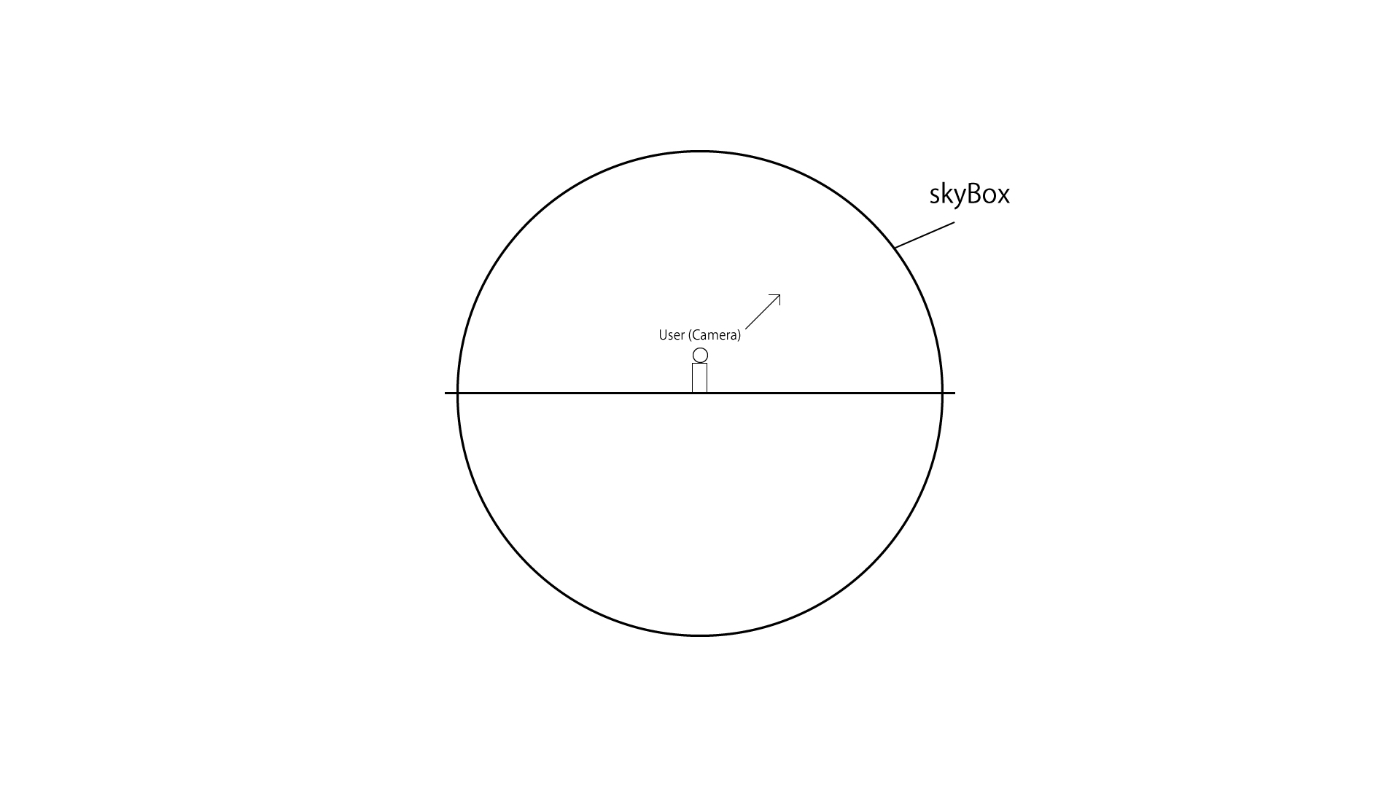
slyBoxは球体/スカイドームを作成し、空のテクスチャを置き換えるためのテクスチャを貼り付けます。
球体の内側にテクスチャを適応していますね、イメージはプラネタリウムです。
ユーザーは球体の真ん中に立ち、空を見上げているということです。

// ~
    // Add sky dome.
    const skyGeo = new THREE.SphereGeometry(1000, 25, 25)

    const textureLoader = new THREE.TextureLoader()
    const texture = textureLoader.load(TEXTURE)
    texture.encoding = THREE.sRGBEncoding
    texture.mapping = THREE.EquirectangularReflectionMapping
    const skyMaterial = new THREE.MeshPhongMaterial({
      map: texture,
      toneMapped: true,
    })

    skyBox = new THREE.Mesh(skyGeo, skyMaterial)
    skyBox.material.side = THREE.BackSide
    scene.add(skyBox)
    skyBox.visible = false

// ~
57行目~129行目
THREE.Groupをピボットポイントとして設定して、球体のシーンに空のコンテンツを配置するためにオブジェクトを追加します。
ここでキャラクターや飛行船を追加しているということですね。
    // Load Airship
    loader.load(
      // Resource URL
      AIRSHIP_MODEL,
      // Called when the resource is loaded
      (gltf) => {
        airshipLoadedModel = gltf.scene
        // Animate the model
        airshipAnimationMixer = new THREE.AnimationMixer(airshipLoadedModel)
        const idleClip = gltf.animations[0]
        idleClipAction = airshipAnimationMixer.clipAction(idleClip.optimize())
        idleClipAction.play()

        // Add the model to a pivot to help position it within the circular sky dome
        airshipPositioningPivot.add(airshipLoadedModel)
        scene.add(airshipPositioningPivot)

        const horizontalDegrees = -25  // Higher number moves model right (in degrees)
        const verticalDegrees = 30  // Higher number moves model up (in degrees)
        const modelDepth = 35  // Higher number is further depth.

        airshipLoadedModel.position.set(0, 0, -modelDepth)
        airshipLoadedModel.rotation.set(0, 0, 0)
        airshipLoadedModel.scale.set(10, 10, 10)
        airshipLoadedModel.castShadow = true

        // Converts degrees into radians and adds a negative to horizontalDegrees to rotate in the direction we want
        airshipPositioningPivot.rotation.y = -horizontalDegrees * (Math.PI / 180)
        airshipPositioningPivot.rotation.x = verticalDegrees * (Math.PI / 180)
      }
    )

    // Load Doty
    loader.load(
      // Resource URL
      DOTY_MODEL,
      // Called when the resource is loaded
      (gltf) => {
        dotyLoadedModel = gltf.scene
        // Animate the model
        dotyAnimationMixer = new THREE.AnimationMixer(dotyLoadedModel)
        const idleClip = gltf.animations[0]
        const walkingClip = gltf.animations[1]
        idleClipAction = dotyAnimationMixer.clipAction(idleClip.optimize())
        walkingClipAction = dotyAnimationMixer.clipAction(walkingClip.optimize())
        idleClipAction.play()

        // Add the model to a pivot to help position it within the circular sky dome
        dotyPositioningPivot.add(dotyLoadedModel)
        dotyPositioningPivot.rotation.set(0, 0, 0)
        dotyPositioningPivot.position.set(0, 0, 0)
        scene.add(dotyPositioningPivot)

        const horizontalDegrees = 0  // Higher number moves model right (in degrees)
        const verticalDegrees = 0  // Higher number moves model up (in degrees)
        const modelDepth = 25  // Higher number is further depth.

        dotyLoadedModel.position.set(0, 0, -modelDepth)
        dotyLoadedModel.rotation.set(0, 0, 0)
        dotyLoadedModel.scale.set(100, 100, 100)
        dotyLoadedModel.castShadow = true

        // Converts degrees into radians and adds a negative to horizontalDegrees to rotate in the direction we want
        dotyPositioningPivot.rotation.y = -horizontalDegrees * (Math.PI / 180)
        dotyPositioningPivot.rotation.x = verticalDegrees * (Math.PI / 180)

        // Need to apply the pivot's rotation to the model's position and reset the pivot's rotation
        // So that you can use the rotation to move Doty in a straight and not a tilted walking path
        const modelPos = new THREE.Vector3(0, 0, -modelDepth).applyEuler(dotyPositioningPivot.rotation)
        dotyLoadedModel.position.copy(modelPos)
        dotyPositioningPivot.rotation.set(0, 0, 0)
      }
    )
232行目~234行目(172行目~176行目)
空が初めに検出されたときに、空が検出された場所と同じ方向と進むように、自動的に空のシーンをrecenterしています。
    listeners: [
      {event: 'layerscontroller.layerfound', process: layerFound},
    ],
layerFound
  const layerFound = ({detail}) => {
    if (detail?.name === 'sky') {
      XR8.LayersController.recenter()
    }
  }
まとめ
今回紹介した8th WallのSky Effectsを使用すれば、お昼でもプラネタリウムを楽しむことができたり、疑似的に夕日を楽しむことができたり、空に自身が作成した3Dモデル浮かべたり、飛ばしたりして遊んだりと現実世界の空を活用した面白いことがたくさんできそうです。
個人的には星空がすきなので、昼でも楽しめるプラネタリウムを作って、星座や惑星を表示したり、流星群を起こしてみたり、地球を表示して、月にいるかのようにしてみたいですね。
フレームワークとの親和性を活かして、様々なことに挑戦してみたいです。
最後になりますが、この記事を読んでくださり、ありがとうございました!
Discussion