Google Cloud FunctionsでAPIを叩いてApp Scriptからその関数を呼び出し、スプレッドシートに書き出す
Google Cloud Functionsで今の東京の天気を取得する
Google Cloud FunctionsはNode.jsで書いていく
天気はOpenWeatherMapのAPIを利用
node-fetchをインポート
const fetch = require('node-fetch');
node-fetchはnode.jsでHTTPリクエストを行うためのライブラリ
これがないとNode.jsではfetch()が使えない
OpenWeatherMapのAPIキーを示す
const apiKey = 'ここにAPIキーを書く';
東京の天気を取得
非同期処理
非同期にすることで時間のかかるAPIを叩くのを待つ必要なく他の処理を進められる
ただし、APIを叩いてからでないと取得できない情報を使ってるものはawaitで処理が終わるまで待っている
OpenWeatherMapのAPIを呼び出して天気情報を取得
async function getTokyoWeather() {
    try {
        const cityName = 'Tokyo';

        // 天気情報を取得
        const response = await fetch(`http://api.openweathermap.org/data/2.5/weather?q=${cityName}&appid=${apiKey}`);
        const data = await response.json();

        // 天気を抽出
        const weatherDescription = data.weather[0].description;

        return { city: data.name, weather: weatherDescription };
    } catch (error) {
        console.error('Error fetching weather data:', error);
        throw error;
    }
}
エクスポートする
成功したら200、失敗したら500を設定
exports.weatherFunction = async (req, res) => {
    try {
        const weatherData = await getTokyoWeather();
        res.status(200).json(weatherData);
    } catch (error) {
        res.status(500).send('Error fetching weather data');
    }
};
package.jsonの編集
node-fetchが使えるようにしておく
{
  "name": "ここに名前を書く",
  "version": "1.0.0",
  "description": "Google Cloud Function for fetching weather data",
  "main": "index.js",
  "scripts": {
    "start": "node index.js",
    "deploy": "gcloud functions deploy weatherFunction --runtime=nodejs14 --trigger-http"
  },
  "author": "",
  "dependencies": {
    "node-fetch": "^2.6.1"
  }
}
Google Apps ScriptでGoogle Cloud Functionsの関数を呼び出し、天気情報を取得する
呼び出す関数のURLを定義
const cloudFunctionUrl = 'ここにGoogle Cloud FunctionsのファンクションのURLを書く';
HTTPリクエストのオプション
HTTPリクエストはGETを使用
リクエストがJSONであることの通知
404などのエラーの場合でも処理を続行してレスポンスを返すようにする
const options = {
    method: 'get',
    contentType: 'application/json',
    muteHttpExceptions: true,
};
HTTPリクエストを送信
指定したGoogle Cloud FunctionsのURLにHTTPリクエストを送信
帰ってきたJSON形式の文字列を使いやすいようにオブジェクトに変換
const response = UrlFetchApp.fetch(cloudFunctionUrl, options);
const responseData = JSON.parse(response.getContentText());
ログに出力
Logger.log(response);
Logger.log(responseData);
{"city":"Tokyo","weather":"few clouds"}
{weather=few clouds, city=Tokyo}
といった出力ができる
Google Cloud Functionsで、指定した都市の天気情報を持ってくるように変更
デフォルトの都市を東京に設定、都市が設定されていない(cityパラメーターがない)場合はデフォルトの都市を使用するようにする
const defaultCity = 'Tokyo';
const cityName = city || defaultCity;
cityパラメーターを抽出する
req.query.cityはクエリパラメータ(URLの?以降)からcityを取得
req.bodyが存在しcityも存在する場合cityの値を取得するようにする
const city = req.query.city || (req.body && req.body.city);
全体
const fetch = require('node-fetch');

// OpenWeatherMapのAPI キー
const apiKey = 'ここにキー;

async function getWeather(city) {
    try {
        // デフォルトの都市をセット(cityパラメーターがない場合)
        const defaultCity = 'Tokyo';
        const cityName = city || defaultCity;

        // 天気情報を取得
        const response = await fetch(`http://api.openweathermap.org/data/2.5/weather?q=${cityName}&appid=${apiKey}`);
        const data = await response.json();

        // 天気を抽出
        const weatherDescription = data.weather[0].description;

        return { city: data.name, weather: weatherDescription};
    } catch (error) {
        console.error('Error fetching weather data:', error);
        throw error;
    }
}

exports.weatherFunction = async (req, res) => {
    try {
        const city = req.query.city || (req.body && req.body.city);
        const weatherData = await getWeather(city);
        res.status(200).json(weatherData);
    } catch (error) {
        res.status(500).send('Error fetching weather data');
    }
};
Google Apps Scriptで指定した都市の天気情報を取得する
都市を指定する
payloadはサーバーに送信されるデータのこと
const payload = {
    city: 'Osaka'
};
payloadをJSON形式の文字列に変更する
HTTPPOSTリクエストの送信でリクエストボディとしてデータを送信したい場合、データをJSON形式で送信する必要がある
JSON形式の文字列に変更しないときちんと送信されなくなる
payload: JSON.stringify(payload)
ログに出力
Logger.log(response);
Logger.log(responseData);
{"city":"Osaka","weather":"scattered clouds"}
{weather=scattered clouds, city=Osaka}
と指定した都市の天気が返ってくるようになった
全体
function callCloudFunction() {
  const cloudFunctionUrl = 'ここにURL';

  const payload = {
    city: 'Osaka'
  };

  const options = {
    method: 'get',
    contentType: 'application/json',
    muteHttpExceptions: true,
    payload: JSON.stringify(payload)
  };

  const response = UrlFetchApp.fetch(cloudFunctionUrl, options);
  const responseData = JSON.parse(response.getContentText());

  Logger.log(response);
  Logger.log(responseData);
}
Google Apps Scriptで取得した都市の天気情報をスプレッドシートに書き込む
アクティブなスプレッドシートの取得
.getActiveSpreadsheet()でアクティブな(開いている)スプレッドシートを取得
.getActiveSheet()でアクティブなシートを取得
const sheet = SpreadsheetApp.getActiveSpreadsheet().getActiveSheet();
書き込むセルを指定
sheet.getRange('A1')でセルA1を指定
.setValue(responseData.city)で都市名(cityプロパティの値)を設定
sheet.getRange('A1').setValue(responseData.city);
同様にB1に天気を書き込む
sheet.getRange('B1').setValue(responseData.weather);
全体
const sheet = SpreadsheetApp.getActiveSpreadsheet().getActiveSheet();

sheet.getRange('A1').setValue(responseData.city);
sheet.getRange('B1').setValue(responseData.weather);
一定の時間ごとにGoogle Apps Scriptを実行するようにする
毎回実行ボタンを押すのではなく、一定の時間ごとに自動で実行するように変更したい
トリガーを利用する
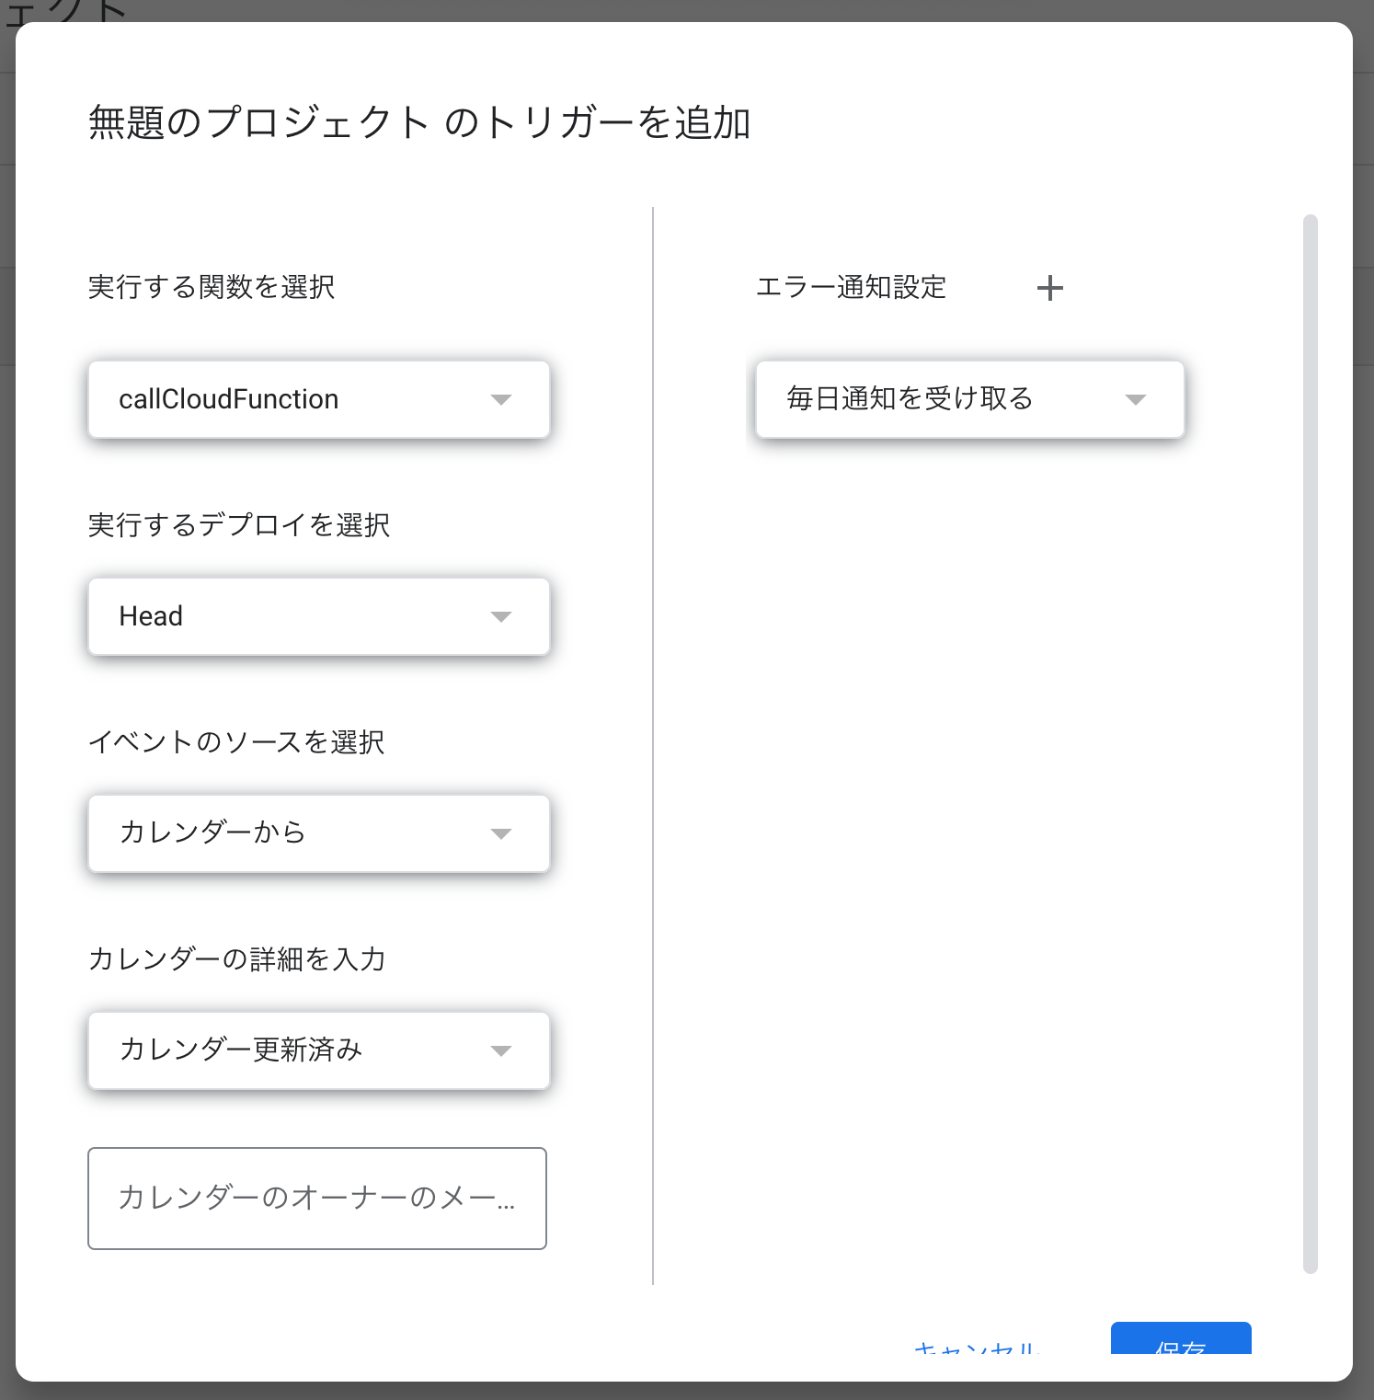
Apps Scriptのトリガーから「+トリガーを追加」を選択
実行する関数
実行したい関数を選ぶ
実行するデプロイを選択
Headは最新の編集中のスクリプトのこと
イベントのソースを選択
スプレッドシートから
スプレッドシートを開いたとき、編集や変更を行ったとき、フォームを送信したときに関数を実行できるようになる
編集はセルの中身を変えたり行の追加や削除など
変更はセルの中身を変えたときのみ
時間主導型
特定の日付の時間や1分おき、6時間おきといったようなタイミングで関数を実行できるようになる
特定の日時にすれば16時といったように選択できるが一度きり
日付ベースにすれば16時から17時というふうに16時ピンポイントで関数の実行は行えない
カレンダーから
Googleカレンダーをのイベントに応じて関数を実行できるようになる
Googleカレンダーでイベントが作成されたときに、その情報をスプレッドシートに記録するなどの使い方がある
GASで実行するたびにスプレッドシートのセルを1つずつずらして書き込むようにする
はじめはA1に都市名、B1に天気を書き込む
次に関数を実行したときにはA2に都市名、B2に天気を書き込むようにする
空白のセルを見つけてそこに書き込むようにする
A列の1行目から2,3,4...と空白のセルが出てくるまで探し、初めて空白のセルが出てきたときに書き込むようにする
はじめに行番号を設定する
1行目からはじめたいのでrow=1からはじめる
let row = 1;
ループして空白のセルを探す
whileを使ってbreakまで無限ループする
while (true)
A列のセルを取得
C列のセルを取得したいときはgetRange(row, 3)にする
const cell = sheet.getRange(row, 1);
空白の行を見つけA1に都市名B1に天気を書き込みループを終了させる
if (cell.getValue() === '') {
      sheet.getRange(row, 1).setValue(responseData.city);
      sheet.getRange(row, 2).setValue(responseData.weather);
      break;
    }
C列に都市名D列に天気を書き込む場合は
sheet.getRange(row, 3).setValue(responseData.city);
sheet.getRange(row, 4).setValue(responseData.weather);
もし空白のセルが見つからなければ1つ下の行を探しに行く
A1が空白でなかった場合は1足してA2にいく
row++;
全体
let row = 1;
while (true) {
    const cell = sheet.getRange(row, 1);
    if (cell.getValue() === '') {
        sheet.getRange(row, 1).setValue(responseData.city);
        sheet.getRange(row, 2).setValue(responseData.weather);
        break;
    }
    row++;
}
毎日同じ時間にGASの関数が実行されるようにトリガーを設定する、トリガー作成用の関数を作成
毎日6時-7時という設定はデフォルトでできるが、毎日6時という設定はできないので自分でコードを書いてトリガーを設定する必要がある
1/1の6時といった設定はできるのでそれを利用して毎日日付も含めた時間の再設定をするようにすると、実質毎日同じ時間に実行するトリガーとなる
トリガーの設定
今日の日時を取得
1足すことで次の日の日時になる
常に次の日の11時50分に設定
const triggerDay = new Date();
triggerDay.setDate(triggerDay.getDate() + 1);
triggerDay.setHours(11);
triggerDay.setMinutes(50);
triggerDay.setSeconds(0);
新しいトリガーを作成
新しいcallCloudFunctionトリガーを作成
callCloudFunctionは天気の情報を取得する関数
.timeBased()時間主導型のトリガー
.at(triggerDay)上で記したtriggerDay(翌日の11時50分)を日時に設定
.create()トリガーを作成
ScriptApp.newTrigger('callCloudFunction')
  .timeBased()
  .at(triggerDay)
  .create();
プロパティに日時を保存
const scriptProperties = PropertiesService.getScriptProperties();
scriptProperties.setProperty('TriggerSetAt', triggerDay.toString());
全てのトリガーから既存のトリガーを探して削除する
このままだと毎日新しいトリガーが生成されてしまうので、すでに実行したトリガーは削除して新しいトリガーを作成するようにする
全てのトリガーを取得
const allTriggers = ScriptApp.getProjectTriggers();
既存のcallCloudFunctionトリガーを取得
トリガーをループし、callCloudFunctionがあればexistingTriggerに設定
let existingTrigger = null;
for (let i = 0; i < allTriggers.length; i++) {
  if (allTriggers[i].getHandlerFunction() === 'callCloudFunction') {
    existingTrigger = allTriggers[i];
    break;
  }
}
既存のトリガーがあれば削除
existingTrigger(callCloudFunctionトリガー)があれば削除する
if (existingTrigger !== null) {
  ScriptApp.deleteTrigger(existingTrigger);
}
全体
function createTrigger() {
  const allTriggers = ScriptApp.getProjectTriggers();
  let existingTrigger = null;

  for (let i = 0; i < allTriggers.length; i++) {
    if (allTriggers[i].getHandlerFunction() === 'callCloudFunction') {
      existingTrigger = allTriggers[i];
      break;
    }
  }

  if (existingTrigger !== null) {
    ScriptApp.deleteTrigger(existingTrigger);
  }

  const triggerDay = new Date();
  triggerDay.setDate(triggerDay.getDate() + 1);
  triggerDay.setHours(11);
  triggerDay.setMinutes(50);
  triggerDay.setSeconds(0);

  ScriptApp.newTrigger('callCloudFunction')
    .timeBased()
    .at(triggerDay)
    .create();

  const scriptProperties = PropertiesService.getScriptProperties();
  scriptProperties.setProperty('TriggerSetAt', triggerDay.toString());
}
作成したcreateTriggerを毎日実行するように設定
11時50分にcallCloudFunction関数が実行されるので、毎日12-13時に作成したcreateTriggerを実行するように設定するとまた翌日の11時50分にcallCloudFunction関数が実行されるようになるというループを作れる
参考
Cloud Functionsで気温を取得し、GASで全国七都市の気温を都市ごとに書き出す
Cloud Functionsで気温を取得するように変更
気温を抽出し、都市名と気温のセットで返す
const currentTemperature = data.main.temp;
return { city: data.name, temperature: currentTemperature };
GASで都市ごとの気温を書き出す
全国七都市を定義
今回は札幌、仙台、東京、横浜、名古屋、大阪、那覇にした
const cities = ['Sapporo', 'Sendai', 'Tokyo', 'Yokohama', 'Nagoya', 'Osaka', 'Naha'];
都市名と気温を書き出すセルの位置を対応させる
先に対応させておくことで、見やすくなったり簡単に追加や変更、削除ができる
const cellMapping = {
    'Sapporo': 'C2',
    'Sendai': 'C3',
    'Tokyo': 'C4',
    'Yokohama': 'C5',
    'Nagoya': 'C6',
    'Osaka': 'C7',
    'Naha': 'C8'
  };
ループさせて各都市の気温を書き出していく
cities.forEach(city => {
}
都市名を設定
const payload = { city: city };
対応するセルに気温を書き出す
cellMapping[city]はcityが'Tokyo'の場合、cellMapping['Tokyo'] は 'C4'を表す
sheet.getRange(cellMapping[city]).setValue(responseData.temperature);
全体
function callCloudFunction() {
  const cloudFunctionUrl = 'https://...';

  const cities = ['Sapporo', 'Sendai', 'Tokyo', 'Yokohama', 'Nagoya', 'Osaka', 'Naha'];
  const cellMapping = {
    'Sapporo': 'C2',
    'Sendai': 'C3',
    'Tokyo': 'C4',
    'Yokohama': 'C5',
    'Nagoya': 'C6',
    'Osaka': 'C7',
    'Naha': 'C8'
  };

  cities.forEach(city => {
    const payload = { city: city };

    const options = {
      method: 'get',
      contentType: 'application/json',
      muteHttpExceptions: true,
      payload: JSON.stringify(payload)
    };

    const response = UrlFetchApp.fetch(cloudFunctionUrl, options);
    const responseData = JSON.parse(response.getContentText());

    const sheet = SpreadsheetApp.getActiveSpreadsheet().getActiveSheet();

    sheet.getRange(cellMapping[city]).setValue(responseData.temperature);
  });
}
全国七都市の最低気温と最高気温も書き出せるようにする
Cloud Functionsで最低気温と最高気温を取得
現在の気温に加えて最低気温と最高気温を抽出し、取得した値を返す
const currentTemperature = data.main.temp;
const minTemperature = data.main.temp_min;
const maxTemperature = data.main.temp_max;

return {
    city: data.name,
    temperature: currentTemperature,
    minTemperature: minTemperature,
    maxTemperature: maxTemperature
};
レスポンスの例(東京の場合)
{
    "city": "Tokyo",
    "temperature": 20.0,
    "minTemperature": 15.0,
    "maxTemperature": 25.0
}
GASで現在の気温に加え最低気温と最高気温も書き出す
セルのマッピングを変更
cellMappingオブジェクトに現在の気温、最低気温、最高気温それぞれをどのセルに書き込むか定義する
const cellMapping = {
  'Sapporo': { current: 'C2', min: 'D2', max: 'E2' },
  'Sendai': { current: 'C3', min: 'D3', max: 'E3' },
  'Tokyo': { current: 'C4', min: 'D4', max: 'E4' },
  'Yokohama': { current: 'C5', min: 'D5', max: 'E5' },
  'Nagoya': { current: 'C6', min: 'D6', max: 'E6' },
  'Osaka': { current: 'C7', min: 'D7', max: 'E7' },
  'Naha': { current: 'C8', min: 'D8', max: 'E8' }
};
それぞれの気温を書き出し
responseDataからそれぞれの気温を取得し、上で定義したセルの場所に書き込む
sheet.getRange(cellMapping[city].current).setValue(responseData.temperature);
sheet.getRange(cellMapping[city].min).setValue(responseData.minTemperature);
sheet.getRange(cellMapping[city].max).setValue(responseData.maxTemperature);
毎日6,12,18,24時にトリガーを起動するようにする
GASのcreateTrigger(トリガーを作る関数)を変更
24時は0時に変換しておく
先に時間の配列を作っておいて、ループさせながらtriggerDay.setHours()に決めた時刻を設定していく
const times = [0, 6, 12, 18];
times.forEach(hour => {
    const triggerDay = new Date();
    triggerDay.setDate(triggerDay.getDate() + 1);
    triggerDay.setHours(hour);
    triggerDay.setMinutes(0);
    triggerDay.setSeconds(0);
    ScriptApp.newTrigger('callCloudFunction')
      .timeBased()
      .at(triggerDay)
      .create();
});
createTriggerのトリガーを設定
設定した日の翌日の0,6,12,18時に設定されるので、毎日18-24時の間にcreateTriggerが実行されるように設定する
今回は毎日19-20時の間にcreateTriggerが実行されるように設定した
毎日全国七都市の最高気温を別シートに記録しておきその月の平均気温を出す
新しい関数を作成
URLを取得
Cloud FunctionのURLを定義
const cloudFunctionUrl = 'https://...';
都市リストとマッピング
全国七都市を定義し、各都市に対応する列をマッピングする
const cities = ['Sapporo', 'Sendai', 'Tokyo', 'Yokohama', 'Nagoya', 'Osaka', 'Naha'];
const cellMapping = {
    'Sapporo': 'B',
    'Sendai': 'C',
    'Tokyo': 'D',
    'Yokohama': 'E',
    'Nagoya': 'F',
    'Osaka': 'G',
    'Naha': 'H'
};
都市ごとに最高気温を取得する
cities.forEach(city => {
    const payload = { city: city };

    const options = {
        method: 'get',
        contentType: 'application/json',
        muteHttpExceptions: true,
        payload: JSON.stringify(payload)
    };

    const response = UrlFetchApp.fetch(cloudFunctionUrl, options);
    const responseData = JSON.parse(response.getContentText());
シートを取得して、空のセルが見つかればそこに気温を書き込む
    // シートの取得
    const sheet = SpreadsheetApp.getActiveSpreadsheet().getSheetByName('6月平均最高気温')

    // 列の取得
    const column = cellMapping[city];
    // 3行目から開始
    let row = 3;

    while (true) {
        // セルの取得(D3のように列と行を結合)
        const cell = sheet.getRange(`${column}${row}`);
        // セルが空であればそのセルに取得した最高気温を書き込む
        if (cell.getValue() === '') {
            sheet.getRange(`${column}${row}`).setValue(responseData.maxTemperature);
            break;
        }
        // セルが空でなければ次の行に移動
        row++;
    }
});
最終更新日時を書き出す
いちいちGASのトリガー実行のところで実行されたかを確認するのも手間なので、最終更新の日時をスプレッドシートに書き出す
関数に追加
// 現在のシートを追加
const sheet = SpreadsheetApp.getActiveSpreadsheet().getActiveSheet();
// 現在の日時を取得
const now = new Date();
// H1セルに取得した日時を書き出す
sheet.getRange('H1').setValue(now.toLocaleString());
GitHubにコードをあげるときにAPIキーを見えないようにする
APIキーが書かれたままGitHubにコードをあげるとセキュリティ的に良くないので、環境変数を使ってAPIキーを他の人に見られないようにしたい
.envファイルを作成
OPENWEATHER_API_KEY="ここにキーを書く"
環境変数を読み込む
dotenvをインストール
npm install dotenv
dotenvを読み込み
require('dotenv').config();
const functions = require("firebase-functions");
const fetch = require("node-fetch");

// API キーを環境変数から読み込む
const apiKey = process.env.OPENWEATHER_API_KEY;
.gitignoreに.envを追加
.env
環境変数をデプロイ環境に設定
firebase functions:config:set openweather.key="ここにキーを書く"
環境変数を使う
process.env.OPENWEATHER_API_KEYが設定されている場合はそれを使用し、そうでない場合は functions.config().openweather.keyを使用するようにする
const apiKey = process.env.OPENWEATHER_API_KEY || functions.config().openweather.key;
Google Cloud FunctionsとGASで書いていたコードをCloud functions for Firebaseで1つのコードにする
Cloud functions for Firebaseのセットアップ
プロジェクトの作成からデプロイまでこちらを参考
字幕を見ながらにはなるがFirebase公式のYoutubeもわかりやすかった
Google Cloud Functionsの移行
Google Cloud Functionsで書いていたコードと大きくは変わらず
GitHubに上げるために環境変数を使用
require("dotenv").config();
const functions = require("firebase-functions");
const fetch = require("node-fetch");

// OpenWeatherMap API キー
const apiKey =
  process.env.OPENWEATHER_API_KEY || functions.config().openweather.key;

async function getCurrentTemperature(city) {
    try {
        // デフォルトの都市をセット(city パラメーターがない場合)
        const defaultCity = 'Tokyo';
        const cityName = city || defaultCity;

        // 天気情報を取得
        const response = await fetch(`http://api.openweathermap.org/data/2.5/weather?q=${cityName}&appid=${apiKey}&units=metric`);
        const data = await response.json();

        // 気温を抽出
        const currentTemperature = data.main.temp;
        const minTemperature = data.main.temp_min;
        const maxTemperature = data.main.temp_max;

        return {
            city: data.name,
            temperature: currentTemperature,
            minTemperature: minTemperature,
            maxTemperature: maxTemperature
        };
    } catch (error) {
        console.error('Error fetching temperature data:', error);
        throw error;
    }
}

exports.temperatureFunction = functions.https.onRequest(async (req, res) => {
    try {
        const city = req.query.city || (req.body && req.body.city);
        const temperatureData = await getCurrentTemperature(city);
        res.status(200).json(temperatureData);
    } catch (error) {
        res.status(500).send('Error fetching temperature data');
    }
});
デプロイ
firebase deploy --only functions
を叩いてデプロイ
出てきたURLにアクセスすると東京の気温が取得できていたので問題なし
パラメーターをOsakaやNahaにしても各都市の情報を取得できていた
GASのコードを移行
Google Cloud functionsとちがいGASのコードは大きく変わった
jsonファイルとサービスアカウントも使用
スプレッドシートのIDも環境変数を使って見えないようにした
サービスアカウントを使った認証
Google Sheets API を有効にする
Google Cloud Consoleのメニューの「API とサービス」→「ライブラリ」
検索窓に「Google Sheets API」と打ち込むと出てくるので有効にする
認証情報を作成
「API とサービス」→「認証情報」
上の方に「+認証情報を作成」の「サービスアカウント」をクリック
サービスアカウントとIDを入力
わかりやすい名前とIDを自分で決める
ロールを選択で「編集者」を選ぶ
サービスアカウント→キー→「鍵を追加」ボタン→新しい鍵を作成→JSON
ダウンロードしたJSONファイルをfunctions直下に置く
名前はservice-account.jsonなどにしておく
.gitignoreに入れとくのも忘れずに
スプレッドシートに共有
スプレッドシートのIDを確認(...spreadsheets/d/IDはこの部分/edit...)
右上の共有ボタン
サービスアカウントのメールアドレス(<サービスアカウント名>@<ID>.iam.gserviceaccount.com)を編集者で追加
functionsに移動して必要なパッケージをインストール
cd functions
npm install firebase-functions firebase-admin googleapis
GASで書いていた機能を再現する
// スプレッドシートのID
const spreadsheetId =
  process.env.SPREADSHEET_ID || functions.config().spreadsheet.id;

// ライブラリのインポート
// Google APIクライアントライブラリをインポート
const {google} = require("googleapis");
// Google Sheets API v4を操作
const sheets = google.sheets("v4");
// Node.jsの標準ライブラリ、ファイルパスの操作
const path = require("path");
// サービスアカウントキーのJSONファイルのパス
const keyPath = path.join(__dirname, "service-account.json");
// サービスアカウントキーのJSONファイルの読み込み
const key = require(keyPath);

// // スプレッドシートの権限要求
const SCOPES = ["https://www.googleapis.com/auth/spreadsheets"];

// サービスアカウントを使って認証
const auth = new google.auth.JWT({
  email: key.client_email,
  key: key.private_key,
  scopes: SCOPES,
});

// スプレッドシートを更新する関数
exports.updateSheetWithCurrentTime =
  functions.https.onRequest(async (req, res) => {
    try {
      const cities = [
        {name: "札幌", english: "Sapporo"},
        {name: "仙台", english: "Sendai"},
        {name: "東京", english: "Tokyo"},
        {name: "横浜", english: "Yokohama"},
        {name: "名古屋", english: "Nagoya"},
        {name: "大阪", english: "Osaka"},
        {name: "那覇", english: "Naha"},
      ];

      // 各都市の天気情報を取得
      const weatherPromises =
        cities.map((city) => getCurrentWeather(city.english));
      const weatherData = await Promise.all(weatherPromises);

      // 現在の日本の時刻を取得
      const currentTime =
          new Date().toLocaleString("ja-JP", {timeZone: "Asia/Tokyo"});

      // サービスアカウントを使用してGoogle Sheets APIへのアクセスを認証
      await auth.authorize();

      // スプレッドシートに書き込むデータを作成
      const values = weatherData.map((data, index) => [
        cities[index].name,
        data.temperature,
        data.minTemperature,
        data.maxTemperature,
      ]);

      // 現在の時刻をH1セルに書き込む
      await sheets.spreadsheets.values.update({
        auth, // 認証情報
        spreadsheetId: spreadsheetId, // 書き込むデータの形式
        range: "シート1!H1", // 書き込むセルの範囲( シート名!セル範囲)
        valueInputOption: "RAW", // 書き込むデータの形式(RAWは変換なしでそのまま入力)
        requestBody: {
          values: [[currentTime]], // 書き込むデータ
        },
      });

      // 天気情報を書き込む
      await sheets.spreadsheets.values.update({
        auth,
        spreadsheetId: spreadsheetId,
        range: "シート1!B2:E8",
        valueInputOption: "RAW",
        requestBody: {
          values: values,
        },
      });

      res.status(200).send("Sheet updated successfully!");
    } catch (error) {
      console.error("Error updating sheet:", error);
      res.status(500).send("Error updating sheet");
    }
  });
デプロイ
deploy --only functions
でデプロイして移行完了
Google OAuth認証を追加する
OAuth2.0クライアントIDとクライアントシークレットの取得
- Google Cloud Consoleからプロジェクトにアクセス
- 「APIとサービス」→「ライブラリ」から使いたいAPI(今回はGoogle Sheets API)を有効にする
- メニューから「APIとサービス」→「認証情報」
- 「+認証情報を作成」→「OAuthクライアントID」を選択
- OAuth2.0同意画面の設定をする
- ユーザータイプ(今回は外部)などを入力
- OAuthクライアントIDの作成に戻り、「アプリケーションの種類」で「Webアプリケーション」を選択
- 名前を入力(My Web Clientなど)
- 「承認されたリダイレクトURI」に「https://developers.google.com/oauthplayground」を追加
- クライアントIDとクライアントシークレットが生成されるので保存する
クライアントIDとクライアントシークレットをファイルに追加
.envファイルに追加する
OAUTH_CLIENT_ID="ここにID"
OAUTH_CLIENT_SECRET="ここにシークレット"
リフレッシュトークンの取得
- OAuth 2.0 Playground にアクセス
- 右上の「歯車ボタン」→「Use your own OAuth credentials」に✓をつける
- クライアントIDとクライアントシークレットを入力
- Step 1: Select & authorize APIs で使用するAPIを選択(今回は「Google Sheets API v4」の「https://www.googleapis.com/auth/spreadsheets」を選択)
- 「Authorize APIs」をクリック、Googleアカウントで認証
- Authorization codeが発行されるのでSTEP2に貼り付け
- 「Exchange authorization code for tokens」をクリックしてリフレッシュトークンを取得する
リフレッシュトークンをファイルに追加
.envファイルに追加する
OAUTH_REFRESH_TOKEN="ここにリフレッシュトークン"
環境変数をデプロイ環境に設定
.envに追加した3つの環境変数を設定する
firebase functions:config:set oauth.client_id="your_oauth_client_id" oauth.client_secret="your_oauth_client_secret" oauth.refresh_token="your_oauth_refresh_token"
OAuth2.0ライブラリをインストール
Google APIsのOAuth2クライアントを使用するためにgoogle-auth-libraryをインストールする
npm install google-auth-library
コードにOAuth2.0を追加
// OAuth2.0クライアントIDとクライアントシークレット
const oauth2Client = new google.auth.OAuth2(
    process.env.OAUTH_CLIENT_ID || functions.config().oauth.client_id,
    process.env.OAUTH_CLIENT_SECRET || functions.config().oauth.client_secret,
    "urn:ietf:wg:oauth:2.0:oob", // リダイレクトURIの代わりのOOBフロー
);

// アクセストークンの設定
oauth2Client.setCredentials({
  refresh_token: process.env.OAUTH_REFRESH_TOKEN ||
    functions.config().oauth.refresh_token,
});

// Google Sheets APIクライアント
const sheets = google.sheets({version: "v4", auth: oauth2Client});
6時間ごとに定期実行するようにする
GASでやっていたように気温の情報を6時間ごとに更新するようにする
スケジュールトリガーを設定
はじめは第2世代のonScheduleを使って実装しようとしたが、第2世代になると変更点が多くなるのでひとまず第1世代でスケジュールを設定することにした
世代の違いは以下の記事がわかりやすかった
exports.updateSheetWithCurrentTime =
  functions.pubsub.schedule("every 6 hours").onRun(async (context) => {
ログも変更
 functions.logger.info("Sheet updated successfully");
} catch (error) {
 functions.logger.error("Error updating sheet:", error);
 throw error;
}
毎日の最高気温をセルに書き出し、その月の平均最高気温を出す機能をGASから移行する
関数をコードに書く
1日おきに定期実行するときは"every 1 day"ではうまくいかない
"every 24 hours"を使う
exports.updateMaxTemperature = functions.pubsub.schedule("every 24 hours").onRun(async (context) => {
  try {
    const cities = [
      {name: "札幌", english: "Sapporo", column: "B"},
      {name: "仙台", english: "Sendai", column: "C"},
      {name: "東京", english: "Tokyo", column: "D"},
      {name: "横浜", english: "Yokohama", column: "E"},
      {name: "名古屋", english: "Nagoya", column: "F"},
      {name: "大阪", english: "Osaka", column: "G"},
      {name: "那覇", english: "Naha", column: "H"}
    ];

    // 各都市の天気情報を取得
    const weatherPromises = cities.map((city) => getCurrentWeather(city.english));
    const weatherData = await Promise.all(weatherPromises);

    // 現在の時刻を取得
    const currentTime = new Date().toLocaleString("ja-JP", {timeZone: "Asia/Tokyo"});

    // サービスアカウントを使用してGoogle Sheets APIへのアクセスを認証
    await auth.authorize();

    // 現在の時刻をK1セルに書き込む
    await sheets.spreadsheets.values.update({
      auth,
      spreadsheetId: spreadsheetId,
      range: "7月平均最高気温!K1",
      valueInputOption: "RAW",
      requestBody: {
        values: [[currentTime]]
      }
    });

    // 各都市の最高気温をスプレッドシートに書き込む
    for (const data of weatherData) {
      const city = cities.find(c => c.english === data.city);
      const column = city.column;

      let row = 3;
      while (true) {
        const range = `${column}${row}`;
        const result = await sheets.spreadsheets.values.get({
          auth,
          spreadsheetId: spreadsheetId,
          range: `7月平均最高気温!${range}`
        });

        if (!result.data.values || result.data.values[0][0] === '') {
          await sheets.spreadsheets.values.update({
            auth,
            spreadsheetId: spreadsheetId,
            range: `7月平均最高気温!${range}`,
            valueInputOption: "RAW",
            requestBody: {
              values: [[data.maxTemperature]]
            }
          });
          break;
        }
        row++;
      }
    }

    functions.logger.info("Sheet updated successfully");
  } catch (error) {
    functions.logger.error("Error updating sheet:", error);
    throw error;
  }
});
6時間ごとに気温を記録する関数と共通している部分があるのでまとめる
各都市の情報や気温、現在の時刻の取得、認証は共通している部分なので1つにして読みやすくする
const cities = [
  {name: "札幌", english: "Sapporo", column: "B"},
  {name: "仙台", english: "Sendai", column: "C"},
  {name: "東京", english: "Tokyo", column: "D"},
  {name: "横浜", english: "Yokohama", column: "E"},
  {name: "名古屋", english: "Nagoya", column: "F"},
  {name: "大阪", english: "Osaka", column: "G"},
  {name: "那覇", english: "Naha", column: "H"},
];

const fetchWeatherDataAndAuthorize = async () => {
  // 各都市の天気情報を取得
  const weatherPromises = cities.map((city) => getCurrentWeather(city.english));
  const weatherData = await Promise.all(weatherPromises);

  // 現在の時刻を取得
  const currentTime =
  new Date().toLocaleString("ja-JP", {timeZone: "Asia/Tokyo"});

  // サービスアカウントを使用してGoogle Sheets APIへのアクセスを認証
  await auth.authorize();

  return {weatherData, currentTime};
};
それぞれの関数をexportする
exports.updateSheetWithCurrentTime =
functions.pubsub.schedule("every 6 hours").onRun(async (context) => {
  try {
    const {weatherData, currentTime} = await fetchWeatherDataAndAuthorize();

    // 現在の時刻をH1セルに書き込む
    await sheets.spreadsheets.values.update({
      auth,
      spreadsheetId: spreadsheetId,
      range: "シート1!H1",
      valueInputOption: "RAW",
      requestBody: {
        values: [[currentTime]],
      },
    });

    // 都市名と天気情報を書き込む
    const values = weatherData.map((data, index) => [
      cities[index].name,
      data.temperature,
      data.minTemperature,
      data.maxTemperature,
    ]);

    await sheets.spreadsheets.values.update({
      auth,
      spreadsheetId: spreadsheetId,
      range: "シート1!C2:E8",
      valueInputOption: "RAW",
      requestBody: {
        values: values,
      },
    });

    functions.logger.info("Sheet updated successfully");
  } catch (error) {
    functions.logger.error("Error updating sheet:", error);
    throw error;
  }
});

exports.updateMaxTemperature =
functions.pubsub.schedule("every 24 hours").onRun(async (context) => {
  try {
    const {weatherData, currentTime} = await fetchWeatherDataAndAuthorize();

    // 現在の時刻をK1セルに書き込む
    await sheets.spreadsheets.values.update({
      auth,
      spreadsheetId: spreadsheetId,
      range: "7月平均最高気温!K1",
      valueInputOption: "RAW",
      requestBody: {
        values: [[currentTime]],
      },
    });

    // 各都市の最高気温をスプレッドシートに書き込む
    for (const data of weatherData) {
      const city = cities.find((c) => c.english === data.city);
      const column = city.column;

      let row = 3;
      while (true) {
        const range = `${column}${row}`;
        const result = await sheets.spreadsheets.values.get({
          auth,
          spreadsheetId: spreadsheetId,
          range: `7月平均最高気温!${range}`,
        });

        if (!result.data.values || result.data.values[0][0] === "") {
          await sheets.spreadsheets.values.update({
            auth,
            spreadsheetId: spreadsheetId,
            range: `7月平均最高気温!${range}`,
            valueInputOption: "RAW",
            requestBody: {
              values: [[data.maxTemperature]],
            },
          });
          break;
        }
        row++;
      }
    }

    functions.logger.info("Sheet updated successfully");
  } catch (error) {
    functions.logger.error("Error updating sheet:", error);
    throw error;
  }
});
JSをTSへリファクタリング
流れ
- TypeScriptプロジェクトに移行
- 全てanyで通るように
- anyを他の型に変える
TypeScriptプロジェクトに移行
必要なパッケージをインストール
npm install dotenv firebase-functions node-fetch typescript
tsconfig.jsonを作成
functionsディレクトリの下に作る
{
  "compilerOptions": {
    "target": "ES2020",
    "module": "commonjs",
    "strict": true,
    "esModuleInterop": true,
    "skipLibCheck": true,
    "outDir": "./lib",
    "resolveJsonModule": true
  },
  "include": ["src/**/*"],
  "exclude": ["node_modules"]
}
package.jsonにスクリプトを追加
{
  "scripts": {
    "build": "tsc"
  }
}
全ての型をanyにする
srcディレクトリを作成
srcディレクトリを作り、index.tsを追加
index.tsにanyで型づけ
index.jsの中身をindex.tsに移行して、全てanyでコンパイルが通るようにする
require("dotenv").config();
const functions: any = require("firebase-functions");
const fetch: any = require("node-fetch");
const { google }: any = require("googleapis");
const path: any = require("path");
const keyPath: any = path.join(__dirname, "service-account.json");
const key: any = require(keyPath);

// OpenWeatherMap API キー
const apiKey: any =
  process.env.OPENWEATHER_API_KEY || functions.config().openweather.key;

// OAuth2.0クライアントIDとクライアントシークレット
const oauth2Client: any = new google.auth.OAuth2(
    process.env.OAUTH_CLIENT_ID || functions.config().oauth.client_id,
    process.env.OAUTH_CLIENT_SECRET || functions.config().oauth.client_secret,
    "urn:ietf:wg:oauth:2.0:oob",
);

// アクセストークンの設定
oauth2Client.setCredentials({
  refresh_token: process.env.OAUTH_REFRESH_TOKEN ||
    functions.config().oauth.refresh_token,
});

// Google Sheets APIクライアント
const sheets: any = google.sheets({ version: "v4", auth: oauth2Client });

/**
 * 指定した都市の現在の天気情報を取得する
 * @param {string} city 都市名
 */
const getCurrentWeather = async (city: any) => {
  try {
    const response: any = await fetch(`http://api.openweathermap.org/data/2.5/weather?q=${city}&appid=${apiKey}&units=metric`);
    const data: any = await response.json();

    return {
      city: data.name,
      temperature: data.main.temp,
      minTemperature: data.main.temp_min,
      maxTemperature: data.main.temp_max,
    };
  } catch (error: any) {
    functions.logger.error("Error fetching weather data:", error);
    throw error;
  }
};

// スプレッドシートのID
const spreadsheetId: any =
  process.env.SPREADSHEET_ID ||
  (functions.config().spreadsheet && functions.config().spreadsheet.id);

if (!spreadsheetId) {
  // eslint-disable-next-line max-len
  throw new Error("Spreadsheet ID is not defined in environment variables or functions config.");
}

// スプレッドシートの権限要求
const SCOPES: any = ["https://www.googleapis.com/auth/spreadsheets"];

// サービスアカウントを使って認証
const auth: any = new google.auth.JWT({
  email: key.client_email,
  key: key.private_key,
  scopes: SCOPES,
});

const cities: any = [
  { name: "札幌", english: "Sapporo", column: "B" },
  { name: "仙台", english: "Sendai", column: "C" },
  { name: "東京", english: "Tokyo", column: "D" },
  { name: "横浜", english: "Yokohama", column: "E" },
  { name: "名古屋", english: "Nagoya", column: "F" },
  { name: "大阪", english: "Osaka", column: "G" },
  { name: "那覇", english: "Naha", column: "H" },
];

const fetchWeatherDataAndAuthorize = async () => {
  // 各都市の天気情報を取得
  const weatherPromises: any = cities.map((city: any) => getCurrentWeather(city.english));
  const weatherData: any = await Promise.all(weatherPromises);

  // 現在の時刻を取得
  const currentTime: any = new Date().toLocaleString("ja-JP", { timeZone: "Asia/Tokyo" });

  // サービスアカウントを使用してGoogle Sheets APIへのアクセスを認証
  await auth.authorize();

  return { weatherData, currentTime };
};

exports.updateSheetWithCurrentTime =
  functions.pubsub.schedule("every 6 hours").onRun(async (context: any) => {
    try {
      const { weatherData, currentTime }: any = await fetchWeatherDataAndAuthorize();

      // 現在の時刻をH1セルに書き込む
      await sheets.spreadsheets.values.update({
        auth,
        spreadsheetId: spreadsheetId,
        range: "シート1!H1",
        valueInputOption: "RAW",
        requestBody: {
          values: [[currentTime]],
        },
      });

      // 都市名と天気情報を書き込む
      const values: any = weatherData.map((data: any, index: any) => [
        cities[index].name,
        data.temperature,
        data.minTemperature,
        data.maxTemperature,
      ]);

      await sheets.spreadsheets.values.update({
        auth,
        spreadsheetId: spreadsheetId,
        range: "シート1!C2:E8",
        valueInputOption: "RAW",
        requestBody: {
          values: values,
        },
      });

      functions.logger.info("Sheet updated successfully");
    } catch (error: any) {
      functions.logger.error("Error updating sheet:", error);
      throw error;
    }
  });

exports.updateMaxTemperature =
  functions.pubsub.schedule("every 24 hours").onRun(async (context: any) => {
    try {
      const { weatherData, currentTime }: any = await fetchWeatherDataAndAuthorize();

      // 現在の時刻をK1セルに書き込む
      await sheets.spreadsheets.values.update({
        auth,
        spreadsheetId: spreadsheetId,
        range: "7月平均最高気温!K1",
        valueInputOption: "RAW",
        requestBody: {
          values: [[currentTime]],
        },
      });

      // 各都市の最高気温をスプレッドシートに書き込む
      for (const data of weatherData) {
        const city: any = cities.find((c: any) => c.english === data.city);
        const column: any = city.column;

        let row = 3;
        // eslint-disable-next-line no-constant-condition
        while (true) {
          const range = `${column}${row}`;
          const result: any = await sheets.spreadsheets.values.get({
            auth,
            spreadsheetId: spreadsheetId,
            range: `7月平均最高気温!${range}`,
          });

          if (!result.data.values || result.data.values[0][0] === "") {
            await sheets.spreadsheets.values.update({
              auth,
              spreadsheetId: spreadsheetId,
              range: `7月平均最高気温!${range}`,
              valueInputOption: "RAW",
              requestBody: {
                values: [[data.maxTemperature]],
              },
            });
            break;
          }
          row++;
        }
      }

      functions.logger.info("Sheet updated successfully");
    } catch (error: any) {
      functions.logger.error("Error updating sheet:", error);
      throw error;
    }
  });
コンパイル
npm run buildでTypeScriptにコンパイルする
index.jsを移動
libディレクトリにできたindex.jsをfunctionsディレクトリに移動する
デプロイ
firebase deploy --only functionsでデプロイ
スプレッドシートが更新されないエラーが発生
JSをTSにしてデプロイし、エラーは発生していなかったがスプレッドシートがトリガーの時間通りに発火していなかった
fetchを変更
const fetch = require('node-fetch');
をimportに変更しようとしたが、それでもうまくいかなかったので
const axios = require("axios");
を使うことにした
getCurrentWeather関数の変更
fetchをaxiosに変更したので、それに伴い気温情報の取得をしているgetCurrentWeather関数も変更する
const getCurrentWeather = async (city) => {
  try {
    // axios.getに変更
    const response = await axios.get(`http://api.openweathermap.org/data/2.5/weather?q=${city}&appid=${apiKey}&units=metric`);
    // .jsonは不要なので削除
    const data = response.data;
    return {
      city: data.name,
      temperature: data.main.temp,
      minTemperature: data.main.temp_min,
      maxTemperature: data.main.temp_max,
    };
  } catch (error) {
    functions.logger.error("Error fetching weather data:", error);
    throw error;
  }
};
トリガーの表記を変更
それぞれschedule("every 6 hours")、schedule("every 24 hours")としていたがhoursに問題がありそうなのでminutes表記に変更
exports.updateSheetWithCurrentTime = functions.pubsub.schedule("every 360 minutes").onRun(async (context) => {

exports.updateMaxTemperature = functions.pubsub.schedule("every 1440 minutes").onRun(async (context) => {
ログのチェック
ログをチェックして情報が正しく取れているかチェックする
  functions.logger.info("Weather Data:", weatherData);
  functions.logger.info("Current Time:", currentTime);
ログの場所
Google Cloudでプロジェクトを選択し、左側のメニューの「ログエクスプローラー」をクリック
大量にログがあってわかりにくいときは時間指定で「直近の1分」などにすると絞り込める
エラーの原因
気温の情報は取れていたが、そのあとのスプレッドシートに書き出すときの範囲のところでエラーが出ていた
2つの関数の同じ部分を1つにまとめたが、そのときに書き出しの範囲までもまとめてしまったのが原因
1つめの関数を修正
exports.updateSheetWithCurrentTime =
functions.pubsub.schedule("every 360 minutes").onRun(async (context: any) => {
  try {
    const {weatherData, currentTime}: any = await fetchWeatherDataAndAuthorize();

    // 現在の時刻をH1セルに書き込む
    const timeUpdateRequest = {
      auth,
      spreadsheetId: spreadsheetId,
      range: "シート1!K1",
      valueInputOption: "RAW",
      requestBody: {
        values: [[currentTime]],
      },
    };

    await sheets.spreadsheets.values.update(timeUpdateRequest);

    // 都市ごとに天気情報を書き込むリクエストを作成
    const weatherUpdateRequests = cities.map((city, index) => {
      const data = weatherData[index];
      return {
        range: `シート1!${city.column}2:${city.column}4`,
        values: [
          [data.temperature],
          [data.minTemperature],
          [data.maxTemperature],
        ],
      };
    });

    // バッチリクエストの作成
    const batchUpdateRequest = {
      auth,
      spreadsheetId: spreadsheetId,
      requestBody: {
        data: weatherUpdateRequests,
        valueInputOption: "RAW",
      },
    };

    await sheets.spreadsheets.values.batchUpdate(batchUpdateRequest);

    functions.logger.info("Sheet updated successfully");
  } catch (error:any) {
    functions.logger.error("Error updating sheet:", error);
    throw error;
  }
});
バッチリクエスト
複数のAPIリクエストを一度にまとめて送信できるというバッチリクエストを使ってみた
Google Sheets APIではbatchUpdateを使う
any型を置き換えていく
string numberなどの基本的な型は割愛
typeof import('')
インポート型
インポートされるモジュールの型を指定
エクスポートされる引数や戻り値の型も含まれる
const functions: typeof import('firebase-functions') = require("firebase-functions");
const {google}: typeof import('googleapis') = require("googleapis");
const path: typeof import('path') = require("path");
AxiosInstance型
axiosで使用する型
const axios: typeof import('axios') = require("axios");
ではaxios.getが使えない(AxiosInstance型を持っていることを認識しない)ためaxiosがAxiosInstance型であることを明示する必要がある
import { AxiosInstance } from 'axios';

const axios: AxiosInstance = require("axios");
オブジェクトリテラル型
オブジェクトが持つプロパティによって型を指定する
const key: {client_email:string,private_key:string} = require(keyPath);
OAuth2Client型
import { OAuth2Client } from 'google-auth-library';

const oauth2Client: OAuth2Client = new google.auth.OAuth2(
  process.env.OAUTH_CLIENT_ID || functions.config().oauth.client_id,
  process.env.OAUTH_CLIENT_SECRET || functions.config().oauth.client_secret,
  "urn:ietf:wg:oauth:2.0:oob",
);