SwiftUIでFirestoreを使う
自分用のドキュメント
データの追加
Cloud Firestore はデータをドキュメントに保存します。ドキュメントはコレクションに保存されます。データを初めてドキュメントに追加すると、Cloud Firestore によってコレクションとドキュメントが暗黙的に作成されます。コレクションやドキュメントを明示的に作成する必要はありません。
次のサンプルコードを使用して、新しいコレクションとドキュメントを作成します。
// Add a new document with a generated ID
do {
  let ref = try await db.collection("users").addDocument(data: [
    "first": "Ada",
    "last": "Lovelace",
    "born": 1815
  ])
  print("Document added with ID: \(ref.documentID)")
} catch {
  print("Error adding document: \(error)")
}
ランダムに生成されるドキュメントIDを使う場合は、addDocument を使うらしい。綺麗なコードではないが練習用で作る。
import SwiftUI
import Firebase
import FirebaseFirestore
import FirebaseFirestoreSwift
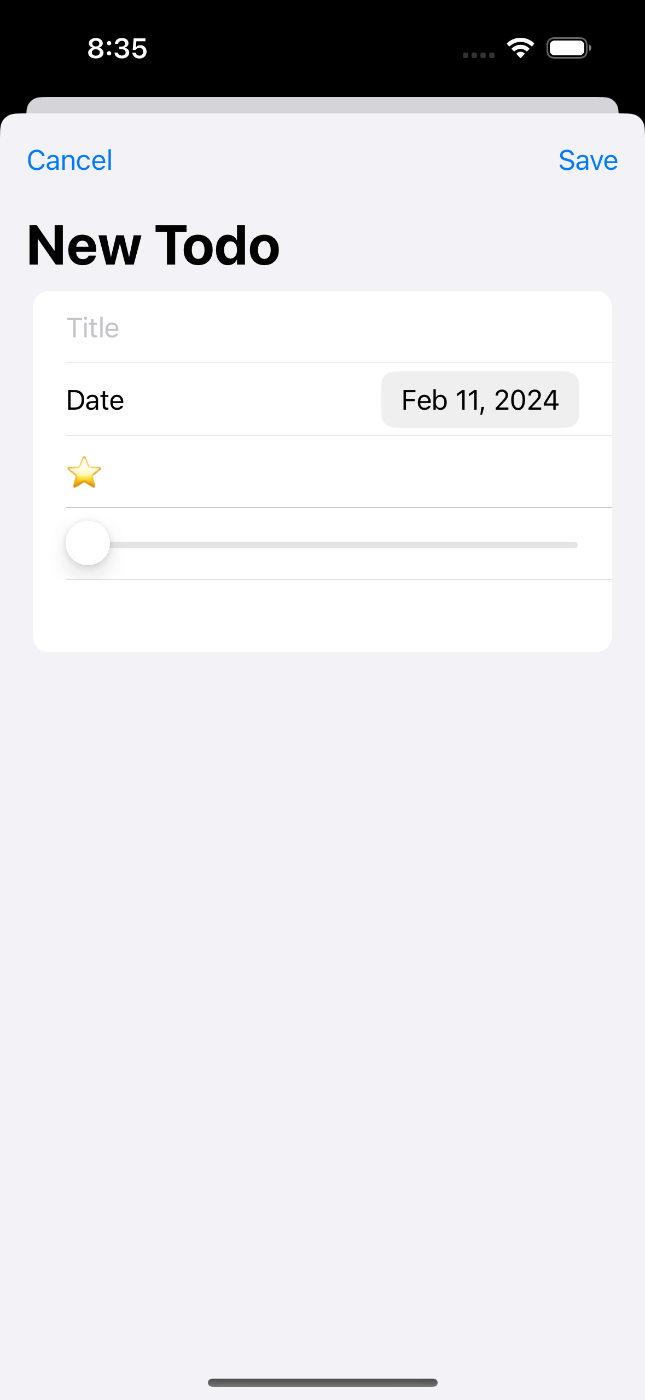
struct AddTodoView: View {
@Environment(\.dismiss) var dismiss
private var db = Firestore.firestore()
@State var title: String = ""
@State var note: String = ""
@State var importance: Double = 1
@State var date: Date = Date()
var body: some View {
NavigationView {
Form {
TextField("Title", text: $title)
DatePicker("Date", selection: $date, displayedComponents: .date)
Text(String(repeating:"⭐️", count: Int(importance)))
Slider(value: $importance, in: 1...5, step:1)
TextEditor(text: $note)
}
.navigationTitle("New Todo")
.toolbar {
ToolbarItem(placement: .navigationBarLeading) {
Button("Cancel") {
dismiss()
}
}
ToolbarItem(placement: .navigationBarTrailing) {
Button("Save") {
var newTodo = Todo(title: title, note: note, importance: importance, date: Timestamp(date: date))
do {
let _ = try db.collection("todos").addDocument(from: newTodo) { err in
if let err = err {
print("Error adding document: \(err)")
} else {
print("Document added with ID: \(newTodo.id ?? "")")
dismiss()
}
}
} catch {
print(error)
}
}
}
}
}
}
}
struct AddTodoView_Previews: PreviewProvider {
static var previews: some View {
AddTodoView()
}
}
編集と削除を作る
ドキュメントを更新する
ドキュメント全体を上書きすることなく一部のフィールドを更新するには、言語固有の次の update() メソッドを使用します。
let washingtonRef = db.collection("cities").document("DC")

// Set the "capital" field of the city 'DC'
do {
  try await washingtonRef.updateData([
    "capital": true
  ])
  print("Document successfully updated")
} catch {
  print("Error updating document: \(error)")
}
ネストされたオブジェクトのフィールドを更新する
ネストされたオブジェクトがドキュメントに含まれている場合は、update() を呼び出すときに「ドット表記」を使用してドキュメント内のネストされたフィールドを参照できます。
// Create an initial document to update.
let frankDocRef = db.collection("users").document("frank")
do {
  try await frankDocRef.setData([
    "name": "Frank",
    "favorites": [ "food": "Pizza", "color": "Blue", "subject": "recess" ],
    "age": 12
  ])

  // To update age and favorite color:
  try await frankDocRef.updateData([
    "age": 13,
    "favorites.color": "Red"
  ])
  print("Document successfully updated")
} catch {
  print("Error updating document: \(error)")
}
ドキュメントを削除する
ドキュメントを削除するには、次の言語固有の delete() メソッドを使用します。
do {
  try await db.collection("cities").document("DC").delete()
  print("Document successfully removed!")
} catch {
  print("Error removing document: \(error)")
}
Listのページから渡された編集・削除ができるページの処理を作成。ViewModelを作っておく。
import Foundation
import Firebase

class TodoViewModel: ObservableObject {
    private var db = Firestore.firestore()
    @Published var todos = [Todo]()

    func fetchData() {
        db.collection("todos").order(by: "date", descending: true).addSnapshotListener { (querySnapshot, error) in
            guard let documents = querySnapshot?.documents else {
                print("No documents")
                return
            }

            self.todos = documents.compactMap { queryDocumentSnapshot -> Todo? in
                return try? queryDocumentSnapshot.data(as: Todo.self)
            }
        }
    }

    func updateData(todo: Todo) {
        if let todoID = todo.id {
            do {
                try db.collection("todos").document(todoID).setData(from: todo)
            }
            catch {
                print(error)
            }
        }
    }

    func deleteData(todo: Todo) {
        if let todoID = todo.id {
            db.collection("todos").document(todoID).delete { (error) in
                if let error = error {
                    print("Error removing document: \(error)")
                } else {
                    print("Document successfully removed!")
                }
            }
        }
    }
}
View側のコードでViewModelというより、ロジック書いたコントローラーのようなクラスを呼び出す。
import SwiftUI
import FirebaseFirestore

struct EditTodoView: View {
   @Environment(\.dismiss) var dismiss
    @ObservedObject var viewModel: TodoViewModel
    @State var editingTodo: Todo
    @State var editMode: Bool


    @State var editingDate: Date = Date()

    var body: some View {
        if editMode {
            Form{
                TextField("Title", text: $editingTodo.title)
                DatePicker("Date", selection: $editingDate, displayedComponents: .date)
                Text(String(repeating:"⭐️", count: Int(editingTodo.importance)))
                Slider(value: $editingTodo.importance, in: 1...5, step:1)
                TextEditor(text: $editingTodo.note)
                    .frame(minHeight: 200)
            }
            .navigationTitle("Edit Mode")
            .toolbar{
                Button("Delete") {
                    viewModel.deleteData(todo: editingTodo)
                    dismiss()
                }
                .foregroundColor(.red)
                Button("Done") {
                    editingTodo.date = Timestamp(date: editingDate)
                    viewModel.updateData(todo: editingTodo)
                    editMode = false
                }
            }
        } else {

        }
    }
}

View側にデータを表示する
onSnapshot() メソッドを使用すると、ドキュメントをリッスンできます。コールバックを使用した最初の呼び出しでは、単一のドキュメントの現在のコンテンツですぐにドキュメント スナップショットが作成されます。次に、コンテンツが変更されるたびに、別の呼び出しによってドキュメント スナップショットが更新されます。
db.collection("cities").document("SF")
  .addSnapshotListener { documentSnapshot, error in
    guard let document = documentSnapshot else {
      print("Error fetching document: \(error!)")
      return
    }
    guard let data = document.data() else {
      print("Document data was empty.")
      return
    }
    print("Current data: \(data)")
  }
データはリアルタイムに取得する
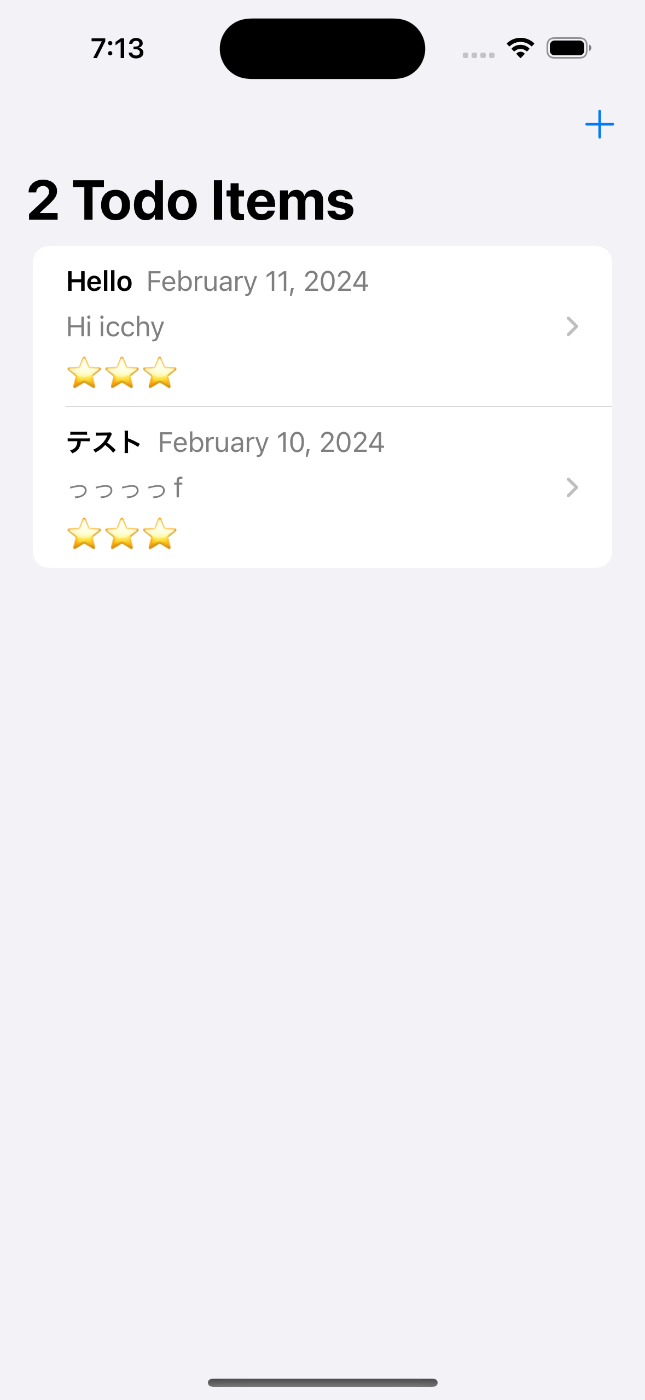
import SwiftUI

struct HelloPage: View {
    var authController: AuthController
    @StateObject var viewModel = TodoViewModel()
    @State var showAddTodoView = false

    var body: some View {
        NavigationView {
            List {
                ForEach(viewModel.todos, id: \.date) { todo in
                    NavigationLink(destination: EditTodoView(viewModel: viewModel, editingTodo: todo, editMode: true)) {
                        VStack(alignment: .leading) {
                            HStack {
                                Text(todo.title).bold()
                                Text(todo.date.dateValue(), style: .date).foregroundStyle(.secondary)
                            }
                            .padding(.bottom,1)
                            HStack {
                                Text(todo.note)
                                    .lineLimit(1)
                                    .foregroundStyle(.secondary)
                            }
                            .padding(.bottom,1)
                            HStack {
                                Text(String(repeating:"⭐️", count: Int(todo.importance)))
                            }
                        }
                    }
                }
            }
            .navigationTitle("\(viewModel.todos.count) Todo Items")
            .toolbar{
                ToolbarItem{
                    Button(action:{
                        showAddTodoView = true
                    }){
                        Label("Add Todo", systemImage: "plus")
                    }
                }
            }
            .sheet(isPresented: $showAddTodoView, content: {
                AddTodoView()
            })
            .onAppear() {
                self.viewModel.fetchData()
            }
        }
    }
}

struct HelloWorldView_Previews: PreviewProvider {
    static var previews: some View {
        HelloPage(authController: AuthController())
    }
}