copyWithメソッドとは?
よく見かけるcopyWithとは何か?
APIリファレンスがあった!
翻訳すると
このテキストテーマのコピーを作成しますが、指定されたフィールドは新しい値に置き換えられます。
海外の技術記事では、「元のオブジェクトを変更せずに、元のオブジェクトと同じプロパティを持ち、指定した値を持つ新しいオブジェクトを返すことです。これにより、オブジェクト自体が可変状態を持たないため、テストと保守が容易なアプリケーションを作成できます。」
と紹介されていた🧑🏼🎓
オブジェクトを変更またはコピーする代わりにcopyWith()、元のオブジェクトと同じプロパティを使用して新しいオブジェクトを作成できますが、一部の値が変更されています。
textThemeこのパターンは、プロパティの取得やオーバーライドなど、Flutterアプリケーション内でアイテムのテーマを設定するときによく使用されます。
Text(
  "I'm using a custom title",
  style: Theme.of(context)
              .textTheme
              .headline
              .copyWith(
                color: Colors.red,
                fontWeight: FontWeight.bold),
)
ここでは、headlineテーマをコピーして、いくつかの値をオーバーライドしています。
これはコピーであるため、元のテーマは影響を受けず、他の値は変更されません。
この不変のコピーファーストパターンは、次のような他の場所で使用されていることがわかりますwithOpacity。
Colors.red.withOpacity(1.0)
自分だけのcopyWith機能を作る方法
copyWith変更したい値を取り込んで、新しい値で新しいオブジェクトを返すことにより、独自の関数を作成できます。
Productクラスの例を次に示します
参考にしたコードがnullsafetyに対応してなかったので書き換えました!
class Product {
  final String id;
  final String name;
  final Color color;

  Product({required this.id, required this.color, required this.name});

  Product copyWith({String? id, String? name, Color? color}) => Product(
        id: id ?? this.id,
        name: name ?? this.name,
        color: color ?? this.color,
      );
}
関数内で、copyWithなどの潜在的なオーバーライドを取り入れています。次に、新しい値を返すか、それらの値を渡された値に置き換えます。id、name、color、Productクラス
これを使用して、販売しているダイニングテーブルのリストを表示できます。idどちらも同じ名前ですが、名前が異なりcolorます。
main.dart
import 'package:flutter/material.dart';
void main() {
runApp(const MyApp());
}
class MyApp extends StatelessWidget {
const MyApp({Key? key}) : super(key: key);
Widget build(BuildContext context) {
return MaterialApp(
title: 'Flutter Demo',
theme: ThemeData(
primarySwatch: Colors.blue,
),
home: const MyHomePage(title: 'Flutter Demo Home Page'),
);
}
}
class MyHomePage extends StatefulWidget {
const MyHomePage({Key? key, required this.title}) : super(key: key);
final String title;
State<MyHomePage> createState() => _MyHomePageState();
}
class _MyHomePageState extends State<MyHomePage> {
List<Product> products = [];
void initState() {
super.initState();
Product sixSeaterDiningTableBrown = Product(
id: "0",
name: "6 Seater Dining Table",
color: Colors.brown,
);
Product sixSeaterDiningTableBlack =
sixSeaterDiningTableBrown.copyWith(color: Colors.black, id: "1");
products.add(sixSeaterDiningTableBrown);
products.add(sixSeaterDiningTableBlack);
}
Widget build(BuildContext context) {
return Scaffold(
appBar: AppBar(
title: Text("Hello, copyWith!"),
),
body: ListView(
children: products
.map(
(Product product) => ListTile(
trailing: Container(
width: 14,
height: 14,
color: product.color,
),
title: Text(product.name),
subtitle: Text(product.id),
),
)
.toList(),
),
);
}
}
class Product {
final String id;
final String name;
final Color color;
Product({required this.id, required this.color, required this.name});
Product copyWith({String? id, String? name, Color? color}) => Product(
id: id ?? this.id,
name: name ?? this.name,
color: color ?? this.color,
);
}
スクリーンショット
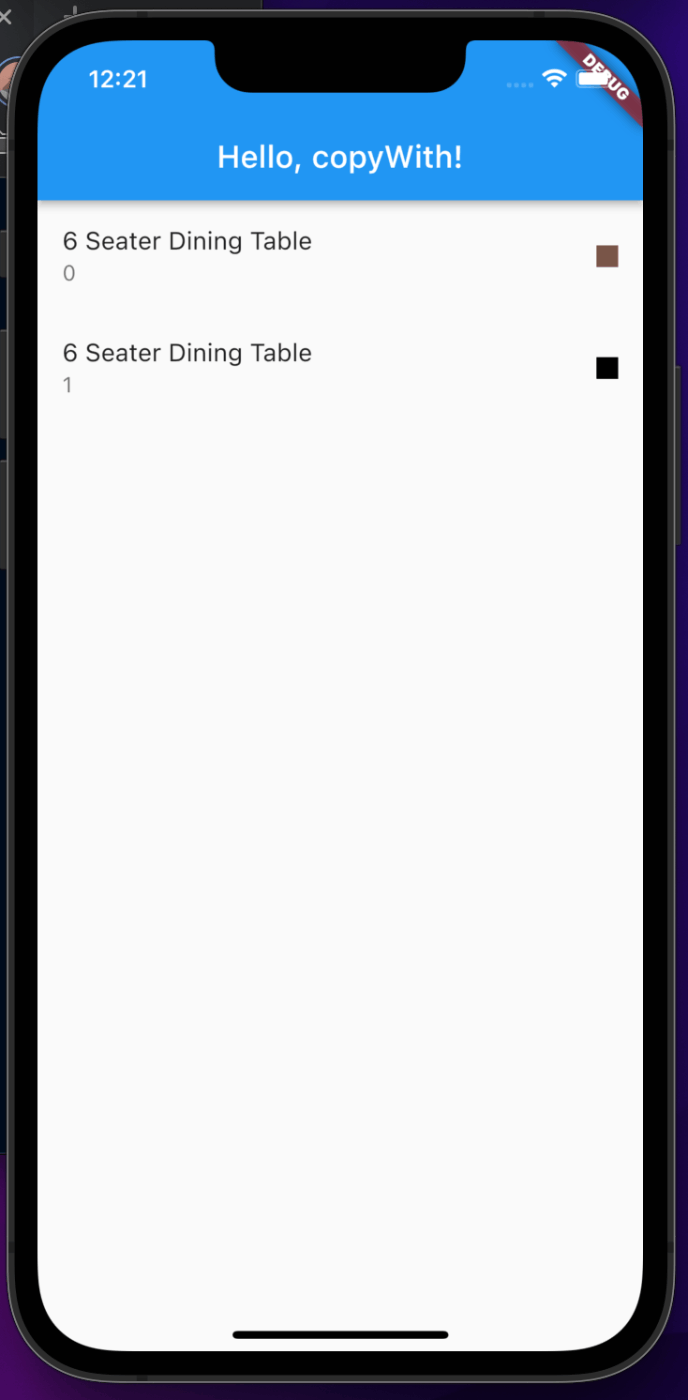
この例では、2つのアイテムがListViewに表示されていてます。最初の項目はsixSeaterDiningTableBrownで、2番目の項目はsixSeaterDiningTableBlackです。
idとcolorは異なりますがnameは、同じです。直接コピーする代わりに、不変copyWith関数を使用して作成しました。sixSeaterDiningTableBlacksixSeaterDiningTableBrown
これは小さな例ですが、このパターンを使用して大規模なアプリケーションのデータを処理する方法を確認できます。
結論
不変性により、オブジェクトの内部変更を追跡する必要がなくなるため、推論が容易なコードを作成できます。これは、リモートソースからのデータを操作する場合に特に便利です。
copyWith元のオブジェクトと同じプロパティで、一部の値が変更された新しいオブジェクトを作成するために使用します。次に、これらの手法をFreezedで適用して、不変の構造を作成および操作するプロセスを簡単にすることができます。
とポール・ハリデイさん?が解説しておりました。
プログラムを書き換えてみた!
main.dart
import 'package:flutter/material.dart';
void main() {
runApp(const MyApp());
}
class MyApp extends StatelessWidget {
const MyApp({Key? key}) : super(key: key);
Widget build(BuildContext context) {
return MaterialApp(
title: 'Flutter Demo',
theme: ThemeData(
primarySwatch: Colors.blue,
),
home: const MyHomePage(title: 'Flutter Demo Home Page'),
);
}
}
class MyHomePage extends StatefulWidget {
const MyHomePage({Key? key, required this.title}) : super(key: key);
final String title;
State<MyHomePage> createState() => _MyHomePageState();
}
class _MyHomePageState extends State<MyHomePage> {
List<Product> products = [];
void initState() {
super.initState();
Product sixSeaterDiningTableBrown = Product(
id: "0",
name: "6 Seater Dining Table",
color: Colors.brown,
);
Product sixSeaterDiningTableBlack =
sixSeaterDiningTableBrown.copyWith(color: Colors.black, id: "1");
Product sixSeaterDiningTableBlue =
sixSeaterDiningTableBrown.copyWith(color: Colors.blue, id: "2");
Product sixSeaterDiningTableRed =
sixSeaterDiningTableBrown.copyWith(color: Colors.red, id: "3");
Product sixSeaterDiningTableYellow =
sixSeaterDiningTableBrown.copyWith(color: Colors.yellow, id: "4");
Product sixSeaterDiningTableGreen =
sixSeaterDiningTableBrown.copyWith(color: Colors.green, id: "5");
products.add(sixSeaterDiningTableBrown);
products.add(sixSeaterDiningTableBlack);
products.add(sixSeaterDiningTableBlue);
products.add(sixSeaterDiningTableRed);
products.add(sixSeaterDiningTableYellow);
products.add(sixSeaterDiningTableGreen);
}
Widget build(BuildContext context) {
return Scaffold(
appBar: AppBar(
title: Text("Hello, copyWith!"),
),
body: ListView(
// map()メソッドは、リストの各要素に指定した処理を実行したIterableを返す。
// Iterable(イテラブル)とは、forで繰り返し可能なオブジェクトです。
children: products
.map(
(Product product) => ListTile(
trailing: Container(
width: 14,
height: 14,
color: product.color,
),
title: Text(product.name),
subtitle: Text(product.id),
),
)
.toList(),
),
);
}
}
class Product {
final String id;
final String name;
final Color color;
Product({required this.id, required this.color, required this.name});
Product copyWith({String? id, String? name, Color? color}) => Product(
id: id ?? this.id,
name: name ?? this.name,
color: color ?? this.color,
);
}
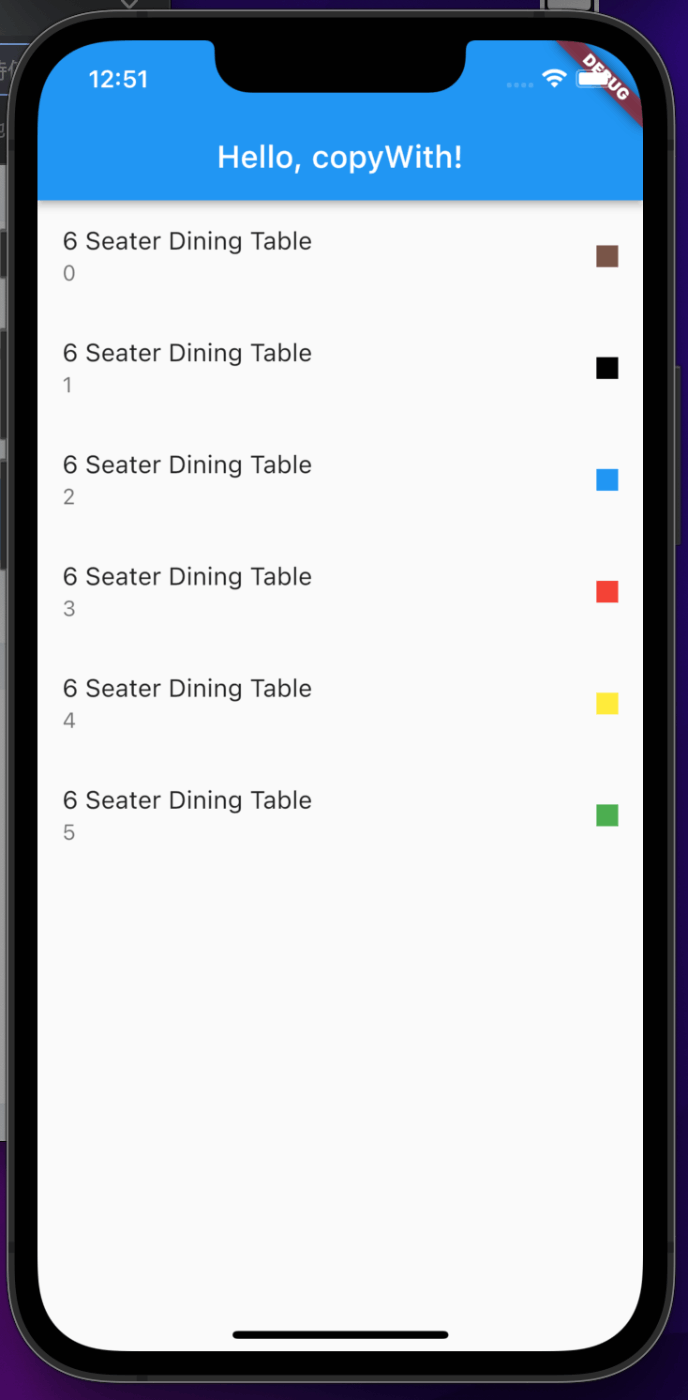
スクリーンショット
copyWith使ってみた感想
元になるデータが入ったクラスを作って、メンバー変数とコンストラクターを定義して、使うときは、プロパティに値を代入して上書きをすることによって、idと色を変更していた。
初期値があって、オーバーライドして上書きしているということですかね😅
アプリ開発では、このcopyWithメソッドを使って、元のデータをコピーして上書きして使い回していたのだなと理解した😇
Discussion