Flutter Dynamic Links
Google検索で、urlを検索するとアプリのページへ飛ばす
今回参考にした動画
どんな効果があるのでしょうか?
ダイナミックリンクは、複数のプラットフォームで、あなたのアプリがすでにインストールされているかどうかにかかわらず、思い通りに動作するリンクです。iOSやAndroidでダイナミックリンクを開くと、あなたのネイティブアプリのリンク先のコンテンツに直接移動することができます。ユーザーがあなたのアプリをインストールしていない場合は、インストールを促すメッセージが表示され、インストール後にあなたのアプリが起動し、リンクにアクセスできます。
今回使用したパッケージ
Firebaseでプロジェクトを作成後に、Androidにgoogle-service.jsonを追加する設定をする。
スクリーンショットを参考にしながら、設定をしていきます。今回は、Firebase CLIは使用しません。
こちらも設定をするときに参考になると思われます


androidディレクトリ配下のbuild.gradleに設定を追加する。
buildscript {
    ext.kotlin_version = '1.7.10'
    repositories {
        google()
        mavenCentral()
    }

    dependencies {
        classpath 'com.android.tools.build:gradle:7.2.0'
        classpath "org.jetbrains.kotlin:kotlin-gradle-plugin:$kotlin_version"
        classpath 'com.google.gms:google-services:4.3.15'// 追加
    }
}

allprojects {
    repositories {
        google()
        mavenCentral()
    }
}

rootProject.buildDir = '../build'
subprojects {
    project.buildDir = "${rootProject.buildDir}/${project.name}"
}
subprojects {
    project.evaluationDependsOn(':app')
}

task clean(type: Delete) {
    delete rootProject.buildDir
}
android/appディレクトリ配下のbuild.gradleに設定を追加する。
def localProperties = new Properties()
def localPropertiesFile = rootProject.file('local.properties')
if (localPropertiesFile.exists()) {
    localPropertiesFile.withReader('UTF-8') { reader ->
        localProperties.load(reader)
    }
}

def flutterRoot = localProperties.getProperty('flutter.sdk')
if (flutterRoot == null) {
    throw new GradleException("Flutter SDK not found. Define location with flutter.sdk in the local.properties file.")
}

def flutterVersionCode = localProperties.getProperty('flutter.versionCode')
if (flutterVersionCode == null) {
    flutterVersionCode = '1'
}

def flutterVersionName = localProperties.getProperty('flutter.versionName')
if (flutterVersionName == null) {
    flutterVersionName = '1.0'
}

apply plugin: 'com.android.application'
apply plugin: 'kotlin-android'
apply from: "$flutterRoot/packages/flutter_tools/gradle/flutter.gradle"
apply plugin: 'com.google.gms.google-services'// 追加

android {
    compileSdkVersion 33 // 33
    ndkVersion flutter.ndkVersion

    compileOptions {
        sourceCompatibility JavaVersion.VERSION_1_8
        targetCompatibility JavaVersion.VERSION_1_8
    }

    kotlinOptions {
        jvmTarget = '1.8'
    }

    sourceSets {
        main.java.srcDirs += 'src/main/kotlin'
    }

    defaultConfig {
        // TODO: Specify your own unique Application ID (https://developer.android.com/studio/build/application-id.html).
        applicationId "com.example.dynamic_links_demo"
        // You can update the following values to match your application needs.
        // For more information, see: https://docs.flutter.dev/deployment/android#reviewing-the-gradle-build-configuration.
        minSdkVersion 21
        targetSdkVersion 33
        versionCode flutterVersionCode.toInteger()
        versionName flutterVersionName
    }

    buildTypes {
        release {
            // TODO: Add your own signing config for the release build.
            // Signing with the debug keys for now, so `flutter run --release` works.
            signingConfig signingConfigs.debug
        }
    }
}

flutter {
    source '../..'
}

dependencies {
    implementation "org.jetbrains.kotlin:kotlin-stdlib-jdk7:$kotlin_version"
    implementation platform('com.google.firebase:firebase-bom:31.3.0')// 追加
}
AndroidManifest.xmlに端末へのアクセスを許可するコードを追加する
<manifest xmlns:android="http://schemas.android.com/apk/res/android"
    package="com.example.dynamic_links_demo">
    <!-- 端末へのアクセスを許可するコード ここから -->
    <uses-permission android:name="android.permission.INTERNET"/>
<!-- ここまで -->
   <application
        android:label="dynamic_links_demo"
        android:name="${applicationName}"
        android:icon="@mipmap/ic_launcher">
        <activity
            android:name=".MainActivity"
            android:exported="true"
            android:launchMode="singleTop"
            android:theme="@style/LaunchTheme"
            android:configChanges="orientation|keyboardHidden|keyboard|screenSize|smallestScreenSize|locale|layoutDirection|fontScale|screenLayout|density|uiMode"
            android:hardwareAccelerated="true"
            android:windowSoftInputMode="adjustResize">
            <!-- Specifies an Android theme to apply to this Activity as soon as
                 the Android process has started. This theme is visible to the user
                 while the Flutter UI initializes. After that, this theme continues
                 to determine the Window background behind the Flutter UI. -->
            <meta-data
              android:name="io.flutter.embedding.android.NormalTheme"
              android:resource="@style/NormalTheme"
              />
            <intent-filter>
                <action android:name="android.intent.action.MAIN"/>
                <category android:name="android.intent.category.LAUNCHER"/>
            </intent-filter>
        </activity>
        <!-- Don't delete the meta-data below.
             This is used by the Flutter tool to generate GeneratedPluginRegistrant.java -->
        <meta-data
            android:name="flutterEmbedding"
            android:value="2" />
    </application>
</manifest>
main.dartを編集した後に一度アプリをビルドする
import 'package:firebase_core/firebase_core.dart';
import 'package:firebase_dynamic_links/firebase_dynamic_links.dart';
import 'package:flutter/material.dart';
import 'package:url_launcher/url_launcher.dart';
Future<void> main() async {
WidgetsFlutterBinding.ensureInitialized();
await Firebase.initializeApp();
runApp(const MyApp());
}
class MyApp extends StatelessWidget {
const MyApp({super.key});
Widget build(BuildContext context) {
return MaterialApp(
title: 'Flutter Demo',
theme: ThemeData(
primarySwatch: Colors.blue,
),
home: const MyHomePage(title: 'Deep Link'),
);
}
}
class MyHomePage extends StatefulWidget {
const MyHomePage({super.key, required this.title});
final String title;
State<MyHomePage> createState() => _MyHomePageState();
}
class _MyHomePageState extends State<MyHomePage> {
// DynamicLinksを使用するコードを追加する
FirebaseDynamicLinks dynamicLinks = FirebaseDynamicLinks.instance;
Future<void> initDynamicLinks() async {
dynamicLinks.onLink.listen((dynamicLinkData) {
Navigator.pushNamed(context, dynamicLinkData.link.path);
}).onError((error) {
print('onLink error');
print(error.message);
});
}
void initState() {
super.initState();
initDynamicLinks();
}
Widget build(BuildContext context) {
return Scaffold(
appBar: AppBar(
title: Text(widget.title),
),
body: Center(
child: Text('Dynamic Links'),
)
);
}
}
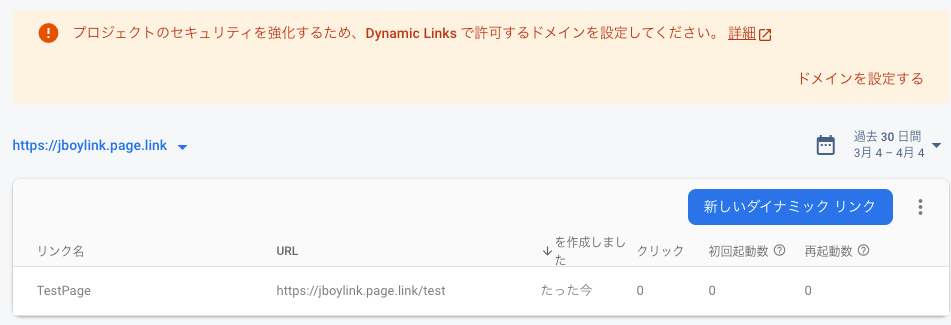
FirebaseでDynamicLinksの設定をする
スクリーンショットを参考に設定して見てください。僕は、海外の動画を参考にやってみたのですが、最初はうまく行かなくて、躓きましたね😅


DynamicLinksを使ってみる
エミュレーターを操作して、GoogleChromeを開いて、DynamicLinksのURLをコピー&ペーストしてください。私のエミュレーターはコピー&ペーストできなかったので、URLを直接入力しました💦
検索をしてみると、ローディングが表示されました。これは、もしかすると。。。
おっアプリの画面が表示されましたね。成功したみたいですね。


まとめ
DynamicLinks興味があって、やってみたのですが難しいですね。インターネットで検索しても参考になりそうな情報が出てこないので、今回は海外の動画を参考にして、チュートリアルをやってみました。
Discussion