🚹
SwiftUIで、TabBarをカスタマイズする
Tips
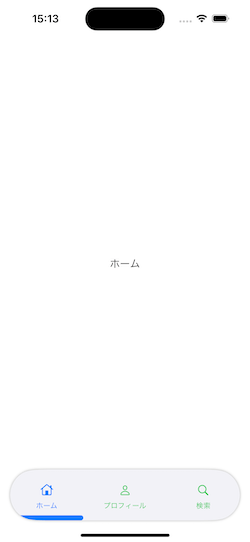
SwiftUIで、TabBarを作っているときに、普通のだと何だか物足りない?
改造すれば、デザインを変更することができるそうです。
今回はこちらを参考に作っていく。
まずは、コンポーネントを作りますか。配列が必要らしい。アイコンとタイトルの名前をTupleを使って、Listに渡す。要素の数に合わせて、rangeを使って、ForEach(0..<3) { index inといった感じで書くと、3個なら、タブのメニューが3個になる。数を合わせないと、エラーが出るの注意。
iOSだと、アイコンの名前が、違うみたいで、settingsとかで検索しても出てこない?
こちらのソフトウェアを使うと、探しやすくなります。検索しても見つからないときは、目視ですが😅
import SwiftUI

struct CustomTabView: View {
    @Binding var tabSelection: Int
    @Namespace private var animationNamespace

    let tabBarItems: [(image: String, title: String)] = [
        // icon, title
    ("house", "ホーム"),
    ("person", "プロフィール"),
    ("magnifyingglass", "検索")
    ]

    var body: some View {
        ZStack {
            Capsule()
                .frame(height: 80)
                .foregroundColor(Color(.secondarySystemBackground))
                .shadow(radius: 2)

            HStack {
                ForEach(0..<3) { index in
                    Button {
                        tabSelection = index + 1
                    } label: {
                        VStack(spacing: 8) {
                            Spacer()

                            Image(systemName: tabBarItems[index].image)

                            Text(tabBarItems[index].title)
                                .font(.caption)

                            if index + 1 == tabSelection {
                                Capsule()
                                    .frame(height: 8)
                                    .foregroundColor(.blue)
                                    .matchedGeometryEffect(id: "SelectedTabId", in: animationNamespace)
                            } else {
                                Capsule()
                                    .frame(height: 8)
                                    .foregroundColor(.clear)
                                    .offset(y: 3)
                            }
                        }
                        .foregroundColor(index + 1 == tabSelection ? .blue : .green)
                    }
                }
            }
            .frame(height: 80)
            .clipShape(Capsule())
        }
        .padding(.horizontal)
    }
}

#Preview {
    CustomTabView(tabSelection: .constant(1))
        .previewLayout(.sizeThatFits)
        .padding(.vertical)
}
最初にビルドされる画面で、カスタマイズした、TabBarをコンポーネントして、使えばカスタマイズしたUIに変更することができます。
import SwiftUI

struct ContentView: View {
    @State private var tabSelect = 1

    var body: some View {
        TabView(selection: $tabSelect) {
            Text("ホーム").tabItem { /*@START_MENU_TOKEN@*/Text("Tab Label 1")/*@END_MENU_TOKEN@*/ }
                .tag(1)

            Text("プロフィール").tabItem { Text("Tab Label 2") }
                .tag(2)

            Text("検索").tabItem { Text("Tab Label 3") }
                .tag(3)
        }
        .overlay(alignment: .bottom) {
            CustomTabView(tabSelection: $tabSelect)
        }
    }
}

#Preview {
    ContentView()
}

最後に
どうでしょうか。こんな感じでカスタマイズしたTabBarを作ることができました。他にもデザインを変える方法はあるので、海外の動画を参考して、試してみてください。
Discussion