UIKitについて
対象者
- Swift学習をしている人
- iOSアプリの開発に興味がある人
やること/やらないこと
やること:
UIKitを使ってコードでUIを作成してみるのを体験してもらいます。
やらないこと:
Storyboardの設定を削除する必要があるのですが、動画見ながらの方がわかりやすいので、私は解説しません。
プロジェクトの説明
動画の通りに、Storyboardを選択してプロジェクトを作成したらまずは、Storyboardの設定を削除しましょう。それが終わったらコードを書いてUIを作って画面遷移をやってみましょう!
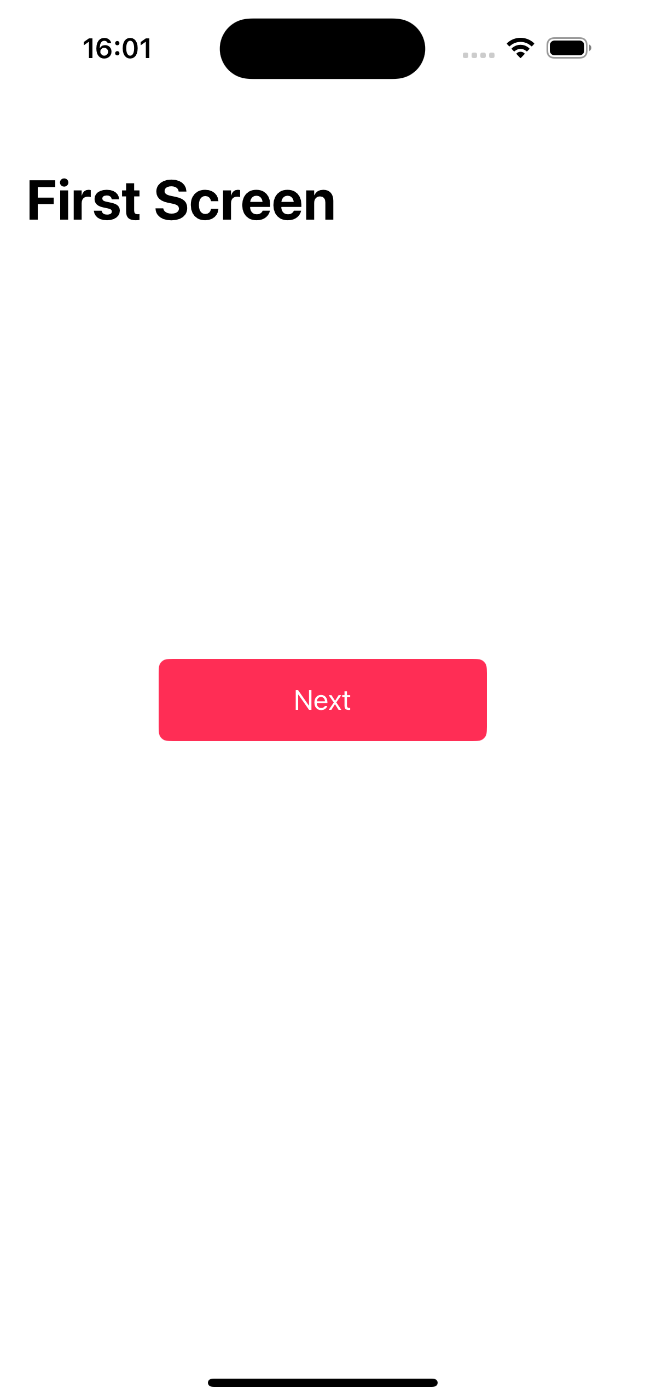
プロジェクト作成時からあるViewControllerをFirstScreenに変更して、最初に表示するUIを作成しましょう。
FirstScreen
import UIKit

class FirstScreen: UIViewController {

    let nextButton = UIButton()

    override func viewDidLoad() {
        super.viewDidLoad()
        setupButton()
        // 背景色がlight modeならwhite、dark modeならblackにする。
        view.backgroundColor = .systemBackground
        // 画面上のタイトル
        title = "First Screen"
        navigationController?.navigationBar.prefersLargeTitles = true
    }

    // 画面遷移するボタン
    func setupButton() {
        view.addSubview(nextButton)

        nextButton.configuration = .filled()
        nextButton.configuration?.baseBackgroundColor = .systemPink
        nextButton.configuration?.title = "Next"

        nextButton.addTarget(self, action: #selector(goToNextScreen), for: .touchUpInside)

        nextButton.translatesAutoresizingMaskIntoConstraints = false
        NSLayoutConstraint.activate([
            nextButton.centerXAnchor.constraint(equalTo: view.centerXAnchor),
            nextButton.centerYAnchor.constraint(equalTo: view.centerYAnchor),
            nextButton.widthAnchor.constraint(equalToConstant: 200),
            nextButton.heightAnchor.constraint(equalToConstant: 50)
        ])
    }
    // 次のページを指定
    @objc func goToNextScreen() {
        let nextScreen = SecondScreen()
        nextScreen.title = "Second Screen"
        navigationController?.pushViewController(nextScreen, animated: true)
    }
}
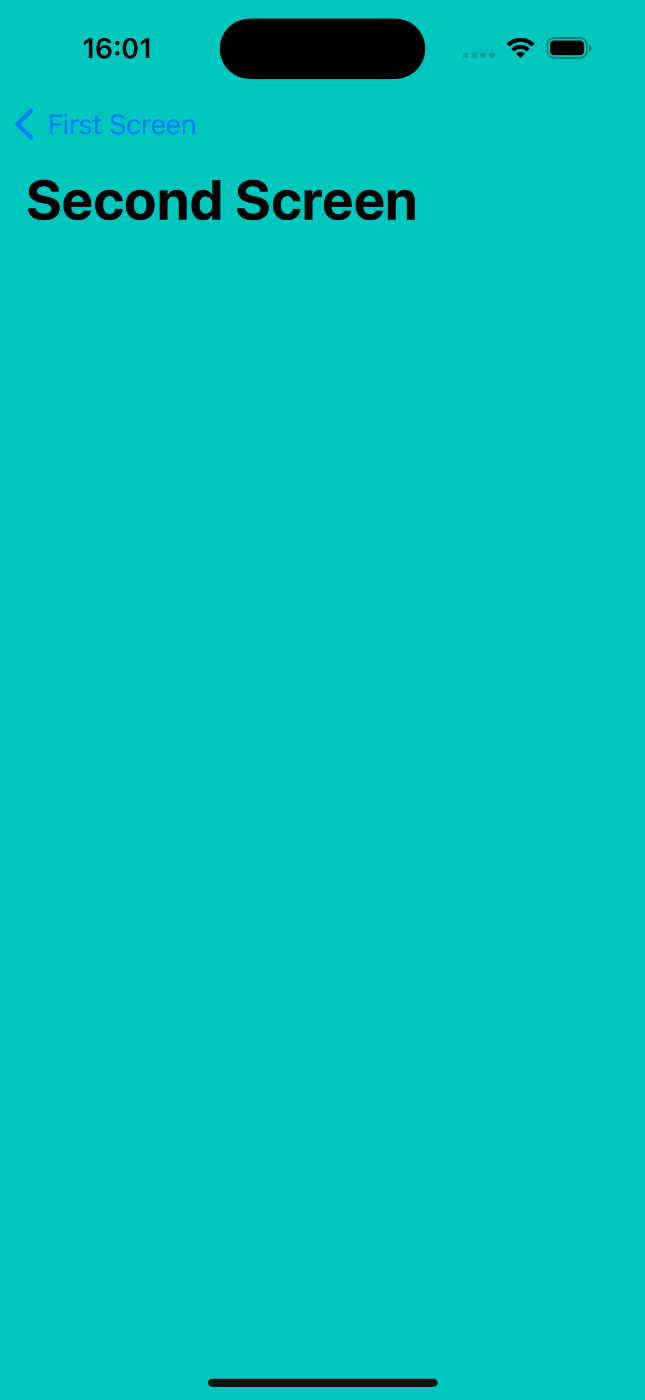
ボタンを押して画面遷移するページのSecondeScreenを作成しましょう。
SecondScreen
import UIKit

class SecondScreen: UIViewController {

    override func viewDidLoad() {
        super.viewDidLoad()
        view.backgroundColor = .systemMint
    }
}
SceneDelegate.swiftを編集して、最初にUIKitで作成したUIを表示できるように、修正しましょう。
SceneDelegate
import UIKit

class SceneDelegate: UIResponder, UIWindowSceneDelegate {

    var window: UIWindow?


    func scene(_ scene: UIScene, willConnectTo session: UISceneSession, options connectionOptions: UIScene.ConnectionOptions) {
        // Use this method to optionally configure and attach the UIWindow `window` to the provided UIWindowScene `scene`.
        // If using a storyboard, the `window` property will automatically be initialized and attached to the scene.
        // This delegate does not imply the connecting scene or session are new (see `application:configurationForConnectingSceneSession` instead).
        guard let windowScene = (scene as? UIWindowScene) else { return }
        // このコードを追加
        window = UIWindow(frame: windowScene.coordinateSpace.bounds)
        window?.windowScene = windowScene
        window?.rootViewController = UINavigationController(rootViewController: FirstScreen())
        window?.makeKeyAndVisible()
        // ここまで設定
    }

    func sceneDidDisconnect(_ scene: UIScene) {
        // Called as the scene is being released by the system.
        // This occurs shortly after the scene enters the background, or when its session is discarded.
        // Release any resources associated with this scene that can be re-created the next time the scene connects.
        // The scene may re-connect later, as its session was not necessarily discarded (see `application:didDiscardSceneSessions` instead).
    }

    func sceneDidBecomeActive(_ scene: UIScene) {
        // Called when the scene has moved from an inactive state to an active state.
        // Use this method to restart any tasks that were paused (or not yet started) when the scene was inactive.
    }

    func sceneWillResignActive(_ scene: UIScene) {
        // Called when the scene will move from an active state to an inactive state.
        // This may occur due to temporary interruptions (ex. an incoming phone call).
    }

    func sceneWillEnterForeground(_ scene: UIScene) {
        // Called as the scene transitions from the background to the foreground.
        // Use this method to undo the changes made on entering the background.
    }

    func sceneDidEnterBackground(_ scene: UIScene) {
        // Called as the scene transitions from the foreground to the background.
        // Use this method to save data, release shared resources, and store enough scene-specific state information
        // to restore the scene back to its current state.
    }
}
これで、UIの表示と、ボタンを押すと画面遷移ができるようになると思います。
感想
UIKitとStoryboardは同じもんだと思ってました(^^;;
実は違った。説明するとこんな感じか...
How to Storyboard?
Xcodeのビジュアルエディタで、アプリの画面遷移やUIのレイアウトを視覚的に設計するためのツール。
How to UIKit?
UIKitは、Appleが開発したUIフレームワークです。iPhoneの発売以来、iOSアプリ開発に使用されてきました。
UIKitには、従来的なアプリ開発アプローチが用意されており、インターフェイス要素を自由に管理できます。ビューやコントロールを更新するために必要なコードを記述できるほか、各要素の構成を変更したり、変更内容をアプリ内の別の箇所に伝えることができます。
UIKitは、2007年から存在する伝統的なフレームワークで、命令型のアプローチを採用しています。この命令型のアプローチは、詳細な制御を可能にし、高度にカスタマイズされたUIを実現します。しかし、その結果としてコードが複雑になりがちです。
UIKitは、SwiftUIより前から存在するため、実装できる機能が多く揃っています。
Discussion