Flutter Google Sign In
Googleアカウントでログインしてみる
過去に書いた記事を参考に、色々ハマったことを書きながら、新しく記事を書こうと思いました。
flutter_hooksを使って実験してたので、HookWidgetを使ってます。StatefulWidgetにしても、ボタンのところで、メソッドを実行すれば機能は使えます。
🎁パッケージを追加する
firebaseで使用するパッケージ
Google Sign Inのパッケージ ソーシャルログインで使うボタンのiconパッケージ flutter_hooksを使っているので、こちらを入れておく
iOSの設定をする
赤い丸で囲んでいる箇所のコードをコピーする。

ios/Runner/Info.plistに設定を追加する。
<?xml version="1.0" encoding="UTF-8"?>
<!DOCTYPE plist PUBLIC "-//Apple//DTD PLIST 1.0//EN" "http://www.apple.com/DTDs/PropertyList-1.0.dtd">
<plist version="1.0">
<dict>
	<key>CFBundleDevelopmentRegion</key>
	<string>$(DEVELOPMENT_LANGUAGE)</string>
	<key>CFBundleDisplayName</key>
	<string>Custom Hook Api</string>
	<key>CFBundleExecutable</key>
	<string>$(EXECUTABLE_NAME)</string>
	<key>CFBundleIdentifier</key>
	<string>$(PRODUCT_BUNDLE_IDENTIFIER)</string>
	<key>CFBundleInfoDictionaryVersion</key>
	<string>6.0</string>
	<key>CFBundleName</key>
	<string>custom_hook_api</string>
	<key>CFBundlePackageType</key>
	<string>APPL</string>
	<key>CFBundleShortVersionString</key>
	<string>$(FLUTTER_BUILD_NAME)</string>
	<key>CFBundleSignature</key>
	<string>????</string>
	<key>CFBundleVersion</key>
	<string>$(FLUTTER_BUILD_NUMBER)</string>
	<key>LSRequiresIPhoneOS</key>
	<true/>
	<key>UILaunchStoryboardName</key>
	<string>LaunchScreen</string>
	<key>UIMainStoryboardFile</key>
	<string>Main</string>
	<key>UISupportedInterfaceOrientations</key>
	<array>
		<string>UIInterfaceOrientationPortrait</string>
		<string>UIInterfaceOrientationLandscapeLeft</string>
		<string>UIInterfaceOrientationLandscapeRight</string>
	</array>
	<key>UISupportedInterfaceOrientations~ipad</key>
	<array>
		<string>UIInterfaceOrientationPortrait</string>
		<string>UIInterfaceOrientationPortraitUpsideDown</string>
		<string>UIInterfaceOrientationLandscapeLeft</string>
		<string>UIInterfaceOrientationLandscapeRight</string>
	</array>
	<key>UIViewControllerBasedStatusBarAppearance</key>
	<false/>
	<key>CADisableMinimumFrameDurationOnPhone</key>
	<true/>
	<key>UIApplicationSupportsIndirectInputEvents</key>
	<true/>
	<!-- trueの下に貼り付ける -->
	<!-- Put me in the [my_project]/ios/Runner/Info.plist file -->
<!-- Google Sign-in Section -->
<key>CFBundleURLTypes</key>
<array>
	<dict>
		<key>CFBundleTypeRole</key>
		<string>Editor</string>
		<key>CFBundleURLSchemes</key>
		<array>
			<!-- TODO Replace this value: -->
			<!-- Copied from GoogleService-Info.plist key REVERSED_CLIENT_ID -->
			<!-- この下に、先ほどコピーしたコードを貼り付ける -->
			<string>com.googleusercontent.apps.196433390992-lck5ulgp7t349uuave08gttjcbusaspr</string>
		</array>
	</dict>
</array>
<!-- End of the Google Sign-in Section -->
</dict>
</plist>
Androidの設定をする
ネイティブ側のコードを設定する。2箇所のbuild.gradleを設定する。
buildscript {
    ext.kotlin_version = '1.7.10'
    repositories {
        google()
        mavenCentral()
    }

    dependencies {
        classpath 'com.android.tools.build:gradle:7.3.0'
        // START: FlutterFire Configuration
        classpath 'com.google.gms:google-services:4.3.14'// futter3.10.5では、4.3.10から、4.3.14に変更
        // END: FlutterFire Configuration
        classpath "org.jetbrains.kotlin:kotlin-gradle-plugin:$kotlin_version"
    }
}

allprojects {
    repositories {
        google()
        mavenCentral()
    }
}

rootProject.buildDir = '../build'
subprojects {
    project.buildDir = "${rootProject.buildDir}/${project.name}"
}
subprojects {
    project.evaluationDependsOn(':app')
}

tasks.register("clean", Delete) {
    delete rootProject.buildDir
}
def localProperties = new Properties()
def localPropertiesFile = rootProject.file('local.properties')
if (localPropertiesFile.exists()) {
    localPropertiesFile.withReader('UTF-8') { reader ->
        localProperties.load(reader)
    }
}

def flutterRoot = localProperties.getProperty('flutter.sdk')
if (flutterRoot == null) {
    throw new GradleException("Flutter SDK not found. Define location with flutter.sdk in the local.properties file.")
}

def flutterVersionCode = localProperties.getProperty('flutter.versionCode')
if (flutterVersionCode == null) {
    flutterVersionCode = '1'
}

def flutterVersionName = localProperties.getProperty('flutter.versionName')
if (flutterVersionName == null) {
    flutterVersionName = '1.0'
}

apply plugin: 'com.android.application'
// START: FlutterFire Configuration
apply plugin: 'com.google.gms.google-services'
// END: FlutterFire Configuration
apply plugin: 'kotlin-android'
apply from: "$flutterRoot/packages/flutter_tools/gradle/flutter.gradle"

android {
    namespace "com.jboy.custom_hook_api"
    compileSdkVersion flutter.compileSdkVersion
    ndkVersion flutter.ndkVersion

    compileOptions {
        sourceCompatibility JavaVersion.VERSION_1_8
        targetCompatibility JavaVersion.VERSION_1_8
    }

    kotlinOptions {
        jvmTarget = '1.8'
    }

    sourceSets {
        main.java.srcDirs += 'src/main/kotlin'
    }

    defaultConfig {
        // TODO: Specify your own unique Application ID (https://developer.android.com/studio/build/application-id.html).
        applicationId "com.jboy.custom_hook_api"
        // You can update the following values to match your application needs.
        // For more information, see: https://docs.flutter.dev/deployment/android#reviewing-the-gradle-build-configuration.
        minSdkVersion 21// APIレベル: 21を指定することで、android 5.0以上で動作するようになる
        targetSdkVersion flutter.targetSdkVersion
        versionCode flutterVersionCode.toInteger()
        versionName flutterVersionName
    }

    buildTypes {
        release {
            // TODO: Add your own signing config for the release build.
            // Signing with the debug keys for now, so `flutter run --release` works.
            signingConfig signingConfigs.debug
        }
    }
}

flutter {
    source '../..'
}

dependencies {
    implementation "org.jetbrains.kotlin:kotlin-stdlib-jdk7:$kotlin_version"
}
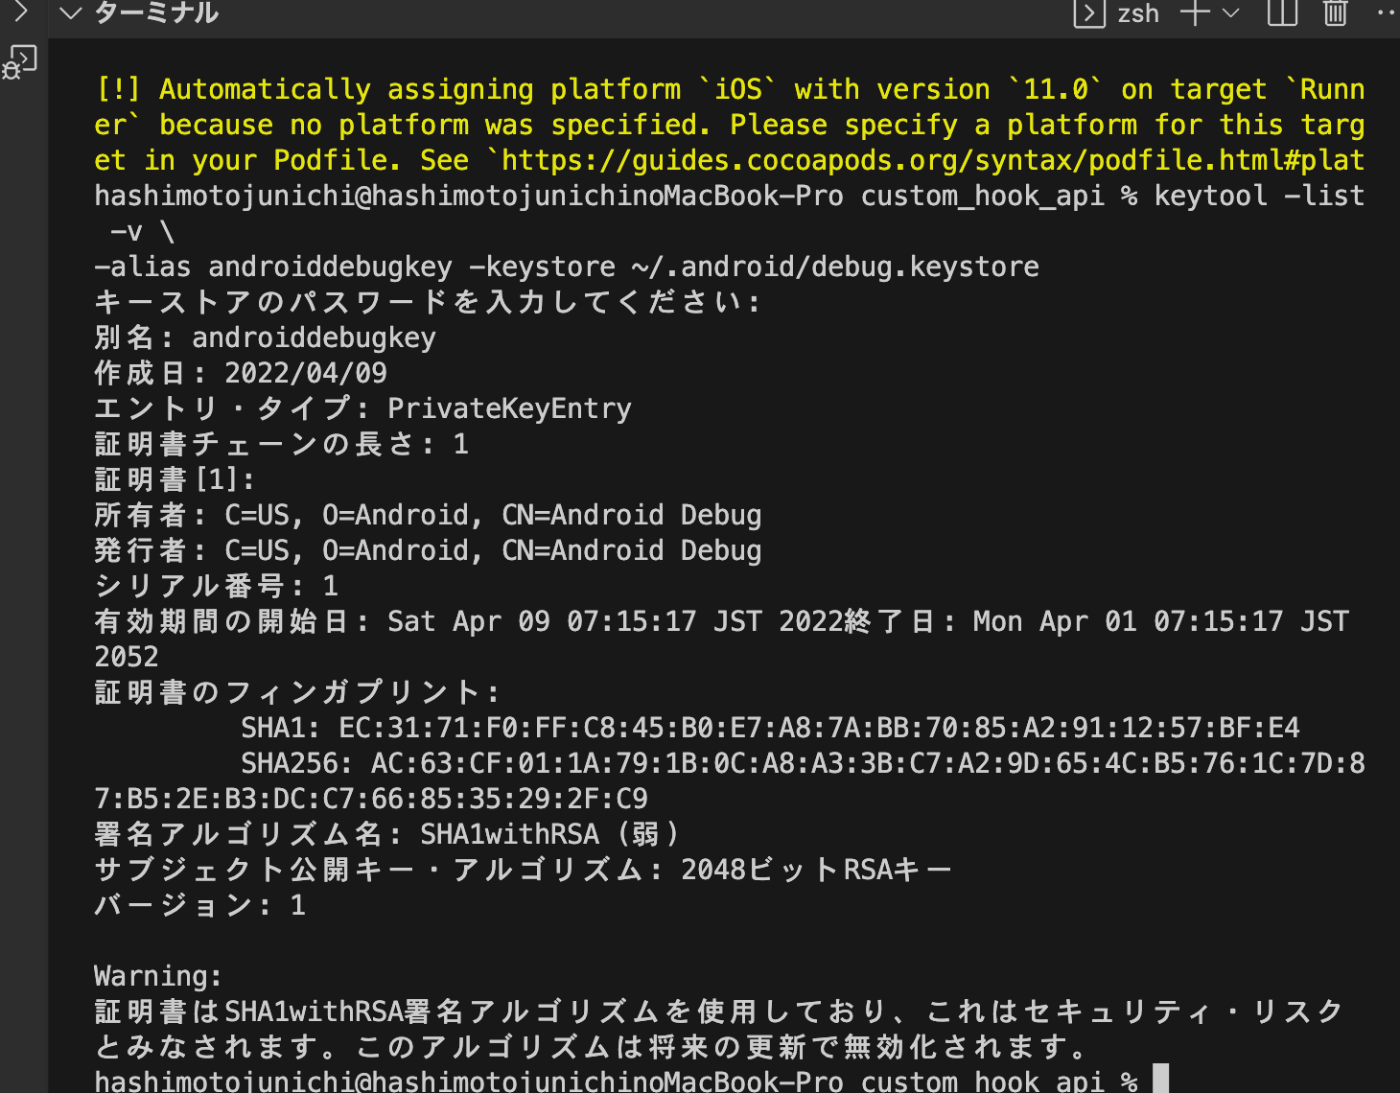
SHA-1 KEYを作る
これは、本来はテスト用なので、リリースするときは、aabファイルを生成するときに作る鍵を使う。GooglePlayにアップロードしたときに、別の鍵がGooglePlayコンソールで発行されるので、そちらをFirebaseの設定に追加する。これがないと、配布するアプリは、Google Sign Inができない😱
パスワードは android らしい?


android/build.gradleを設定する
buildscript {
    ext.kotlin_version = '1.7.10'
    repositories {
        google()
        mavenCentral()
    }

    dependencies {
        classpath 'com.android.tools.build:gradle:7.3.0'
        // START: FlutterFire Configuration
        classpath 'com.google.gms:google-services:4.3.14'// futter3.10.5では、4.3.10から、4.3.14に変更
        // END: FlutterFire Configuration
        classpath "org.jetbrains.kotlin:kotlin-gradle-plugin:$kotlin_version"
    }
}

allprojects {
    repositories {
        google()
        mavenCentral()
    }
}

rootProject.buildDir = '../build'
subprojects {
    project.buildDir = "${rootProject.buildDir}/${project.name}"
}
subprojects {
    project.evaluationDependsOn(':app')
}

tasks.register("clean", Delete) {
    delete rootProject.buildDir
}
Firebaseの設定をする
まずは、Googleの認証機能をFirebaseAuthに追加して、設定をする


ソースコード
Google Sign Inのロジックを書いたファイルです。hooksフォルダに作りましたが、ファイル名はなんでもいいです。
// flutter_hooksで、Apple Sign Inをスルメソッドを実装する
import 'package:custom_hook_api/main.dart';
import 'package:firebase_auth/firebase_auth.dart';
import 'package:flutter/material.dart';
import 'package:flutter/services.dart';
import 'package:google_sign_in/google_sign_in.dart';

// flutter_hooksで、Google Sign Inを実装する
Future<UserCredential?> gooleSignInHook(BuildContext context) async {
  try {
    // ここで、Google Sign Inの認証画面が表示される
    final googleUser = await GoogleSignIn().signIn();
    // ここで、Firebaseの認証画面が表示される
    final googleAuth = await googleUser!.authentication;
    // ここで、Firebaseの認証が完了する
    final credential = GoogleAuthProvider.credential(
      accessToken: googleAuth.accessToken,
      idToken: googleAuth.idToken,
    );
    print(credential);
    // userCredentialには、Firebaseの認証情報が入っている
    final userCredential = await FirebaseAuth.instance.signInWithCredential(credential);
    // ここに画面遷移をするコードを書く!
    if (context.mounted) {
      Navigator.of(context).pushAndRemoveUntil(
          MaterialPageRoute(builder: (context) => const HomePage()),
          (route) => false);
    }
    // ここで、Firebaseの認証が完了する
    return userCredential;
  } catch (e) {
    // ここで、エラー処理をする
    if (e is PlatformException && e.code == 'sign_in_canceled') {
      print('User canceled the Google sign-in process');
      // Here, you can show some message to the user or handle the cancellation in a way that fits your app
    } else {
      throw e.toString();
    }
  }
  // nullなのは、エラーが発生した場合
  return null;
}
Google Sign Inをするコード
import 'package:custom_hook_api/firebase_options.dart';
import 'package:custom_hook_api/hook/auth_hook.dart';
import 'package:firebase_auth/firebase_auth.dart';
import 'package:firebase_core/firebase_core.dart';
import 'package:flutter/material.dart';
import 'package:flutter_hooks/flutter_hooks.dart';
import 'package:sign_in_button/sign_in_button.dart';
void main() async {
WidgetsFlutterBinding.ensureInitialized();
await Firebase.initializeApp(options: DefaultFirebaseOptions.currentPlatform);
runApp(const MyApp());
}
class MyApp extends HookWidget {
const MyApp({super.key});
Widget build(BuildContext context) {
return const MaterialApp(
title: 'API Data Example',
home: GoogleSignInDemo(),
);
}
}
class GoogleSignInDemo extends HookWidget {
const GoogleSignInDemo({Key? key}) : super(key: key);
Widget build(BuildContext context) {
return Scaffold(
appBar: AppBar(
backgroundColor: Colors.indigoAccent,
title: const Text('Google Sign In')),
body: Center(
child: Container(
width: 200,
height: 30,
child: SignInButton(Buttons.google, onPressed: () async {
// Google Sign Inする
await gooleSignInHook(context);
}),
),
),
);
}
}
// Google Sign Inしたページ
class HomePage extends HookWidget {
const HomePage({Key? key}) : super(key: key);
Widget build(BuildContext context) {
final auth = FirebaseAuth.instance;
return Scaffold(
appBar: AppBar(
title: const Text('Google Sign Inしました!'),
),
body: Center(
child: ElevatedButton(
child: const Text('Sign Out'),
onPressed: () async {
// ログアウトする
await auth.signOut();
if (context.mounted) {
Navigator.of(context).pushAndRemoveUntil(
MaterialPageRoute(
builder: (context) => const GoogleSignInDemo()),
(route) => false);
}
},
)),
);
}
}
あとは、ビルドして動かすだけです。過去に書いた記事と同じようにできるはずです。
まとめ
過去に書いた記事をFirebase CLIに対応したものに変更しました。
なぜか、ダイアログが出てこなかったり、2段階認証をしなかったのが、気になりましたが、原因はGoogleアカウントを確認すると、過去にログインをしていたので、自動ログインを実機でも仮想デバイスでもしてしまうようです。もし、自動ログインをしてしまう場合は、Googleのアカウントに、デバイスがログインしていないか確かめてください。
Discussion