GetXでFirebase Auth使ってみた!
職場の人がGetX推してるので勉強してみた!
今回こちらのYouTube動画を参考に作ってみました!
開発環境
mac os monterey
VsCode
Flutter: 3.0.2
Firebase CLI
最近Firebase CLIが流行ってるので個人開発では使っております
だってGoogle-service.jsonとかを設定するのめんどくさいもん😅
仕事では、やってますけどね😇
それでは、やっていきましょう!
- プロジェクトを作る
- GetXを導入する
- Firebaseの設定をする
- UIとControllerを作る
今回はファイル作るコマンドは使いません!
なぜなら、作成するフォルダとファイルが少ないので、自動生成されるあのテンプレートが多すぎて必要ないのですよ!
お好きな場所でプロジェクトを作成
flutter create get_auth
Firebase CLIの環境構築がまだの方は、すませておいてください!
公式ドキュメント
Aoiさんという方の環境構築の記事がわかりやすいのでリンク貼っておきます。
もしパスが通らなかったら、他のパスが干渉しているとのことで、.zshrcの中身を消してやり直したほうがいいかもしれないですね。
私は、Javaとかanancondaとか使ってないのは全部消しました😅
Firebaseにプロジェクトを作成しておいてください。
今回は、get-authというプロジェクトを作成しました
Firebase Authenticationの設定を忘れずにしておいてください!
動画ではGmailの設定しているが、email、passwordの設定だけのような気がする?
作成した人が他のチュートリアルで使うみたいですね?
CRUDできるアプリを作るチュートリアル
動画の通りに進めていけば設定はできると思います。
私の作ったのは、Firebase CLI使ってるので、やり方は特殊ですね。
Firebase CLIを導入する
プロジェクト内でFirebase側に、iOSとAndroidの設定をコマンドを使って自動でやってもらいます!
今回はFlutter Webも使ってみたかったので追加してみた!
Firebase側にプラットフォームごとに自動で設定をしてくれるコマンド
flutterfire configure

mac oshはいらないので、外しておきます。後は全部エンターキーを押す!
それでは、作っていきましょう!
フォルダの構成
libフォルダの中
hashimotojunichi@hashimotojunichinoMacBook-Pro lib % tree
.
├── Constants
│   └── firebase_constants.dart
├── Controllers
│   └── auth_controller.dart
├── Screens
│   ├── home.dart
│   └── login.dart
├── firebase_options.dart
├── generated_plugin_registrant.dart
└── main.dart
iOSの接続を高速化!
ios/Podfile
# Uncomment this line to define a global platform for your project
platform :ios, '13.0'

# CocoaPods analytics sends network stats synchronously affecting flutter build latency.
ENV['COCOAPODS_DISABLE_STATS'] = 'true'

project 'Runner', {
  'Debug' => :debug,
  'Profile' => :release,
  'Release' => :release,
}

def flutter_root
  generated_xcode_build_settings_path = File.expand_path(File.join('..', 'Flutter', 'Generated.xcconfig'), __FILE__)
  unless File.exist?(generated_xcode_build_settings_path)
    raise "#{generated_xcode_build_settings_path} must exist. If you're running pod install manually, make sure flutter pub get is executed first"
  end

  File.foreach(generated_xcode_build_settings_path) do |line|
    matches = line.match(/FLUTTER_ROOT\=(.*)/)
    return matches[1].strip if matches
  end
  raise "FLUTTER_ROOT not found in #{generated_xcode_build_settings_path}. Try deleting Generated.xcconfig, then run flutter pub get"
end

require File.expand_path(File.join('packages', 'flutter_tools', 'bin', 'podhelper'), flutter_root)

flutter_ios_podfile_setup

target 'Runner' do
  ## ここから
  pod 'FirebaseFirestore', :git => 'https://github.com/invertase/firestore-ios-sdk-frameworks.git', :tag => '8.15.0'
  ## ここまで追加
  use_frameworks!
  use_modular_headers!

  flutter_install_all_ios_pods File.dirname(File.realpath(__FILE__))
end

post_install do |installer|
  installer.pods_project.targets.each do |target|
    flutter_additional_ios_build_settings(target)
  end
end
Dartのパッケージの導入
pubspec.yaml
name: get_auth
description: A new Flutter project.

# The following line prevents the package from being accidentally published to
# pub.dev using `flutter pub publish`. This is preferred for private packages.
publish_to: 'none' # Remove this line if you wish to publish to pub.dev

# The following defines the version and build number for your application.
# A version number is three numbers separated by dots, like 1.2.43
# followed by an optional build number separated by a +.
# Both the version and the builder number may be overridden in flutter
# build by specifying --build-name and --build-number, respectively.
# In Android, build-name is used as versionName while build-number used as versionCode.
# Read more about Android versioning at https://developer.android.com/studio/publish/versioning
# In iOS, build-name is used as CFBundleShortVersionString while build-number used as CFBundleVersion.
# Read more about iOS versioning at
# https://developer.apple.com/library/archive/documentation/General/Reference/InfoPlistKeyReference/Articles/CoreFoundationKeys.html
version: 1.0.0+1

environment:
  sdk: ">=2.17.3 <3.0.0"

# Dependencies specify other packages that your package needs in order to work.
# To automatically upgrade your package dependencies to the latest versions
# consider running `flutter pub upgrade --major-versions`. Alternatively,
# dependencies can be manually updated by changing the version numbers below to
# the latest version available on pub.dev. To see which dependencies have newer
# versions available, run `flutter pub outdated`.
dependencies:
  flutter:
    sdk: flutter


  # The following adds the Cupertino Icons font to your application.
  # Use with the CupertinoIcons class for iOS style icons.
  cupertino_icons: ^1.0.2
  firebase_core: ^1.18.0
  firebase_auth: ^3.3.20
  get: ^4.6.5

dev_dependencies:
  flutter_test:
    sdk: flutter

  # The "flutter_lints" package below contains a set of recommended lints to
  # encourage good coding practices. The lint set provided by the package is
  # activated in the `analysis_options.yaml` file located at the root of your
  # package. See that file for information about deactivating specific lint
  # rules and activating additional ones.
  flutter_lints: ^2.0.0

# For information on the generic Dart part of this file, see the
# following page: https://dart.dev/tools/pub/pubspec

# The following section is specific to Flutter packages.
flutter:

  # The following line ensures that the Material Icons font is
  # included with your application, so that you can use the icons in
  # the material Icons class.
  uses-material-design: true

  # To add assets to your application, add an assets section, like this:
  # assets:
  #   - images/a_dot_burr.jpeg
  #   - images/a_dot_ham.jpeg

  # An image asset can refer to one or more resolution-specific "variants", see
  # https://flutter.dev/assets-and-images/#resolution-aware

  # For details regarding adding assets from package dependencies, see
  # https://flutter.dev/assets-and-images/#from-packages

  # To add custom fonts to your application, add a fonts section here,
  # in this "flutter" section. Each entry in this list should have a
  # "family" key with the font family name, and a "fonts" key with a
  # list giving the asset and other descriptors for the font. For
  # example:
  # fonts:
  #   - family: Schyler
  #     fonts:
  #       - asset: fonts/Schyler-Regular.ttf
  #       - asset: fonts/Schyler-Italic.ttf
  #         style: italic
  #   - family: Trajan Pro
  #     fonts:
  #       - asset: fonts/TrajanPro.ttf
  #       - asset: fonts/TrajanPro_Bold.ttf
  #         weight: 700
  #
  # For details regarding fonts from package dependencies,
  # see https://flutter.dev/custom-fonts/#from-packages
Constantsフォルダを作成
constantsとは英語で不変という意味だそうです😅
プログラミングしながら、英語の勉強してます。Util、というよく見かける単語は便利なって意味らしいです?
firebase_constants.dart
import 'package:firebase_auth/firebase_auth.dart';
import 'package:firebase_core/firebase_core.dart';
// Firebase Authを使う設定
FirebaseAuth auth = FirebaseAuth.instance;
final Future<FirebaseApp> firebaseInitialization = Firebase.initializeApp();
Controllerフォルダを作成
Providerやriverpodと同じ役割を担ってくれます!
ロジックを分離することができて、コードの可読性が上がる!
GetXはcontextもいらない、シンタックスシュガーでコードを書ける便利なフレームワーク!
auth_controller.dart
import 'package:firebase_auth/firebase_auth.dart';
import 'package:get/get.dart';
import 'package:get_auth/Constants/firebase_constants.dart';
import 'package:get_auth/Screens/home.dart';
import 'package:get_auth/Screens/login.dart';
class AuthController extends GetxController {
static AuthController authInstance = Get.find();
late Rx<User?> firebaseUser;
void onReady() {
super.onReady();
firebaseUser = Rx<User?>(auth.currentUser);
firebaseUser.bindStream(auth.userChanges());
ever(firebaseUser, _setInitialScreen);
}
_setInitialScreen(User? user) {
if (user != null) {
// user is logged in
Get.offAll(() => const Home());
} else {
// user is null as in user is not available or not logged in
Get.offAll(() => Login());
}
}
/// [新規登録のメソッド]
void register(String email, String password) async {
try {
await auth.createUserWithEmailAndPassword(
email: email, password: password);
} on FirebaseAuthException catch (e) {
// this is solely for the Firebase Auth Exception
// for example : password did not match
print(e.message);
// Get.snackbar("Error", e.message!);
Get.snackbar(
"Error",
e.message!,
snackPosition: SnackPosition.BOTTOM,
);
} catch (e) {
// this is temporary. you can handle different kinds of activities
//such as dialogue to indicate what's wrong
print(e.toString());
}
}
/// [ユーザーログインのメソッド]
void login(String email, String password) async {
try {
await auth.signInWithEmailAndPassword(email: email, password: password);
} on FirebaseAuthException catch (e) {
// this is solely for the Firebase Auth Exception
// for example : password did not match
print(e.message);
} catch (e) {
print(e.toString());
}
}
/// [ログアウトするメソッド]
// AppBar右上のアイコンをタップするとログアウトできます
void signOut() {
try {
auth.signOut();
} catch (e) {
print(e.toString());
}
}
}
Screenフォルダを作成
こちらにUIを作るファイルを作成します。
home.dart
import 'package:flutter/material.dart';
import 'package:get_auth/Controllers/auth_controller.dart';
/// [ログインした先のページ]
class Home extends StatelessWidget {
const Home({Key? key}) : super(key: key);
Widget build(BuildContext context) {
return Scaffold(
appBar: AppBar(
title: const Text("Welcome!"),
actions: [
IconButton(
onPressed: () {
// this icon button is for the user to signout
AuthController.authInstance.signOut();
},
icon: const Icon(Icons.power_off))
],
),
body: const Center(
child: Text("Home Page"),
),
);
}
}
login.dart
import 'package:flutter/material.dart';
import 'package:get/get.dart';
import 'package:get_auth/Controllers/auth_controller.dart';
/// [ログイン画面のTOPページ]
class Login extends StatelessWidget {
final emailController = TextEditingController();
final passwordController = TextEditingController();
Widget build(BuildContext context) {
return Scaffold(
appBar: AppBar(),
body: Center(
child: Padding(
padding: const EdgeInsets.symmetric(horizontal: 12.0),
child: Column(
mainAxisAlignment: MainAxisAlignment.center,
children: [
Text(
"Welcome",
style: Get.textTheme.headline3,
),
TextField(
controller: emailController,
),
TextField(
obscureText: true,
controller: passwordController,
),
const SizedBox(
height: 30,
),
Row(
mainAxisAlignment: MainAxisAlignment.spaceAround,
children: [
ElevatedButton(
onPressed: () {
// this is for the register function in auth controller
AuthController.authInstance.register(
emailController.text.trim(),
passwordController.text.trim(),
);
},
child: const Text("Sign Up"),
),
ElevatedButton(
onPressed: () {
// this is for the login function in auth controller
AuthController.authInstance.login(
emailController.text.trim(),
passwordController.text.trim(),
);
},
child: const Text("Login"),
),
],
),
],
),
),
),
);
}
}
自動生成されるファイル
こちらは、プロジェクト作成時とFirebase CLIのコマンドで自動生成されます。
ファイルの内容は人によって異なるので書かないでおきます。
firebase_options.dart
generated_plugin_registrant.dart
こちらが、プログラムを実行するmain.dart
main.dart
import 'package:firebase_core/firebase_core.dart';
import 'package:flutter/material.dart';
import 'package:get/get.dart';
import 'package:get_auth/Constants/firebase_constants.dart';
import 'package:get_auth/Controllers/auth_controller.dart';
import 'package:get_auth/firebase_options.dart';
void main() async {
WidgetsFlutterBinding.ensureInitialized();
/// [Flutter Fireのドキュメントのコードを追加!]
// ここから
await Firebase.initializeApp(
options: DefaultFirebaseOptions.currentPlatform,
);
// ここまで!
firebaseInitialization.then((value) {
// we are going to inject the auth controller over here!
Get.put(AuthController());
});
runApp(const MyApp());
}
class MyApp extends StatelessWidget {
const MyApp({Key? key}) : super(key: key);
Widget build(BuildContext context) {
return GetMaterialApp(
debugShowCheckedModeBanner: false,
title: 'Flutter Demo',
theme: ThemeData(
primarySwatch: Colors.blue,
),
home: const Center(
child: CircularProgressIndicator(),
),
);
}
}
スクリーンショット
iOS、Android、Flutter Webそれぞれで実行してみました!
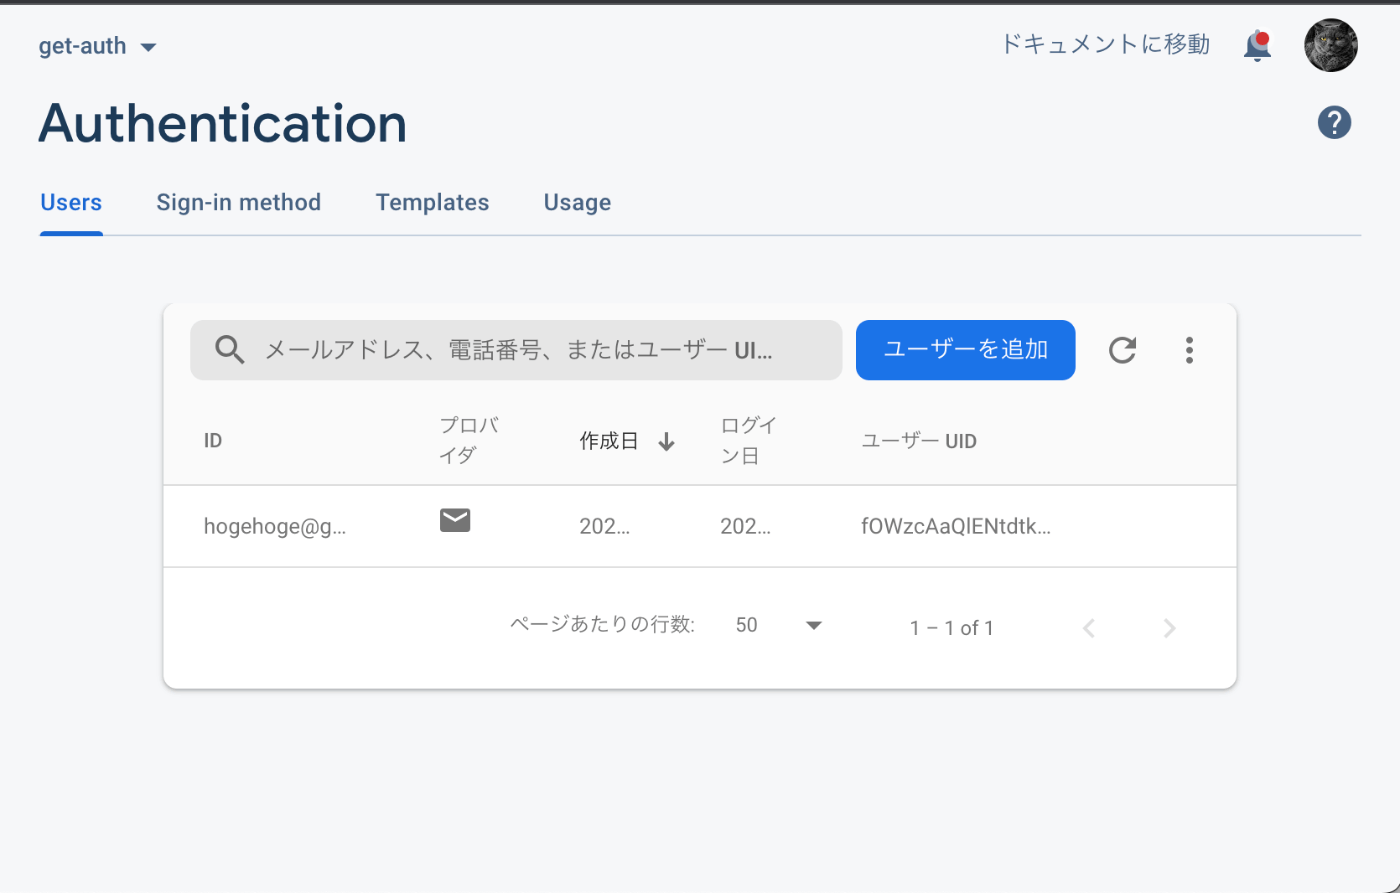
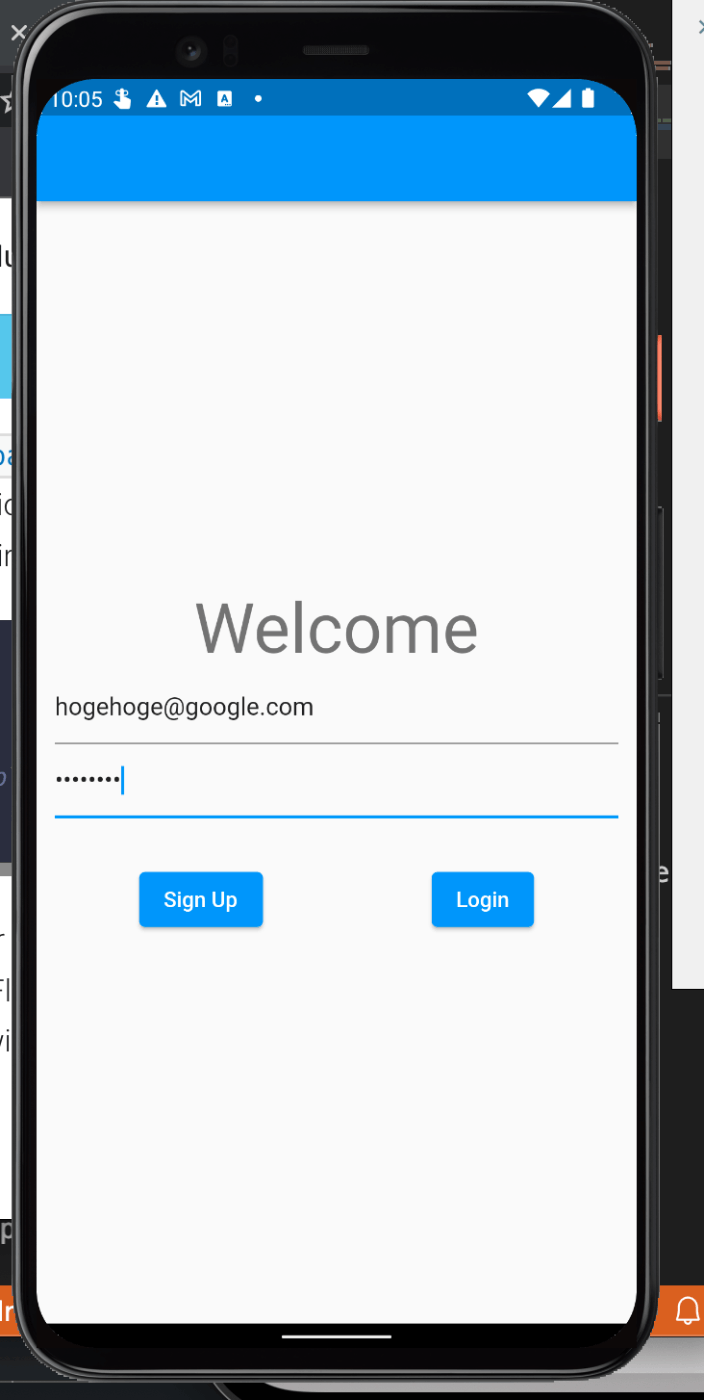
iOS


おお!、ユーザーが登録されているようですね!、成功しました!
Android

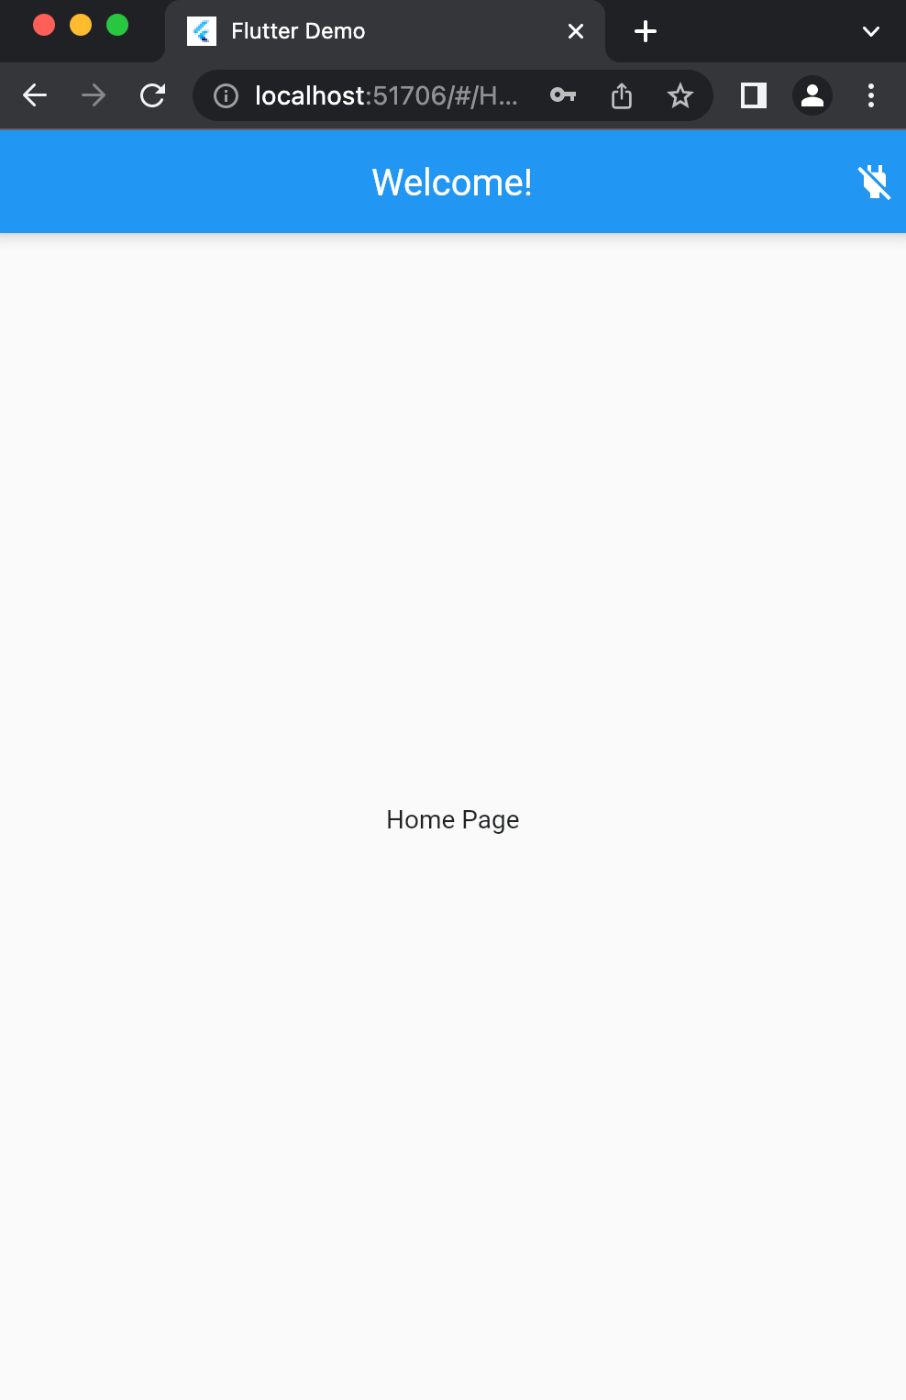
Flutter Web
こちらは、UIが崩れていたので画面を狭くして表示してます😅
Webも作れるから便利ですけど、やはりReactやVue.jsの方が綺麗なUIを作れる気がします😇

最後に
GetXは人によっては批判する意見がありますが、UIとロジックの分離が簡単なことから、世界では流行っているのではないかと思われます?
日本では、Provider、riverpodの方が多く使われているので、そっちを学習しなければならない雰囲気になっておりますが、選択肢を無くしてしまうのは良くないなと思って私は使ってみました!
興味がある技術は勉強するようにしていて、それがFlutterエンジニアになって役に立っている気がします。
まだ、業務では戦力にはなっておりませんがMVVMとかFirebaseのデータモデリングを理解して、会社に貢献したいと思っております!
Discussion