🔵
RawMaterialButton class
Overview
Semantics、Material、InkWellウィジェットを基にボタンを作成します。
このクラスは、現在のThemeまたはButtonThemeを使用して、指定されていないパラメータのデフォルト値を計算することはありません。このクラスは、テーマまたはアプリ固有のソースからのデフォルト値を任意で組み込んだカスタムMaterialボタンに使用することを意図しています。
このクラスは将来のリリースで非推奨になる予定です。ElevatedButton、FilledButton、OutlinedButton、TextButton の基底クラスである ButtonStyleButton を参照してください。
良い感じのボタンを作れるWidgetがあったので、試しに使ってみたのですがもうなくなるようですね😇
ElevatedButtonで以前は丸のボタンを作ってたのですがこちらが推奨らしい?
summary
今回は、オシャレなストップウォッチを作った時に使った書き方でご紹介しようと思います。ソースコードはこちら💁
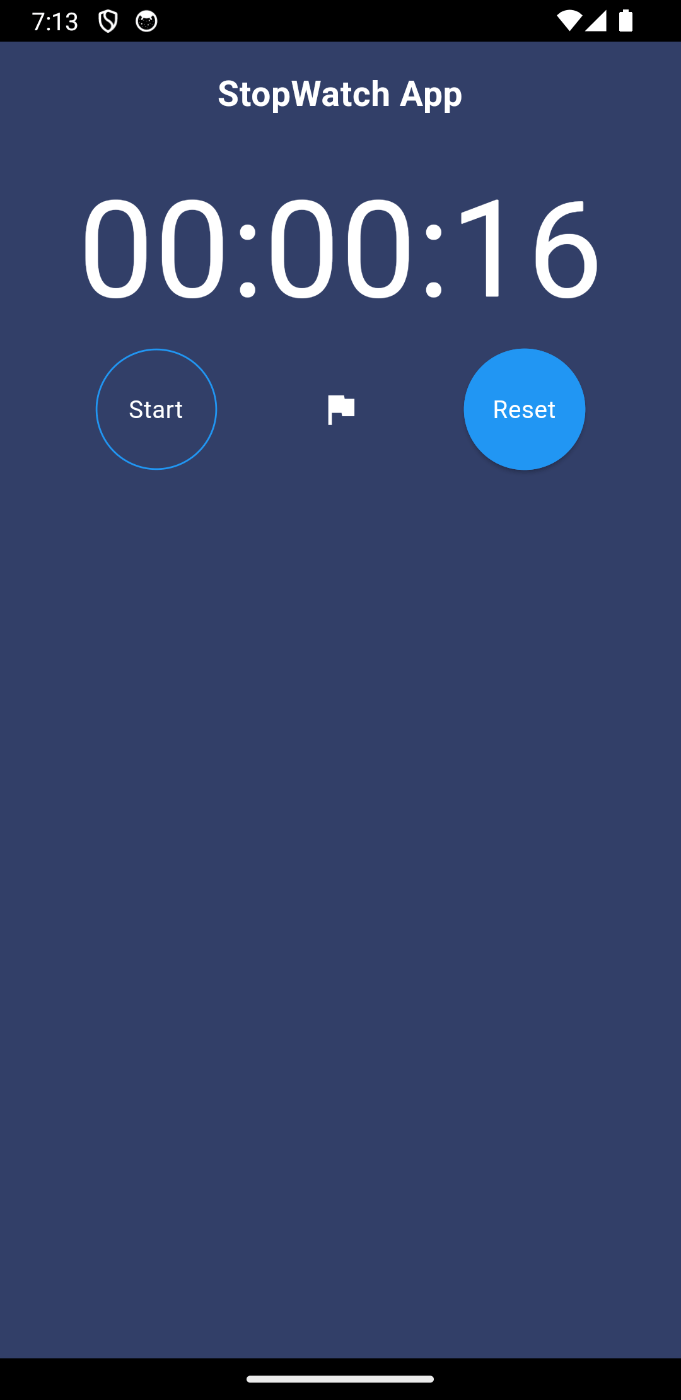
こちらのコードだと、背景色が透明で外枠がブルーのボタンを作成してます。
Expanded(
      child: SizedBox(
	width: 70.0,
	height: 70.0,
	child: RawMaterialButton(
	  onPressed: () {
	    // ロジックをcallbackに書く
	  },
	  shape: const CircleBorder(
	      side: BorderSide(color: Colors.blue)
	  ),
	  child: Text(
	    (!started) ? "Start" : "Stop",
	    style: const TextStyle(
	      color: Colors.white,
	    ),
	  ),
	),
      ),
    ),
もし背景色をつけたい場合は、こちらの書き方をします。fillColor: Colors.blueとパラメーターをつけると、背景色をブルーにできます。
Expanded(
      child: SizedBox(
	width: 70.0,
	height: 70.0,
	child: RawMaterialButton(
	  onPressed: () {
	    reset();
	  },
	  fillColor: Colors.blue, // ボタンの背景色
	  shape: const CircleBorder(
	    side: BorderSide(color: Colors.blue)), // ボタンの枠の色
	  child: const Text(
	    "Reset",
	    style: TextStyle(
	      color: Colors.white,
	    ),
	  ),
	),
      ),
    ),
全体のコードはこちらです。オシャレなストップウオッチアプリを作ってみました!
全体のコード
import 'dart:async';
import 'package:flutter/material.dart';
void main() {
runApp(const MyApp());
}
class MyApp extends StatelessWidget {
const MyApp({super.key});
Widget build(BuildContext context) {
return MaterialApp(
debugShowCheckedModeBanner: false,
title: 'Flutter Demo',
theme: ThemeData(
colorScheme: ColorScheme.fromSeed(seedColor: Colors.deepPurple),
useMaterial3: true,
),
home: const MyHomePage(),
);
}
}
class MyHomePage extends StatefulWidget {
const MyHomePage({super.key});
State<MyHomePage> createState() => _MyHomePageState();
}
class _MyHomePageState extends State<MyHomePage> {
// 時間を保持する変数。変数が3あるのは、それぞれ秒、分、時間を保持するため。Dartでは1行で複数の変数を宣言できる。
int seconds = 0, minutes = 0, hours = 0;
// 時間を表示するための変数。digiSecondsは秒、digiMinutesは分、digiHoursは時間を保持する。
String digiSeconds = "00", digiMinutes = "00", digiHours = "00";
// タイマーを保持する変数
Timer? timer;
// ストップウォッチがスタートしているかどうかを保持する変数
bool started = false;
// ラップタイムを保持するリスト。ストップウォッチを停止するときに、このリストに現在の時間を追加する。
List laps = [];
// ストップウォッチの時間を止める関数
void stop() {
timer?.cancel();
setState(() {
started = false;
});
}
// ストップウォッチの時間をリセットする関数
void reset() {
setState(() {
timer!.cancel();
setState(() {
seconds = 0;
minutes = 0;
hours = 0;
digiSeconds = "00";
digiMinutes = "00";
digiHours = "00";
started = false;
});
});
}
// ストップウォッチの時間を更新する関数
void addLaps() {
String lap = "$digiHours:$digiMinutes:$digiSeconds";
setState(() {
laps.add(lap);
});
}
// ストップウォッチの時間をスタートする関数
void start() {
started = true;
timer = Timer.periodic(const Duration(seconds: 1), (timer) {
int localSeconds = seconds + 1;
int localMinutes = minutes;
int localHours = hours;
if (localSeconds > 59) {
if (localMinutes > 59) {
localHours++;
localMinutes = 0;
} else {
localMinutes++;
localSeconds = 0;
}
}
setState(() {
seconds = localSeconds;
minutes = localMinutes;
hours = localHours;
digiSeconds = (seconds >= 10) ? "$seconds" : "0$seconds";
digiHours = (hours >= 10) ? "$hours" : "0$hours";
digiMinutes = (minutes >= 10) ? "$minutes" : "0$minutes";
});
});
}
Widget build(BuildContext context) {
// iOS、Androidでも画面の上部に余白を作るためのウィジェット
return SafeArea(
child: Scaffold(
// 背景色をネイビーにする
backgroundColor: const Color(0xFF323F68),
body: Padding(
padding: const EdgeInsets.all(16.0),
child: SingleChildScrollView(
child: Column(
mainAxisAlignment: MainAxisAlignment.spaceBetween,
crossAxisAlignment: CrossAxisAlignment.center,
children: [
const Center(
child: Text(
"StopWatch App",
style: TextStyle(
fontSize: 20.0,
fontWeight: FontWeight.bold,
color: Colors.white,
),
),
),
const SizedBox(height: 20.0),
Center(
child: Text(
"$digiHours:$digiMinutes:$digiSeconds",
style: const TextStyle(
fontSize: 78.0,
color: Colors.white,
fontWeight: FontWeight.w400,
),
),
),
Row(
mainAxisAlignment: MainAxisAlignment.spaceBetween,
children: [
Expanded(
child: SizedBox(
width: 70.0,
height: 70.0,
child: RawMaterialButton(
onPressed: () {
(!started) ? start() : stop();
},
shape: const CircleBorder(
side: BorderSide(color: Colors.blue)
),
child: Text(
(!started) ? "Start" : "Stop",
style: const TextStyle(
color: Colors.white,
),
),
),
),
),
const SizedBox(width: 8.0),
IconButton(
color: Colors.white,
onPressed: () {
addLaps();
},
icon: const Icon(Icons.flag)),
const SizedBox(width: 8.0),
Expanded(
child: SizedBox(
width: 70.0,
height: 70.0,
child: RawMaterialButton(
onPressed: () {
reset();
},
fillColor: Colors.blue, // ボタンの背景色
shape: const CircleBorder(
side: BorderSide(color: Colors.blue)), // ボタンの枠の色
child: const Text(
"Reset",
style: TextStyle(
color: Colors.white,
),
),
),
),
),
],
),
],
),
),
),
),
);
}
}
こんな感じです:

thoughts
今回は、見た目がかっこいいから気に入ったWidgetを紹介することにしましたが、まさか将来なくなるとは知らなかった💦
なので丸のボタンを作る時は、ElevatedButtonなどを使いましょう!
こんな感じですね!
Expanded(
      child: SizedBox(
	width: 70.0,
	height: 70.0,
	child: ElevatedButton(
	  style: ElevatedButton.styleFrom(
	    backgroundColor: Colors.transparent,
	    shape: const CircleBorder(
		side: BorderSide(color: Colors.blue)
	    ),
	  ),
	  onPressed: () {
	    (!started) ? start() : stop();
	  },
	  child: Text(
	    (!started) ? "開始" : "停止",
	    style: const TextStyle(
	      color: Colors.white,
	    ),
	  ),
	),
      ),
    ),
Discussion