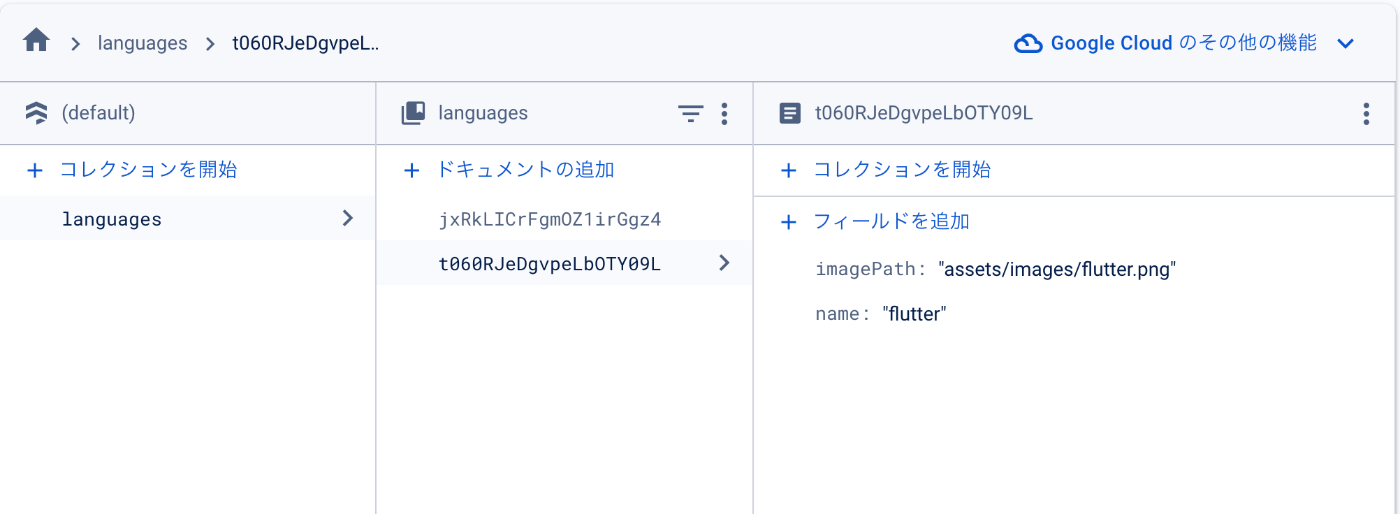
Firestoreにローカルの画像のパスを保存して呼び出す。
読んでほしい人
- Dart3.0のswitch式が気になる人.
- Enumとの組み合わせ
- 決まった画像ならわざわざFirebaseStorageに入れたくない
補足情報
画像がいるので、用意してください。jpeg、pngどちらでも良いです。こんな感じで配置してください。assetsディレクトリまでは、作らなくても良いかも。

YAMLファイルにパッケージと画像の設定を追加しておいてください。
yaml
name: enum_img
description: A new Flutter project.
# The following line prevents the package from being accidentally published to
# pub.dev using `flutter pub publish`. This is preferred for private packages.
publish_to: 'none' # Remove this line if you wish to publish to pub.dev

# The following defines the version and build number for your application.
# A version number is three numbers separated by dots, like 1.2.43
# followed by an optional build number separated by a +.
# Both the version and the builder number may be overridden in flutter
# build by specifying --build-name and --build-number, respectively.
# In Android, build-name is used as versionName while build-number used as versionCode.
# Read more about Android versioning at https://developer.android.com/studio/publish/versioning
# In iOS, build-name is used as CFBundleShortVersionString while build-number is used as CFBundleVersion.
# Read more about iOS versioning at
# https://developer.apple.com/library/archive/documentation/General/Reference/InfoPlistKeyReference/Articles/CoreFoundationKeys.html
# In Windows, build-name is used as the major, minor, and patch parts
# of the product and file versions while build-number is used as the build suffix.
version: 1.0.0+1

environment:
  sdk: '>=3.1.3 <4.0.0'

# Dependencies specify other packages that your package needs in order to work.
# To automatically upgrade your package dependencies to the latest versions
# consider running `flutter pub upgrade --major-versions`. Alternatively,
# dependencies can be manually updated by changing the version numbers below to
# the latest version available on pub.dev. To see which dependencies have newer
# versions available, run `flutter pub outdated`.
dependencies:
  flutter:
    sdk: flutter


  # The following adds the Cupertino Icons font to your application.
  # Use with the CupertinoIcons class for iOS style icons.
  cupertino_icons: ^1.0.2
  flutter_riverpod: ^2.4.9
  riverpod_annotation: ^2.3.3
  firebase_core: ^2.24.2
  cloud_firestore: ^4.14.0

dev_dependencies:
  flutter_test:
    sdk: flutter

  # The "flutter_lints" package below contains a set of recommended lints to
  # encourage good coding practices. The lint set provided by the package is
  # activated in the `analysis_options.yaml` file located at the root of your
  # package. See that file for information about deactivating specific lint
  # rules and activating additional ones.
  flutter_lints: ^2.0.0
  freezed_annotation: ^2.4.1
  build_runner: ^2.4.8
  freezed: ^2.4.6
  json_annotation: ^4.8.1
  json_serializable: ^6.7.1
  riverpod_generator: ^2.3.9
  custom_lint: ^0.5.8
  riverpod_lint: ^2.3.7

# For information on the generic Dart part of this file, see the
# following page: https://dart.dev/tools/pub/pubspec

# The following section is specific to Flutter packages.
flutter:

  # The following line ensures that the Material Icons font is
  # included with your application, so that you can use the icons in
  # the material Icons class.
  uses-material-design: true

  # To add assets to your application, add an assets section, like this:
  assets:
    - assets/images/flutter.png
    - assets/images/xd.png

  # An image asset can refer to one or more resolution-specific "variants", see
  # https://flutter.dev/assets-and-images/#resolution-aware

  # For details regarding adding assets from package dependencies, see
  # https://flutter.dev/assets-and-images/#from-packages

  # To add custom fonts to your application, add a fonts section here,
  # in this "flutter" section. Each entry in this list should have a
  # "family" key with the font family name, and a "fonts" key with a
  # list giving the asset and other descriptors for the font. For
  # example:
  # fonts:
  #   - family: Schyler
  #     fonts:
  #       - asset: fonts/Schyler-Regular.ttf
  #       - asset: fonts/Schyler-Italic.ttf
  #         style: italic
  #   - family: Trajan Pro
  #     fonts:
  #       - asset: fonts/TrajanPro.ttf
  #       - asset: fonts/TrajanPro_Bold.ttf
  #         weight: 700
  #
  # For details regarding fonts from package dependencies,
  # see https://flutter.dev/custom-fonts/#from-packages
Firestoreに、languageコレクションIDを作成して画像の名前とパスの場所を保存してください。nameはなんでも良いけど、パスはローカルのフォルダを指定してください。正しくないと読み込めません😱

記事の内容
Firestoreに画像を保存しなくても実は、端末で特定のデータだと決まっていればローカルの画像を表示して使う方法があります。僕もやったことないのでできるか疑問でしたが⁉️
まずは、モデルクラスをつくっておいてください。値を保持するクラスが必要です。これに引数を渡して、Enumで使うと、どのデータか特定することができます。
📦モデルを作る
モデル
import 'package:freezed_annotation/freezed_annotation.dart';
import 'package:flutter/foundation.dart';
part 'language.freezed.dart';
part 'language.g.dart';
class Language with _$Language {
const factory Language({
required String name,
required String imagePath,
}) = _Language;
factory Language.fromJson(Map<String, dynamic> json) =>
_$LanguageFromJson(json);
}
💁♂️Enumを考えてみた
昔のEnumだと、extensionとcase、returnの組み合わせだったりする。これでも動きますよ。でも最近は、この書き方だといけてないらしい???
Swiftだと、クラスでもEnumでもextension使うけど、SwiftのはEnumでしかできないことがあるらしい。
例えば、Swiftのenumは非常に強力で、関連値やメソッドを持つことができるとのこと???
Kotlinにもあったような。
それは置いておいて、これがサンプル
古い方
enum ImageType {
  flutter,
  xd,
}

extension on ImageType {
  Language get language {
    switch (this) {
      case ImageType.flutter:
        return const Language(
            name: 'flutter', imagePath: 'assets/images/flutter.png');
      case ImageType.xd:
        return const Language(name: 'xd', imagePath: 'assets/images/xd.png');
    }
  }
}
Dart3.0からは、switch式なるものが出てきました。最近色々試していて、switchでパターンマッチングとか色々あるのですけど、今回は、ゲッター(これはメソッドなんですけど)を使って、switch式とEnumの値でFreezedで作成したメソッドに引数を渡して、flutterとxdという画像を探してきてもろうロジックを作ってます。
新しい方
enum ImageType {
  flutter,
  xd;

  Language get language => switch (this) {
        flutter => const Language(name: 'flutter', imagePath: 'assets/images/flutter.png'),
        xd => const Language(name: 'xd', imagePath: 'assets/images/xd.png'),
      };
}
StreamProviderでEnumとFreezdを使ってみようと思います。FutureProviderでも良い気がしますけどね。こんな感じで、Firestoreから、languagesコレクションIDの情報を取得しています。
yieldについてですが、Pythonの経験がある僕の意見だと、メモリの消費量を抑えてくれるものだと、認識してます。
プロバイダー
import 'package:cloud_firestore/cloud_firestore.dart';
import 'package:enum_img/model/language.dart';
import 'package:riverpod_annotation/riverpod_annotation.dart';
part 'language_provider.g.dart';
enum ImageType {
flutter,
xd;
Language get language => switch (this) {
flutter => const Language(name: 'flutter', imagePath: 'assets/images/flutter.png'),
xd => const Language(name: 'xd', imagePath: 'assets/images/xd.png'),
};
}
Stream<List<Language>> languageStream(LanguageStreamRef ref) async* {
final store = FirebaseFirestore.instance;
final snapshot = store.collection('languages').snapshots();
await for (final snap in snapshot) {
yield snap.docs.map((doc) {
final data = doc.data();
final name = data['name'] as String;
final imagePath = data['imagePath'] as String;
return Language(name: name, imagePath: imagePath);
}).toList();
}
}
今回は、main.dartにViewのコードを全て書いてます。小さなアプリですからね。練習するなら小さいアプリの方が分かりやすいのですよ。
main.dart
import 'package:enum_img/firebase_options.dart';
import 'package:enum_img/provider/language_provider.dart';
import 'package:firebase_core/firebase_core.dart';
import 'package:flutter/material.dart';
import 'package:flutter_riverpod/flutter_riverpod.dart';
void main() async {
WidgetsFlutterBinding.ensureInitialized();
await Firebase.initializeApp(options: DefaultFirebaseOptions.currentPlatform);
runApp(const ProviderScope(child: MyApp()));
}
class MyApp extends StatelessWidget {
const MyApp({super.key});
Widget build(BuildContext context) {
return MaterialApp(
title: 'Flutter Demo',
theme: ThemeData(
colorScheme: ColorScheme.fromSeed(seedColor: Colors.deepPurple),
useMaterial3: true,
),
home: const MyHomePage(),
);
}
}
class MyHomePage extends ConsumerWidget {
const MyHomePage({super.key});
Widget build(BuildContext context, WidgetRef ref) {
final languages = ref.watch(languageStreamProvider);
return Scaffold(
appBar: AppBar(title: const Text('新しいEnum generator')),
body: languages.when(
data: (languages) {
return GridView.builder(
gridDelegate: const SliverGridDelegateWithFixedCrossAxisCount(
crossAxisCount: 2,
childAspectRatio: 1,
),
itemCount: languages.length,
itemBuilder: (context, index) {
final language = languages[index];
return Column(
children: [
Expanded(
child: Image.asset(language.imagePath,
width: 150, height: 150),
),
Text(language.name),
],
);
},
);
},
loading: () => const Center(child: CircularProgressIndicator()),
error: (error, stackTrace) => Center(child: Text(error.toString())),
),
);
}
}
実行結果はこんな感じですね。FutterとAdobeXDの画像が表示されます。最初Typoして、Flutterの画像だけ表示されてませんでした!

最後に
今回は、ローカルの画像を使ってGridViewにFirestoreのデータで、FlutterとXDの画像を表示させました。決まった画像しか使わないならローカルに配置してしまえばおそらくコスト削減になるでしょう。作っても多分、6〜8個ぐらいだろうし。
参考になった記事:
Discussion