


flutter camera
概要
これは、デバイスのカメラへのアクセスを可能にする、iOS、Android、およびWeb用のFlutterプラグインです。
- ウィジェット内にライブカメラプレビューを表示します。
- スナップショットをキャプチャしてファイルに保存できます。
- ビデオを録画します。
- Dartからイメージストリームへのアクセスを追加します。
📸カメラパッケージを使ってみた
cameraというパッケージを使ってみた。使ってみたと言っても公式のコードをそのまま使ってみただけ。写真撮影はできなかったです。もう少し改良が必要。
add package:
flutter pub add camera
YouTubeの動画を参考に、iOS, Androidの設定をしていきましょう。
iOS
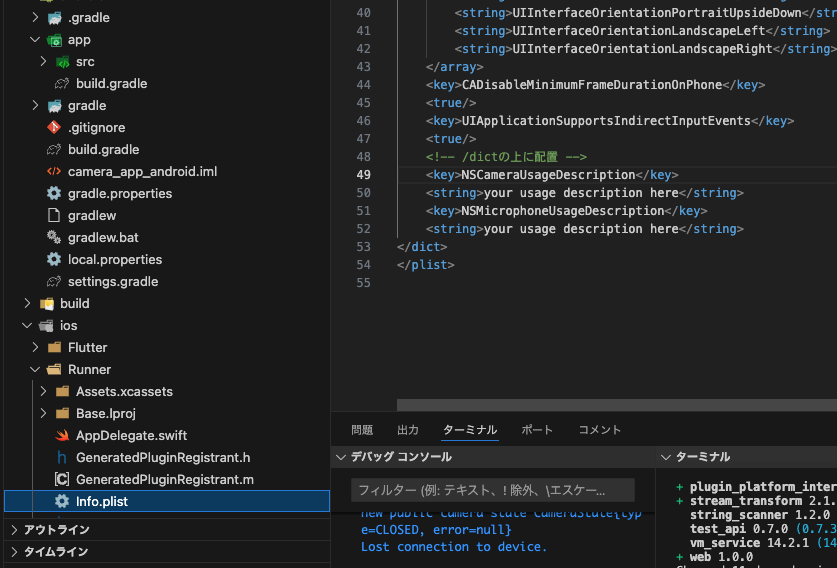
Add two rows to the ios/Runner/Info.plist:
one with the key Privacy - Camera Usage Description and a usage description.
and one with the key Privacy - Microphone Usage Description and a usage description.
If editing Info.plist as text, add:
<key>NSCameraUsageDescription</key>
<string>your usage description here</string>
<key>NSMicrophoneUsageDescription</key>
<string>your usage description here</string>
Android
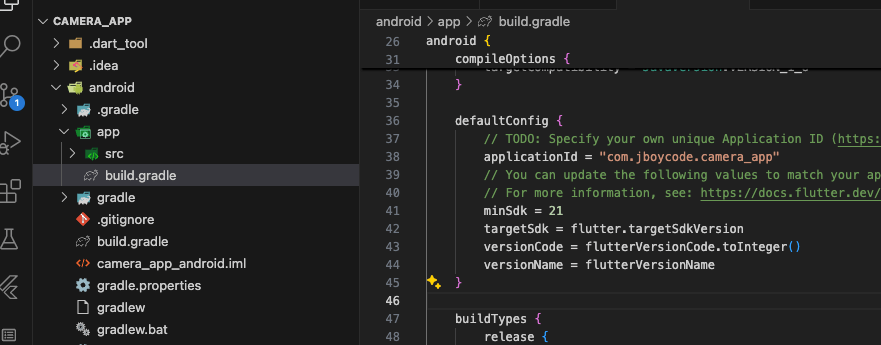
Change the minimum Android sdk version to 21 (or higher) in your android/app/build.gradle file.
minSdkVersion 21
CameraControllerの設定ができれば、カメラは使えます。実機でないと試せないかとやってみましたが、撮影するボタンがない罠があった😅
ちょっと機能追加が必要みたいすね。image_pickerだと、カメラ機能ついていたような???
example
import 'package:camera/camera.dart';
import 'package:flutter/material.dart';
late List<CameraDescription> _cameras;
void main() async {
WidgetsFlutterBinding.ensureInitialized();
_cameras = await availableCameras();
runApp(const MyApp());
}
class MyApp extends StatelessWidget {
const MyApp({super.key});
@override
Widget build(BuildContext context) {
return MaterialApp(
title: 'Flutter Demo',
theme: ThemeData(
colorScheme: ColorScheme.fromSeed(seedColor: Colors.deepPurple),
useMaterial3: true,
),
home: const MyHomePage(title: 'Flutter Demo Home Page'),
);
}
}
class MyHomePage extends StatefulWidget {
const MyHomePage({super.key, required this.title});
final String title;
@override
State<MyHomePage> createState() => _MyHomePageState();
}
class _MyHomePageState extends State<MyHomePage> {
late CameraController controller;
@override
void initState() {
super.initState();
controller = CameraController(_cameras[0], ResolutionPreset.max);
controller.initialize().then((_) {
if (!mounted) {
return;
}
setState(() {});
}).catchError((Object e) {
if (e is CameraException) {
switch (e.code) {
case 'CameraAccessDenied':
// Handle access errors here.
default:
// Handle other errors here.
}
}
});
}
@override
void dispose() {
controller.dispose();
super.dispose();
}
@override
Widget build(BuildContext context) {
if (!controller.value.isInitialized) {
return Container();
}
return Scaffold(
appBar: AppBar(
title: Text(widget.title),
),
body: CameraPreview(
controller
),
);
}
}
感想
カメラのプレビューを試すぐらいのサンプルのようですね。もし何かカメラアプリを作りたい人がいたらこちらの記事を参考にした方が良いと思われます。
2025年12月追加
camera packageのズームインとズームアウトの機能をジェスチャーを使用して再現したソースコードを作ってみました。写真を撮るとスマートフォンの写真アプリに保存されます。Androidのみで検証しております。
改良版
import 'package:camera/camera.dart';
import 'package:flutter/material.dart';
import 'package:gal/gal.dart';
late List<CameraDescription> _cameras;
Future<void> main() async {
WidgetsFlutterBinding.ensureInitialized();
_cameras = await availableCameras();
runApp(const CameraApp());
}
/// CameraApp is the Main Application.
class CameraApp extends StatefulWidget {
/// Default Constructor
const CameraApp({super.key});
@override
State<CameraApp> createState() => _CameraAppState();
}
class _CameraAppState extends State<CameraApp> {
late CameraController controller;
double _minZoomLevel = 1.0;
double _maxZoomLevel = 1.0;
double _currentZoomLevel = 1.0;
double _baseZoomLevel = 1.0;
FlashMode _flashMode = FlashMode.off;
bool _isTimerEnabled = false;
int _countdown = 0;
@override
void initState() {
super.initState();
controller = CameraController(_cameras[0], ResolutionPreset.max);
controller.initialize().then((_) {
if (!mounted) {
return;
}
controller.getMaxZoomLevel().then((value) => _maxZoomLevel = value);
controller.getMinZoomLevel().then((value) => _minZoomLevel = value);
controller.setFlashMode(_flashMode);
setState(() {});
}).catchError((Object e) {
if (e is CameraException) {
switch (e.code) {
case 'CameraAccessDenied':
// Handle access errors here.
break;
default:
// Handle other errors here.
break;
}
}
});
}
@override
void dispose() {
controller.dispose();
super.dispose();
}
Future<void> _takePicture() async {
if (!controller.value.isInitialized) {
return;
}
if (controller.value.isTakingPicture) {
return;
}
if (_isTimerEnabled) {
setState(() {
_countdown = 3;
});
for (int i = 3; i > 0; i--) {
await Future.delayed(const Duration(seconds: 1));
if (!mounted) return;
setState(() {
_countdown = i - 1;
});
}
}
try {
final XFile file = await controller.takePicture();
await Gal.putImage(file.path);
if (mounted) {
ScaffoldMessenger.of(context).showSnackBar(
const SnackBar(content: Text('Saved to gallery!')),
);
}
} catch (e) {
debugPrint(e.toString());
} finally {
if (mounted) {
setState(() {
_countdown = 0;
});
}
}
}
Future<void> _setZoom(double zoom) async {
if (!controller.value.isInitialized) {
return;
}
// Clamp the zoom level
final double newZoom = zoom.clamp(_minZoomLevel, _maxZoomLevel);
await controller.setZoomLevel(newZoom);
setState(() {
_currentZoomLevel = newZoom;
});
}
void _handleScaleStart(ScaleStartDetails details) {
_baseZoomLevel = _currentZoomLevel;
}
Future<void> _handleScaleUpdate(ScaleUpdateDetails details) async {
// details.scale is the scale factor since the start of the gesture
final double newZoom = _baseZoomLevel * details.scale;
await _setZoom(newZoom);
}
void _toggleFlash() {
FlashMode newMode;
if (_flashMode == FlashMode.off) {
newMode = FlashMode.auto;
} else if (_flashMode == FlashMode.auto) {
newMode = FlashMode.always;
} else {
newMode = FlashMode.off;
}
controller.setFlashMode(newMode).then((_) {
setState(() {
_flashMode = newMode;
});
});
}
void _toggleTimer() {
setState(() {
_isTimerEnabled = !_isTimerEnabled;
});
}
@override
Widget build(BuildContext context) {
if (!controller.value.isInitialized) {
return Container();
}
return MaterialApp(
home: Scaffold(
body: Stack(
children: [
GestureDetector(
onScaleStart: _handleScaleStart,
onScaleUpdate: _handleScaleUpdate,
child: Center(child: CameraPreview(controller)),
),
// Controls
Positioned(
top: 50,
right: 20,
child: Column(
children: [
IconButton(
icon: Icon(
_flashMode == FlashMode.off
? Icons.flash_off
: (_flashMode == FlashMode.auto
? Icons.flash_auto
: Icons.flash_on),
color: Colors.white,
size: 30,
),
onPressed: _toggleFlash,
),
const SizedBox(height: 20),
IconButton(
icon: Icon(
_isTimerEnabled ? Icons.timer_3 : Icons.timer_off,
color: Colors.white,
size: 30,
),
onPressed: _toggleTimer,
),
],
),
),
Positioned(
bottom: 30,
left: 0,
right: 0,
child: Center(
child: FloatingActionButton(
onPressed: _takePicture,
child: const Icon(Icons.camera_alt),
),
),
),
if (_countdown > 0)
Center(
child: Text(
'$_countdown',
style: const TextStyle(
color: Colors.white,
fontSize: 80,
fontWeight: FontWeight.bold,
shadows: [
Shadow(
blurRadius: 10.0,
color: Colors.black,
offset: Offset(2.0, 2.0),
),
],
),
),
),
],
),
),
);
}
}
flutter_hooks対応もしてみた。
StatefulWidgetだとsetStateを使うと、全てのWidgetを構築するのでパフォーマンスが良くなかったりする。Riverpodを使うべきか?
UIの場合は、flutter_hooksを使う方が適切。なぜなら、カメラを1ページでしか使わないので全ての場所で状態管理できるRiverpodを使う必要はない。
flutter_hooks対応
import 'package:camera/camera.dart';
import 'package:flutter/material.dart';
import 'package:flutter_hooks/flutter_hooks.dart'; // 追加
import 'package:gal/gal.dart';
late List<CameraDescription> _cameras;
Future<void> main() async {
WidgetsFlutterBinding.ensureInitialized();
_cameras = await availableCameras();
runApp(const MaterialApp(home: CameraScreen()));
}
class CameraScreen extends HookWidget {
const CameraScreen({super.key});
@override
Widget build(BuildContext context) {
// 1. コントローラーの作成(一度だけ実行される)
final controller = useMemoized(
() => CameraController(_cameras[0], ResolutionPreset.max));
// 2. 初期化状態とライフサイクル管理
final isInitialized = useState(false);
useEffect(() {
controller.initialize().then((_) {
isInitialized.value = true;
}).catchError((Object e) {
// エラーハンドリング
});
// ウィジェット破棄時にコントローラーも破棄
return controller.dispose;
}, [controller]);
// 3. 各種状態管理
final currentZoomLevel = useState(1.0);
final flashMode = useState(FlashMode.off);
final isTimerEnabled = useState(false);
final countdown = useState(0);
// ズーム用のベース値を保持
final baseZoomLevel = useRef(1.0);
// 初期化前はローディングなどを表示
if (!isInitialized.value) {
return const Scaffold(body: Center(child: CircularProgressIndicator()));
}
// 関数定義(useCallbackを使うと再描画時の再生成を防げますが、この規模なら直接関数でも可)
Future<void> takePicture() async {
if (controller.value.isTakingPicture) return;
if (isTimerEnabled.value) {
countdown.value = 3;
for (int i = 3; i > 0; i--) {
await Future.delayed(const Duration(seconds: 1));
if (!context.mounted) return;
countdown.value = i - 1;
}
}
try {
final XFile file = await controller.takePicture();
await Gal.putImage(file.path);
if (context.mounted) {
ScaffoldMessenger.of(context).showSnackBar(
const SnackBar(content: Text('Saved to gallery!')),
);
}
} catch (e) {
debugPrint(e.toString());
} finally {
countdown.value = 0;
}
}
void toggleFlash() {
FlashMode newMode;
if (flashMode.value == FlashMode.off) {
newMode = FlashMode.auto;
} else if (flashMode.value == FlashMode.auto) {
newMode = FlashMode.always;
} else {
newMode = FlashMode.off;
}
controller.setFlashMode(newMode).then((_) {
flashMode.value = newMode;
});
}
return Scaffold(
body: Stack(
children: [
GestureDetector(
onScaleStart: (details) {
baseZoomLevel.value = currentZoomLevel.value;
},
onScaleUpdate: (details) async {
final double newZoom = (baseZoomLevel.value * details.scale)
.clamp(1.0, await controller.getMaxZoomLevel());
await controller.setZoomLevel(newZoom);
currentZoomLevel.value = newZoom;
},
child: Center(child: CameraPreview(controller)),
),
// ... UI部分はほぼ同じ ...
Positioned(
top: 50,
right: 20,
child: Column(
children: [
IconButton(
icon: Icon(
flashMode.value == FlashMode.off
? Icons.flash_off
: (flashMode.value == FlashMode.auto
? Icons.flash_auto
: Icons.flash_on),
color: Colors.white,
size: 30,
),
onPressed: toggleFlash,
),
const SizedBox(height: 20),
IconButton(
icon: Icon(
isTimerEnabled.value ? Icons.timer_3 : Icons.timer_off,
color: Colors.white,
size: 30,
),
onPressed: () => isTimerEnabled.value = !isTimerEnabled.value,
),
],
),
),
Positioned(
bottom: 30,
left: 0,
right: 0,
child: Center(
child: FloatingActionButton(
onPressed: takePicture,
child: const Icon(Icons.camera_alt),
),
),
),
if (countdown.value > 0)
Center(
child: Text(
'${countdown.value}',
style: const TextStyle(
color: Colors.white,
fontSize: 80,
fontWeight: FontWeight.bold,
shadows: [
Shadow(
blurRadius: 10.0,
color: Colors.black,
offset: Offset(2.0, 2.0),
),
],
),
),
),
],
),
);
}
}
Discussion