💶
Node.jsでStripeを使ってみた
対象者
- Stripeに興味がある人
- Stripeのアカウントを持っている人
やること/やらないこと
やること:
- Testモードで決済をやってみる
- Test用のクレジット番号を入力する
やらないこと:
- 領収証の発行機能はつけません
プロジェクトの説明
Node.jsを使って今回は決済システムの構築をやってみようと思います。秘密鍵は見えないように環境変数に隠して安全に扱えるようにします。
npmを初期化する
npm init -y
.envファイルを作成する
touch .env
これを書く
WAKUWAKU_XXX=12345
WAKUWAKU_YYY=67891
server.jsを作成して実行する
require('dotenv').config()

const env = process.env
console.log(env.WAKUWAKU_XXX)
console.log(env.WAKUWAKU_YYY)
ターミナルでコマンドを実行する
node server.js
実行結果:
12345
67891
使えるかテストする。
環境変数を導入する
npm i dotenv
-
express, nodemon, stripeをインストールする
npm i express
npm i nodemon
npm i stripe
- publicディレクトリを作成して、
index.htmlを配置する
    <!DOCTYPE html>
    <html lang="en">
    <head>
        <meta charset="UTF-8">
        <meta http-equiv="X-UA-Compatible" content="IE=edge">
        <meta name="viewport" content="width=device-width, initial-scale=1.0">
        <title>Document</title>
    </head>
    <body>
        <form action="/create-checkout-session" method="post">
            <p>2000円の商品です</p>
            <button type="submit">Checkout</button>
        </form>
    </body>
    </html>
-
success.htmlを作成する。決済が完了するとこのページにリダイレクトする。領収証の機能は使えません🙅
<!DOCTYPE html>
<html>
  <head>
    <title>Thanks for your order!</title>
    <link rel="stylesheet" href="style.css" />
    <script src="client.js" defer></script>
  </head>
  <body>
    <section>
      <div class="product Box-root">
        <div class="description Box-root">
          <h3>俺ちゃんプランに加入しました!</h3>
        </div>
      </div>
      <form action="/create-portal-session" method="POST">
        <input type="hidden" id="session-id" name="session_id" value="" />
        <button id="checkout-and-portal-button" type="submit">
          領収書を確認する
        </button>
      </form>
    </section>
  </body>
</html>
秘密鍵を.envに設定する
TEST_KEY=sk_test_51N5LiSHTIXj8ui****************************
Stripeの機能を実装したJavaScriptのコードを書く:
require("dotenv").config();
const stripe = require("stripe")(
    process.env.TEST_KEY
);

const express = require("express");
const app = express();
app.use(express.static("public"));
app.use(express.urlencoded({ extended: true }));
app.use(express.json());

const YOUR_DOMAIN = "http://localhost:3000";

app.post("/create-checkout-session", async (req, res) => {

  try {
    const prices = await stripe.prices.list({});
    // console.log(prices);
    const session = await stripe.checkout.sessions.create({
      billing_address_collection: "auto",
      line_items: [
        {
          price: prices.data[0].id,
          // For metered billing, do not pass quantity
          quantity: 1,
        },
      ],
      mode: "subscription",
      success_url: `${YOUR_DOMAIN}/success.html?session_id={CHECKOUT_SESSION_ID}`,
      cancel_url: `${YOUR_DOMAIN}/cancel.html`,
    });

    res.redirect(303, session.url);
  } catch (err) {
    console.log(err);
  }
});

app.post("/create-portal-session", async (req, res) => {
  // For demonstration purposes, we're using the Checkout session to retrieve the customer ID.
  // Typically this is stored alongside the authenticated user in your database.

  const { session_id } = req.body;
  const checkoutSession = await stripe.checkout.sessions.retrieve(session_id);

  // This is the url to which the customer will be redirected when they are done
  // managing their billing with the portal.
  const returnUrl = YOUR_DOMAIN;

  const portalSession = await stripe.billingPortal.sessions.create({
    customer: checkoutSession.customer,
    return_url: returnUrl,
  });

  console.log(portalSession.url);
  res.redirect(303, portalSession.url);
});

app.post(
  "/webhook",
  express.raw({ type: "application/json" }),
  (request, response) => {
    const event = request.body;
    // Replace this endpoint secret with your endpoint's unique secret
    // If you are testing with the CLI, find the secret by running 'stripe listen'
    // If you are using an endpoint defined with the API or dashboard, look in your webhook settings
    // at https://dashboard.stripe.com/webhooks
    const endpointSecret = "whsec_12345";
    // Only verify the event if you have an endpoint secret defined.
    // Otherwise use the basic event deserialized with JSON.parse
    if (endpointSecret) {
      // Get the signature sent by Stripe
      const signature = request.headers["stripe-signature"];
      try {
        event = stripe.webhooks.constructEvent(
          request.body,
          signature,
          endpointSecret
        );
      } catch (err) {
        console.log(`⚠️  Webhook signature verification failed.`, err.message);
        return response.sendStatus(400);
      }
    }
    let subscription;
    let status;
    // Handle the event
    switch (event.type) {
      case "customer.subscription.trial_will_end":
        subscription = event.data.object;
        status = subscription.status;
        console.log(`Subscription status is ${status}.`);
        // Then define and call a method to handle the subscription trial ending.
        // handleSubscriptionTrialEnding(subscription);
        break;
      case "customer.subscription.deleted":
        subscription = event.data.object;
        status = subscription.status;
        console.log(`Subscription status is ${status}.`);
        // Then define and call a method to handle the subscription deleted.
        // handleSubscriptionDeleted(subscriptionDeleted);
        break;
      case "customer.subscription.created":
        subscription = event.data.object;
        status = subscription.status;
        console.log(`Subscription status is ${status}.`);
        // Then define and call a method to handle the subscription created.
        // handleSubscriptionCreated(subscription);
        break;
      case "customer.subscription.updated":
        subscription = event.data.object;
        status = subscription.status;
        console.log(`Subscription status is ${status}.`);
        // Then define and call a method to handle the subscription update.
        // handleSubscriptionUpdated(subscription);
        break;
      default:
        // Unexpected event type
        console.log(`Unhandled event type ${event.type}.`);
    }
    // Return a 200 response to acknowledge receipt of the event
    response.send();
  }
);

app.listen(3000, () => console.log("Running on port 3000"));
仮の商品が必要なので、Stripのコンソールで作成してください。
テスト用の💳クレジットカードの番号はこちらにあります。
ローカルサーバーを起動して、このURLにアクセスする。
npm run dev

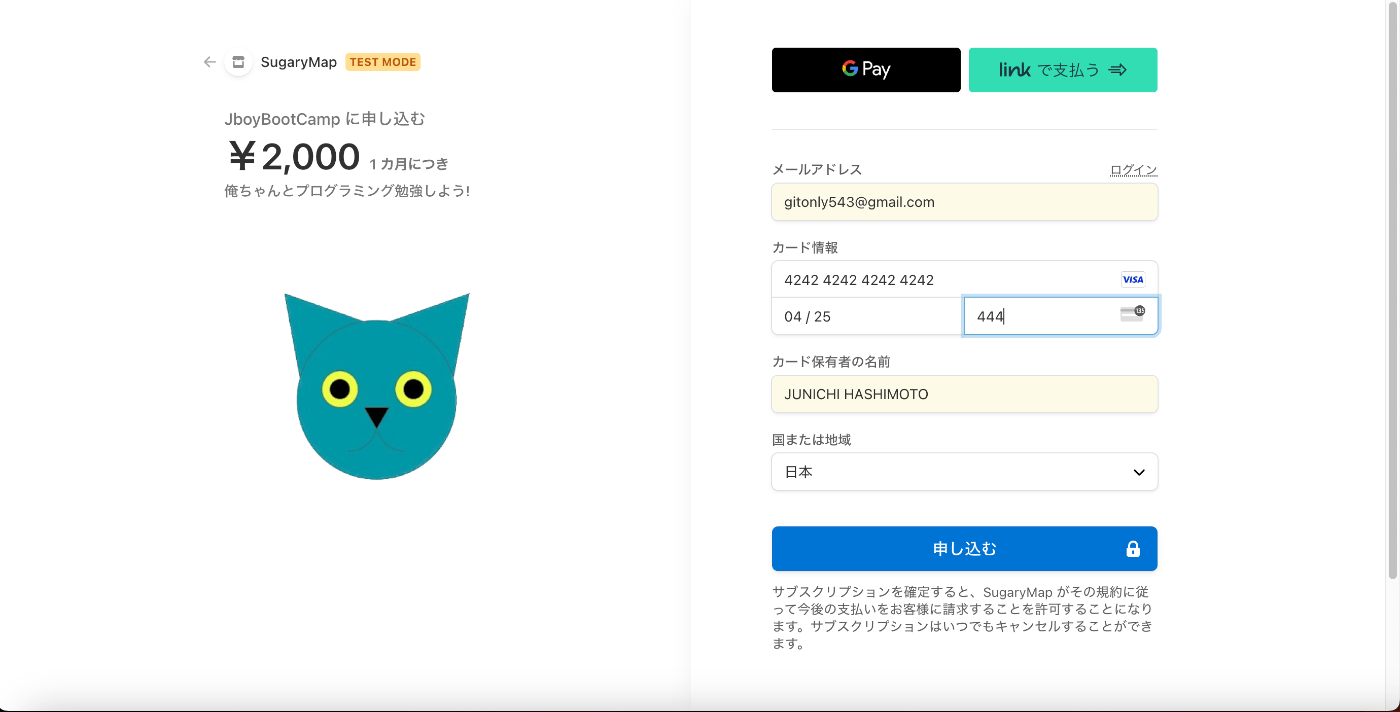

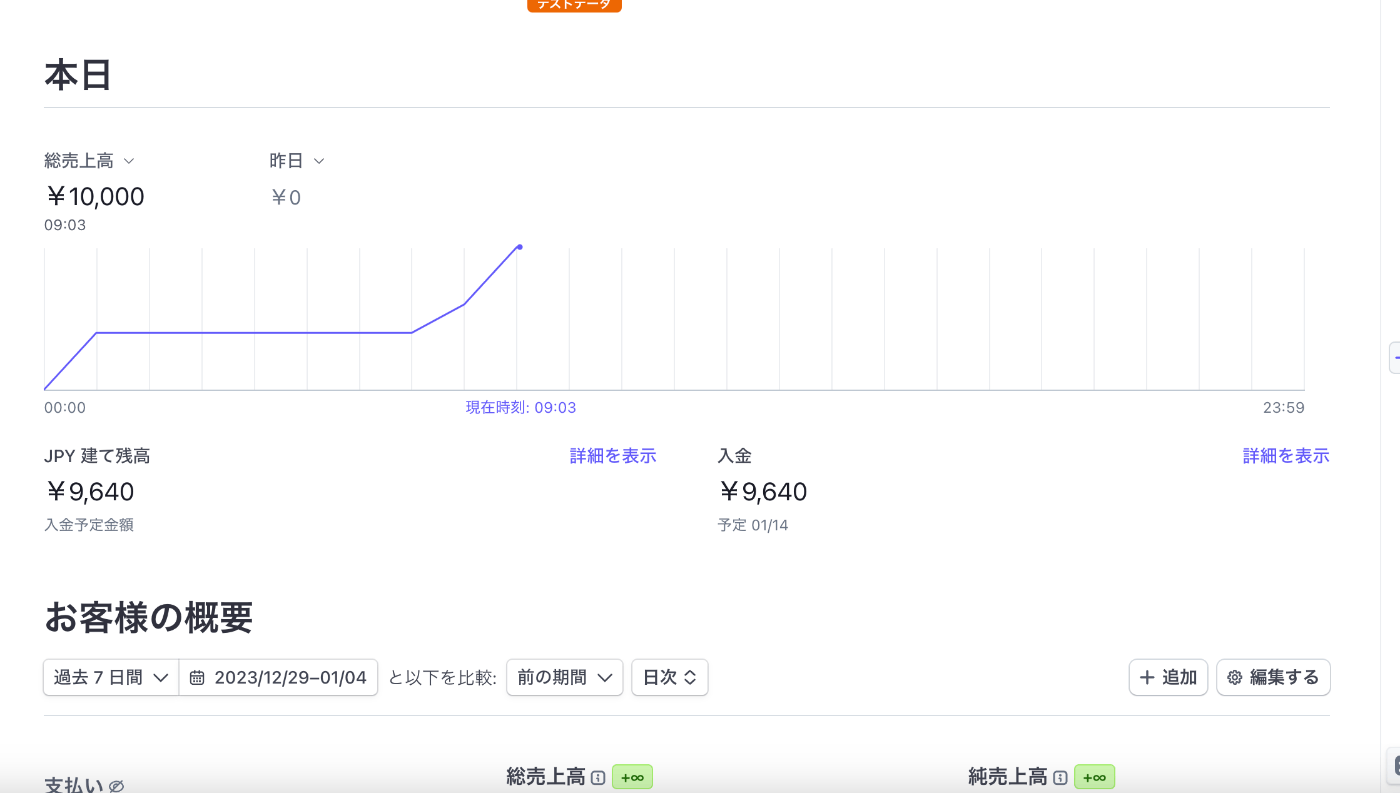
何度か実験して、Testモードで決済された履歴があるので決済に成功しているようです。
感想
Node.jsをnpmのパッケージとStripeの外部サービスと連携させて簡単な気がしなかったが決済システムを作ってみました。
今回参考にした動画:
Discussion