🫡
MediaQueryについて学んでみる
端末ごとのサイズ調整したい
MediaQueryを使うとスマートフォンの画面の幅と高さのサイズを取得できます。これを使うとどんなメリットがあるのかというと、テックフォードアカデミーの学生さんによると、サイズ調整ができるContainerと組み合わせて、端末ごとのズレを無くすことに役立つようです。
実際に使ってみて検証してみました!
こちらは以前書いていたソースコード
import 'package:flutter/material.dart';
void main() {
runApp(const MyApp());
}
class MyApp extends StatelessWidget {
const MyApp({super.key});
// This widget is the root of your application.
Widget build(BuildContext context) {
return MaterialApp(
title: 'Flutter Demo',
theme: ThemeData(
primarySwatch: Colors.blue,
),
home: const DummyBuy(),
);
}
}
class DummyBuy extends StatefulWidget {
const DummyBuy({Key? key}) : super(key: key);
State<DummyBuy> createState() => _DummyBuyState();
}
class _DummyBuyState extends State<DummyBuy> {
int counter = 0;
void decrement() {
setState(() {
counter--;
});
}
void increment() {
setState(() {
counter++;
});
}
Widget build(BuildContext context) {
return Scaffold(
appBar: AppBar(
centerTitle: true,
title: const Text('予約する'),
),
body: SingleChildScrollView(
child: Center(
child: Column(
children: <Widget>[
SizedBox(height: 20),
Container(
color: Colors.grey,
width: 300,
height: 150,
),
SizedBox(height: 10),
Container(width: 300, child: Text('ショートケーキ5号')),
SizedBox(height: 10),
Container(
width: 300,
child: Text('直径15cm、4〜6人分です。フルーツがいっぱいのっている贅沢なケーキです。')),
SizedBox(height: 20),
Container(
width: 300,
child: TextFormField(
maxLines: 5,
keyboardType: TextInputType.multiline,
decoration: InputDecoration(
hintText:
"(例)食物アレルギーでキゥイがダメ、メッセージプレートの内容が、英語でHappy Birthday",
border: OutlineInputBorder()),
),
),
SizedBox(height: 20),
Container(
width: 300,
child: Row(
children: [
TextButton(
onPressed: () {
decrement();
},
child: const Text('-', style: TextStyle(fontSize: 20))),
const SizedBox(width: 10),
Text(counter.toString()),
const SizedBox(width: 10),
TextButton(
onPressed: () {
increment();
},
child: const Text('+', style: TextStyle(fontSize: 20))),
],
),
),
const SizedBox(height: 20),
ElevatedButton(onPressed: () {}, child: const Text('カートに追加する')),
],
),
),
),
);
}
}
これは、無駄があったりした!
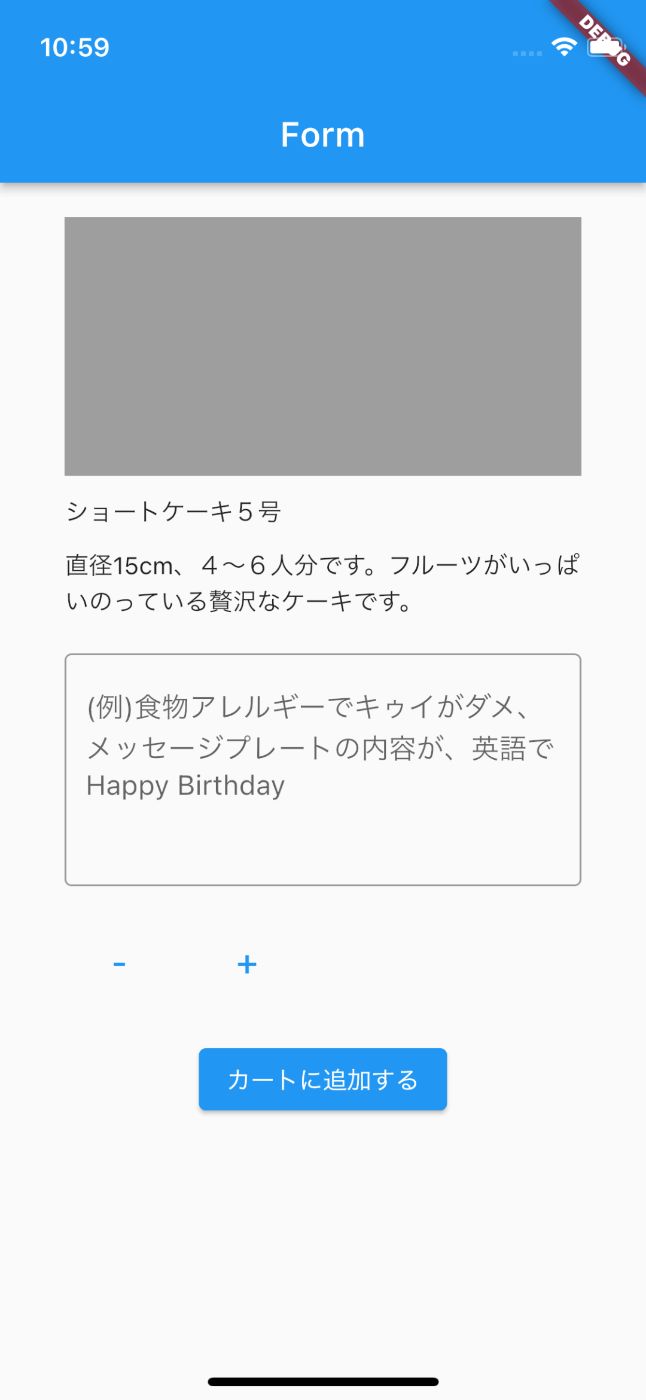
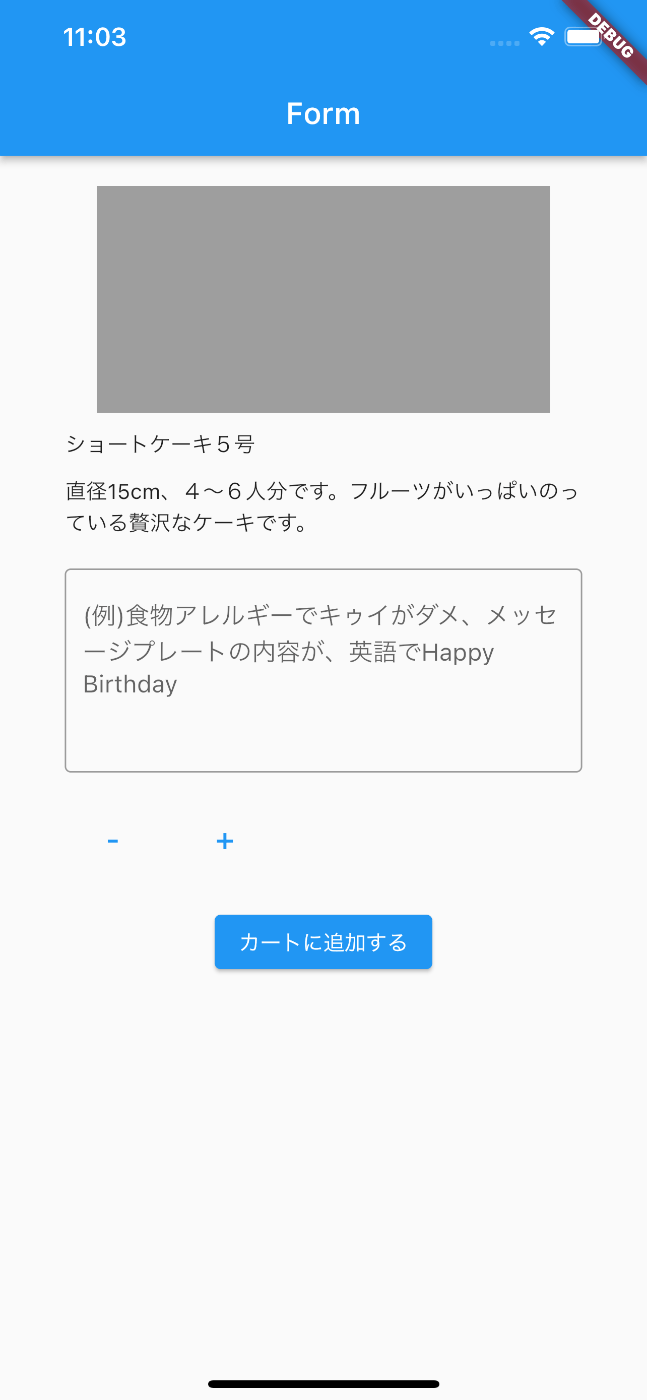
各所にContainerで囲んだWidgetがあります。トップレベルのColumnをcontainerでラップして横幅を指定するといい感じになるとのこと!
設定を変えてみる
MediaQueryを使ってみて端末ごとにレイアウトを変えてみる。タブレットは別の設定が必要なので、これだけでは、対応できなかったですね😅
iPhone13

import 'package:flutter/material.dart';
void main() {
runApp(const MyApp());
}
class MyApp extends StatelessWidget {
const MyApp({super.key});
// This widget is the root of your application.
Widget build(BuildContext context) {
return MaterialApp(
title: 'Flutter Demo',
theme: ThemeData(
primarySwatch: Colors.blue,
),
home: const FormExample(),
);
}
}
class FormExample extends StatelessWidget {
const FormExample({Key? key}) : super(key: key);
Widget build(BuildContext context) {
final deviceWidth = MediaQuery.of(context).size.width;
final deviceHeight = MediaQuery.of(context).size.height;
print('width: $deviceWidth'); // flutter: width: 375.0
print('height $deviceHeight'); // flutter: height 812.0
return Scaffold(
appBar: AppBar(
title: const Text('Form'),
),
body: SingleChildScrollView(
child: Center(
child: Container(
width: deviceWidth * 0.8,
child: Column(
children: <Widget>[
SizedBox(height: 20),
Container(
color: Colors.grey,
width: 300,
height: 150,
),
SizedBox(height: 10),
Container(width: deviceWidth * 0.8, child: Text('ショートケーキ5号')),
SizedBox(height: 10),
Text('直径15cm、4〜6人分です。フルーツがいっぱいのっている贅沢なケーキです。'),
SizedBox(height: 20),
TextFormField(
maxLines: 5,
keyboardType: TextInputType.multiline,
decoration: InputDecoration(
hintText:
"(例)食物アレルギーでキゥイがダメ、メッセージプレートの内容が、英語でHappy Birthday",
border: OutlineInputBorder()),
),
SizedBox(height: 20),
Row(
children: [
TextButton(
onPressed: () {},
child: const Text('-', style: TextStyle(fontSize: 20))),
const SizedBox(width: 10),
TextButton(
onPressed: () {},
child: const Text('+', style: TextStyle(fontSize: 20))),
],
),
const SizedBox(height: 20),
ElevatedButton(onPressed: () {}, child: const Text('カートに追加する')),
],
),
),
),
),
);
}
}
iPhone13 mini

import 'package:flutter/material.dart';
void main() {
runApp(const MyApp());
}
class MyApp extends StatelessWidget {
const MyApp({super.key});
// This widget is the root of your application.
Widget build(BuildContext context) {
return MaterialApp(
title: 'Flutter Demo',
theme: ThemeData(
primarySwatch: Colors.blue,
),
home: const FormExample(),
);
}
}
class FormExample extends StatelessWidget {
const FormExample({Key? key}) : super(key: key);
Widget build(BuildContext context) {
final deviceWidth = MediaQuery.of(context).size.width;
final deviceHeight = MediaQuery.of(context).size.height;
print('width: $deviceWidth'); // flutter: width: 375.0
print('height $deviceHeight'); // flutter: height 812.0
return Scaffold(
appBar: AppBar(
title: const Text('Form'),
),
body: SingleChildScrollView(
child: Center(
child: Container(
width: deviceWidth * 0.8,
child: Column(
children: <Widget>[
SizedBox(height: 20),
Container(
color: Colors.grey,
width: 300,
height: 150,
),
SizedBox(height: 10),
Container(width: deviceWidth * 0.8, child: Text('ショートケーキ5号')),
SizedBox(height: 10),
Text('直径15cm、4〜6人分です。フルーツがいっぱいのっている贅沢なケーキです。'),
SizedBox(height: 20),
TextFormField(
maxLines: 5,
keyboardType: TextInputType.multiline,
decoration: InputDecoration(
hintText:
"(例)食物アレルギーでキゥイがダメ、メッセージプレートの内容が、英語でHappy Birthday",
border: OutlineInputBorder()),
),
SizedBox(height: 20),
Row(
children: [
TextButton(
onPressed: () {},
child: const Text('-', style: TextStyle(fontSize: 20))),
const SizedBox(width: 10),
TextButton(
onPressed: () {},
child: const Text('+', style: TextStyle(fontSize: 20))),
],
),
const SizedBox(height: 20),
ElevatedButton(onPressed: () {}, child: const Text('カートに追加する')),
],
),
),
),
),
);
}
}
iPhone13 Pro Mac

import 'package:flutter/material.dart';
void main() {
runApp(const MyApp());
}
class MyApp extends StatelessWidget {
const MyApp({super.key});
// This widget is the root of your application.
Widget build(BuildContext context) {
return MaterialApp(
title: 'Flutter Demo',
theme: ThemeData(
primarySwatch: Colors.blue,
),
home: const FormExample(),
);
}
}
class FormExample extends StatelessWidget {
const FormExample({Key? key}) : super(key: key);
Widget build(BuildContext context) {
final deviceWidth = MediaQuery.of(context).size.width;
final deviceHeight = MediaQuery.of(context).size.height;
print('width: $deviceWidth'); // flutter: width: 428.0
print('height $deviceHeight'); // flutter: height 926.0
return Scaffold(
appBar: AppBar(
title: const Text('Form'),
),
body: SingleChildScrollView(
child: Center(
child: Container(
width: deviceWidth * 0.8,
child: Column(
children: <Widget>[
SizedBox(height: 20),
Container(
color: Colors.grey,
width: 300,
height: 150,
),
SizedBox(height: 10),
Container(width: deviceWidth * 0.8, child: Text('ショートケーキ5号')),
SizedBox(height: 10),
Text('直径15cm、4〜6人分です。フルーツがいっぱいのっている贅沢なケーキです。'),
SizedBox(height: 20),
TextFormField(
maxLines: 5,
keyboardType: TextInputType.multiline,
decoration: InputDecoration(
hintText:
"(例)食物アレルギーでキゥイがダメ、メッセージプレートの内容が、英語でHappy Birthday",
border: OutlineInputBorder()),
),
SizedBox(height: 20),
Row(
children: [
TextButton(
onPressed: () {},
child: const Text('-', style: TextStyle(fontSize: 20))),
const SizedBox(width: 10),
TextButton(
onPressed: () {},
child: const Text('+', style: TextStyle(fontSize: 20))),
],
),
const SizedBox(height: 20),
ElevatedButton(onPressed: () {}, child: const Text('カートに追加する')),
],
),
),
),
),
);
}
}
iPhone SE

import 'package:flutter/material.dart';
void main() {
runApp(const MyApp());
}
class MyApp extends StatelessWidget {
const MyApp({super.key});
// This widget is the root of your application.
Widget build(BuildContext context) {
return MaterialApp(
title: 'Flutter Demo',
theme: ThemeData(
primarySwatch: Colors.blue,
),
home: const FormExample(),
);
}
}
class FormExample extends StatelessWidget {
const FormExample({Key? key}) : super(key: key);
Widget build(BuildContext context) {
final deviceWidth = MediaQuery.of(context).size.width;
final deviceHeight = MediaQuery.of(context).size.height;
print('width: $deviceWidth'); // flutter: width: 375.0
print('height $deviceHeight'); // flutter: height 667.0
return Scaffold(
appBar: AppBar(
title: const Text('Form'),
),
body: SingleChildScrollView(
child: Center(
child: Container(
width: deviceWidth * 0.8,
child: Column(
children: <Widget>[
SizedBox(height: 20),
Container(
color: Colors.grey,
width: 300,
height: 150,
),
SizedBox(height: 10),
Container(width: deviceWidth * 0.8, child: Text('ショートケーキ5号')),
SizedBox(height: 10),
Text('直径15cm、4〜6人分です。フルーツがいっぱいのっている贅沢なケーキです。'),
SizedBox(height: 20),
TextFormField(
maxLines: 5,
keyboardType: TextInputType.multiline,
decoration: InputDecoration(
hintText:
"(例)食物アレルギーでキゥイがダメ、メッセージプレートの内容が、英語でHappy Birthday",
border: OutlineInputBorder()),
),
SizedBox(height: 20),
Row(
children: [
TextButton(
onPressed: () {},
child: const Text('-', style: TextStyle(fontSize: 20))),
const SizedBox(width: 10),
TextButton(
onPressed: () {},
child: const Text('+', style: TextStyle(fontSize: 20))),
],
),
const SizedBox(height: 20),
ElevatedButton(onPressed: () {}, child: const Text('カートに追加する')),
],
),
),
),
),
);
}
}
まとめ
Containerでラップして幅を300でベタ書きして設定していたのですが、端末ごとの幅を取得して×0.8ぐらいにしてサイズの異なる端末ごとに設定すると、いい感じのレイアウトになった気がします。
もっと綺麗なレイアウトをできるように、サイズ調整のテクニックを学ばなくてはならないと、情報系の学生さんから学べました。
シェアハウスで暮らしていないと、コードレビューもないですから他の書き方もあるよなと、気づかずに自己流になっていましたね。
もっといいコードを書きたい。
Discussion