🚵
ReactのuseReducerを使ってみる
対象読者
- React初心者.
- この記事は普段DartとたまにTS書いてるエンジニアが書いてます.
紹介すること/紹介しないこと(やること/やらないこと)
- useReducerをなんとなく理解する.
- useStateの場合どう書くのか.
- 知識の深掘りはしない.
- 使えるようになるのを目指す.
対象プロダクトを使ってみる
まずはカウンターからやってみましょう。
useStateを使った例:
よくあるボタンを押すとstateを更新して数字を増減するロジックですね。
import { useState } from "react";

function CountHooks() {
  const [count, setCount] = useState<number>(0);

  function increment(): void {
    setCount(count + 1);
  }

  function decrement(): void {
    setCount(count - 1);

  }

  return (
    <div>
      <p>{count}</p>
      {/* ボタンを押してsetCountを実行する */}
      <button onClick={increment}>+</button>
      <button onClick={decrement}>-</button>
    </div>
  );
}

export default CountHooks;
useReducerを使った例:
これがuseReducerになるとこんな感じでstateの管理をします。typeを使って、Stateでデータ型を定義して、Actionで増やすか減らすかの型を定義します。Reducerというジェネリティクスを使って型を指定して、数値と増減する値を渡してるイメージですね。
import { useReducer, Reducer } from "react";
// useReducerのStateの型を定義
type State = {
  count: number;
};
// useReducerのActionの型を定義
type Action = {
  type: "increment" | "decrement";// Actionのtypeはincrementかdecrementのみ
};
// useReducerのReducerの型を定義
const reducer: Reducer<State, Action> = (state, action) => {
  // Actionのtypeによってstateを変更
  switch (action.type) {
    // Actionのtypeがincrementの場合数値を+1
    case "increment":
      return { count: state.count + 1 };
    // Actionのtypeがdecrementの場合数値を-1
    case "decrement":
      return { count: state.count - 1 };
    // 上記以外の場合はstateをそのまま返す
    default:
      return state;
  }
};
// useReducerを使ってカウントアップ・ダウンを実装
function CountHooks() {
  // useReducerを使ってstateとdispatchを定義
  const [state, dispatch] = useReducer(reducer, { count: 0 });
  // カウントアップ・ダウンの関数を定義
  function increment(): void {
    dispatch({ type: "increment" });
    console.log(state.count);
  }
  // カウントアップ・ダウンの関数を定義
  function decrement(): void {
    dispatch({ type: "decrement" });
    console.log(state.count);
  }

  return (
    <div>
      <p>{state.count}</p>
      <button onClick={increment}>+</button>
      <button onClick={decrement}>-</button>
    </div>
  );
}

export default CountHooks;
こちらをApp.tsxでimportしてあげるとカウンターを使うことができます。両方試してみてください。
App.tsx
import CountHooks from "./pages/count"

interface User {
  name: string;
  age: number;
}

const users: User = {
  name: "Jboyさん",
  age: 34,
};

function App() {
  return (
    <>
      <p>{users.name}</p>
      <p>{users.age}</p>
      <CountHooks />
    </>
  )
}

export default App
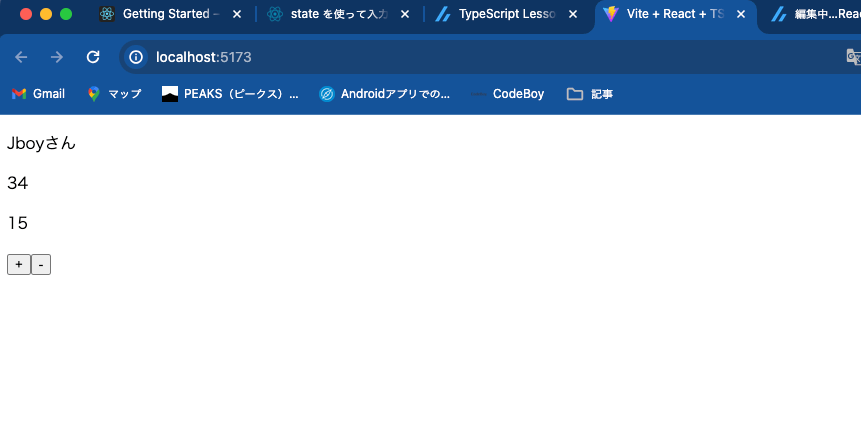
実行結果:
美しくなくて申し訳ないです🙇
応用編
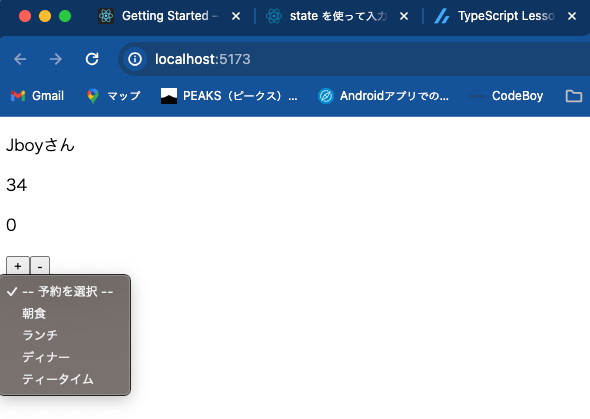
カウンターだと面白くないので、dropdownボタンを作ってみましょう。普段はTSとかでUI作らないので、挑戦してみました!
string型のObjectを定義してこれを多次元配列のデータ型に使います。stateの管理はuseStateでおこなっています。
useStateの例:
import { useState } from "react";

function DropdownHook() {
  // 予約のstateを定義
  const [meal, setMeal] = useState<string>("");
  // mealsの型を定義
  type Meals = {
    value: string;
    label: string;
  };
  // 予約の選択肢を定義
  const meals: Meals[] = [
    { value: "朝食", label: "朝食" },
    { value: "ランチ", label: "ランチ" },
    { value: "ディナー", label: "ディナー" },
    { value: "ティータイム", label: "ティータイム" },
  ];

  const handleChange = (event: React.ChangeEvent<HTMLSelectElement>) => {
    setMeal(event.target.value);
  };

  return (
    <div>
      <select value={meal} onChange={handleChange}>
        <option value="">-- 予約を選択 --</option>
        {meals.map((meal) => (
          <option key={meal.value} value={meal.value}>
            {meal.label}
          </option>
        ))}
      </select>
      {meal && <p>選択された予約: {meal}</p>}
    </div>
  );
}

export default DropdownHook;
useReducerを使った例:
先ほどと同じように、データの型を定義して、Stateが変数の型で、Actionがロジックの型ですね。やってることは単縦で、dropdownの選択された値を変更して画面を更新してるだけです。これだけでも難しいですけどね😅
import { useReducer, Reducer } from "react";

type State = {
  meal: string;
};

type Action = {
  type: "SET_MEAL";
  payload: string;
};

const reducer: Reducer<State, Action> = (state, action) => {
  switch (action.type) {
    case "SET_MEAL":
      return { meal: action.payload };
    default:
      return state;
  }
};

function DropdownHook() {
  const [state, dispatch] = useReducer(reducer, { meal: "" });

  type Meals = {
    value: string;
    label: string;
  };

  const meals: Meals[] = [
    { value: "朝食", label: "朝食" },
    { value: "ランチ", label: "ランチ" },
    { value: "ディナー", label: "ディナー" },
    { value: "ティータイム", label: "ティータイム" },
  ];

  const handleChange = (event: React.ChangeEvent<HTMLSelectElement>) => {
    dispatch({ type: "SET_MEAL", payload: event.target.value });
  };

  return (
    <div>
      <select value={state.meal} onChange={handleChange}>
        <option value="">-- 予約を選択 --</option>
        {meals.map((meal) => (
          <option key={meal.value} value={meal.value}>
            {meal.label}
          </option>
        ))}
      </select>
      {state.meal && <p>選択された予約: {state.meal}</p>}
    </div>
  );
}

export default DropdownHook;
App.tsxでimportして実行しましょう。
import CountHooks from "./pages/count"
import DropdownHook from "./pages/dropdown";

interface User {
  name: string;
  age: number;
}

const users: User = {
  name: "Jboyさん",
  age: 34,
};

function App() {
  return (
    <>
      <p>{users.name}</p>
      <p>{users.age}</p>
      <CountHooks />
      <DropdownHook />
    </>
  )
}

export default App
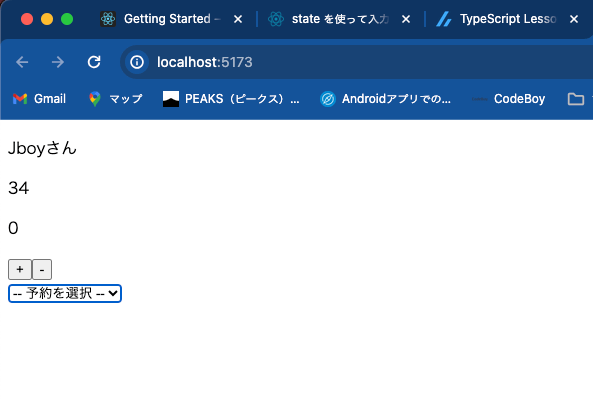
実行結果:


まとめ
なんとなく状態管理の仕方が理解できたかなと思います。Reactのライフサイクルは、画面を更新するためのものかな〜と...
FlutterのuseStateみたいな感じですね。Reactが本家なんでしょうけどね。
📕完成品:
Discussion