🚶
Flutter healthを使ってみた
👤対象者
- Flutterでヘルスケアアプリを作ってみたい人
- healthというパッケージに興味がある。
- 歩数計を作ってみたい
- iOSの知識がある。xcodeの操作をしたことがある。Swiftで簡単なアプリを作った程度
- AppleDeveloperアカウントを持っている。
- iPhoneの実機を持っている
記事の内容
Flutterで歩数計を作る機能要件がある案件のお話が来て技術調査をやっていて試しにやってみました。SwiftUIで作った方がまだ簡単でしたがアウトプットも兼ねて技術記事を書くことにしました。
補足情報
海外の動画を参考にチュートリアルをやってみたのですが破壊的変更があるようで参考になりませんでした。Health() を使用してシングルトンとして動作するようになりました 。HealthFactory のインスタンスを作成する必要がなくなったみたいです。

チュートリアルをやってみる
プロジェクトを作成したらhealthを追加します。次はReadmeの解説を見ながら設定をしていきましょう。
Setup
Apple Health (iOS)
First, add the following 2 entries to the Info.plist:
<key>NSHealthShareUsageDescription</key>
<string>We will sync your data with the Apple Health app to give you better insights</string>
<key>NSHealthUpdateUsageDescription</key>
<string>We will sync your data with the Apple Health app to give you better insights</string>

xmlの設定
<?xml version="1.0" encoding="UTF-8"?>
<!DOCTYPE plist PUBLIC "-//Apple//DTD PLIST 1.0//EN" "http://www.apple.com/DTDs/PropertyList-1.0.dtd">
<plist version="1.0">
<dict>
    <!-- health settingsここから -->
    <key>NSHealthShareUsageDescription</key>
    <string>We will sync your data with the Apple Health app to give you better insights</string>
    <key>NSHealthUpdateUsageDescription</key>
    <string>We will sync your data with the Apple Health app to give you better insights</string>
    <!-- ここまで -->
	<key>CFBundleDevelopmentRegion</key>
	<string>$(DEVELOPMENT_LANGUAGE)</string>
	<key>CFBundleDisplayName</key>
	<string>Health Care App</string>
	<key>CFBundleExecutable</key>
	<string>$(EXECUTABLE_NAME)</string>
	<key>CFBundleIdentifier</key>
	<string>$(PRODUCT_BUNDLE_IDENTIFIER)</string>
	<key>CFBundleInfoDictionaryVersion</key>
	<string>6.0</string>
	<key>CFBundleName</key>
	<string>health_care_app</string>
	<key>CFBundlePackageType</key>
	<string>APPL</string>
	<key>CFBundleShortVersionString</key>
	<string>$(FLUTTER_BUILD_NAME)</string>
	<key>CFBundleSignature</key>
	<string>????</string>
	<key>CFBundleVersion</key>
	<string>$(FLUTTER_BUILD_NUMBER)</string>
	<key>LSRequiresIPhoneOS</key>
	<true/>
	<key>UILaunchStoryboardName</key>
	<string>LaunchScreen</string>
	<key>UIMainStoryboardFile</key>
	<string>Main</string>
	<key>UISupportedInterfaceOrientations</key>
	<array>
		<string>UIInterfaceOrientationPortrait</string>
		<string>UIInterfaceOrientationLandscapeLeft</string>
		<string>UIInterfaceOrientationLandscapeRight</string>
	</array>
	<key>UISupportedInterfaceOrientations~ipad</key>
	<array>
		<string>UIInterfaceOrientationPortrait</string>
		<string>UIInterfaceOrientationPortraitUpsideDown</string>
		<string>UIInterfaceOrientationLandscapeLeft</string>
		<string>UIInterfaceOrientationLandscapeRight</string>
	</array>
	<key>CADisableMinimumFrameDurationOnPhone</key>
	<true/>
	<key>UIApplicationSupportsIndirectInputEvents</key>
	<true/>
</dict>
</plist>
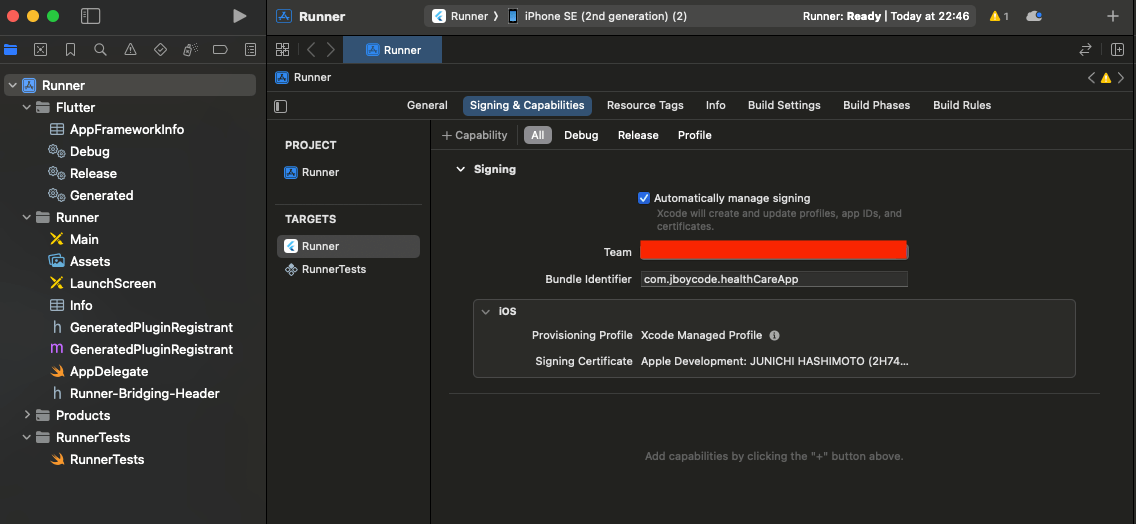
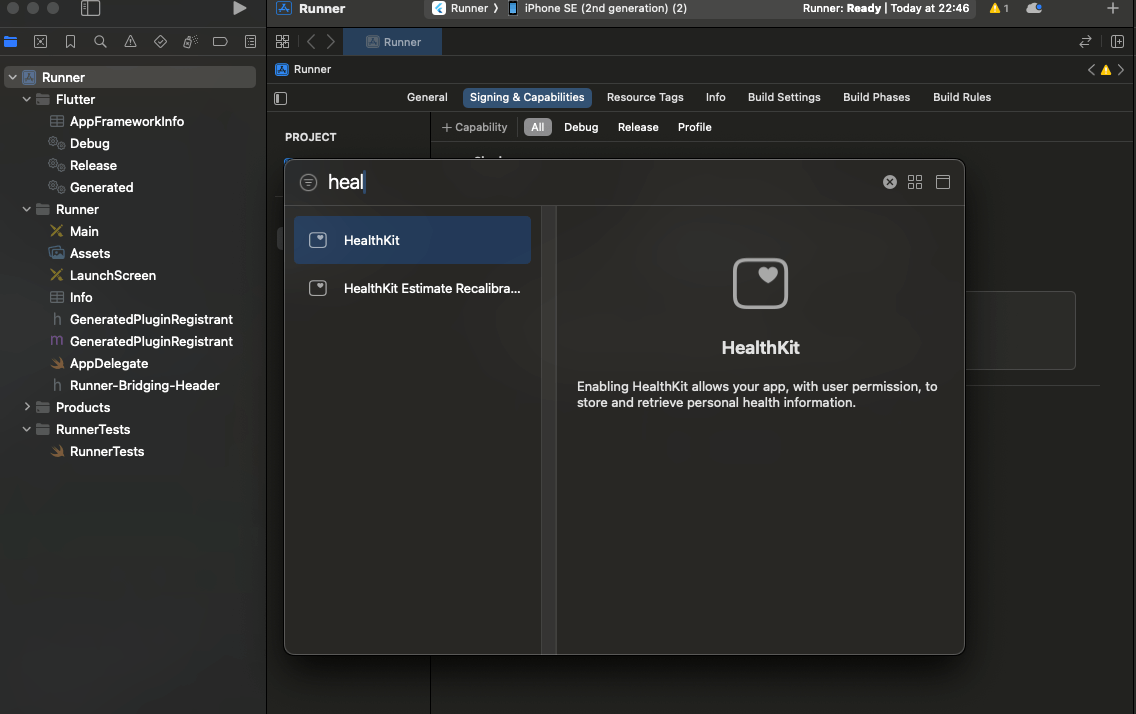
xocdeの設定をするのですが今だと13のバージョンを指定すればOKみたい?


✅をつける

こんなエラー出る人いたらPodfileが怪しいので削除したりpod installためしてください。


アプリ全体のコード
main.dart
import 'package:flutter/material.dart';
import 'package:health/health.dart';
void main() {
runApp(const MyApp());
}
class MyApp extends StatelessWidget {
const MyApp({super.key});
Widget build(BuildContext context) {
return MaterialApp(
title: 'Flutter Demo',
theme: ThemeData(
colorScheme: ColorScheme.fromSeed(seedColor: Colors.deepPurple),
useMaterial3: true,
),
home: const MyHomePage(),
);
}
}
class MyHomePage extends StatefulWidget {
const MyHomePage({super.key});
State<MyHomePage> createState() => _MyHomePageState();
}
class _MyHomePageState extends State<MyHomePage> {
int _steps = 0;
bool _isAuthorized = false;
final health = Health();
void initState() {
super.initState();
_checkPermissions();
}
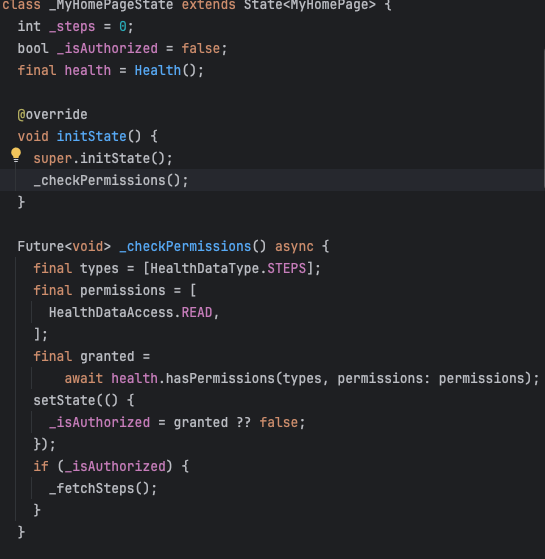
Future<void> _checkPermissions() async {
final types = [HealthDataType.STEPS];
final permissions = [
HealthDataAccess.READ,
];
final granted =
await health.hasPermissions(types, permissions: permissions);
setState(() {
_isAuthorized = granted ?? false;
});
if (_isAuthorized) {
_fetchSteps();
}
}
Future<void> _requestPermissions() async {
final types = [HealthDataType.STEPS];
final permissions = [
HealthDataAccess.READ,
];
try {
_isAuthorized =
await health.requestAuthorization(types, permissions: permissions);
setState(() {});
if (_isAuthorized) {
_fetchSteps();
}
} catch (e) {
print("Exception in requestAuthorization: $e");
}
}
Future<void> _fetchSteps() async {
final now = DateTime.now();
final midnight = DateTime(now.year, now.month, now.day);
try {
final steps = await health.getTotalStepsInInterval(midnight, now);
setState(() {
_steps = steps ?? 0;
});
} catch (error) {
print("Exception in getTotalStepsInInterval: $error");
}
}
Widget build(BuildContext context) {
return Scaffold(
appBar: AppBar(
backgroundColor: Colors.redAccent,
title: const Text("歩数計"),
),
body: Center(
child: Column(
mainAxisAlignment: MainAxisAlignment.center,
children: <Widget>[
if (!_isAuthorized)
ElevatedButton(
onPressed: _requestPermissions,
child: const Text('歩数計測の許可を求める'),
)
else
Column(
children: [
const Text(
'今日の歩数:',
style: TextStyle(fontSize: 24),
),
Text(
'$_steps 歩',
style: const TextStyle(
fontSize: 48, fontWeight: FontWeight.bold),
),
ElevatedButton(
onPressed: _fetchSteps,
child: const Text('歩数を更新'),
),
],
),
],
),
),
);
}
}
感想
OSに依存した機能、センサー系の機能はSwiftUIで開発した方が実装はしやすかったですね。Androidの対応までするとなると複雑なロジックを書くことになりそうですね。クロスプラットフォームのよくないところなのかもしれない。ビルドするときに、iOS, Androidで実行するロジックも切り替える対応が必要そう。
AppleとGoogleが提供している機能の解説はこちら💁
時間のあるときにゆっくり読みますか📚
SwiftUIで開発したデモアプリはこちら
Discussion