💸
flutter_hooksでATT(App Tracking Transparency)
Flutterで簡単にATTができる!
Swiftで個人開発をしていたときに、AppStoreにアプリの申請を出したときに、アプリがインストールされたら表示させるApp Tracking Transparencyを実装しないといけなくて、意味わかんないxmlとx-codeの設定を自力でやって実現しましたが、これは本来はプログラミングスクールが教えないといけないと思うんですよね。😅
Flutterだと簡単にできる!
便利なライブラリがあってこちらを使わせていただきました! 参考にしたサイト
info.pilistを編集する
ドキュメントのコードを決めれたところにコピペするだけですね。
<key>NSUserTrackingUsageDescription</key>
<string>This identifier will be used to deliver personalized ads to you.</string>
info.pilist
<?xml version="1.0" encoding="UTF-8"?>
<!DOCTYPE plist PUBLIC "-//Apple//DTD PLIST 1.0//EN" "http://www.apple.com/DTDs/PropertyList-1.0.dtd">
<plist version="1.0">
<dict>
	<key>CFBundleDevelopmentRegion</key>
	<string>$(DEVELOPMENT_LANGUAGE)</string>
	<!--ここに配置する!-->
	<key>NSUserTrackingUsageDescription</key>
        <string>表示する広告を適切に選択するために使用します。</string>
	<key>CFBundleDisplayName</key>
	<string>App Tracker</string>
	<key>CFBundleExecutable</key>
	<string>$(EXECUTABLE_NAME)</string>
	<key>CFBundleIdentifier</key>
	<string>$(PRODUCT_BUNDLE_IDENTIFIER)</string>
	<key>CFBundleInfoDictionaryVersion</key>
	<string>6.0</string>
	<key>CFBundleName</key>
	<string>app_tracker</string>
	<key>CFBundlePackageType</key>
	<string>APPL</string>
	<key>CFBundleShortVersionString</key>
	<string>$(FLUTTER_BUILD_NAME)</string>
	<key>CFBundleSignature</key>
	<string>????</string>
	<key>CFBundleVersion</key>
	<string>$(FLUTTER_BUILD_NUMBER)</string>
	<key>LSRequiresIPhoneOS</key>
	<true/>
	<key>UILaunchStoryboardName</key>
	<string>LaunchScreen</string>
	<key>UIMainStoryboardFile</key>
	<string>Main</string>
	<key>UISupportedInterfaceOrientations</key>
	<array>
		<string>UIInterfaceOrientationPortrait</string>
		<string>UIInterfaceOrientationLandscapeLeft</string>
		<string>UIInterfaceOrientationLandscapeRight</string>
	</array>
	<key>UISupportedInterfaceOrientations~ipad</key>
	<array>
		<string>UIInterfaceOrientationPortrait</string>
		<string>UIInterfaceOrientationPortraitUpsideDown</string>
		<string>UIInterfaceOrientationLandscapeLeft</string>
		<string>UIInterfaceOrientationLandscapeRight</string>
	</array>
	<key>UIViewControllerBasedStatusBarAppearance</key>
	<false/>
	<key>CADisableMinimumFrameDurationOnPhone</key>
	<true/>
</dict>
</plist>
サンプルコードをそのまま使えばやりたいことは実現できました!
pub.devのExampleに書いてあるコードをそのまま使用しました。
main.dart
import 'package:flutter/material.dart';
import 'package:app_tracking_transparency/app_tracking_transparency.dart';
void main() {
runApp(MyApp());
}
class MyApp extends StatelessWidget {
Widget build(BuildContext context) {
return MaterialApp(
home: HomePage(),
);
}
}
class HomePage extends StatefulWidget {
_HomePageState createState() => _HomePageState();
}
class _HomePageState extends State<HomePage> {
String _authStatus = 'Unknown';
void initState() {
super.initState();
initPlugin();
}
// Platform messages are asynchronous, so we initialize in an async method.
Future<void> initPlugin() async {
final TrackingStatus status =
await AppTrackingTransparency.trackingAuthorizationStatus;
setState(() => _authStatus = '$status');
// If the system can show an authorization request dialog
if (status == TrackingStatus.notDetermined) {
// Show a custom explainer dialog before the system dialog
await showCustomTrackingDialog(context);
// Wait for dialog popping animation
await Future.delayed(const Duration(milliseconds: 200));
// Request system's tracking authorization dialog
final TrackingStatus status =
await AppTrackingTransparency.requestTrackingAuthorization();
setState(() => _authStatus = '$status');
}
final uuid = await AppTrackingTransparency.getAdvertisingIdentifier();
print("UUID: $uuid");
}
Future<void> showCustomTrackingDialog(BuildContext context) async =>
await showDialog<void>(
context: context,
builder: (context) => AlertDialog(
title: const Text('Dear User'),
content: const Text(
'We care about your privacy and data security. We keep this app free by showing ads. '
'Can we continue to use your data to tailor ads for you?\n\nYou can change your choice anytime in the app settings. '
'Our partners will collect data and use a unique identifier on your device to show you ads.',
),
actions: [
TextButton(
onPressed: () => Navigator.pop(context),
child: const Text('Continue'),
),
],
),
);
Widget build(BuildContext context) {
return Scaffold(
appBar: AppBar(
title: const Text('App Tracking Transparency Example'),
),
body: Center(
child: Text('Tracking status: $_authStatus\n'),
),
);
}
}
riverpodだと、どうすればいいの?
状態管理を行うriverodでは、initStateを使えないので、同じようなことができるflutter_hooksが持っている機能のuseEffectメソッドを使い実現できました!
使う方法はなくもないのですが、公式ドキュメントによると、ConsumerStatefulWidgetとStatefulHookConsumerWidgetを使えば実現することはできます。
RiverpodのProviderの利用方法について
完成したソースコード
pubspec.yaml
name: app_tracker
description: A new Flutter project.

# The following line prevents the package from being accidentally published to
# pub.dev using `flutter pub publish`. This is preferred for private packages.
publish_to: 'none' # Remove this line if you wish to publish to pub.dev

# The following defines the version and build number for your application.
# A version number is three numbers separated by dots, like 1.2.43
# followed by an optional build number separated by a +.
# Both the version and the builder number may be overridden in flutter
# build by specifying --build-name and --build-number, respectively.
# In Android, build-name is used as versionName while build-number used as versionCode.
# Read more about Android versioning at https://developer.android.com/studio/publish/versioning
# In iOS, build-name is used as CFBundleShortVersionString while build-number used as CFBundleVersion.
# Read more about iOS versioning at
# https://developer.apple.com/library/archive/documentation/General/Reference/InfoPlistKeyReference/Articles/CoreFoundationKeys.html
version: 1.0.0+1

environment:
  sdk: ">=2.17.6 <3.0.0"

# Dependencies specify other packages that your package needs in order to work.
# To automatically upgrade your package dependencies to the latest versions
# consider running `flutter pub upgrade --major-versions`. Alternatively,
# dependencies can be manually updated by changing the version numbers below to
# the latest version available on pub.dev. To see which dependencies have newer
# versions available, run `flutter pub outdated`.
dependencies:
  flutter:
    sdk: flutter


  # The following adds the Cupertino Icons font to your application.
  # Use with the CupertinoIcons class for iOS style icons.
  cupertino_icons: ^1.0.2
  app_tracking_transparency: ^2.0.2+4
  flutter_hooks: ^0.18.5+1
  hooks_riverpod: ^1.0.4

dev_dependencies:
  flutter_test:
    sdk: flutter

  # The "flutter_lints" package below contains a set of recommended lints to
  # encourage good coding practices. The lint set provided by the package is
  # activated in the `analysis_options.yaml` file located at the root of your
  # package. See that file for information about deactivating specific lint
  # rules and activating additional ones.
  flutter_lints: ^2.0.0

# For information on the generic Dart part of this file, see the
# following page: https://dart.dev/tools/pub/pubspec

# The following section is specific to Flutter packages.
flutter:

  # The following line ensures that the Material Icons font is
  # included with your application, so that you can use the icons in
  # the material Icons class.
  uses-material-design: true

  # To add assets to your application, add an assets section, like this:
  # assets:
  #   - images/a_dot_burr.jpeg
  #   - images/a_dot_ham.jpeg

  # An image asset can refer to one or more resolution-specific "variants", see
  # https://flutter.dev/assets-and-images/#resolution-aware

  # For details regarding adding assets from package dependencies, see
  # https://flutter.dev/assets-and-images/#from-packages

  # To add custom fonts to your application, add a fonts section here,
  # in this "flutter" section. Each entry in this list should have a
  # "family" key with the font family name, and a "fonts" key with a
  # list giving the asset and other descriptors for the font. For
  # example:
  # fonts:
  #   - family: Schyler
  #     fonts:
  #       - asset: fonts/Schyler-Regular.ttf
  #       - asset: fonts/Schyler-Italic.ttf
  #         style: italic
  #   - family: Trajan Pro
  #     fonts:
  #       - asset: fonts/TrajanPro.ttf
  #       - asset: fonts/TrajanPro_Bold.ttf
  #         weight: 700
  #
  # For details regarding fonts from package dependencies,
  # see https://flutter.dev/custom-fonts/#from-packages
rapository.dart
import 'package:app_tracking_transparency/app_tracking_transparency.dart';
import 'package:flutter/material.dart';
String _authStatus = 'Unknown';
Future<void> initPlugin(context) async {
final TrackingStatus status =
await AppTrackingTransparency.trackingAuthorizationStatus;
_authStatus = '$status';
// If the system can show an authorization request dialog
if (status == TrackingStatus.notDetermined) {
// Show a custom explainer dialog before the system dialog
await showCustomTrackingDialog(context);
// Wait for dialog popping animation
await Future.delayed(const Duration(milliseconds: 200));
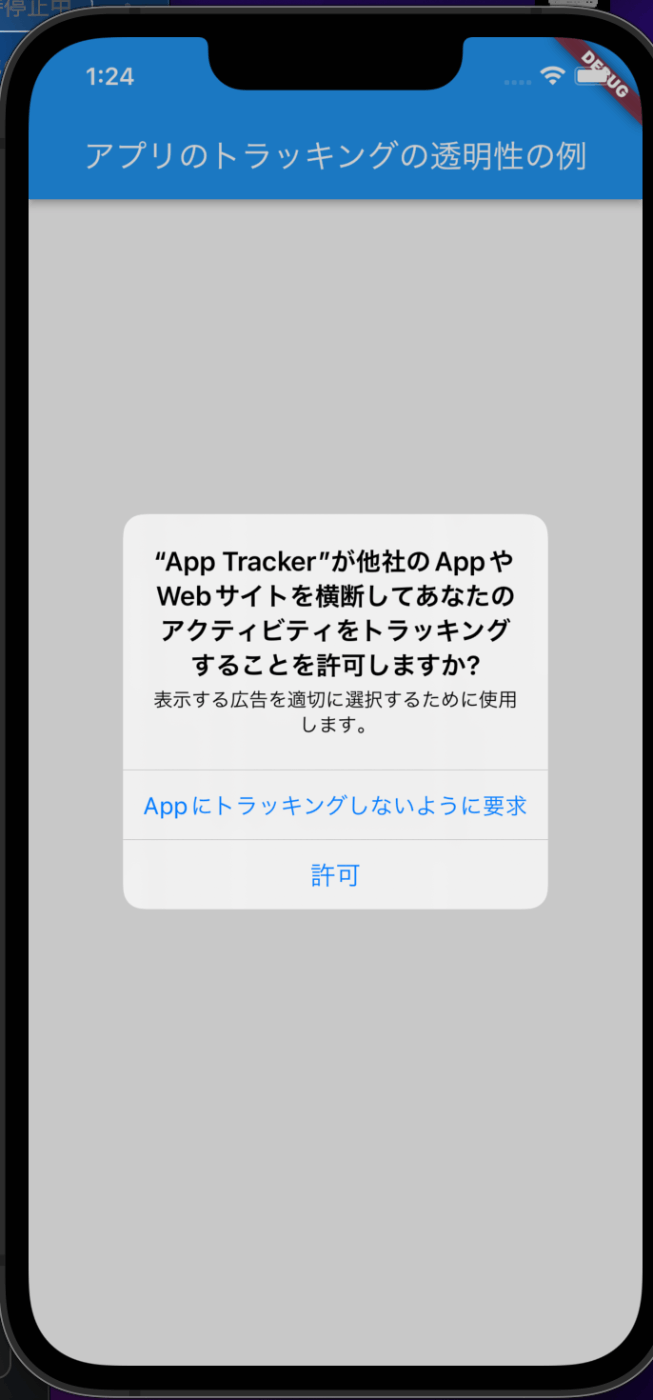
// Request system's tracking authorization dialog
final TrackingStatus status =
await AppTrackingTransparency.requestTrackingAuthorization();
_authStatus = '$status';
}
final uuid = await AppTrackingTransparency.getAdvertisingIdentifier();
print("UUID: $uuid");
}
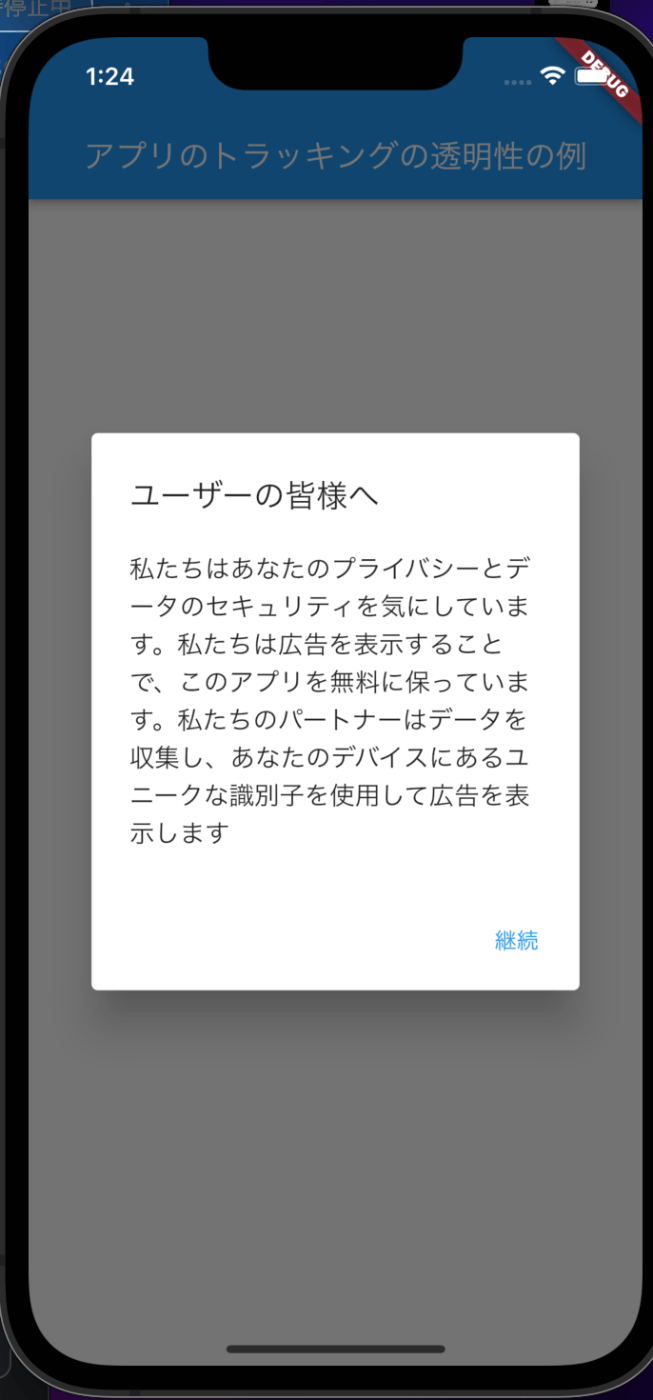
Future<void> showCustomTrackingDialog(BuildContext context) async =>
await showDialog<void>(
context: context,
builder: (context) => AlertDialog(
title: const Text('ユーザーの皆様へ'),
content: const Text(
'私たちはあなたのプライバシーとデータのセキュリティを気にしています。私たちは広告を表示することで、このアプリを無料に保っています。'
'私たちのパートナーはデータを収集し、あなたのデバイスにあるユニークな識別子を使用して広告を表示します'),
actions: [
TextButton(
onPressed: () => Navigator.pop(context),
child: const Text('継続'),
),
],
),
);
main.dart
import 'package:app_tracker/repository.dart';
import 'package:flutter/material.dart';
import 'package:flutter_hooks/flutter_hooks.dart';
import 'package:hooks_riverpod/hooks_riverpod.dart';
void main() {
runApp(ProviderScope(child: MyApp()));
}
class MyApp extends StatelessWidget {
Widget build(BuildContext context) {
return MaterialApp(
home: HomePage(),
);
}
}
class HomePage extends HookConsumerWidget {
const HomePage({Key? key}) : super(key: key);
Widget build(BuildContext context, WidgetRef ref) {
String _authStatus = 'Unknown';
/// [initStateの代わりにuseEffectメソッドを使用]
useEffect(() {
initPlugin(context);
return null;
}, const []);
return Scaffold(
appBar: AppBar(
title: const Text('アプリのトラッキングの透明性の例'),
),
body: Center(
child: Text('トラッキングの状況: $_authStatus\n'),
),
);
}
}
最後に
Gif画像を作成したかったのですが、画像が多すぎてできなかったようです😇
スクリーンショットを代わりに投稿しますね。

やってみた感想
x-codeを操作して、xmlの操作をすることなく、Flutterのライブラリを使うだけでATTの機能を実装することができました!
以前、Swiftで個人開発をしてAppStoreに申請するために設定をしていたときの大変さが、一瞬で亡くなりました!
Flutterはアプリ開発を速く、簡単にしてくれるからGoogleさんには、感謝しないとですね。
Discussion