


JINSでITアーキテクト/テックリードしている@Takuma3atoです。
ここでは、AWSが開発しているインターフェース定義言語のSmithyについて書いています。1回目はSmithyのモデル定義について、2回目は定義したモデルをビルドするところについて書いていますが、今回はその2回目です。1回目の記事は、こちら。
2.Smithy CLIのインストール
前回、モデルの定義を行いましたので、次にこのモデルをビルドし、アーティファクトを生成していきます。方法としては、Smithy CLIをインストールして行うか、Gradleで実施することになるのですが、今回はせっかくなので、Smithy CLIを使ってみたいと思います。私の使っているPCマシンはMacBook Air(M1)なので、HomebrewでSmithy CLIをインストールします。
brew tap smithy-lang/tap && brew install smithy-cli
いくつかHomebrewのアップデートが走りつつ処理は進みました。
# brewによるTap処理
==> Tapping smithy-lang/tap
Cloning into '/opt/homebrew/Library/Taps/smithy-lang/homebrew-tap'...
remote: Enumerating objects: 124, done.
remote: Counting objects: 100% (48/48), done.
・・・

# Smithy CLIのインストール処理
==> Fetching smithy-lang/tap/smithy-cli
==> Downloading https://github.com/smithy-lang/smithy/releases/download/1.49.0/smithy-cli-darwin-aarch64.zip
・・・
しかし、一部の処理で問題が発生したようです。smithy-modelのバージョン1.26.0の依存関係をダウンロードできなかったみたいです。
# brewによるwarmup処理
/opt/homebrew/Cellar/smithy-cli/1.49.0/bin/smithy warmup

Picked up _JAVA_OPTIONS: -Djava.io.tmpdir=/private/tmp
Picked up _JAVA_OPTIONS: -Djava.io.tmpdir=/private/tmp
Failed to collect dependencies at software.amazon.smithy:smithy-model:jar:1.26.0
Error warming up CLI in phase CLASSES
Warning: The post-install step did not complete successfully
You can try again using:
  brew postinstall smithy-lang/tap/smithy-cli
・・・
この処理は、CLIに必要な依存関係を事前にダウンロードしてキャッシュし、後の実行を高速化する為の処理のようです。
とりあえず、インストールしたSmithy CLIのバージョンは確認できており、先に進みます。
$ smithy --version
1.49.0
3.定義したモデルのビルド
3-1.smithy-build.jsonを作成する
次に、Smithyモデルを定義するために必要な構成ファイルをsmithy-quickstart直下に作成します。
smithy-quickstart/
├── model
│   └── weather.smithy
└── smithy-build.json
作成したsmithy-build.jsonに以下を記載します。
{
    // Version of the smithy-build.json file specification
    "version": "1.0",
    // Location to search for Smithy model source files
    "sources": ["model"]
}
3-2. モデルをビルドする
追記できましたら、事前にインストール済みのSmithy CLIを用いてビルドします。
$ smithy build
SUCCESS: Validated 251 shapes

Validated model, now starting projections...

──  source  ────────────────────────────────────────────────────────────────────
Completed projection source (251): /Users/<hoge>/Library/Mobile Documents/com~apple~CloudDocs/SystemResource/DevelopmentSpace/smithy-quickstart/build/smithy/source

Summary: Smithy built 1 projection(s), 3 plugin(s), and 4 artifacts
無事、成功しました。
具体的には、smithy-quickstart/build配下にアーティファクトが作成されました。
$ tree
.
├── build
│   └── smithy
│       └── source
│           ├── build-info
│           │   └── smithy-build-info.json
│           ├── model
│           │   └── model.json
│           └── sources
│               ├── manifest
│               └── weather.smithy
├── model
│   └── weather.smithy
└── smithy-build.json
smithy-build.jsonで使用するプロパティ説明
参考までに、今回は使わないものもありますが、smithy-build.jsonに記述する主なプロパティを列挙します。
| プロパティ | 型 | 説明 |
|---|---|---|
| version | string | 必須。このバージョンは1.0を指定する。 |
| outputDirectory | string | model.json内のprojectionsで記載された内容を元にサブディレクトリを作成し、model.jsonを含むアーティファクトを格納する。 |
| sources | [string] | ビルドのソースモデルとなるモデルを含む、相対ファイルやディレクトリのリストを作ります。ディレクトリ指定の場合は、そのディレクトリツリー配下の全てのファイルがソースとして追加されます。 |
| imports | [string] | モデル構築時に依存するモデルファイルを指定する。インポートされたモデルはローカルな依存関係として扱われ、ビルドされるモデルパッケージの一部にはならないが、ビルド時に一時的に必要とされる。指定したディレクトリ配下のファイルがインポートされる |
| projections | map<string, object> | プロジェクション名とその設定を紐づける。 |
| plugins | map<string, object> | プロジェクションをビルドする時にモデルに適用するプラグインを定義する。このプラグインは、プラグイン ID とプラグイン固有の設定オブジェクトとしてマッピングする。 |
| ignoreMissingPlugins | boolean | プラグインが見つからない場合はデフォルトでビルドを失敗させるが true にすることでビルドを続行させる。 |
| maven | Maven configuration structure | モデルのビルドに必要な Java Maven 依存関係を定義する。 |
これらのプロパティを用いたサンプルも載せておきます。
smithy-build.json (sample)
{
    "version": "1.0",
    "outputDirectory": "build/output",
    "sources": ["model"],
    "imports": ["foo.json", "some/directory"],
    "maven": {
        "dependencies": [
            "software.amazon.smithy:smithy-aws-traits:1.47.0"
        ]
    },
    "projections": {
        "my-abstract-projection": {
            "abstract": true
        },
        "projection-name": {
            "imports": ["projection-specific-imports/"],
            "transforms": [
                {
                    "name": "excludeShapesByTag",
                    "args": {
                        "tags": ["internal", "beta", "..."]
                    }
                },
                {
                    "name": "excludeShapesByTrait",
                    "args": {
                        "traits": ["internal"]
                    }
                }
            ],
            "plugins": {
                "plugin-name": {
                    "plugin-config": "value"
                },
                "run::custom-artifact-name": {
                    "command": ["my-codegenerator", "--debug"]
                },
                "...": {}
            }
        }
    },
    "plugins": {
        "plugin-name": {
            "plugin-config": "value"
        },
        "...": {}
    }
}
プロパティ詳細については、こちらを参照ください。
4.アプリケーションコードの生成
Smithyの特徴として、作成したモデルを使用するクライアントアプリケーションや、APIアプリケーションのコードを生成できることが挙げられます。
今回は、クライアントアプリケーションのコードをTypeScriptで生成するのと、モデルをもう少しAPIとして使える形にしていきます。
4-1. 通信プロトコルを指定する
APIは、HTTP通信で利用することを想定しており、Smithyの場合はTraitsを用いてこのネットワーク通信の情報をモデルに記述していきます。
{
    "...": "..."
    "maven": {
        "dependencies": [
            "software.amazon.smithy:smithy-aws-traits:1.49.0"
        ]
    },
    "...": "..."
}
@aws.protocols#restJson1トレイトをインポートします。
$version: "2"
namespace example.weather

use aws.protocols#restJson1

/// Provides weather forecasts.
@paginated(
    inputToken: "nextToken"
    outputToken: "nextToken"
    pageSize: "pageSize"
)

@restJson1
service Weather {
    version: "2006-03-01"
    resources: [City]
    operations: [GetCurrentTime]
}
4-2. HTTPバインディングを追加する
Smithyでは、HTTPバインディングトレイトをオペレーションシェイプに適用することでHTTPを構成します。
まずは、HTTPメソッド、リクエストURI、および@httpトレイトを使用して、成功した応答のステータスコードを設定します。
@readonly
@http(code: 200, method: "GET", uri: "/cities/{cityId}")
operation GetCity {
    input: GetCityInput
    output: GetCityOutput
    errors: [NoSuchResource]
}

@paginated(items: "items")
@readonly
@http(code: 200, method: "GET", uri: "/cities")
operation ListCities {
    input: ListCitiesInput
    output: ListCitiesOutput
}

@readonly
@http(code: 200, method: "GET", uri: "/currentTime")
operation GetCurrentTime {
    input: GetCurrentTimeInput
    output: GetCurrentTimeOutput
}

@readonly
@http(code: 200, method: "GET", uri: "/forecast/{cityId}")
operation GetForecast {
    input: GetForecastInput
    output: GetForecastOutput
}
次に、GetCityおよびGetForecastオペレーションのURIパターンはそれぞれ、@httpLabelを使用して、オペレーション入力構造体のcityIdメンバーをリクエストURIにバインドします。
@input
structure GetCityInput {
    // "cityId" provides the identifier for the resource and
    // has to be marked as required.
    @required
    @httpLabel
    cityId: CityId
}

@input
structure GetForecastInput {
    @required
    @httpLabel
    cityId: CityId
}
ListCities操作の場合は、@httpQueryトレイトを使用して、クエリパラメーターとしてリクエストURI にnextTokenとpageSizeを含めます。
@input
structure ListCitiesInput {
    @httpQuery("nextToken")
    nextToken: String
    @httpQuery("pageSize")
    pageSize: Integer
}
4-3. Codegenプラグインを追加する
続いて、TypeScriptのコード生成に入ります。smithy-build.jsonに、以下を追記します。
{
    // Version of the smithy-build.json file specification
    "version": "1.0",
    // Location to search for Smithy model source files
    "sources": ["model"],
    // Add the Smithy TypeScript code generator dependency
    "maven": {
        "dependencies": [
            "software.amazon.smithy:smithy-aws-traits:1.47.0",
            "software.amazon.smithy.typescript:smithy-typescript-codegen:0.20.1"
        ]
    },
    "plugins": {
        // Add the Smithy TypeScript client plugin
        "typescript-client-codegen": {
            // Minimal configuration: add package name and version
            "package": "@weather-service/client",
            "packageVersion": "0.0.1"
        }
    }
}
4-4. 生成したコードを使用する
さあ、ここまでできたら、あとはコードを生成しましょう。smithy buildをします。
$ smithy build
SUCCESS: Validated 511 shapes (NOTE: 3)

Validated model, now starting projections...

[警告] Unable to find a protocol generator for example.weather#Weather: The example.weather#Weather service supports the following unsupported protocols [aws.protocols#restJson1]. The following protocol generators were found on the class path: []
──  source  ────────────────────────────────────────────────────────────────────
Completed projection source (511): /Users/<hoge>/Library/Mobile Documents/com~apple~CloudDocs/SystemResource/DevelopmentSpace/smithy-quickstart/build/smithy/source

Summary: Smithy built 1 projection(s), 4 plugin(s), and 29 artifacts
 $ tree
.
├── build
│   └── smithy
│       ├── classpath.json
│       └── source
│           ├── build-info
│           │   └── smithy-build-info.json
│           ├── model
│           │   └── model.json
│           ├── sources
│           │   ├── manifest
│           │   └── weather.smithy
│           └── typescript-client-codegen
│               ├── package.json
│               ├── src
│               │   ├── Weather.ts
│               │   ├── WeatherClient.ts
│               │   ├── commands
│               │   │   ├── GetCityCommand.ts
│               │   │   ├── GetCurrentTimeCommand.ts
│               │   │   ├── GetForecastCommand.ts
│               │   │   ├── ListCitiesCommand.ts
│               │   │   └── index.ts
│               │   ├── extensionConfiguration.ts
│               │   ├── index.ts
│               │   ├── models
│               │   │   ├── WeatherServiceException.ts
│               │   │   ├── index.ts
│               │   │   └── models_0.ts
│               │   ├── pagination
│               │   │   ├── Interfaces.ts
│               │   │   ├── ListCitiesPaginator.ts
│               │   │   └── index.ts
│               │   ├── runtimeConfig.browser.ts
│               │   ├── runtimeConfig.native.ts
│               │   ├── runtimeConfig.shared.ts
│               │   ├── runtimeConfig.ts
│               │   └── runtimeExtensions.ts
│               ├── tsconfig.cjs.json
│               ├── tsconfig.es.json
│               ├── tsconfig.json
│               └── tsconfig.types.json
├── model
│   └── weather.smithy
└── smithy-build.json

13 directories, 32 files
無事、アーティファクトが生成されました([警告]表示が出ましたが、ビルド処理自体には問題はないので、必要なタイミングで対応すれば良いです)。この生成されたコードは通常の TypeScript パッケージであり、以降は、TypeScriptのシステム開発をしていきます。モデルが構築されコードが生成されたらその度に、TypeScriptコードもコンパイルする必要があります。
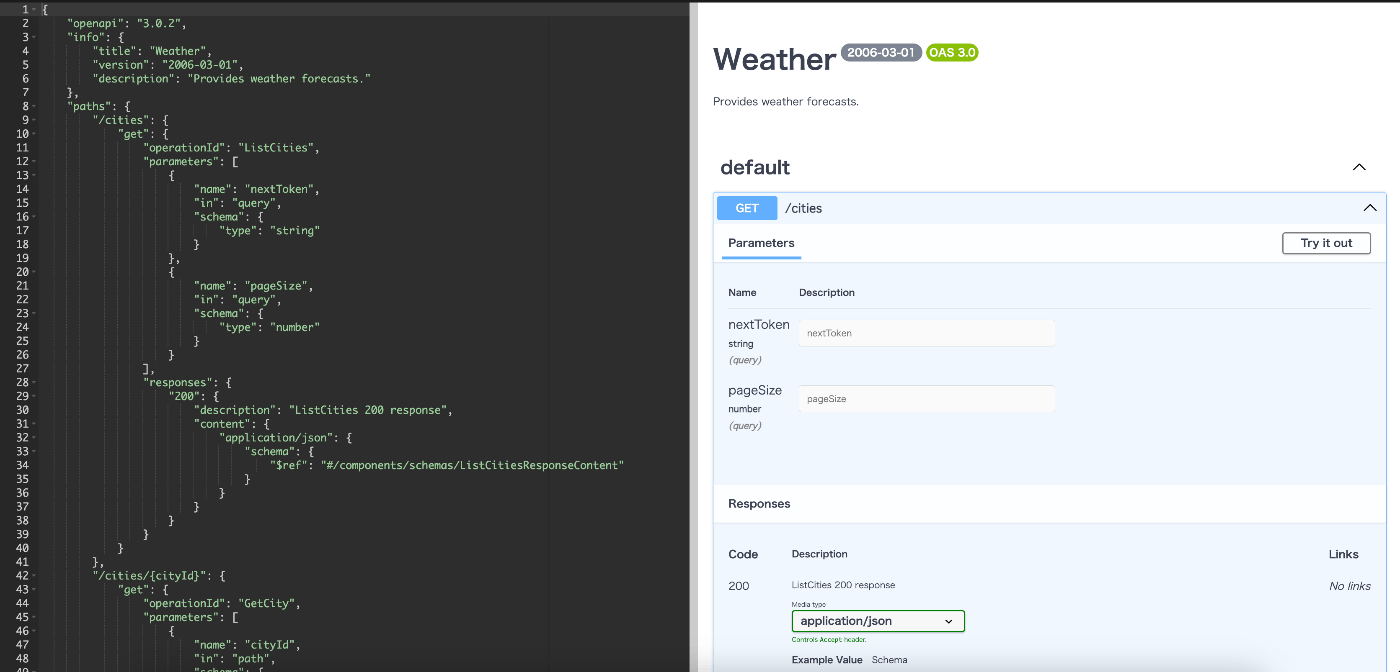
4-5. OpenAPI Specificationを生成してみる
このSmithyはなんと、OASへの変換もできてしまいます。RESTful APIを記述するOpenAPI Specificationをサポートしており、例えば、SwaggerUIなどのOpenAPIツールの利用ができますし、Postmanコレクションの作成などに繋げることができるので、APIテストもし易くなりそうです。
こちらの内容に従って、早速やってみます。
smithy-build.jsonに、以下の設定を追記します。
{
    "version": "1.0",
    "sources": ["model"],
    "maven": {
        "dependencies": [
            "software.amazon.smithy:smithy-aws-traits:1.47.0",
            "software.amazon.smithy.typescript:smithy-typescript-codegen:0.20.1",
        //  Add the Smithy OpenAPI plugin
           "software.amazon.smithy:smithy-openapi:1.49.0"
        ]
    },
    "plugins": {
        "typescript-client-codegen": {
            "package": "@weather-service/client",
            "packageVersion": "0.0.1"
        },
        //  Add the Smithy OpenAPI plugin
        "openapi": {
            "service": "example.weather#Weather",
            "protocol": "aws.protocols#restJson1",
            "version": "3.1.0"
        }
    }
}
追記が終わったら、smithy buildでビルドします。
成功すると、smithy-quickstart/build/smithy/source/openapi直下に、Weather.openapi.jsonが生成されます。
Swagger Editorでもきちんと表示させることができました。
4-6. AWSサービスとインテグレーションする
Smithyは、AWSが開発しているだけのことはあって、AWSサービスとのインテグレーションもできます。IAMやAPI Gateway、CloudFormationがサポートされていて、Smithyのトレイトを用いて実現するようです。
このトレイトでは、API Gatewayと実際のバックエンドを統合するActionsを定義できます。AWSサービスを使ってシステム開発をする時に利用できるのは嬉しいですね。個人的には、Terraformのコード生成をして欲しいので、勝手に期待しておこうと思います。
まとめ
いかがだったでしょうか。今回はSmithyというAWSが開発しているインターフェース言語について調べてみました。記載するコードの文法も開発者が分かりやすいものになっていますし、各種アプリケーションコードの生成やOpenAPI Specificationへの変換、AWSサービスとのインテグレーションなど開発生産性の向上を実現するような作りになっていることに好感が持てました。みなさんもぜひ使ってみてください。
参考

Discussion