㊙️
1次ソース公式ドキュメントBlender 4.0 Python API Documentation を日本語で嚙み砕く(24/02/12追)
Blender 4.0 Python API Documentation を日本語で嚙み砕く
【Quickstart】
- 先ずはEnable Developer Extra and Python Tooltips.を表示できるようにチェック --> 上部Edit-Prefarence-interface-PythonTooltips と DeveloperExtrasチェック
#---GUIをCUIで実行する例
import bpy
bpy.context.preferences.view.show_tooltips_python = True #PythonTooltipsをONする
bpy.context.preferences.view.show_developer_ui = True #DeveloperExtrasをONする
bpy.ops.wm.save_userpref()# 変更を保存
#---e-

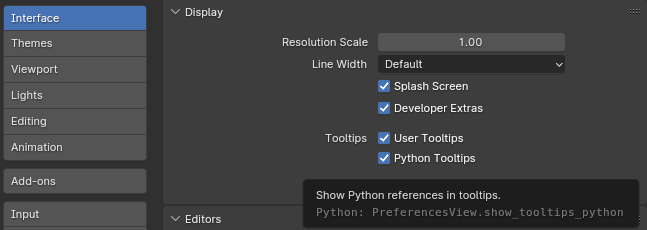
- ボタンのツールチップ(Python Tooltips)には Python属性と演算子名が表示されます --> Edit-Prefarence-interface-python tooltipsチェック
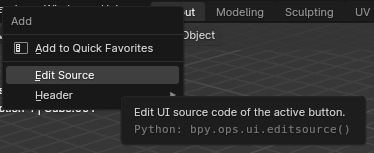
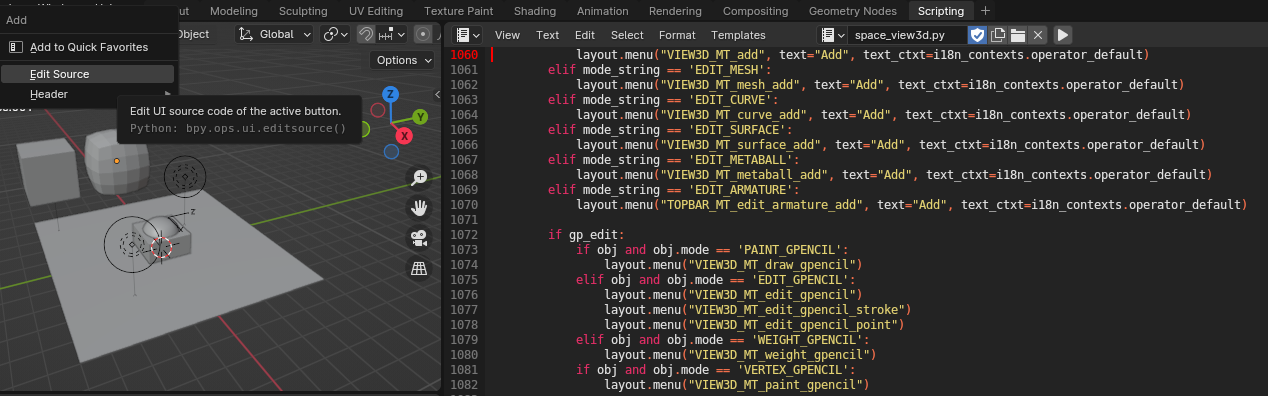
- Blender で配布されているスクリプトをさらに調べるには(ボタン上で右クリEditSourceで飛べる) --> bl_ui "C:\Program Files\Blender Foundation\Blender 4.0\4.0\scripts\startup\bl_ui",
bl_operators "C:\Program Files\Blender Foundation\Blender 4.0\4.0\scripts\startup\bl_operators" プラットフォームによってディレクトリは変わる
https://docs.blender.org/manual/en/dev/advanced/blender_directory_layout.html#blender-directory-layout
- Python スクリプトを実行する --> 最も一般的な 2 つの方法は、組み込みのテキスト エディタを使用する方法と、Python コンソールにコマンドを入力する方法です。
bpy.data
- GUIと同じようにPython APIでCUIできる-ライブラリデータにアクセス例(コレクションを返す)
#---コレクションを返す
print(bpy.data.scenes) # <bpy_collection[1], BlendDataScenes>
- コレクションを表示
#---コレクションをlistにして表示
print(list(bpy.data.scenes)) # [bpy.data.scenes['Scene']]
#---e-
- コレクションのメンバーにアクセスする
#---コレクションのメンバーにアクセスする
print(bpy.data.scenes[0]) # <bpy_struct, Scene("Scene") at 0x0000026BBF1A6048>

print(bpy.data.scenes["Scene"]) # <bpy_struct, Scene("Scene") at 0x0000026BBF1A6048>

for scean in bpy.data.scenes: #全てにアクセス
    print(scean) # <bpy_struct, Scene("Scene") at 0x0000026BBF1A6048>
#---e-
- コレクションのメンバーの属性にアクセスする
#---コレクションのメンバーの属性にアクセスする
print(bpy.data.scenes["Scene"].name)
#---e-
#---深い階層の属性にアクセスする(ボタンのツールチップ(Python Tooltips)にはPython属性と演算子名が表示されるので確認可能)
print(bpy.data.scenes["Scene"].render.resolution_percentage) #resolution_percentageはレンダリング解像度のパーセンテージ 100
print(bpy.data.scenes["Scene"].eevee.taa_render_samples) #EEVEEのレンダリングサンプルの数 64
print(bpy.data.scenes[0].objects["Plane"].data.vertices[0].co.x) #-0.7811800241470337
#---e-
- 注意点: データは、bpy.data のコレクションのメソッドを介して追加および除去をします(bpy.types.Mesh()は型なのでこのような経由では操作出来ません)
bpy.context
- カスタムプロパティ-変数、コレクション、コンテキスト(アクティブなオブジェクト、シーン、ツール設定および他の多くの属性を取得する)も一例
bpy.context.object["MyOwnProperty"] = 42
- コンテキストは基本読み取り専用 --> APIにより変更可能 bpy.context.view_layer.objects.active = obj 一覧-"https://docs.blender.org/api/current/bpy.context.html#module-bpy.context"
#---コンテキストは読み取り専用(API 関数を実行するかデータ API を使用することで変更できます。)
bpy.context.object

bpy.context.selected_objects

bpy.context.visible_bones

'''
bpy.context.active_object = obj は読み取り専用でエラー ↓↓

'''
# オブジェクトをアクティブに設定
bpy.context.view_layer.objects.active = obj #APIにより動作する
#---e-
- カスタムコレクション(辞書)-単なる辞書データ --> 辞書を作成後Blenderのコレクションにする bpy.context.scene.collection.children.link(new_collection) #Blenderにコレクションを追加
#カスタムコレクション(辞書)

#---単なる辞書データ (Outliner-blenderFileに表示される)
collection = bpy.data.collections.new("MyTestCollection") #dictionaries can be assigned as long as they only use basic types.
collection["MySettings"] = {"foo": 10, "bar": "spam", "baz": {}}

del collection["MySettings"]
#---e-

#---辞書を作成後Blenderのコレクションにする
new_collection = bpy.data.collections.new("MyTestCollection")
new_collection["MyTestCollection"] = {"foo": 10, "bar": "spam", "baz": {}}
bpy.context.scene.collection.children.link(new_collection) #Blenderにコレクションを追加

target_collection = bpy.data.collections.get("MyTestCollection", "none")
print(target_collection) #<bpy_struct, Collection("MyTestCollection") at 0x0000026BBEE4E688>
bpy.data.collections.remove(target_collection)
#---e-
- コンテキストを使ってシーン内のObjを全て選択する例
import bpy
from bpy import context

context_override = context.copy()
context_override["selected_objects"] = list(context.scene.objects) #シーン内のすべてのオブジェクト)のリストに設定
with context.temp_override(**context_override): #dictの可変長引数
    bpy.ops.object.delete()
bpy.ops (--------------以下24/02/11 追記---)
- オペレーター(ツール)-ボタン、メニュー項目など --> bpy.ops モジュール オペレーターチートシート
https://docs.blender.org/manual/en/dev/advanced/operators.html#bpy-ops-wm-operator-cheat-sheet - cubeを作るオペレーター例、面を分割するオペレーター例
#オペレーター(ツール)-ボタン、メニュー項目など
#---オペレーター(ツール)
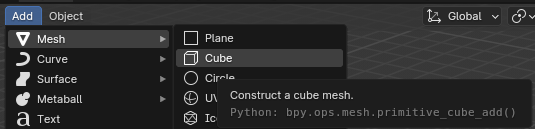
bpy.ops.mesh.primitive_cube_add() #cubeを作りたい -上部Add-Mesh-Cube (Python Tooltipsで確認できる)
#EditモードでObjを選択後に
bpy.ops.mesh.subdivide(number_cuts=3, smoothness=0.5) #面の分割 右クリック-subdivide (Python Tooltipsで確認できる)
#EditモードでObjを選択後に
bpy.ops.mesh.hide(unselected=False) #選択したメッシュの非表示化
bpy.ops.object.transform_apply() #オブジェクトの変換を適用する
bpy.ops.mesh.flip_normals() #選択したメッシュの法線を反転
bpy.ops.object.hide_view_set() #使えない??
#---e-
bpy.ops「ポーリング」機能
- 「ポーリング」機能 --> カーソルが有効な領域にあるか?,オブジェクトが正しいモードか?チェック機能
- 「ポーリング」の例 --> if bpy.ops.object.mode_set.poll(): bpy.ops.object.mode_set(mode='EDIT')
#---「ポーリング」機能 poll()
if bpy.ops.object.mode_set.poll(): #この条件だとどんな場合でもtrueになるんだけど??
    bpy.ops.object.mode_set(mode='EDIT')
    print("change EditMode")
else:
    print("not change EditMode")
独自ボタンを既存のメニューに追加(継承を利用)
- 独自ボタンを既存のメニューに追加する(アドオン化しないとblender閉じるでリセット) --> bpy.types.VIEW3D_MT_object.append(menu_func) # 「「3D Viewport > 上部Object > 変数bl_label」に登録
- Menu Searchメニュー検索ポップアップでメニュー登録されているか確認どうぞ --> F3(Menu Search)-sample
import bpy


def main(context):
    for ob in context.scene.objects:
        print(ob) ##<bpy_struct, Object("Camera") at 0x000001FA5F661D08> <bpy_struct, Object("Light") at 0x000001FA5F617208> <bpy_struct, Object("Light.001") at 0x000001FA5F616B08>


class SimpleOperator(bpy.types.Operator): #継承
    """自作機能をメニューやツールバーから呼び出すボタン追加機能(継承で差分作成), 標準出力をするクラス"""
    bl_idname = "object.simple_operator"
    bl_label = "Simple Object Operator" #ボタンのラベル

    @classmethod
    def poll(cls, context):
        return context.active_object is not None

    def execute(self, context):
        main(context)
        return {'FINISHED'}


def menu_func(self, context):
    """変数bl_label のボタン作成"""
    self.layout.operator(SimpleOperator.bl_idname, text=SimpleOperator.bl_label)


# Register and add to the "object" menu (required to also use F3 search "Simple Object Operator" for quick access).
def register():
    bpy.utils.register_class(SimpleOperator)
    bpy.types.VIEW3D_MT_object.append(menu_func) # 3D Viewport > 上部Object > 変数bl_label のボタン


def unregister():
    bpy.utils.unregister_class(SimpleOperator)
    bpy.types.VIEW3D_MT_object.remove(menu_func)


if __name__ == "__main__":
    register()

    # test call
    bpy.ops.object.simple_operator()
独自ボタンを右端部既存のPropatiesパネルに追加(panel継承を利用)
-右端部Object-変数bl_label に登録(アドオン化しないとblender閉じるでリセット)
class HelloWorldPanel(bpy.types.Panel):
    """右端部既存のPropatiesパネルに独自ボタンを追加(継承で差分作成)"""
    bl_label = "Hello World Panel" #ボタンのラベル名
    bl_idname = "OBJECT_PT_hello"
    bl_space_type = 'PROPERTIES'
    bl_region_type = 'WINDOW'
    bl_context = "object"

    def draw(self, context):
        """表示UI"""
        layout = self.layout

        obj = context.object

        row = layout.row()
        row.label(text="Hello world!", icon='WORLD_DATA') #1行目
        row = layout.row()
        row.label(text="Active object is: " + obj.name) #2行目
        row = layout.row()
        row.prop(obj, "name") #3行目
        row = layout.row()
        row.operator("mesh.primitive_cube_add") #4行目ボタン

def register():
    bpy.utils.register_class(HelloWorldPanel)

def unregister():
    bpy.utils.unregister_class(HelloWorldPanel)

if __name__ == "__main__":
    register()
3つの型 1))Native Types 2))Internal Types 3))Mathutils Types
#---1))Native Types
C.object.rotation_mode = 'AXIS_ANGLE'
bpy.context.scene.camera.data.show_guide = {'GOLDEN', 'CENTER'}
self.report({'WARNING', 'INFO'}, "Some message!")
#---e-


#---2))Internal Types
bpy.context.object
C.scene.objects
#---e-

#---3))Mathutils Types ベクトル、四元数、オイラー角、行列、色のタイプ
bpy.context.object.matrix_world @ bpy.context.object.data.verts[0].co
bpy.context.object.location.z += 2.0
#---e-
キーフレームを追加する(アニメ)
#---キーフレームを追加する(アニメ) -1))プロパティを直接使用する方法
obj = bpy.context.object
obj.location[2] = 0.0
obj.keyframe_insert(data_path="location", frame=10.0, index=2) #10コマ目
obj.location[2] = 1.0
obj.keyframe_insert(data_path="location", frame=20.0, index=2) #20コマ目
#---e-


#---キーフレームを追加する(アニメ) -2))カーブとキーフレーム データを手動で作成し、プロパティへのパスを設定
obj = bpy.context.object
obj.animation_data_create()
obj.animation_data.action = bpy.data.actions.new(name="MyAction") #アニメに名前を付ける
fcu_z = obj.animation_data.action.fcurves.new(data_path="location", index=2)
fcu_z.keyframe_points.add(2)
fcu_z.keyframe_points[0].co = 10.0, 0.0
fcu_z.keyframe_points[1].co = 20.0, 1.0
#---e-
【API Overview】は後日
【API Reference Usage】
- bpyのAPIは大きく分けて3つ、1))bpy.types-(IDデータの型) 2))bpy.context-(現在の状態やユーザーの選択にアクセス) 3))bpy.data-(データにアクセス)
ID Data
- 3))bpy.data-(データにアクセス) --> IDデータブロックはデータコンテナ --> bpy.data.* は Blender の最上位のデータコンテナで、この中に様々な IDデータブロックが格納されています。
- 3))bpy.data-(データにアクセス) --> IDs はblendファイルのデータ。IDs には Python の bpy.data.* からアクセスでき.name 属性があり、アニメーションデータについては.animation_dataがある。IDsには独自のGCシステムあり。
- 1))bpy.types-(IDデータの型) --> IDデータ型(bpy.types.IDのサブクラス)には、シーン (bpy.types.Scene)、グループ (bpy.types.Group)、オブジェクト (bpy.types.Object)、メッシュ (bpy.types.Mesh)、ワークスペース (bpy.types.WorkSpace)、ワールド (bpy.types.World)、アーマチュア (bpy.types.Armature)、画像 (bpy.types.Image)、テクスチャ (bpy.types.Texture)があります。
- Blender で配布されているスクリプトをさらに調べるには(ボタン上で右クリOnline Python Referenceで飛べる) --> ドキュメントにリンクされます。
- 2))bpy.context-(現在の状態やユーザーの選択にアクセス) --> オブジェクトには多くの参照がありますが、オブジェクトにアクセスする最も一般的な場所の1つはコンテキストを使用することです。--ユーザーが選択したデータにアクセスしたい場合は、通常、bpy.context参照を確認するだけで済みます
- 2))bpy.context-(現在の状態やユーザーの選択にアクセス) --> a))モード固有である場合、ウェイト ペイント モードでのみ実行されるツールを作成する場合はbpy.context.weight_paint_objectを使用することが適切-b))モード固有でない場合(汎用的)、ユーザーが最後に選択したアイテムにアクセスするには、bpy.context.active_bone、bpy.context.active_node、bpy.context.active_objectが適切 実例: bpy.context.active_object.locationで属性にアクセス
- 2))bpy.context と 3))bpy.data で同じ結果であるが経路が違う例 --> 2))bpy.context.active_object.locationで属性にアクセス --> 3))bpy.data.objects["Cube"].location -bpy.data.objects では、これはオブジェクトのコレクションであるため、そのメンバーの 1 つにアクセスする必要があります。
- 2))bpy.context と 3))bpy.data で同じ結果であるが経路が違う例の補足 --> 参照内のオブジェクトにアクセスするための他の一般的な場所は、bpy.types.BlendData.objects これはbpy.data.objectsとしてリストされていませんが、これはbpy.dataがbpy.types.BlendDataクラスのインスタンスであるため、ドキュメントがそこを指しているためです。
Nested Properties, b-2))Copy Data Path, a))Indirect Data Access
- 1))ネストされていないプロパティ bpy.context.active_object.location 2))ネストされた間接的なプロパティ bpy.context.scene.cycles.samples bpy.context.tool_settings.weight_paint.brush.size bpy.context.window.screen.show_fullscreen
- 2))ネストされた間接的なプロパティのデータパスの調べ方 --> a))ドキュメントを使用して参照をたどる b-1))ボタンのツールチップ(Python Tooltips)には Python属性と演算子名が表示されます --> Edit-Prefarence-interface-python tooltipsチェック b-2))ボタン上で右クリcopyFullDataPathでクリップボードに保存される
- a))ドキュメントを使用して参照をたどる の実例 --> Blenderのツールバーで、「Context → Tool Settings → Sculpt → Brush → Texture → Contrast」とたどります。--> a-1))コンテキストでアクセス。bpy.context.tool_settings.sculpt.brush.texture.contrast a-2))自動化のためには bpy.data を使用することが一般的である。bpy.data.textures["Texture"].contrast
- b-2))ボタン上で右クリcopyFullDataPath の実例 --> cubeを作りSubdivisionを実行する。ModifierPropatyの実行UIのLevelsViewportボタン上で右クリcopyFullDataPath --> bpy.data.objects["Cube"].modifiers["Subdivision"].levels
Operators (bpy.ops)
- ホットキーとボタンは bpy.ops経由です。
- ボタンのツールチップ(Python Tooltips)には Python属性と演算子名が表示されます。--> ツールチップが表示されないか、Python: の行がない場合、そのボタンはオペレータを使用しておらず、Pythonからアクセスすることはできません。↓↓但し
- スクリプトでこれを使用したい場合 --> マウスをボタンの上に置いた状態で Ctrl-C を押してクリップボードにコピーすることができます。 例: bpy.ops.wm.call_menu(name="VIEW3D_MT_view")
Info Editor
- Info Editor --> 実行したオペレータを記録し、それらをInfoエディターに表示します。注意:すべてのオペレータが表示のために登録されるわけではありません。たとえば、ビューをズームするようなアクションは繰り返すのにあまり役立たないため、出力から除外されています。
【Best Practice】(--------------以下24/02/12 追記---)
- 私たちが推奨するプラクティスがあります
Style Conventions
- スタイル規約 --> スタイルガイドは pep8
- ・クラス名はキャメルMyClass
- ・モジュール名は小文字スネークmy_module
- ・インデントはnotTab
- ・演算子にはスペースを1 + 1, not 1+1
- ・importは明示的に(*は使わない)
- ・1 行に複数のステートメントを使用しない
- スタイル規約 --> Blender Python スクリプトに使用される追加の規則 -->
- 1))列挙型には'一重引用符'を使用し、文字列には"二重引用符"を使用します。
- 2))PEP8 では、行は 79 文字を超えてはならないと定義されていますが、これは制限が厳しすぎると判断したため、スクリプトごとにオプションとしています。
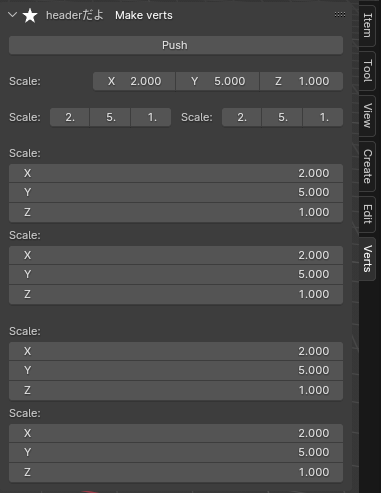
User Interface Layout
- UIボタン配置のコード例。--> layout.prop(context.object, "scale")
import bpy
import bpy.utils.previews
import bmesh

import os

bl_info = {
    "name": "Sample: Make Vert",
    "author": "maitakedayo",
    "version": (1, 0, 0),
    "blender": (4, 0, 2),
    "location": "3D Viewport > Sidebar > Vert",
    "description": "Addon that creates a vert.",
    "warning": "",
    "support": "COMMUNITY",
    "doc_url": "",
    "tracker_url": "",
    "category": "Sample"
}

custom_image_collection = None

def create_vert():
    """スケッチ用に頂点を1つ作る関数"""
    new_mesh = bpy.data.meshes.new("Vert")
    new_obj = bpy.data.objects.new("Vert", new_mesh)
    bpy.context.scene.collection.objects.link(new_obj)
    bpy.context.view_layer.objects.active = new_obj
    new_obj.select_set(True)

    bm = bmesh.new()

    # 頂点の位置
    verts = [
        bm.verts.new([0, 0, 0]),
        bm.verts.new([0, 0, 0.5]),
    ]

    #bm更新
    bm.to_mesh(new_mesh)

class SAMPLE_OT_CreateVert(bpy.types.Operator): #継承
    """メニューやツールバーから呼び出すボタン追加機能(継承で差分作成), 星2Dを作るクラス"""

    bl_idname = "sample.make_vert" #クラス変数
    bl_label = "Make vert"
    bl_description = "Make vert"
    bl_options = {'REGISTER', 'UNDO'}
    #F9オペレータプロパティを使いたい

    # execute:オペレータが実行されたときに呼び出される
    def execute(self, context): #親のexecute()をオーバーライドしている
        create_vert()
        print("Operator executed.")
        return {'FINISHED'}

class SAMPLE_PT_CreateVert(bpy.types.Panel): #継承
    """Nでボタン表示作成(継承で差分作成)"""
    bl_idname = "SAMPLE_PT_CreateVert"
    bl_label = "Make verts"
    bl_space_type = 'VIEW_3D'
    bl_region_type = 'UI'
    bl_category = "Verts"

    def draw_header(self, context):
        """アイコン追加"""
        layout = self.layout

        layout.label(text="headerだよ", icon_value=custom_image_collection["custom_icon"].icon_id)

    def draw(self, context):
        """Nでボタン表示UI"""
        layout = self.layout

        layout.operator(SAMPLE_OT_CreateVert.bl_idname, text="Push") #作成ボタン
        layout.separator()

        layout.prop(context.object, "scale") #UIボタン配置
        layout.separator()

        row = layout.row()
        row.prop(context.object, "scale")
        row.prop(context.object, "scale")
        layout.separator()

        col = layout.column()
        col.prop(context.object, "scale")
        col.prop(context.object, "scale")
        layout.separator()

        split = layout.split() #layout.separator()の複合
        col = split.column()
        col.prop(context.object, "scale")
        col.prop(context.object, "scale")


classes = [
    SAMPLE_OT_CreateVert,
    SAMPLE_PT_CreateVert,
]

# register:アドオンのオペレータを登録し、メニューに追加
def register():
    for c in classes:
        bpy.utils.register_class(c)

    #カスタムボタンの左横に自作pngアイコンを使う
    global custom_image_collection
    custom_image_collection = bpy.utils.previews.new()
    custom_image_collection.load("custom_icon", f"{os.path.dirname(__file__)}/custom_icon.png", 'IMAGE')

    print(f"Addon '{bl_info['name']}' is now enabled.")

# unregister:アドオンのオペレータの登録を解除し、メニューから削除
def unregister():
    bpy.utils.previews.remove(custom_image_collection)

    for c in reversed(classes):
        bpy.utils.unregister_class(c)

    print(f"Addon '{bl_info['name']}' is now disabled.")

if __name__ == "__main__":
    register()
- blender_UI命名規則(以下の変数名を使ってね) row, col, split, flow: スペースが不足すると次の行に折り返される, sub: ネストされたレイアウト
Script Efficiency
- スクリプトの効率化のヒント(blender関係ないpythonの話)
List Manipulation (General Python Tips)
- 以下は分かりにくいがループ処理がありO(n)なので注意して使ってね --> my_list.count(list_item) my_list.index(list_item) my_list.remove(list_item) if list_item in my_list: ...
Modifying Lists
- listに追加や削除はO(n)なのでO(1)のメソッドを使ってね --> my_list.append(list_item) my_list.extend(some_list) my_list.pop() del my_list[-1]
- O(n)なのでインデックスを使用しての削除は重い my_list.insert(index, list_item) list.pop(index) --> listを再構築する方が高速で良い場合がある (ただし、メモリ効率は低下) たとえば、リスト内のすべての三角形のポリゴンを削除する場合など polygons = [p for p in mesh.polygons if len(p.vertices) != 3]
Adding List Items
- リストに別のリストを追加したい場合、単にループを使う代わりに extend() メソッドをお勧めする my_list.extend([a, b, c...])
- 先頭にinsert(0, list_item) メソッドはO(n)なのでappend()より遅い。逆順にしたい場合はsome_list[::-1]のスライスで複製するのが良いが実行時間は測定しておくべき
Removing List Items
- my_list.remove(list_item) メソッドはO(n)なのでpop_indexを最後にするように交換したあとに my_list.pop() を使って削除した方が早い my_list[-1], my_list[pop_index] = my_list[pop_index], my_list[-1] my_list.pop()
Avoid Copying Lists
- listやdictを関数に渡すときは、Python がメモリ内でlistを複製する必要がないようにした方が早い。my_list[:]スライスされたリストも複製なので大量の余分なメモリを使用する可能性があります。
Writing Strings to a File
- 文字列の結合は+よりもjoin()が早い --> str1 + " " + str2 + " " + str3 + "\n" よりも " ".join((str1, str2, str3, "\n"))
Parsing Strings
- Blenderにインポートする際に文字列を解析するいくつかの方法があります
- 数字の解析 --> eval(string) の代わりに float(string) を使用すると良い.整数であることが分かっている場合は int(string) ,。float() は整数でも動作しますが、整数を読み込む際に int() を使う方が速い
- 文字列の先頭や末尾を確認する場合 --> startswith(), endswith()が早い, lower() または upper()も便利です。
Error Handling
- 基本的にtry文はif文より遅いです。
Value Comparison
- 1))同値性の比較 a == b, 2))同一性の比較 a is b -同じ値を確認していることが分かっている場合、is の方が速いです。
Time Your Code
- パフォーマンスは時間を計測 --> time_start = time.time() #実行code print("My Script Finished: %.4f sec" % (time.time() - time_start))
【Tips and Tricks】
- 続きは後日
Discussion