🪜
Jetpack ComposeでFirestoreを使う
Overview
最近、Jetpack Composeをキャッチアップしていて、NativeのAndroidでFirestoreを使うにはどうすればいいのかアウトプットするために簡単だけど、難しかったサンプルアプリを作ってみました。
公式の動画の通りにやれば、google-service.jsonは追加できる。
今回やることは、Firestoreにデータを追加することと、追加したデータを表示することです。
summary
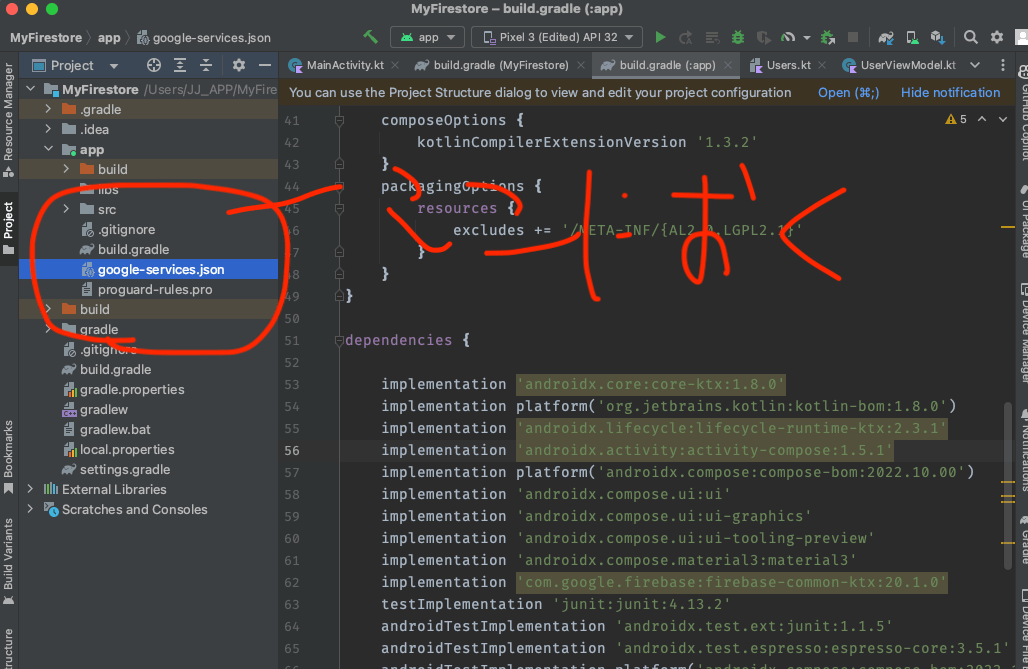
2箇所のbuild.gradleにパッケージのコードを追加する。
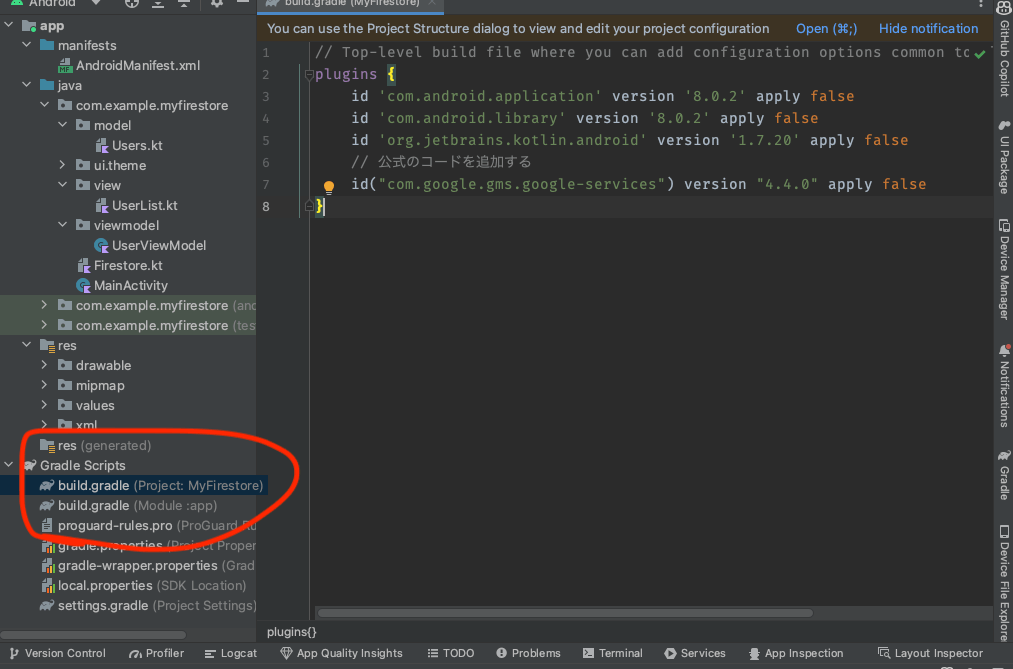
/Users/JJ_APP/MyFirestore/build.gradle
// Top-level build file where you can add configuration options common to all sub-projects/modules.
plugins {
    id 'com.android.application' version '8.0.2' apply false
    id 'com.android.library' version '8.0.2' apply false
    id 'org.jetbrains.kotlin.android' version '1.7.20' apply false
    // 公式のコードを追加する
    id("com.google.gms.google-services") version "4.4.0" apply false
}
こちらだと、パッケージを追加したら、画面右上のsync nowのボタンを押す。
/Users/JJ_APP/MyFirestore/app/build.gradle
plugins {
    id 'com.android.application'
    id 'org.jetbrains.kotlin.android'
    // 公式のコードを追加する
    id("com.google.gms.google-services")
}

android {
    namespace 'com.example.myfirestore'// このidをFirebaseに設定する
    compileSdk 33

    defaultConfig {
        applicationId "com.example.myfirestore"
        minSdk 24
        targetSdk 33
        versionCode 1
        versionName "1.0"

        testInstrumentationRunner "androidx.test.runner.AndroidJUnitRunner"
        vectorDrawables {
            useSupportLibrary true
        }
    }

    buildTypes {
        release {
            minifyEnabled false
            proguardFiles getDefaultProguardFile('proguard-android-optimize.txt'), 'proguard-rules.pro'
        }
    }
    compileOptions {
        sourceCompatibility JavaVersion.VERSION_1_8
        targetCompatibility JavaVersion.VERSION_1_8
    }
    kotlinOptions {
        jvmTarget = '1.8'
    }
    buildFeatures {
        compose true
    }
    composeOptions {
        kotlinCompilerExtensionVersion '1.3.2'
    }
    packagingOptions {
        resources {
            excludes += '/META-INF/{AL2.0,LGPL2.1}'
        }
    }
}

dependencies {

    implementation 'androidx.core:core-ktx:1.8.0'
    implementation platform('org.jetbrains.kotlin:kotlin-bom:1.8.0')
    implementation 'androidx.lifecycle:lifecycle-runtime-ktx:2.3.1'
    implementation 'androidx.activity:activity-compose:1.5.1'
    implementation platform('androidx.compose:compose-bom:2022.10.00')
    implementation 'androidx.compose.ui:ui'
    implementation 'androidx.compose.ui:ui-graphics'
    implementation 'androidx.compose.ui:ui-tooling-preview'
    implementation 'androidx.compose.material3:material3'
    implementation 'com.google.firebase:firebase-common-ktx:20.1.0'
    testImplementation 'junit:junit:4.13.2'
    androidTestImplementation 'androidx.test.ext:junit:1.1.5'
    androidTestImplementation 'androidx.test.espresso:espresso-core:3.5.1'
    androidTestImplementation platform('androidx.compose:compose-bom:2022.10.00')
    androidTestImplementation 'androidx.compose.ui:ui-test-junit4'
    debugImplementation 'androidx.compose.ui:ui-tooling'
    debugImplementation 'androidx.compose.ui:ui-test-manifest'

    // 公式のコードを追加する
    implementation(platform("com.google.firebase:firebase-bom:32.4.1"))
    // Firestoreのパッケージを追加する
    implementation("com.google.firebase:firebase-firestore-ktx")
}
MVVMでコードを書いていく。
MVVMぽくしてるだけですが😅
フォルダ分けは今回はやらなくても良くて、ファイルだけ分けてソースコードを書くだけでもいいですよ。
data classを作成する。
package com.example.myfirestore.model

// 初期値がいるらしい?
data class User(
    val born: Int = 0,
    val first: String = "",
    val last: String = ""
)
Repositoryはないけど、MVVM必要だったので作りました。
package com.example.myfirestore.viewmodel

import android.util.Log
import androidx.lifecycle.ViewModel
import com.example.myfirestore.model.User
import com.google.firebase.firestore.FirebaseFirestore
import kotlinx.coroutines.flow.MutableStateFlow
import kotlinx.coroutines.flow.StateFlow
import kotlinx.coroutines.flow.asStateFlow

class UserViewModel : ViewModel() {
    // StateFlowは値を保持するためのクラス
    private val _users = MutableStateFlow<List<User>>(emptyList())
    // usersはStateFlowの値を公開するためのプロパティ
    val users: StateFlow<List<User>> = _users.asStateFlow()
    // Firestoreのインスタンスを取得
    private val db = FirebaseFirestore.getInstance()
    // usersコレクションのデータをリアルタイムに取得
    init {
        db.collection("users")
            .addSnapshotListener { snapshot, e ->
                if (e != null) {
                    Log.w(TAG, "Listen failed.", e)
                    return@addSnapshotListener
                }

                val userList = mutableListOf<User>()
                // 取得したデータをusers変数に格納
                for (doc in snapshot!!) {
                    doc.toObject(User::class.java)?.let {
                        userList.add(it)
                    }
                }
                // StateFlowの値を更新
                _users.value = userList
            }
    }
    // Firestoreにデータを追加する関数
    companion object {
        private const val TAG = "UserViewModel"
    }
}
データを追加する機能
ボタンを押すと実行できる機能です。使わないときは、コメントアウトしてください。
これを参考に追加機能を実装しました
package com.example.myfirestore

import com.example.myfirestore.model.Users
import com.example.myfirestore.model.users
import com.google.firebase.firestore.ktx.firestore
import com.google.firebase.ktx.Firebase

// Firebase Firestoreのインスタンスを取得
val db = Firebase.firestore

// 追加するデータをMapで定義
val user = hashMapOf(
    "first" to "Ada",
    "last" to "Lovelace",
    "born" to 1815,
)

// Firestoreにデータを追加する関数
fun addData() {
    // usersコレクションにデータを追加
    db.collection("users")
        .add(user)
        .addOnSuccessListener { documentReference ->
            println("DocumentSnapshot added with ID: ${documentReference.id}")
        }
        .addOnFailureListener {
            println("Error adding document")
        }
}

// usersコレクションのデータをリアルタイムに取得する関数
fun getData() {
    // usersコレクションのデータをリアルタイムに取得
    db.collection("users")
        .addSnapshotListener { value, e ->
            if (e != null) {
                println("Listen failed.")
                return@addSnapshotListener
            }

            // 取得したデータをusers変数に格納
            if (value != null) {
                users = value.toObjects(Users::class.java)
            }
        }
}
🔥データを追加するボタンはこれ
ハードコーディングですが、ボタンを押すとデータを追加するメソッドを実行できます。
@Composable
fun Greeting(name: String, modifier: Modifier = Modifier) {
    Column(
        modifier = modifier
    ) {
        Text(text = "Hello $name!")
        // Firestoreのデータを取得して表示する
        // 縦に余白を作る
        Spacer(modifier = Modifier.weight(1f))
        // usersコレクションからリアルタイムにデータを取得して画面に表示する
        LazyColumn {
            items(users.size) { index ->
                Text(text = users[index].first)
            }
        }
        Spacer(modifier = Modifier.weight(1f))
        // Firestoreにデータを追加するボタン
        Example {
            addData()
        }

    }
}

@Composable
fun Example(onClick: () -> Unit) {
    FloatingActionButton(
        onClick = { onClick() },
    ) {
        Icon(Icons.Filled.Add, "Floating action button.")
    }
}

@Preview(showBackground = true)
@Composable
fun GreetingPreview() {
    MyFirestoreTheme {
        Greeting("Android")
    }
}
アプリを実行するコードはこれです。
ここで必要なコードをimportしてビルドすればアプリの機能は完成です。追加ボタンを使うときは、コメントを外して、画面に表示して使ってください。
package com.example.myfirestore

import android.os.Bundle
import androidx.activity.ComponentActivity
import androidx.activity.compose.setContent
import androidx.compose.material3.MaterialTheme
import androidx.compose.material3.Surface
import com.example.myfirestore.ui.theme.MyFirestoreTheme
import com.example.myfirestore.view.UserList
import com.example.myfirestore.viewmodel.UserViewModel

class MainActivity : ComponentActivity() {
    override fun onCreate(savedInstanceState: Bundle?) {
        super.onCreate(savedInstanceState)
        setContent {
            MyFirestoreTheme {
                // A surface container using the 'background' color from the theme
                Surface(
                    color = MaterialTheme.colorScheme.background
                ) {
                    UserList(
                        viewModel = UserViewModel()
                    )
                }
            }
        }
    }
}

//@Composable
//fun Greeting(name: String, modifier: Modifier = Modifier) {
//    Column(
//        modifier = modifier
//    ) {
//        Text(text = "Hello $name!")
//        // Firestoreのデータを取得して表示する
//        // 縦に余白を作る
//        Spacer(modifier = Modifier.weight(1f))
//        // usersコレクションからリアルタイムにデータを取得して画面に表示する
//        LazyColumn {
//            items(users.size) { index ->
//                Text(text = users[index].first)
//            }
//        }
//        Spacer(modifier = Modifier.weight(1f))
//        // Firestoreにデータを追加するボタン
//        Example {
//            addData()
//        }
//
//    }
//}

//@Composable
//fun Example(onClick: () -> Unit) {
//    FloatingActionButton(
//        onClick = { onClick() },
//    ) {
//        Icon(Icons.Filled.Add, "Floating action button.")
//    }
//}
//
//@Preview(showBackground = true)
//@Composable
//fun GreetingPreview() {
//    MyFirestoreTheme {
//        Greeting("Android")
//    }
//}
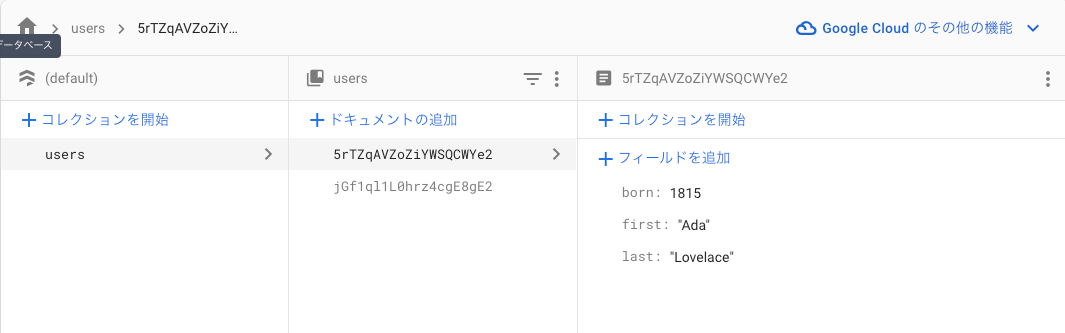
Firestoreにデータを保存しておきましょう!
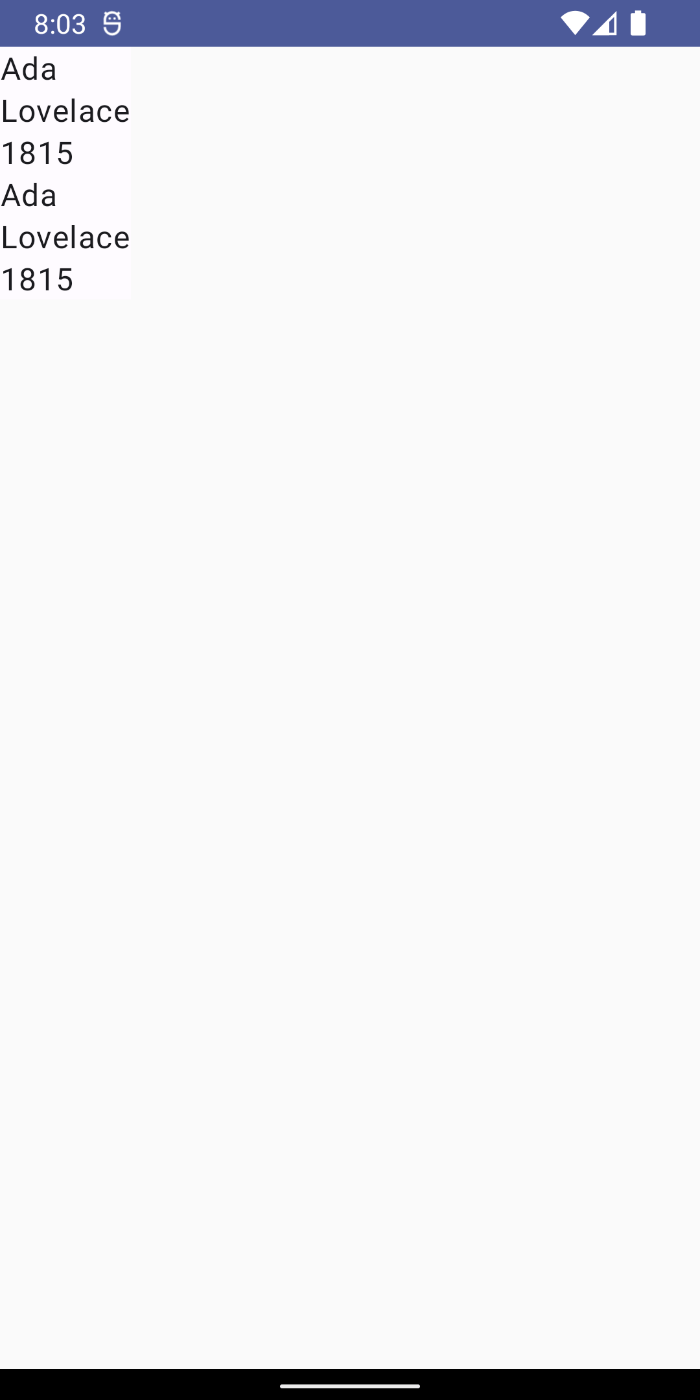
ビルドした画面
先ほど保存したデータが表示されれば成功です🙌
thoughts
今回は、NativeのAndroidでFirestoreを使って躓いたのは、あまり情報がなかったので、試行錯誤をしたところでした。Udemyの講座を参考にしようと思ったのですが、なぜかリアルタイムデータベースしかなかった???
こちらが完成品のソースコードです
Discussion