


🔍前回の環境構築の続き
こちらの記事を参考に、TypeScriptで、fastifyの環境構築をしました。次は、REST APIを作ってみようと思います。
🛠️REST APIを作ってみる
ダミーのデータが入っている配列を定義して、HTTP POST GETができるメソッドを定義する。
import fastify from 'fastify'
import { FastifySchema, RouteShorthandOptionsWithHandler } from 'fastify'

const server = fastify()

// Dummy data array
let shopping = ['りんご', 'ぶどう', 'みかん']

server.get('/ping', async (request, reply) => {
  return 'pong\n'
})

// GET endpoint to retrieve data from the shopping array
server.get('/shopping', async (request, reply) => {
  return shopping
})

// Define a schema for the POST request body
const postShoppingSchema: FastifySchema = {
  body: {
    type: 'object',
    properties: {
      item: { type: 'string' }
    },
    required: ['item']
  }
}

// POST endpoint to add data to the shopping array
const postShoppingOptions: RouteShorthandOptionsWithHandler = {
  schema: postShoppingSchema,
  handler: async (request, reply) => {
    // asを使用して、型アサーションを行う。型アサーションとは、型を明示的に指定すること。
    const { item } = request.body as { item: string }
    shopping.push(item)
    return shopping
  }
}

server.post('/shopping', postShoppingOptions)

server.listen({ port: 8080 }, (err, address) => {
  if (err) {
    console.error(err)
    process.exit(1)
  }
  console.log(`Server listening at ${address}`)
})
JavaScriptにトランスパイルする
npm run build
簡易サーバーを起動する
npm run start
このコードは、/shoppingというエンドポイントに対してGETとPOSTリクエストを受け付けます。GETリクエストは現在のショッピングリストを返し、POSTリクエストは新たなアイテムをショッピングリストに追加します。
以下に、curlコマンドを使用して、このAPIにアクセスする方法を示します:
新しいアイテムを追加するPOSTリクエスト:
POSTした後に、追加されたデータが表示される
curl -X POST -H "Content-Type: application/json" -d '{"item":"バナナ"}' http://localhost:8080/shopping
ターミナルのログ
2回実行したので、バナナが2個になってます😅
project % curl -X POST -H "Content-Type: application/json" -d '{"item":"バナナ"}' http://localhost:8080/shopping

["りんご","ぶどう","みかん","バナナ","バナナ"]%
ショッピングリストを取得するGETリクエスト:
curl -X GET http://localhost:8080/shopping
ターミナルのログ
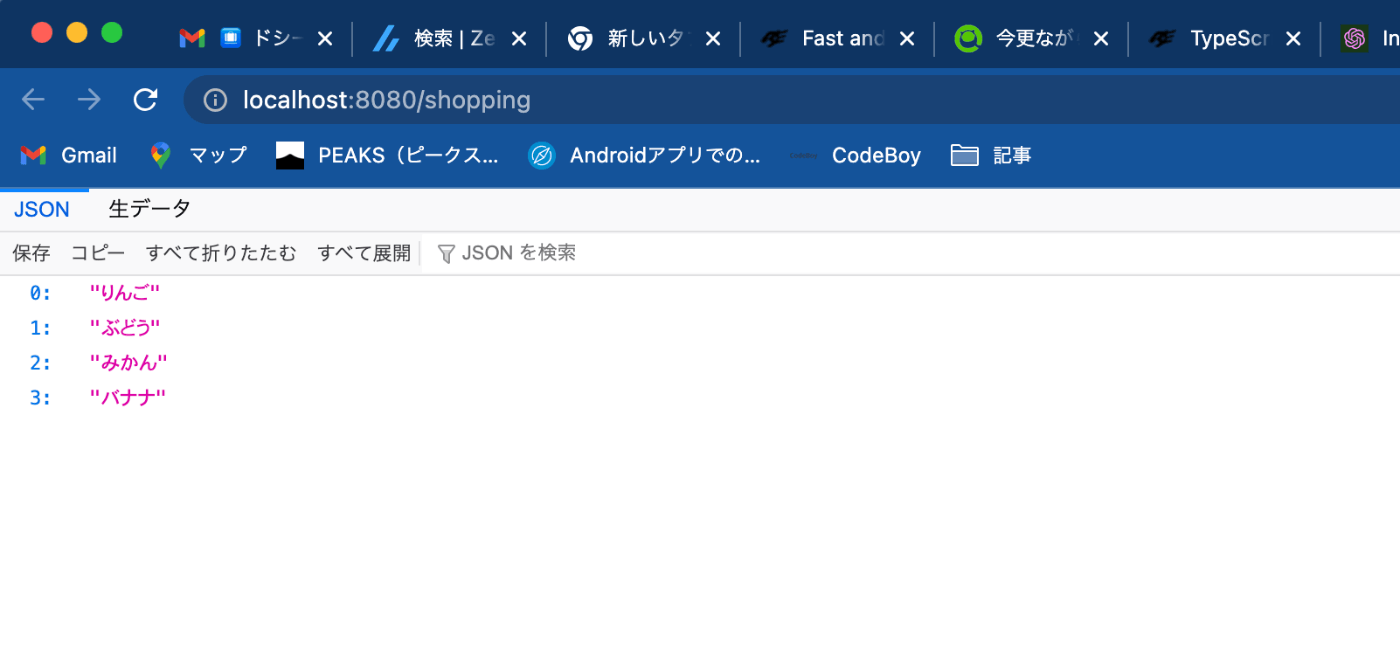
HTTPのGETメソッドで、APIからのデータを取得すると配列のデータが表示されました。
project % curl -X GET http://localhost:8080/shopping

["りんご","ぶどう","みかん","バナナ","バナナ"]%
エンドポイントに、アクセスすると、ダミーのデータをブラウザでも表示することができます。
ポストマンを使う場合
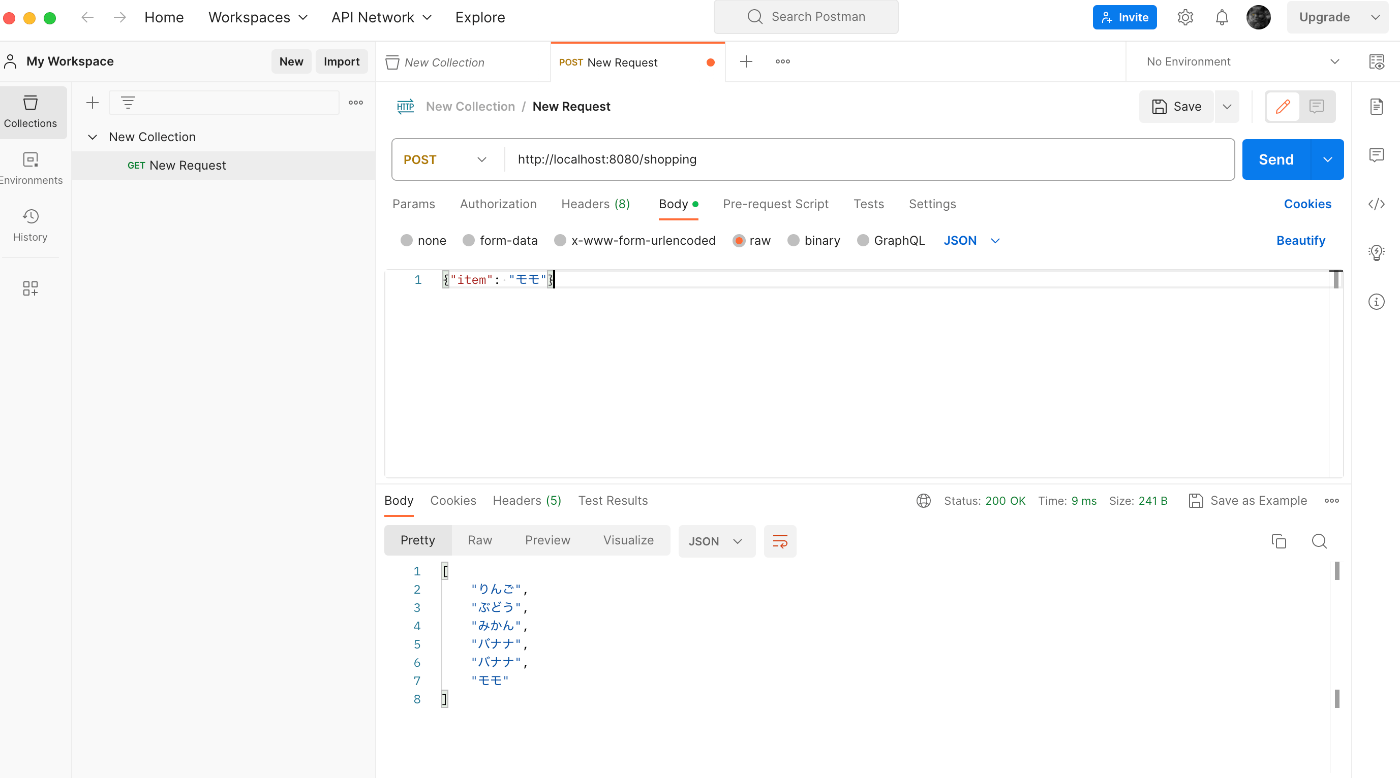
curlだとやりにくい人は、ポストマンと呼ばれているデスクトップアプリを使うと便利です。データを送信するときは、JSON形式で行います。
POSTMANを使ってPOSTリクエストを送信する際には、通常JSON形式でボディを送信します。上記のFastifyサーバー設定に基づいて、以下の手順を実行します:
- POSTMANを開き、新しいリクエストを作成します。
- メソッドを「POST」に設定し、URLフィールドに
http://localhost:8080/shoppingと入力します。 - リクエストヘッダーズで、「Content-Type」を
application/jsonに設定します。 - 「Body」タブを選択し、「raw」を選択します。
- JSON形式でデータを入力します。例えば、「モモ」を追加する場合は、次のようになります:
{"item": "モモ"}
{}を使用してデータを囲む理由は、JSON形式のデータは通常オブジェクト(キーと値のペア)または配列([]で囲まれた値のリスト)として表現され、上記のFastifyサーバーではオブジェクト形式のリクエストボディを期待しているからです。
まとめ
fastiryで、httpメソッドを使う場合は、こちらのドキュメントを見ると良さそうです。

Discussion