AWS Amplify + React Native + Expo を始めてみる
こちらの記事は「山陰 Advent Calendar 2022」の19日目の記事です。
AWS Amplify + React Native + Expo の組み合わせでモバイルアプリケーションを作成してみました。
今回は以下の流れを紹介します。
- AmplifyでExpoプロジェクト作成
- Expo Application Services (EAS) を使ってアプリをビルド
プロジェクトを作成
Amplifyの公式ドキュメントにステップバイステップでアプリケーションを作成するチュートリアルがあります。その中にReact NativeとExpoを使用するものも用意されています。
チュートリアルを参考にまずAmplify CLIのインストール、環境設定など必要環境を準備します。
続いてExpoプロジェクトを作成していきます。
Expo CLIのインストール
$ npm install -g expo-cli
Expoプロジェクトを作成
$ npx create-expo-app my-app
npx: 1個のパッケージを5.784秒でインストールしました。
✔ Downloaded and extracted project files.
✔ Installed JavaScript dependencies.

✅ Your project is ready!

To run your project, navigate to the directory and run one of the following yarn commands.

- cd my-app
- yarn android
- yarn ios
- yarn web
シミュレータ、実機で動作確認
$ cd my-app
$ npx expo start
Starting project at /Users/ishikura/work/_sandbox/my-app
Starting Metro Bundler

# ...
# QRコードが表示されます
# ...

› Metro waiting on exp://192.168.0.76:19000
› Scan the QR code above with Expo Go (Android) or the Camera app (iOS)

› Press a │ open Android
› Press i │ open iOS simulator
› Press w │ open web

› Press j │ open debugger
› Press r │ reload app
› Press m │ toggle menu

› Press ? │ show all commands

Logs for your project will appear below. Press Ctrl+C to exit.
iOS、またはAndroidのシミュレータでも確認ができます。
それぞれXcodeやAndroid Studioが必要です。
キーボードのiを押下してiOSシミュレータで確認すると以下のような画面が表示されます。

また、QRコードを読み込むとExpo Goというクライアントアプリケーション経由で実機での動作確認も簡単に行えます。
Amplifyの設定
Amplifyの設定をしていきます。
$ amplify init

Note: It is recommended to run this command from the root of your app directory
? Enter a name for the project myapp
The following configuration will be applied:

Project information
| Name: myapp
| Environment: dev
| Default editor: Visual Studio Code
| App type: javascript
| Javascript framework: react-native
| Source Directory Path: src
| Distribution Directory Path: /
| Build Command: npm run-script build
| Start Command: npm run-script start

? Initialize the project with the above configuration? Yes
Using default provider  awscloudformation
? Select the authentication method you want to use: AWS profile

For more information on AWS Profiles, see:
https://docs.aws.amazon.com/cli/latest/userguide/cli-configure-profiles.html

? Please choose the profile you want to use default
Adding backend environment dev to AWS Amplify app: d1ks0rw4tleuvl
⠼ Initializing project in the cloud...

...

✅ Initialized your environment successfully.

Your project has been successfully initialized and connected to the cloud!

Some next steps:
"amplify status" will show you what you've added already and if it's locally configured or deployed
"amplify add <category>" will allow you to add features like user login or a backend API
"amplify push" will build all your local backend resources and provision it in the cloud
"amplify console" to open the Amplify Console and view your project status
"amplify publish" will build all your local backend and frontend resources (if you have hosting category added) and provision it in the cloud

Pro tip:
Try "amplify add api" to create a backend API and then "amplify push" to deploy everything
amplify initが終わるとamplifyフォルダとsrc/aws-exports.jsが生成されています。また、AWSマネージメントコンソールのAmplifyにアクセスするとプロジェクトが作成されています。

続いて必要なライブラリをインストールします。
$ npm install aws-amplify amazon-cognito-identity-js
@react-native-community/netinfo @react-native-async-storage/async-storage
最後に以下のコードをApp.jsに加えます。
import { Amplify } from 'aws-amplify'
import awsconfig from './src/aws-exports'

Amplify.configure(awsconfig)
これでAmplifyでバックエンドを作っていく準備が整いました。
ビルド
Expoには、Expo Application Services (EAS)というモバイルのネイティブアプリケーションを扱うクラウドサービスがあり、その中でEAS Buildというビルドを扱う機能も用意されています。これを使えばiOSアプリやAndroidアプリをビルドする環境がローカルになくてもビルドすることが可能です。
Android エミュレーター/デバイスまたは iOS シミュレーター用にビルドする
ストア用にビルドするよりも簡単で、Google Play Developer membershipやApple Developer Program membershipも不要です。
iOSのシミュレータ用にビルドをしてみます。
まずEAS CLIをインストールします。
$ npm install -g eas-cli
$ eas login
EASの設定をします。
$ eas build:configure

💡 The following process will configure your iOS and/or Android project to be compatible with EAS Build. These changes only apply to your local project files and you can safely revert them at any time.

✔ Which platforms would you like to configure for EAS Build? › iOS

✔ Generated eas.json

🎉 Your project is ready to build.

- Run eas build when you are ready to create your first build.
- Once the build is completed, run eas submit to upload the app to app stores.
- Learn more about other capabilities of EAS Build: https://docs.expo.dev/build/introduction
生成されたeas.jsonにあるpreviewプロファイル中にios.simulatorの値をtrueとして加えます。
{
  "build": {
    "preview": {
      "ios": {
        "simulator": true
      }
    },
    "production": {}
  }
}
ビルドを実行します。
$ eas build -p ios --profile preview
Expoの管理画面からビルド中のステップやログが確認できます。

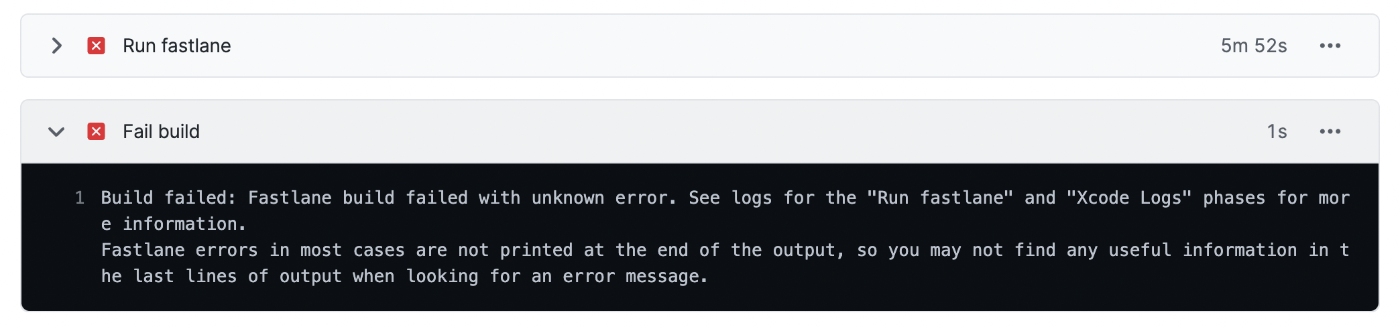
しかし、このままではRun fastlaneのステップでエラーとなります。Amplifyのフロント側で使用している設定ファイルaws-exports.jsが.gitignoreに含まれているため、eas buildした際にアセットとしてアップロードされないためです。
以下を参考に問題を回避します。
-
aws-exports.jsファイルをbase64にエンコード
-
エンコードした値をExpoの管理画面から環境変数として保存
Expo管理画面の左メニューから「Secrets」を選択
Secret Name: AWS_EXPORTS
Secret Value: base64にエンコードしたaws-exports.jsファイル
でSecretを新規作成する

-
ビルドのpre-installのステップでこの環境変数からデコードするスクリプトを追加
"scripts":{
  "eas-build-pre-install": "echo $AWS_EXPORTS | base64 -d > ./src/aws-exports.js",
  ...
}
再度eas build -p ios --profile previewを実行するとpre-installのステップでaws-exports.jsonが生成されて無事にビルドが終了します。

生成されたアプリをダウンロードし、シミュレータにドラッグするとインストールすることができます。
ストア用にビルドする
ストア用にビルドするためにはGoogle Play Developer membershipやApple Developer Program membershipが必要です。
また、アプリ署名資格情報が必要となりますが、EAS CLIでビルドを実行すると署名資格情報を作成(またはすでにある場合は再度使用)することもできます。
デバッグ
参考として、デバッグに関するドキュメントも用意されています。 この中でReact Native Debuggerが便利です。
最後に
今回は AWS Amplify + React Native + Expo の組み合わせでのモバイルアプリケーション構築のスタートの部分を紹介しました。
AmplifyやExpoにはアプリケーションを構築する上で開発スピードを上げるサービスやライブラリがたくさん用意されています。
また、今回EASはビルドだけの紹介でしたが、他にもストアへの登録まわりを扱う EAS Submit、ストアを経由せずにアセットを更新できる EAS Update があります。
Web技術をベースとしたモバイルアプリケーション構築を検討する際、これらの組み合わせは協力な選択肢の一つであると思いました。
Discussion