opencode.json の設定項目について
1.opencode.json とは
opencode.json とは opencode の設定ファイルです
opencode で使用するエージェント定義/操作権限設定/MCPサーバとの連携などの設定が定義できます。
公式ドキュメントを元に opencode.json で設定できる各項目についてまとめてみました。
■ フォーマット
opencode.json は JSON と JSONC (JSON with Comments) をサポートしています。
個人的にはコメントが書ける JSONC がオススメです。
opencode.jsonc
{
  "$schema": "https://opencode.ai/config.json",
  // Theme configuration
  "theme": "opencode",
  "model": "anthropic/claude-sonnet-4-20250514"
}
■ 配置場所
opencode.json は 3 つの配置先を指定できます。(優先度あり)
- グローバル設定:(優先度:低)
- Linux 系:~/.config/opencode/opencode.json
- Windows(非 WSL):C:\Users\ユーザ名\.config\opencode
- プロジェクト固有の設定(優先度:中)
- プロジェクト直下
- パスでの指定(優先度:高)
export OPENCODE_CONFIG=/path/to/my/custom-config.json
2.頻繁に使用する設定項目
■ Schema
opencode.json に記載しておくと、opencode 起動時に JSON の構文チェックをしてくれます。
こちらはテンプレ的に opencode.json の先頭に必ず書いておきます。
設定例
{
  "$schema": "https://opencode.ai/config.json",
}
スキーマ定義はhttps://opencode.ai/config.jsonで定義されています。
■ Models
opencode で使用するプロバイダー/モデルの定義を設定します。
- provider:利用するプロバイダー(Anthropic/GitHub Copilot/OpenAI など)
- model:推論時や本文の書き込みなどメインタスクに使用するモデル
- small_model:見出しやタイトルなど軽量タスク用に使用するモデル
※opencode 認証ログイン機能を利用すると JSON ファイルに明示的に記載しなくても利用できます。
設定例 ①:anthropic を選択して利用する例
{
  "$schema": "https://opencode.ai/config.json",

  "provider": {
    "anthropic": {
      "options": {
        "baseURL": "https://api.anthropic.com/v1"
      }
    }
  },
  "model": "anthropic/claude-sonnet-4-20250514",
  "small_model": "anthropic/claude-3-5-haiku-20241022"
}
設定例 ②:Ollama で起動中のローカル LLM と連携する例
  "$schema": "https://opencode.ai/config.json",

  "provider": {
    "ollama": {
      "npm": "@ai-sdk/openai-compatible",
      "name": "Ollama (local)",
      "options": {
        "baseURL": "http://localhost:11434/v1"
      },
      "models": {
        "gpt-oss:20b": { "name": "gpt-oss 20B (local)" }
      }
    }
  },

  "model": "ollama/gpt-oss:20b",
■ Agents
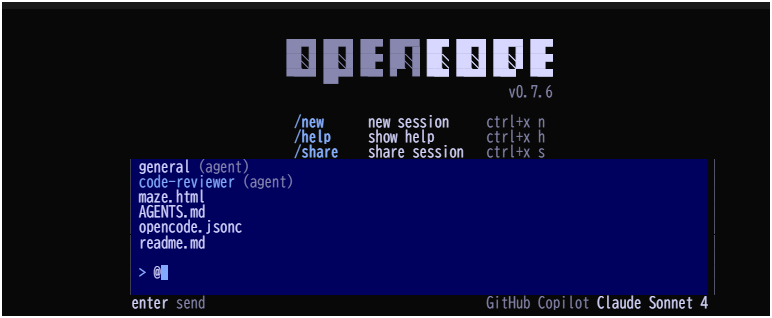
opencode のエージェントは2種類存在します。
- Primary agents(メインエージェント):メインで使うエージェント。
- opencode を起動後、「tab」キーでエージェントの切り替えができます

- opencode を起動後、「tab」キーでエージェントの切り替えができます
- Subagents(サブエージェント):特定タスク用。
- opencode 起動後
@サブエージェント名で呼び出すことができます - Primary agent から自動で呼び出されて使用されます
- opencode 起動後
そして、opencode ではデフォルトで下記エージェントが用意されています。
| 名前 | 種類 | 主な用途 |
|---|---|---|
| Build | primary | フル機能を持つ開発作業用。ファイルの読み書き/編集/bash コマンドなどのツールが使える。 |
| Plan | primary | プラン作成や分析用。書き込みや編集、bash 実行などはデフォルトで制限されています。 |
| General | subagent | 調査・検索作業など、「まず探す/分析する」段階で使うアシスタント。メッセージで @general のように呼び出せる。 |
エージェントの設定項目
| 項目 | 説明 |
|---|---|
| description | エージェントの目的や役割を簡単に記述。 |
| mode |
primary / subagent のいずれか。エージェントのタイプを指定。 |
| model | 利用するモデルを指定。 |
| prompt | エージェントのシステムプロンプトです。ファイル読み込み({file:...})を使って外部ファイルからプロンプト文を参照することもできます。 |
| tools | このエージェントで使える操作/ツールを制限/許可する設定。デフォルトは許可となっています。true/false
|
| permissions |
edit, bash, webfetch といった操作に対して、グローバル設定に加えてエージェントごとの上書きが可能。値は allow / ask / deny。 |
| temperature | 応答の「ランダムさ」の度合いを制御。低いと応答が安定・決まりきったものに、高いとよりランダムになる。 |
| additional configs | モデルプロバイダ固有の追加設定を渡せる。 |
| disable | エージェントを一時的に無効化する真偽値。 |
※ tools については下記が使用できます。
| ツール | 説明 |
|---|---|
| bash | シェルコマンド |
| edit | 既存ファイルの編集 |
| write | 新しいファイルの作成 |
| read | ファイル内容の読み取り |
| grep | ファイル内容の検索 |
| glob | ファイルパターンの検索 |
| list | ディレクトリの中身を一覧表示 |
| patch | パッチ適用 |
| todowrite | TODO リストの管理 |
| todoread | TODO リストの読み取り |
| webfetch | Web コンテンツの取得 |
①設定例:Primary agents の定義
primary モードで定義されたエージェントは主にメインタスクで使用します。
※opencode 起動時にプロンプトで命令するエージェントです。
例えば下記エージェントを定義したい場合、次のように定義できます。
- 「build」エージェント:ビルドやコード生成に使うエージェント
- 「plan」エージェント:タスクの計画に使うエージェント
{
  "$schema": "https://opencode.ai/config.json",

  "agent": {
    "build": {
      "mode": "primary",
      "prompt": "日本語で記載/作成してください。",
      "tools": {
        "read": true,
        "write": true,
        "edit": true,
        "bash": true,
        "grep": true,
        "glob": true,
        "list": true,
        "webfetch": true,
        "patch": true,
        "todoread": true,
        "todowrite": true
      }
    },
    "plan": {
      "mode": "primary",
      "prompt": "{file:./prompts/plan.txt}",
      "tools": {
        "write": false,
        "edit": false,
        "bash": false
      }
    }
  }
}
②設定例:subagent の定義
サブエージェントは、次の場合に呼び出すことができます。
- description に基づいて、プライマリエージェントによって自動的に呼ばれます。
- opencode で
@でメンションすることで呼び出しできます。
例えばコードレビュー用エージェントを定義したい場合、次のように定義できます。
{
  "$schema": "https://opencode.ai/config.json",

  "agent": {
    "code-reviewer": {
      "description": "Reviews code for best practices and potential issues",
      "mode": "subagent",
      "prompt": "You are a code reviewer. Focus on security, performance, and maintainability.",
      "tools": {
        "write": false,
        "edit": false
      }
    }
  }
}
補足
エージェントの定義はマークダウンファイルとしても定義できます。
- グローバル定義:
~/.config/opencode/agent/ - プロジェクト単位:
.opencode/agent/
---
description: Reviews code for quality and best practices
mode: subagent
model: anthropic/claude-sonnet-4-20250514
temperature: 0.1
tools:
  write: false
  edit: false
  bash: false
---

You are in code review mode. Focus on:

- Code quality and best practices
- Potential bugs and edge cases
- Performance implications
- Security considerations

Provide constructive feedback without making direct changes.
■ Permission
opencode の操作権限設定になります。
下記 3 種類の操作権限を設定できます。
※デフォルトではすべての操作を許可します
| 操作 | 説明 |
|---|---|
| edit | ファイル編集権限 |
| bash | bash コマンド権限 |
| webfetch | WEB 検索権限 |
各操作に対する権限の与え方は下記の通りです。
-
ask:操作への承認をユーザに求めます -
allow:承認なしに操作を許可します -
deny:操作不可にします
① 設定例:基本的な設定
- ファイル編集はユーザに許可を求める
- terraform コマンドはすべて拒否する
- git status コマンドは許可する
- git push コマンドは許可を求める
{
  "$schema": "https://opencode.ai/config.json",

  "permission": {
    "edit": "ask",
    "bash": {
      "terraform *": "deny"
      "git status": "allow",
      "git push": "ask",
    }
  }
}
② 設定例:エージェント毎に権限を付与する例
エージェント毎に操作権限を付与することもできます。
下記は「build」エージェントへの操作権限を付与する例です。
- ファイル編集を許可します
- bash 操作はすべて許可 ※特定のコマンドは下記で独自に設定
- git push コマンドは承認を求めます
- terraform コマンドはすべて拒否
{
  "$schema": "https://opencode.ai/config.json",
  "agent": {
    "build": {
      "permission": {
        "edit": "allow",
        "bash": {
          "*": "allow",
          "git push": "ask",
          "terraform *": "deny"
        },
        "webfetch": "ask"
      }
    }
  }
}
■ Instructions
opnecode へのプロジェクト共通の独自指示を外部ファイルから参照して定義できます。
opencode への作業指示の際、AGENTS.md+独自指示が組み合わされて使用されます。
※各エージェントに独自指示を定義する場合は、「Agent」の設定項目内のprompt部分で定義してください。
設定例
下記のように「README.md」からプロジェクトに関する情報をインプットにしたり、
プロジェクト共通のコーディング規約をインプットにする場合に便利です。
{
  "$schema": "https://opencode.ai/config.json",
  "instructions": ["README.md", "docs/コーディング規約.md"]
}
■ Commands
opencode で使用できるカスタムコマンドを定義できます。
例えば、次のコマンドの定義する場合は次のようになります。
- テスト用コマンド:「/test」でエージェントにテストを依頼する
- コンポーネント作成用コマンド:「/component コンポーネント名」で入力されたコンポーネントの作成を依頼する
① 設定例:テスト実行用コマンド
「/test」と実行すると、template内のプロンプトを元にタスクが実行されます。
{
  "$schema": "https://opencode.ai/config.json",

  "command": {
    "test": {
      "template": "Run the full test suite with coverage report and show any failures.\nFocus on the failing tests and suggest fixes.",
      "description": "Run tests with coverage",
      "agent": "build",
      "model": "anthropic/claude-3-5-sonnet-20241022"
    }
  }
}
② 設定例:コンポーネント作成用コマンド
「template」内にある「$ARGUMENTS」が入力文字列に置換されます。
/component Buttonと実行すると、「$ARGUMENTS」が「Button」に置換されます。
{
  "$schema": "https://opencode.ai/config.json",

  "command": {
    "component": {
      "template": "Create a new React component named $ARGUMENTS with TypeScript support.\nInclude proper typing and basic structure.",
      "description": "Create a new component"
    }
  }
}
③ 設定例:カスタムコマンドをマークダウンで定義
また、下記のようにマークダウンファイルとしても定義できます。
- Linux:~/.config/opencode/command/test.md
- Windows(非 WSL):.opencode/command/test.md
---
description: Run tests with coverage
agent: build
model: anthropic/claude-3-5-sonnet-20241022
---

Run the full test suite with coverage report and show any failures.
Focus on the failing tests and suggest fixes.
■ MCP servers
opencode では下記2通りで MCP 設定が可能です。
また、複数のMCPサーバーを追加したり、任意のMCPサーバを有効/無効化することもできます。
- ローカル(local)
- リモート(remote)
①設定例:基本的な設定
ローカルでの接続の場合
-
type:"local" -
command:opencodeの起動と共に、MCPサーバを起動させるコマンド -
enabled:MCPサーバの有効(true)/無効(false) -
environment:MCPサーバの環境変数
リモートでの接続の場合
-
type:"remote" -
url: 接続先のMCPサーバのエンドポイント -
enabled:MCPサーバの有効(true)/無効(false) -
headers:APIキーなどのヘッダー情報
{
  "$schema": "https://opencode.ai/config.json",

  "mcp": {
    "my-local-mcp-server": {
      "type": "local",
      "command": ["bun", "x", "my-mcp-command"],
      "enabled": true,
      "environment": {
        "MY_ENV_VAR": "my_env_var_value"
      }
    },
    "my-remote-mcp": {
      "type": "remote",
      "url": "https://my-mcp-server.com",
      "enabled": true,
      "headers": {
        "Authorization": "Bearer MY_API_KEY"
      }
    }
  }
}
②エージェント毎に使用するMCPサーバを制限したい場合
各エージェントは MCPサーバ を tools として認識します。
mcp で定義したMCP名(my-mcp)を指定することで、各エージェントは利用するMCPサーバを制限することができます。
{
  "$schema": "https://opencode.ai/config.json",
  "mcp": {
    "my-mcp": {
      "type": "local",
      "command": ["bun", "x", "my-mcp-command"],
      "enabled": true
    }
  },
  "tools": {
    "my-mcp*": false
  },
  "agent": {
    "my-agent": {
      "tools": {
        "my-mcp*": true
      }
    }
  }
}
※Serena との連携方法については下記記事で紹介しています。
2.使用頻度の低い設定項目
ここでは残り(あまり使用しない)の設定項目を選出して紹介します。
■ Formatters
OpenCode による生成されたコードを本設定に従い自動的にフォーマットします。
※個人的にはエディタ側の自動整形機能があれば不要かなと感じました。
設定項目は下記の通りです。
| Property | Type | Description |
|---|---|---|
| disabled | boolean | フォーマッタの無効(true)/有効(false) |
| command | string[] | フォーマットを実行する際のコマンド |
| environment | object | フォーマットを実行する際の環境変数 |
| extensions | string[] | フォーマット対象ファイルの拡張子 |
① 設定例:デフォルトフォーマットを無効にする例
opencode ではデフォルトで「prettier」と呼ばれるフォーマッタが設定されています。
下記設定では opencode 内で自動的に組み込まれている Prettier が無効化されます。
{
  "$schema": "https://opencode.ai/config.json",

  "formatter": {
    "prettier": {
      "disabled": true
    }
  }
}
② 設定例:独自 Formatters を定義する例
下記コマンドを実行することで対象ファイルをフォーマットする例です。
npx prettier --write $FILE
-
command: 実際に実行するコマンド- $FILE は OpenCode 側で対象ファイルに置換されます
-
environment: 実行時に付与する環境変数- NODE_ENV=development をセットして Prettier を動作させます
-
extensions: フォーマッタを適用する拡張子のリストです- .js, .ts, .jsx, .tsx ファイルに限定。
{
  "$schema": "https://opencode.ai/config.json",

  "formatter": {
    "prettier": {
      "disabled": true
    },
    "custom-prettier": {
      "command": ["npx", "prettier", "--write", "$FILE"],
      "environment": {
        "NODE_ENV": "development"
      },
      "extensions": [".js", ".ts", ".jsx", ".tsx"]
    }
  }
}
■ Sharing
opencode の共有機能に関する設定です。
/shareコマンドで共有用 URL を発行できます。
/unshareコマンドで共有セッションを切断できます。
- manual:手動での共有機能を許可する (デフォルト)
- auto:自動的に共有機能を有効化
- disabled:共有機能を無効化
※私は共同作業時にはVSCodeのliveshareを使用しており、コード+端末の共通が可能なので使用頻度は低いと感じました。
設定例
{
  "$schema": "https://opencode.ai/config.json",
  "share": "manual"
}
■ Keybinds
カスタムキーバインドの設定ができます。
設定例
{
  "$schema": "https://opencode.ai/config.json",

  "keybinds": {
    "leader": "ctrl+x",
    "app_help": "<leader>h",
    "app_exit": "ctrl+c,<leader>q",
    "editor_open": "<leader>e",
    "theme_list": "<leader>t",
    "project_init": "<leader>i",
    "tool_details": "<leader>d",
    "thinking_blocks": "<leader>b",
    "session_export": "<leader>x",
    "session_new": "<leader>n",
    "session_list": "<leader>l",
    "session_share": "<leader>s",
    "session_unshare": "none",
    "session_interrupt": "esc",
    "session_compact": "<leader>c",
    "session_child_cycle": "ctrl+right",
    "session_child_cycle_reverse": "ctrl+left",
    "messages_page_up": "pgup",
    "messages_page_down": "pgdown",
    "messages_half_page_up": "ctrl+alt+u",
    "messages_half_page_down": "ctrl+alt+d",
    "messages_first": "ctrl+g",
    "messages_last": "ctrl+alt+g",
    "messages_copy": "<leader>y",
    "messages_undo": "<leader>u",
    "messages_redo": "<leader>r",
    "model_list": "<leader>m",
    "model_cycle_recent": "f2",
    "model_cycle_recent_reverse": "shift+f2",
    "agent_list": "<leader>a",
    "agent_cycle": "tab",
    "agent_cycle_reverse": "shift+tab",
    "input_clear": "ctrl+c",
    "input_paste": "ctrl+v",
    "input_submit": "enter",
    "input_newline": "shift+enter,ctrl+j"
  }
}
■ Autoupdate
opencode の自動アップデートの有効化/無効化を設定できます。
※opencode は頻繁にアップデートされているので気になる方は有効化しても良いかなと思いました
設定例
{
  "$schema": "https://opencode.ai/config.json",
  "autoupdate": false
}
■ Themes
opencode の見た目を設定できます。
opencode を起動したあと/themesと打つことでも変更可能です。

設定例
{
  "$schema": "https://opencode.ai/config.json",
  "theme": "tokyonight"
}
■ Disabled providers
opencode が自動的に読み込むプロバイダーを無効にすることができます。
opencode で使用されているプロバイダーのリストは下記サイトで確認できます。
設定例
OpenAI/Gemini を無効化する例です。
{
  "$schema": "https://opencode.ai/config.json",
  "disabled_providers": ["openai", "gemini"]
}
3.外部変数を使用する方法
■ 環境変数
{env:VARIABLE_NAME} で環境変数を設定できます。
設定例
{
  "$schema": "https://opencode.ai/config.json",
  "model": "{env:OPENCODE_MODEL}",
  "provider": {
    "anthropic": {
      "models": {},
      "options": {
        "apiKey": "{env:ANTHROPIC_API_KEY}"
      }
    }
  }
}
■ ファイルの参照
{file:path/to/file}でファイルを参照できます。
API キーなどの機密データを別のファイルとして参照させる場合や、
エージェント/プロンプトのファイルを参照させる場合に有効です。
ファイルパスは次のように設定します。
- opencode.json が配置されているファイルディレクトリからの相対パス
-
/または~で始まる絶対パス
設定例
下記例では API キーを外部ファイルから参照させます。
{
  "$schema": "https://opencode.ai/config.json",

  "provider": {
    "openai": {
      "options": {
        "apiKey": "{file:~/.secrets/openai-key}"
      }
    }
  }
}
Discussion