ESP32 + 温度・湿度・気圧センサ(BME280)
はじめに
この記事では温度・湿度・気圧センサ(BME280)をESP32開発ボードに接続し、Pythonプログラムにより温度・湿度・気圧測定する方法について記述しています。
In English
This article describes how to measure temperature, humidity and barometer using BME280 connected to ESP32 development board in Japanese.
BME280について
- ドイツBOSCH社製の温度、湿度、気圧が測定できるセンサ
- 電源電圧は1.71V~3.6V
- 測定範囲は温度:-40~+85°C、 ±1°C、湿度:0~100%、±3%、気圧:300~1100hPa、±1hPa
- インターフェイスはI2C
- I2Cのアドレスは0x76もしくは0x77
- 秋月電子の取扱説明書(日本語)
-
秋月電子のデータシート(英語)
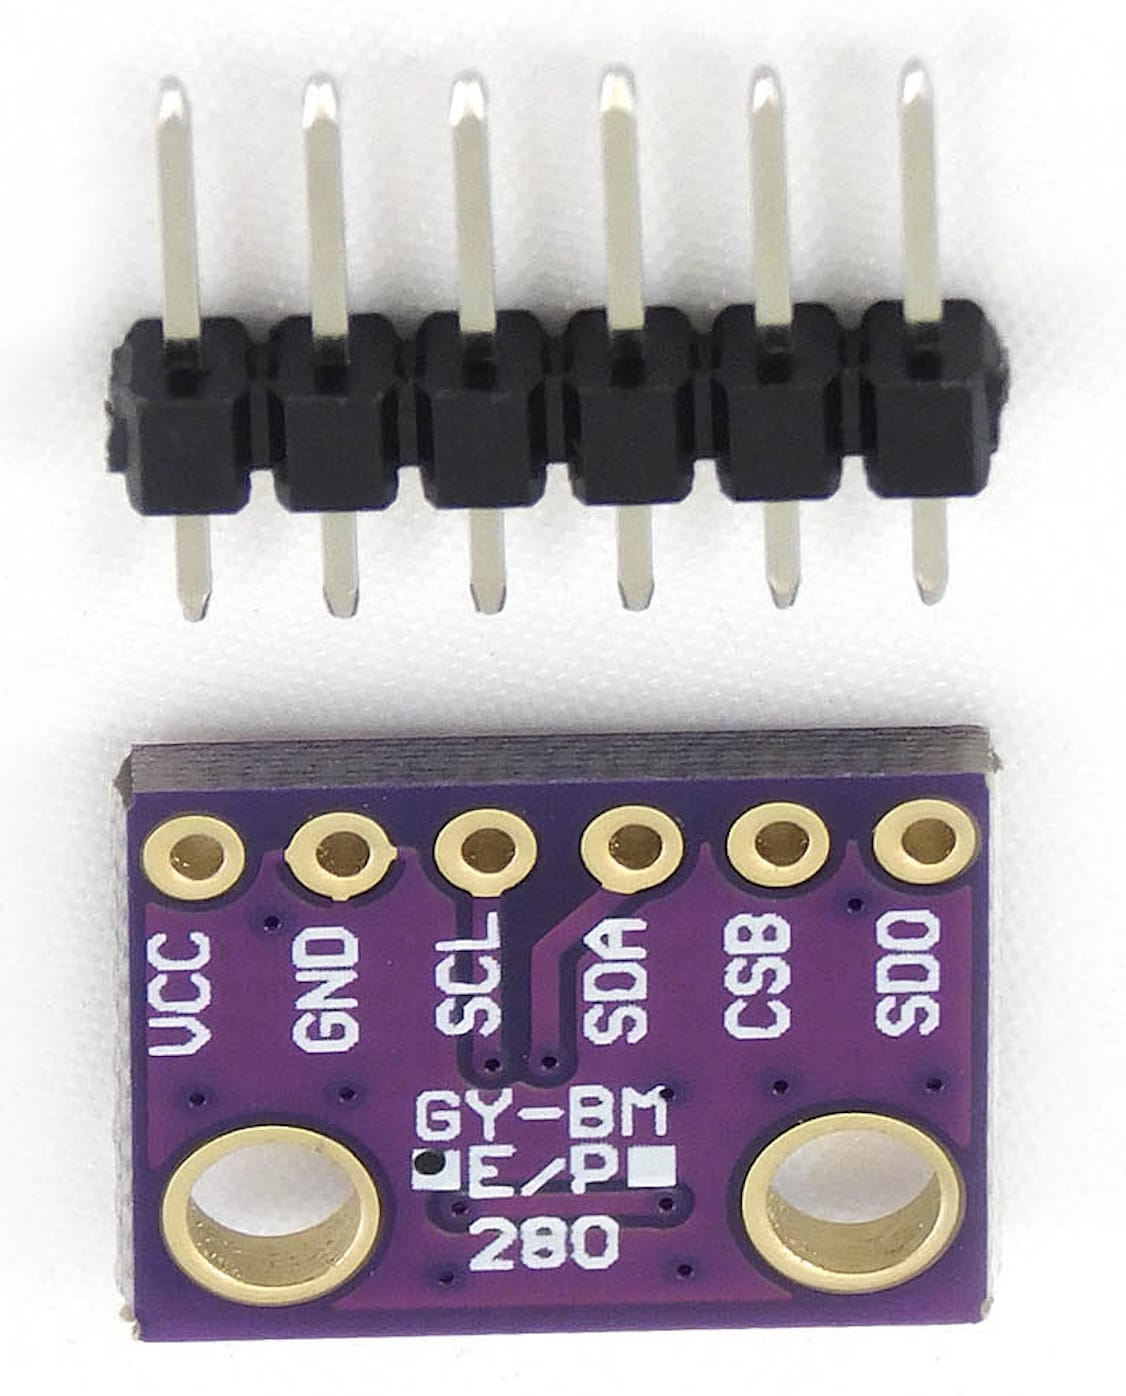
画像引用元:https://nettigo.eu/system/images/2382/original.jpg?1503322940
I2Cについて
- Inter-Integrated Circuit
- オランダのフィリップス社が開発した2線式シリアル通信規格
- I2Cとも表記される。アイ・スクエア・シー、アイ・ツー・シーと発音される
- 同じ基板内のように近距離で直結したデバイス同士で100Kbps、400Kbps(ファーストモード)、3.4Mbps(ハイスピードモード)でシリアル通信を行う
- 信号線はシリアルデータライン(SDA)とシリアルクロックライン(SCL)の2本のみ
- 実装ではSDA、SCLに加えて電源ラインとグランドラインの4本が使われる
- 接続されているデバイスを7ビットのアドレスで指定できる。
2^7=128 - 接続されたデバイスはマスタとスレーブからなり、マスタからアドレスを指定することで1対1の通信を行う
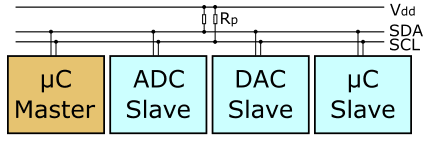
画像引用元: https://ja.wikipedia.org/wiki/I2C
準備
誤結線による事故からESP32開発ボードやPCを守るために、ESP32開発ボードからUSBケーブルを引き抜く。
用意するもの
- BME280温度湿度気圧センサ
- リード線(赤、黒、黄、白それぞれ1本)
結線
- BME280のVccとESP32開発ボードの3.3Vを赤色リード線で結ぶ。
- BME280のGNDとESP32開発ボードのGNDを黒色リード線で結ぶ。
- BME280のSDAとGPIO27を黄色リード線で結ぶ。
- BME280のSCLとGPIO26を白色リード線で結ぶ。
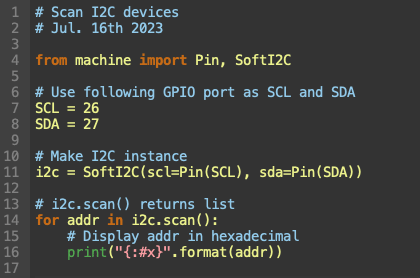
サンプルプログラム1
I2Cバスに接続されているデバイスをスキャンし、デバイスのI2Cアドレスを調べます。
I2Cのメソッドについてはこちらを参照して下さい。
bme280-1.py
コピペ用 bme280-1.py
# Scan I2C devices
# Jul. 16th 2023

from machine import Pin, SoftI2C

# Use following GPIO port as SCL and SDA
SCL = 26
SDA = 27

# Make I2C instance
i2c = SoftI2C(scl=Pin(SCL), sda=Pin(SDA))

# i2c.scan() returns list
for addr in i2c.scan():
    # Display addr in hexadecimal
    print("{:#x}".format(addr))
実行結果
この例ではI2Cバスにデバイスが2つ接続されていることが分かります。
BME280のアドレスは0x76です。(BME280しか接続されていない場合、0x76しか表示されません。)
>>> %Run -c $EDITOR_CONTENT
0x68
0x76
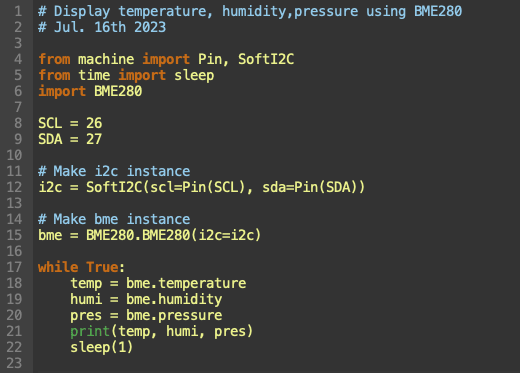
サンプルプログラム2
BME280から温度、湿度、気圧を読み込んで表示するサンプルコードです。
ここからBME280.pyをダウンロードし、Micropythonデバイスに保存する必要があります。
bme280-2.py
コピペ用 bme280-2.py
# Display temperature, humidity,pressure using BME280
# Jul. 16th 2023

from machine import Pin, SoftI2C
from time import sleep
import BME280

SCL = 26
SDA = 27

# Make i2c instance
i2c = SoftI2C(scl=Pin(SCL), sda=Pin(SDA))

# Make bme instance
bme = BME280.BME280(i2c=i2c)

while True:
    temp = bme.temperature
    humi = bme.humidity
    pres = bme.pressure
    print(temp, humi, pres)
    sleep(1)
実行例
>>> %Run bme280-client.py
>>> %Run -c $EDITOR_CONTENT
26.96C 69.12% 985.27hPa
26.90C 70.40% 985.30hPa
26.90C 70.40% 985.36hPa
26.89C 70.42% 985.30hPa
26.88C 70.45% 985.33hPa
BME280.pyの変更
サンプルプログラム2を実行すると温度、湿度、気圧の数値の後に単位が表示されるので、数値だけが表示する関数を追加します。
変更する理由は、ESP32サーバにNode-REDから接続し、データを取得し、グラフを描く予定にしているからです。
MicroPythonデバイス上にあるBME280.pyを開きます。
- 263行目から285行目までを選択しコピーします。
- 285行目の行末で2回エンターキーを押して2行の空行を挿入します。
- 二つ目の空行の行頭にペーストします。ペーストした部分を次のように変更します。
- def temperature(self): の行を def temperature2(self): に変更。
- return "{}.{:02d}C".format(ti, td) の行をreturn "{}.{:02d}".format(ti, td)として温度の単位のCを削除します。
- def pressure(self): の行をdef pressure2(self): に変更。
- return "{}.{:02d}hPa".format(pi, pd) の行を return "{}.{:02d}".format(pi, pd)として気圧の単位であるhPaを削除します。
- def humidity(self): の行をdef humidity2(self): に変更。
- return "{}.{:02d}%".format(hi, hd) の行を return "{}.{:02d}".format(hi, hd)として湿度の単位の%を削除します。
以上の変更を加えてMicroPythonデバイスに保存(Macはcommand+S、WinはCTRL+S)
サンプルプログラム3
ESP32をTCPサーバにして、アクセスがあると温度、湿度、気圧を測定し、その結果を返すプログラムです。httpサーバのプログラムを少し変更し、不要な部分を削り、サンプルプログラム2とマージしました。
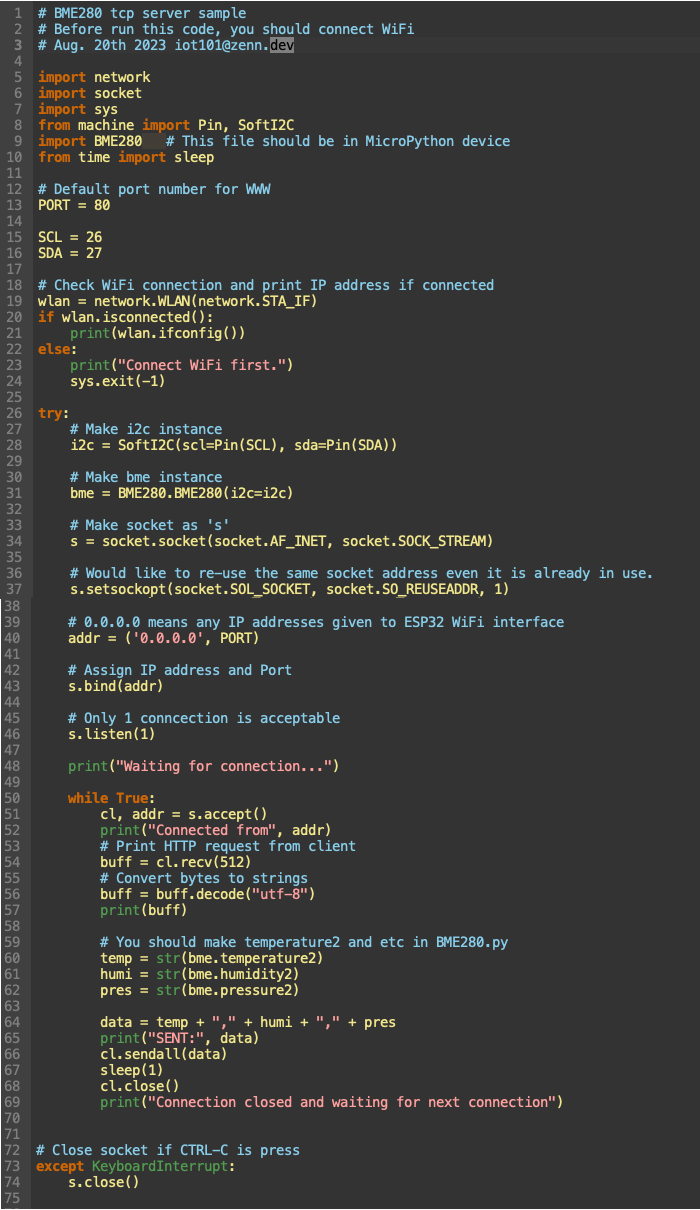
bme280-3.py
コピペ用 bme280-3.py
# BME280 tcp server sample
# Before run this code, you should connect WiFi
# Aug. 20th 2023 iot101@zenn.dev

import network
import socket
import sys
from machine import Pin, SoftI2C
import BME280	# This file should be in MicroPython device
from time import sleep

# Default port number for WWW
PORT = 80

SCL = 26
SDA = 27

# Check WiFi connection and print IP address if connected
wlan = network.WLAN(network.STA_IF)
if wlan.isconnected():
    print(wlan.ifconfig())
else:
    print("Connect WiFi first.")
    sys.exit(-1)

try:
    # Make i2c instance
    i2c = SoftI2C(scl=Pin(SCL), sda=Pin(SDA))

    # Make bme instance
    bme = BME280.BME280(i2c=i2c)

    # Make socket as 's'
    s = socket.socket(socket.AF_INET, socket.SOCK_STREAM)

    # Would like to re-use the same socket address even it is already in use.
    s.setsockopt(socket.SOL_SOCKET, socket.SO_REUSEADDR, 1)

    # 0.0.0.0 means any IP addresses given to ESP32 WiFi interface
    addr = ('0.0.0.0', PORT)

    # Assign IP address and Port
    s.bind(addr)

    # Only 1 conncection is acceptable
    s.listen(1)

    print("Waiting for connection...")

    while True:
        cl, addr = s.accept()
        print("Connected from", addr)
        # Print HTTP request from client
        buff = cl.recv(512)
        # Convert bytes to strings
        buff = buff.decode("utf-8")
        print(buff)

        # You should make temperature2 and etc in BME280.py
        temp = str(bme.temperature2)
        humi = str(bme.humidity2)
        pres = str(bme.pressure2)

        data = temp + "," + humi + "," + pres
        print("SENT:", data)
        cl.sendall(data)
        sleep(1)
        cl.close()
        print("Connection closed and waiting for next connection")


# Close socket if CTRL-C is press
except KeyboardInterrupt:
    s.close()
サンプルプログラム4
サンプルプログラム3が動いているESP32サーバにアクセスして測定データを取得するクライアントのサンプルコードです。PC上で実行します。
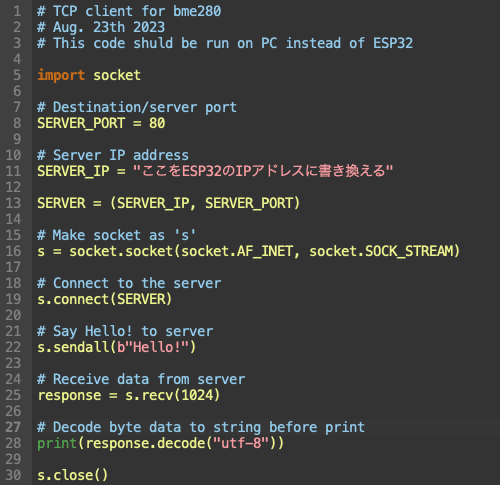
bme280-client.py
コピペ用 bme280-client.py
# TCP client for bme280
# Aug. 23th 2023
# This code shuld be run on PC instead of ESP32

import socket

# Destination/server port
SERVER_PORT = 80

# Server IP address
SERVER_IP = "ここをESP32のIPアドレスに書き換える"

SERVER = (SERVER_IP, SERVER_PORT)

# Make socket as 's'
s = socket.socket(socket.AF_INET, socket.SOCK_STREAM)

# Connect to the server
s.connect(SERVER)

# Say Hello! to server
s.sendall(b"Hello!")

# Receive data from server
response = s.recv(1024)

# Decode byte data to string before print
print(response.decode("utf-8"))

s.close()
実行例
>>> %Run bme280-client.py
26.96,69.12,985.27
Discussion